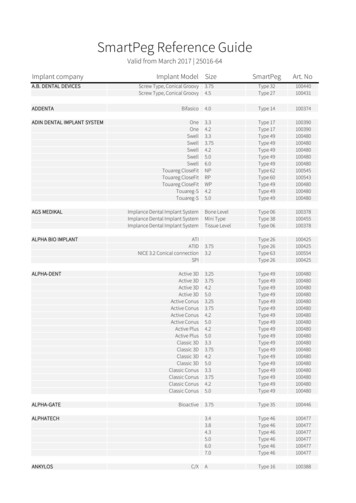
![[Type Here] 02/15/2022 - SOS Inventory Management Software](/img/43/sos-inventory-ios-quickstart-guide-1x.jpg)
Transcription
[Type here]02/15/2022
123Introduction . 11.1Installation . 11.2Signing in and out . 1Navigating the app . 22.1Work menu . 22.2Find menu . 32.3Lists menu . 32.3.1 Standard screen layout for individual lists . 42.3.2 Screen layout for Items list. 42.4Tools menu . 52.5Barcode scanner . 7Syncing and refreshing data . 83.145Refreshing data in the iOS app . 8Working with data records . 94.1Creating a new record . 94.2Editing and deleting records, applying actions, and signing transactions . 104.3Using Scan & go . 114.3.1 Criteria for using Scan & go to open transactions. 114.3.2 Opening an item or transaction with Scan & go . 12Counting physical inventory . 135.1Initiating a new physical count . 135.2Resuming a partially-completed physical count .14SOS Inventory iOS 1.x Quick Start Guidei02/15/2022
1This Quick Start Guide serves as the user guide for version 1 of the SOS Inventory iOS app. Theapp is intended to serve as a companion to the web version of SOS Inventory, and the QuickStart Guide assumes that our iOS app users already possess a basic working knowledge of theSOS Inventory web app.If you do not have an existing account with SOS Inventory, you must create one via the SOSInventory website at https://www.sosinventory.com and go through the setup process for theweb app prior to using the iOS app.Help is available via the SOS Inventory website (https://www.sosinventory.com/support), aswell as by contacting our Support Team by email at support@sosinventory.com. Phone support isavailable for SOS Inventory Plus and Pro plan customers from 9 a.m. to 6 p.m. Central Time,Monday through Friday, by dialing 1-888-545-4146.1.1The SOS Inventory iOS app, available on Apple App Store, can be installed on any iPhone oriPod Touch with an operating system of iOS 13 or higher, as well as on iPads with iPadOS 13or higher. Install the SOS Inventory iOS app using the same installation process you normally usefor apps on your device.1.2Log into the SOS Inventory iOS app with the same credentials that you use for the web app.Once logged in, you will remain signed into the iOS app unless you sign out. To log out, selectthe Tools icon in the bottom right corner of your screen, then select Sign Out.If you experience difficulty logging in, please contact our Support Team for assistance atsupport@sosinventory.com.SOS Inventory iOS 1.x Quick Start Guide102/15/2022
2Once you sign into the iOS app, the Work menu page will appear on your screen (see thescreenshot in the next section). At the bottom of the screen are the icons for the main menus in theapp: Work, Find, Lists, and Tools.2.1*Feature supports barcode scanning.Notifications. In the top right corner of theWork menu, the presence of a red oval witha number inside indicates that you have oneor more notifications.*Check stock. Provides the On Hand andAvailable For Sale quantities for a selecteditem. Can be filtered by location and date.*Check pricing. Obtains unit and totalpricing for an item. Can be filtered bycustomer, price tier, and quantity.*Which bin is it? Specifies the bin number ofan item at a bin-tracked location.*Physical inventory. Allows you to conduct a physical count of your items, comparing thenumber in the system to the quantity you actually have. SOS Inventory will generate anadjustment transaction for a physical count that has a discrepancy. See Counting physicalinventory in this guide for more information on the feature.Add sale.the creation of a new sales transaction (estimate,sales order, sales receipt, or invoice) without having to access its list.*Compare barcodes. A utility feature that allows a comparison of two barcodes. This featuredoes not add any data to the system.02/15/20222SOS Inventory iOS 1.x Quick Start Guide
2.2*Scan and go.built-in camera to open from a printedbarcode a corresponding item ortransaction. This feature can be used,for example, to scan the QR Code ofa printed sales order. The app willopen the sales order. You can thenedit the sales order if needed orperform an action (such as generatinga shipment transaction). For more information, see Using Scan & go.Stuff assigned to me. Pulls up a list of your assigned transactions and tasks.Smart search. Conducts a global search of data available within the system.2.3The Lists menu is the most feature-rich area of the iOS app. This menu is a listing of lists, and itfunctions in a manner that is very similar to theOperations menu. The menus in bothapps contain the same lists, in the same order. Both allow you to filter data, create a new record,flag important records with stars, and conduct a quick search within a list.One key difference, however, is how the Actions menu features of the web app are accessed inthe iOS app. In SOS Inventory iOS, Edit and other actions (such as PDF, Email, and CreateShipment) are accessed in the top menu of an individual transaction or other record not in itscorresponding list. Please see Editing and deleting records, applying actions, and signingtransactions in this guide for more information about using actions in the iOS app.Although many similarities exist between the overall list functions of both the web and iOS apps,please note that some differences do exist in the options available for filters, as well as those foractions.SOS Inventory iOS 1.x Quick Start Guide302/15/2022
2.3.1The screenshot below of a Purchase Orders list is an example of the typical layout used for listsin the iOS app:2.3.2The Items list is very heavily used in the SOS Inventory iOS app. It is accessed when (1) addingnew and editing existing items; (2) adding line items on transactions; and (3) conducting physicalinventory. The iOS app supports the use of barcode scanning for all these processes.Although the Items list screen layout is like that of other lists, it also possesses a barcode scannericon, as shown in the next screenshot. The barcode scanner accesses your device s camera tomake the scan.The number at the right of each item record indicates the total Available for Sale quantity at alllocations.02/15/20224SOS Inventory iOS 1.x Quick Start Guide
Additional sub-menus appear when using the iOS app to conduct a physical inventory. Whenconducting a physical count, the name of the list is called Items to Inventory but the content ofthe list is the same. See Counting physical inventory in this guide for more information.2.4Refresh Static Data. Updates infrequently changed data in the system. See Refreshing data inthe iOS app for more information about this feature.Update Cache. Updates all data in the system except static data.Sync with QuickBooks. Performs a manual sync to QuickBooks Online.Account Info. Includes your user email address, company name, SOS account number,QuickBooks account number, the status of your account, and yourexpirationdate.Switch Companies. Allows a user with access privileges to switch from the SOS Inventoryaccount of one company to that of another company. Also specifies the default company to usewhen the iOS app is opened.Sign Out. Logs out of the SOS Inventory iOS app.SOS Inventory iOS 1.x Quick Start Guide502/15/2022
Settings. Includes the following: Auto-scan serials. Allows back-to-back barcode scans of serial items, bypassing theneed to select the scanner icon before each scan. This setting is disabled by default. About. Shows the currently installed versions of the app and server, as well asacknowledgements.Help and Support. Includes the following: Online Help. Links to the Support page of the SOS Inventory website, which includes:(1) PDFs of the iOSQuick Start Guide and web app SOS Inventory 8.x UserGuide; (2) video tutorials; (3) step-by-step How-To s; (4) FAQs; (5) our Supportemail address; and (6) our toll-free phone number. iOS Quickstart Guide. Links directly to the user guide for the iOS app. Email Us. Allows sending an email to SOS Inventory Support via your email client. Terms of Service. Outlines the service agreement between you and Saddle OakSoftware, LLC, for the use of SOS Inventory. Privacy Policy. Outlines our policy on the data we collect from customers.02/15/20226SOS Inventory iOS 1.x Quick Start Guide
2.5The barcode scanner in the SOSInventory iOS app accesses yourdevice camera to make a scan.As previously mentioned, scanninga printed barcode of an item,transaction, or other record willopen it in the app.The scanner can be accessed byselecting the Barcode scanner iconin the Items list, as well as throughthe Check stock, Check pricing,Which bin is it?, Physicalinventory, Compare barcodes,and Scan & go features in the iOSapp.The scan area can be resized or moved with a stylus or finger. To resize, simply pick any cornerand move the circle inward or outward. To move the scan area, select anywhere within the scanregion and slide.The Flash icon, a toggle located in the upper right corner of the scanner screen, allows you toenhance the lighting for your scan if needed.Move the blue Slider, located at the bottom of the touchscreen, to zoom in or out of an image.SOS Inventory iOS 1.x Quick Start Guide702/15/2022
3When you log in to the SOS Inventory iOS app for the first time, the web app knows it and willbegin the process of loading data to your device automatically. Once the initial sync iscomplete, communication between the iOS and web apps occurs thereafter in real time everytime you save a transaction, item, customer, vendor, and so on. However, you do need torefresh your iOS app s screen to see themost current information.If your business has configured the web version of SOS Inventory for automatic syncing withQuickBooks Online, any new or updated data that is saved in the iOS app will sync withQuickBooks at its regularly scheduled interval. You can perform a manual sync with QuickBooksOnline by going to the Tools menu and selecting Sync with QuickBooks.3.1The SOS Inventory iOS app offers four different types of refreshes, each tailored to the type ofdata refresh you desire: (1) an individual list; (2) an individual record (transaction, item,customer, or vendor); (3) all lists; and (4) static data.Refreshing an individual list or record. When you are viewing an individual list or record, use adownward swipe gesture on the touchscreen to refresh the list or the data in a record. A spinnerwill appear while the refresh is in progress.Refreshing all lists. To obtain the most comprehensive refresh, go to the Tools menu and selectUpdate Cache. This will update all data in the app except static data.Refreshing static data. Some data such as locations, units of measure, price tiers and settingsdo not change very often. Most static data will correspond to features under theSettings menu, as well as the Miscellaneous section of the Company Menu. If you desire torefresh static data in the iOS app, go to the Tools menu and select Refresh static data. NOTE:The iOS app allows only the refreshing of static data so that it matches the information containedin the web app. Any modifications to settings or other static data must be performed in the webapp.02/15/20228SOS Inventory iOS 1.x Quick Start Guide
4The iOS app allows you to perform some of the most common functions performed in the webversion of SOS Inventory: the ability to create and edit a record, as well as apply an action(including the ability to generate a child transaction from a parent transaction). The iOS app alsooffers a unique function: the ability to sign a transaction.4.1The steps required to create a new record in SOS Inventory iOS app are basically the same,whether you are creating a transaction, customer, vendor, or item.do to add a new record:1.2.3.4.Open the Lists menu at the bottom of the touchscreen.Open the appropriate list for the type of record you wish to create.Select Add New (the icon in the top right corner of the list).Complete the data fields as needed.a. Data fields in the SOS Inventory iOS app are the same as those in the web app.Please refer to the SOS Inventory 8.x User Guide if you need help with data fielddescriptions.b. If you are creating a transaction, use the following additional steps for each lineitem:i. Use the Add Line feature (see the New Purchase Order screenshot on thenext page) to add a line item. (In Builds and Process Transactions, theterms used are Add Input and Add Output.)ii.Line Item screen will open. Under the Item heading,select .iii. The Items list will open. Search for and select the desired item or selectthe barcode scanner iconiv. After you select the item or scan its barcode, the app will immediatelyreturn to theLine Item screen. Enter the desired quantity, unitof measure, and any other data needed for the item.SOS Inventory iOS 1.x Quick Start Guide902/15/2022
v. When finished, select Done in the upper right corner. This will take youback to your transaction page, where you can add another item orcontinue completing the rest of the transaction data fields.5. When finished entering the data fields for the transaction, select Save in the top rightcorner of the touchscreen.6. Upon saving, the data is immediately updated to the web app. The new transaction willappear in its designated list on your iOS app, but a refresh is required for the transactionto be seen in the web app or on another iOS device.4.2Like the web app, SOS Inventory iOS app allows existing records to be modified using the Editaction. The Actions menu icon ( ) provides additional options, although the iOS app may nothave all the options that are accessible in the web app at this time.To delete an existing record, locate the record on its list, then make a leftward swipe and selectthe red Delete button. SOS Inventory will ask you to confirm that you want to delete the record.02/15/202210SOS Inventory iOS 1.x Quick Start Guide
A feature unique to the SOS Inventory iOS app allows you to obtain signatures for transactionstouchscreen. You can sign using either a stylus or a finger.4.3The Scan & go feature of the SOS Inventory iOS app allows you to use the barcode scanner toopen the data record of any barcoded item or any transaction that has been printed with a QRCode. Once opened, the item or transaction can be edited as needed.4.3.11. The hard copy of the transaction must be from a PDF created using thePDF action.2. The PDF form template chosen for the transaction must be compatible with the Scan & gofeature. The form templates in SOS Inventory that can be used with Scan & go use thenaming convention [name of transaction type] with QR Code (App Use). For example,Sales Order with QR Code (App Use). These templates, which are found in the webTemplate Library, must be added to the Form Templates list via the web app. ForSOS Inventory iOS 1.x Quick Start Guide1102/15/2022
more information on using templates and the Template Library, see Chapter 19, FormTemplates, in the SOS Inventory 8.x User Guide.4.3.21. Go to the Work menu and select Scan & Go.2. Scan the item barcode or transaction QR Code. The record will then open.02/15/202212SOS Inventory iOS 1.x Quick Start Guide
5The iOS app makes the process of conducting physical inventory counts easier. It allows you topull up the item you need to count with a search or barcode scan. The app shows the quantitylisted in the system and allows you to enter a corrected value if needed. If you need to stop andthen resume your counting later, the app allows you to pick up where you left off.When you have completed your inventory counting session, SOS Inventory will generate anadjustment transaction for all the items affected by quantity changes. You can preview theadjustment before saving. NOTE: To avoid a slow processing time for the adjustment transaction,we recommend that the number of adjusted items be limited to 200 line items per inventorysession.5.11. Go to the Work menu and select Physical Inventory.2. Select the Location where you are performing the count.3. By default, the As Of field uses the current date and time as the basis for your physicalcount. If you need to change either the date or time, do so.4. Select Begin Inventory. A spinner will appear while SOS Inventory pulls the data fromthe specified location.5. Select Inventory. SOS Inventory will pull up the Items To Inventory list.6. Select the Filters icon and choose the number of Results to Display, as well as theCategory and Tags (if applicable). When finished, select Done.7. Search for the item you wish to count or select the Barcode scanner icon and scan the8. Conduct a count of your item. If the Expected Count differs from the Actual Count, enterthe correct value in in the Actual Count field. Whether you count is changed orunchanged, select Save in the upper right corner when finished with that item.9. Repeat steps 6 (only if filters need to be changed) through 8 for each item you wish tocount.SOS Inventory iOS 1.x Quick Start Guide1302/15/2022
a.NOTE: If you use the Search bar to locate an item, the sub-menu below willappear. It allows you to view all items in the list, only those which have alreadybeen verified by a physical count, or only those items that have yet to be counted.10. When finished with the last item you will count (or have time to count), select the Backarrow in the upper left corner of the list page. The app will automatically save your work.You can pick up where you left off later, if needed. See the next section, Resuming apartially-completed physical count, for more details.11. Select Preview Adjustment to view the adjustment. You can revise the count of any itemlisted if it does not appear to be correct. Do not proceed to step 12 unless you arefinished with your counting and satisfied with what you see in the preview.12. Select Save and Finish. The iOS app will automatically generate an adjustmenttransaction to reflect any changes you made to item quantities. The system will issue amessage to notify you that an adjustment has been created and saved.5.2If you need to continue working on a physical count that you previously started, take thefollowing steps:1. Go to the Work menu and select Physical Inventory.2. Select Continue Previous Inventory. Change the As Of date and time, if desired.3. Select Inventory. This will open the Items to Inventory list. You can then continue thecount, as specified in steps 6-12 of Initiating a new physical count.02/15/202214SOS Inventory iOS 1.x Quick Start Guide
available for SOS Inventory Plus and Pro plan customers from 9 a.m. to 6 p.m. Central Time, Monday through Friday, by dialing 1-888-545-4146. 1.1 The SOS Inventory iOS app, available on Apple App Store, can be installed on any iPhone or iPod Touch with an operating system of iOS 13 or higher, as well as on iPads with iPadOS 13 or higher .