Transcription
2010 BMW 535xiBRAKES Brakes - Repair InstructionsBRAKESBrakes - Repair InstructionsBRAKE TESTING AND BLEEDING34 00. GENERAL INFORMATIONThe brake system is one of the most important safety systems on any motor vehicle. It is therefore essential toact with utmost care when working on the brake system and to follow the instructions below.General: Ensure cleanliness and only use rags which do not lose lint.Wash away or vacuum up brake dust, do not clear it away using compressed air. This dust is a healthhazard.Ensure that no oils or grease enter the brake system: these substances would cause complete failure of theentire brake system.When cleaning brake components with brake cleaner do not allow brake cleaner to get into the brakesystem.Even the most minute traces of brake cleaner must be avoided.cardiagn.com Brake fluid: Replace brake fluid at least every two years.Never re-use drained brake fluid.Always use BMW-approved brake fluid, refer to BRAKES - OPERATING FLUIDS .Always dispose of brake fluid in approved receptacles.Do not allow brake fluid to drain into drain pipes, into the outside environment or into unsuitablefacilities. This would create the risk of groundwater contamination since brake fluid is classed as a fluidthat is hazardous to water.Do not allow brake fluid to come into contact with paintwork as this will destroy the paint.Brake fluid must not be allowed to remain on bare skin too long in order to avoid skin problems. Washskin coated with brake fluid with water and soap.If brake fluid makes contact with eyes, immediately flush with large quantity of clean water and visit eyedoctor.Wheel brakes: Brake pads:Brake pads must be replaced when the warning threshold of the brake pad wear indicator is reached.Refer to TECHNICAL DATA .CARMANUALSUSASaturday, September 05, 2015 9:16:269:16:22 AMPage 1 2011 Mitchell Repair Information Company, LLC.
2010 BMW 535xiBRAKES Brakes - Repair InstructionsBrake pads must always be replaced on both sides of any axle.The friction surfaces of the brake pads must not come into contact with oils or greases. The brake padsmust be replaced if they are fouled by such substances.In the case of rotation-dependent brake pads, make sure the arrow marking points in the direction ofrotation of the brake disk for when the vehicle is moving forward. Brake pads with left/right markingsmust be fitted on the relevant side of the vehicle.One-sided angled areas on the brake pads must be located on the disk contact side of the brake caliper forwhen the vehicle is moving forward.Brake discs:Brake disks must not be scored or cracked. Furthermore, minimum brake disk thickness, disk runout,parallelism and surface roughness of the friction surfaces must not exceed or drop below the permittedvalues.Refer to TECHNICAL DATA .Always strip preservative off new parts before installation. With the rear brake discs, also strippreservative off brake drum on parking brake. Brake drums:cardiagn.com Brake drums must not be scored or cracked. Furthermore, the maximum drum inside diameter, radialrunout and surface roughness of the friction surfaces must not exceed or drop below the permitted values.Refer to TECHNICAL DATA .Always strip preservative off new parts before installation. Brake calipers:Only approved pastes on the basis of glycine must be used for repairs on brake calipers.All moving parts on the brake caliper must move freely: note grease specifications.Use only BMW-approved lubricants to grease caliper guides, refer to BRAKES - OPERATINGFLUIDS .Brake lines, brake hoses: brake pad wear indicator Brake lines and brake hoses must be correctly routed and must not abut with body or components in away which would cause chafing.To prevent damage, release and tighten brake line couplings with a special brake line wrench only.CARMANUALSUSASaturday, September 05, 2015 9:16:22 AMPage 2 2011 Mitchell Repair Information Company, LLC.
2010 BMW 535xiBRAKES Brakes - Repair Instructions The system must be bled each time any brake lines have been detached.All connection points must be checked for leaks.Only tighten down brake hoses on the front axle when wheels are in straight-ahead position.Close open connections on brake lines and individual components to prevent dirt from entering the brakesystem.Observe tightening torques when tightening down brake line screw connections.Tightening torque: 34 32 1AZ .Wheel-slip control system:The slip control system is basically maintenance-free. When carrying out welding work with electric welding equipment, be sure to disconnect the plug fromthe electronic control unit (ignition turned off).During painting work, the control unit may be subjected for brief periods to loads of max. 95 C and forlong periods (approx. 2 hours) to loads of max. 85 C.Tighten down the battery terminals completely.The brake lines on the hydraulic unit must not be mixed up; if necessary, mark them before they areremoved and after completing repairs perform the mix-up check with the DIS Tester.34 00. GENERAL INFORMATION ON BREAKING IN NEW BRAKE DISCS / BRAKE PADSIMPORTANT: After completing work: Carry out function check on brake analyzer (test stand) to ensure that thebrakes complies with legal requirements.Carry out test braking while driving at low speed; the effectiveness of thebrakes may be reduced during the initial braking operations.Exaggerated drastic and continuous braking operations for fasterbreaking in are not permitted.Advise the customer not to perform any wilful drastic breaking in the first200 km after brake replacement.Attach mirror tag to interior rearview mirror.cardiagn.comHowever, be sure to adhere to the following:34 00. TESTING AWD VEHICLES ON DYNAMIC BRAKE AND POWER ANALYZERS (E30, E34,E46, E53, E83, E60, E61, E90, E91, E92)IMPORTANT: Power measurements on single-axle roller dynamometers are generally notpermitted as total failure of the transfer case cannot be ruled out during suchmeasurements.CARMANUALSUSASaturday, September 05, 2015 9:16:22 AMPage 3 2011 Mitchell Repair Information Company, LLC.
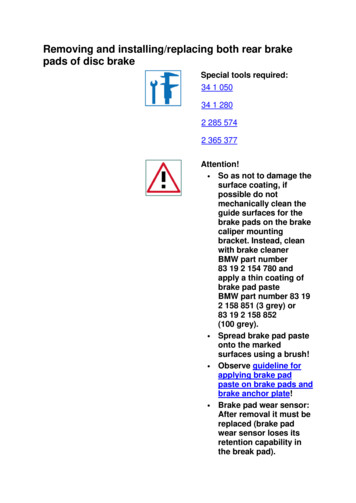
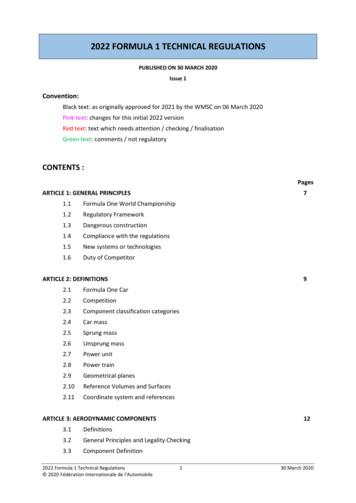
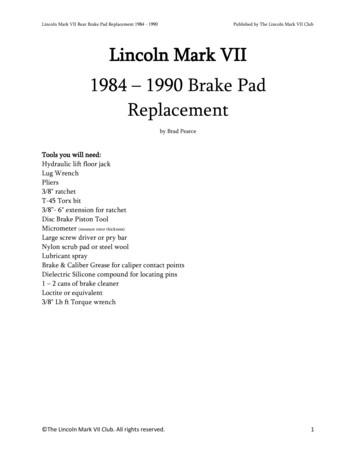
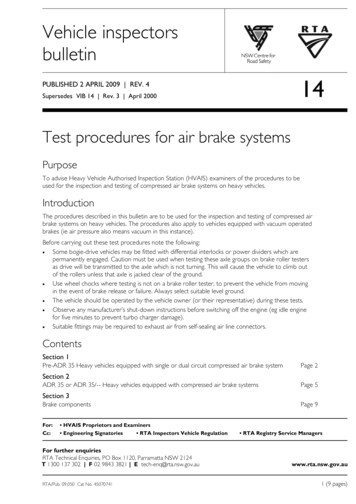
2010 BMW 535xiBRAKES Brakes - Repair Instructions34 00. CHECKING BRAKE DISCSSpecial tools required: 34 1 280Necessary preliminary tasks: Remove wheels.cardiagn.comChecking thickness difference: Measure thickness difference within brake surfaces at 8 point (spread over thecircumference) with a micrometer gauge. Compare measurement result with setpoint value. See BRAKES TECHNICAL DATA .Fig. 1: Checking Rotor Thickness DifferenceCourtesy of BMW OF NORTH AMERICA, INC.Check minimum brake disc thickness: Position special tool 34 1 280 at three measuring points in area (1) andmeasure. Compare measurement result and lowest value with setpoint value. See BRAKES - TECHNICALDATA .CARMANUALSUSASaturday, September 05, 2015 9:16:22 AMPage 4 2011 Mitchell Repair Information Company, LLC.
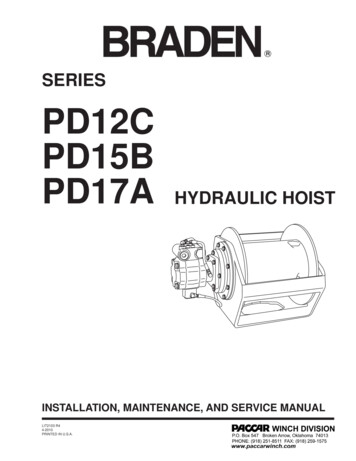
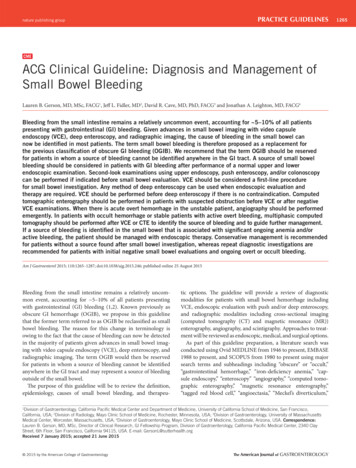
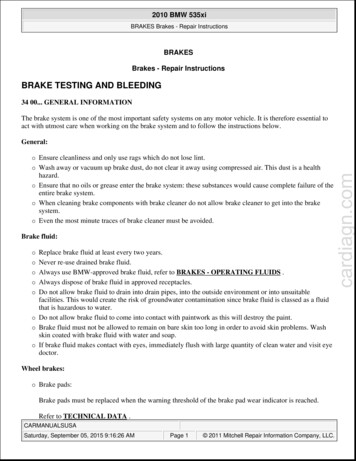
2010 BMW 535xiBRAKES Brakes - Repair Instructions34 00 009 CHECKING BRAKES ON TEST STANDNecessary preliminary tasks: Check tires for damageCheck tire treadsCheck tire pressurecardiagn.comFig. 2: Checking Minimum Rotor ThicknessCourtesy of BMW OF NORTH AMERICA, INC.In the case of vehicles with DSC, the system must be deactivated with the switch. The DSC telltale and warninglight must light up in the instrument cluster!The brakes must be at normal operating temperature. For this purpose, gently warm up the brake disks/drumswhile dry by braking the vehicle several times.E65 and E66: Carry out function check on parking brake.Fig. 3: Identifying Brake Test Stands (Dynamic Analyzers)CARMANUALSUSASaturday, September 05, 2015 9:16:22 AMPage 5 2011 Mitchell Repair Information Company, LLC.
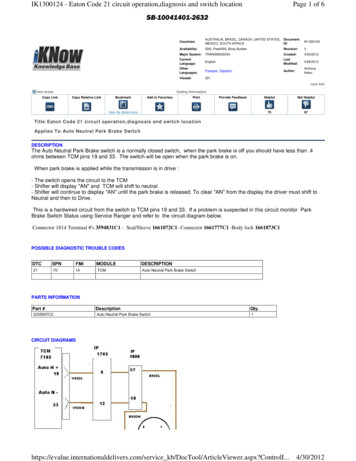
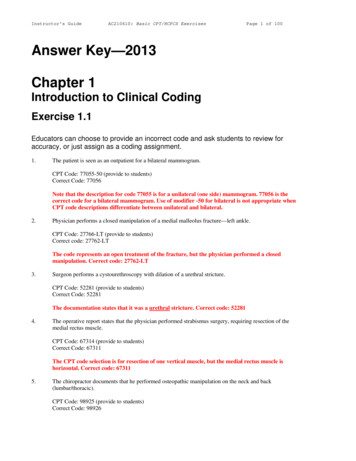
2010 BMW 535xiBRAKES Brakes - Repair InstructionsCourtesy of BMW OF NORTH AMERICA, INC.IMPORTANT: Only brake test stands (dynamic analyzers) with test speeds of 2.5-6 km/h maybe used.You must follow without fail the guidelines contained in the operatinginstructions of the relevant test stand manufacturer.Failure to do so may result in damage to the vehicle and the system and alsopersonal injury.34 00 010 CHECKING THICKNESS OF BRAKE PADSpecial tools required:34 1 260NOTE:The thickness of the outer brake pads can be determined without removing thewheels.If necessary, move car until opening for brake pad wear indicator (brake pad)can be seen through rim styling.Insert special tool 34 1 260 through rim into opening for brake pad wear indicator.Press special tool onto brake pad. Slide ring (1) in direction of arrow up to stop and read off measured value.NOTE:A. Brake diskB. Brake pad with backplateSAFE LIMIT FOR PAD WEAR, FRONT BRAKE .cardiagn.com SAFE LIMIT FOR PAD WEAR, REAR BRAKE .Fig. 4: Inserting Special Tool 34 1 260 Through RimCARMANUALSUSASaturday, September 05, 2015 9:16:22 AMPage 6 2011 Mitchell Repair Information Company, LLC.
2010 BMW 535xiBRAKES Brakes - Repair InstructionsCourtesy of BMW OF NORTH AMERICA, INC.34 00 012 PARKING BRAKE FUNCTION CHECKNOTE:If deviations are identified during the following check, the parking brake mustbe adjusted:Drive vehicle onto chassis dynamometer.Warm up brakes.Check handbrake.Vehicles with automatic transmission: Selector lever in "N" position. Without locking differential or 150 N.With locking differential or 200 N (possibly odd display).1st tooth: No increase in braking force with regard to 0th tooth. Indicator lamp can be lit.2nd tooth: Indicator lamp must be lit.3rd tooth: Increase in braking force.5th tooth: The brake force display must have reached or 400 N.Checking brake force differential at wheel:cardiagn.com0th tooth (handbrake released): Vehicles with manual transmission: Shift lever in neutral position.Apply handbrake until a wheel circumferential force (measured on brake test stand) of min. 1000 N is reached.Max. permitted brake force differential right/left or 35 % (referred to greater brake value).It must be possible to brake with locked wheels with the handbrake.34 00 017 CHECKING BRAKE BOOSTER (LOW-PRESSURE TEST)Special tools required: 34 3 100Necessary preliminary tasks: REMOVE LEFT MICROFILTER HOUSINGCARMANUALSUSASaturday, September 05, 2015 9:16:22 AMPage 7 2011 Mitchell Repair Information Company, LLC.
2010 BMW 535xiBRAKES Brakes - Repair Instructions Detach hose from connection piece. Install vacuum tester 34 3 100 between connection piece and vacuumhose of non-return valve.Start engine.Check buildup of partial vacuum.Switch off engine.Press the brake pedal to set a vacuum pressure of not more than 0.8 bar and wait for the value to stabilize.When the brake pedal is not pressed, the vacuum pressure is permitted to drop over a test period of 1minute by max. 0.06 bar.Fig. 5: Identifying Vacuum Tester 34 3 100 Between Connection Piece And Vacuum Hose Of NonReturn ValveCourtesy of BMW OF NORTH AMERICA, INC.If specified values are not reached: Check line connections for vacuum seal.Replace non-return valve.Check seal between brake booster and brake master cylinder (sealing ring) for perfect condition andcorrect seating.If the specified values are not achieved when the test is repeated, you must replace the brake booster.cardiagn.com 34 00 025 REPLACING FLUID IN ABS/ASC T BRAKE SYSTEMNecessary preliminary tasks: READ AND COMPLY WITH GENERAL INFORMATION.REMOVE LOWER SECTION OF MICROFILTER HOUSING .IMPORTANT: When carrying out repairs to the brake system, follow the procedure set out inBLEEDING BRAKE SYSTEM WITH DSC.CARMANUALSUSASaturday, September 05, 2015 9:16:22 AMPage 8 2011 Mitchell Repair Information Company, LLC.
2010 BMW 535xiBRAKES Brakes - Repair InstructionsConnect bleeder unit to expansion tank and switch on.Check relevant Operating Instructions for each device.Charging pressure should not exceed 2 bar.Fig. 6: Connecting Bleeder Unit To Expansion TankCourtesy of BMW OF NORTH AMERICA, INC.Flushing brake system completelyConnect bleeder hose with collecting tray to bleeder valve on rear right brake caliper.Open bleeder valve and purge until clear, bubble-free brake fluid emerges.Close bleed valve.Follow same procedure on rear left, front right and front left wheel brake.cardiagn.comNOTE:Fig. 7: Connecting Bleeder Hose With Collecting Tray To Bleeder ValveCourtesy of BMW OF NORTH AMERICA, INC.CARMANUALSUSASaturday, September 05, 2015 9:16:22 AMPage 9 2011 Mitchell Repair Information Company, LLC.
2010 BMW 535xiBRAKES Brakes - Repair InstructionsNOTE:The clutch slave cylinder must also be scavenged in vehicles with manualtransmissions.Switch off brake fluid changer and remove from expansion tank.Check brake fluid level. If necessary, top up/draw off to max. level.Close expansion tank.Pay attention to rubber seal (1) in sealing cap.cardiagn.comNOTE:Fig. 8: Identifying Rubber SealCourtesy of BMW OF NORTH AMERICA, INC.34 00 050 BLEEDING BRAKE SYSTEM WITH DSCNecessary preliminary tasks: REMOVE LOWER SECTION OF MICROFILTER HOUSING .READ AND COMPLY WITH GENERAL INFORMATION.Observe the filling and bleeding instructions when replacing or repairing: ReplaceHydraulic unitComponents and connecting lines which are fitted between these assemblies.Connect bleeder unit with max. 2 bar filling pressure.A second person is needed to help carry out this work.IMPORTANT: Check relevant Operating Instructions for each device.CARMANUALSUSASaturday, September 05, 2015 9:16:22 AMPage 10 2011 Mitchell Repair Information Company, LLC.
2010 BMW 535xiBRAKES Brakes - Repair InstructionsCharging pressure should not exceed 2 bar. Connect BMW Diagnosis and Information System (DIS).Select path: Service functions - Chassis/Suspension - Slip control systems - Bleeding procedure.Connect bleeder unit to expansion tank and switch on.Fig. 9: Connecting Bleeder Unit To Expansion TankCourtesy of BMW OF NORTH AMERICA, INC.Flushing brake system completelyConnect bleeder hose with collecting tray to bleeder valve on rear right brake caliper.Open bleeder valve and purge until clear, bubble-free brake fluid emerges.Close bleed valve.Follow same procedure on rear left, front right and front left wheel brake.cardiagn.com Fig. 10: Connecting Bleeder Hose With Collecting Tray To Bleeder ValveCourtesy of BMW OF NORTH AMERICA, INC.CARMANUALSUSASaturday, September 05, 2015 9:16:22 AMPage 11 2011 Mitchell Repair Information Company, LLC.
2010 BMW 535xiBRAKES Brakes - Repair InstructionsBleeding rear-axle brake circuitConnect bleeder hose with collecting tray to bleeder valve on rear right brake caliper.Close bleeder valve.Run through bleeding routine with BMW Diagnosis and Information System (DIS) with bleeder valve open.After completing routine, press brake pedal 5 times to floor, clear and bubble-free brake fluid must flow out.Close bleed valve.Fig. 11: Connecting Bleeder Hose With Collecting Tray To Bleeder ValveCourtesy of BMW OF NORTH AMERICA, INC.Bleeding front-axle brake circuitcardiagn.comRepeat procedure at rear left.Connect bleeder hose with collecting tray to bleeder valve on front right brake caliper.Close bleeder valve.Run through bleeding routine with BMW Diagnosis and Information System (DIS) with bleeder valve open.After completing routine, press brake pedal 5 times to floor, clear and bubble-free brake fluid must flow out.Close bleed valve.Repeat procedure at front left.CARMANUALSUSASaturday, September 05, 2015 9:16:22 AMPage 12 2011 Mitchell Repair Information Company, LLC.
2010 BMW 535xiBRAKES Brakes - Repair InstructionsSwitch off brake fluid changer and remove from expansion tank.Check brake fluid level. If necessary, top up/draw off to max. level.Close expansion tank.NOTE:Pay attention to rubber seal (1) in sealing cap.cardiagn.comFig. 12: Connecting Bleeder Hose With Collecting Tray To Bleeder ValveCourtesy of BMW OF NORTH AMERICA, INC.Fig. 13: Identifying Rubber SealCourtesy of BMW OF NORTH AMERICA, INC.FRONT BRAKES34 11. OVERVIEW OF FRONT BRAKECARMANUALSUSASaturday, September 05, 2015 9:16:22 AMPage 13 2011 Mitchell Repair Information Company, LLC.
2010 BMW 535xiFig. 14: Overview Of Front BrakeCourtesy of BMW OF NORTH AMERICA, INC.34 11 000 REMOVING AND INSTALLING/REPLACING BRAKE PADS ON BOTH FRONT DISCBRAKEScardiagn.comBRAKES Brakes - Repair InstructionsSpecial tools required: 34 1 08034 1 28034 6 320IMPORTANT: The brake pad wear sensor must be replaced once it has been removed (brakepad wear sensor loses its retention capability in the brake pad).IMPORTANT: Sport brake pads for M5 / M6: Due to the increased strain on the brake discs, we recommend that youalso replace the brake discs when fitting this brake pad.CARMANUALSUSASaturday, September 05, 2015 9:16:22 AMPage 14 2011 Mitchell Repair Information Company, LLC.
2010 BMW 535xiBRAKES Brakes - Repair Instructions It is absolutely essential to replace the brake discs if cracked or 13mm even before the brake pad is worn.Necessary preliminary tasks: Remove wheelsRemove BRAKE PAD WEAR SENSORObserve SAFETY INSTRUCTIONS on raising the vehicle.Lever out retaining spring (1) in direction of arrow towards rear.Attach retaining spring (1) first at top and bottom and then allow retaining lug (2) to engage in recess of brakecaliper housing.cardiagn.comInstallation:Fig. 15: Identifying Retaining Spring And Retaining LugCourtesy of BMW OF NORTH AMERICA, INC.Remove plastic plugs (1).CARMANUALSUSASaturday, September 05, 2015 9:16:22 AMPage 15 2011 Mitchell Repair Information Company, LLC.
2010 BMW 535xiBRAKES Brakes - Repair InstructionsLeft:Pull brake pad wear sensor (1) towards rear out of pad.Release guide screws (2) with special tool 34 1 080 . Withdraw brake caliper backwards.Installation:Only clean guide screws; do not grease.Check threads.Replace all guide screws which are not in perfect condition.Tightening torque 34 11 3AZ .cardiagn.comFig. 16: Identifying Plastic PlugsCourtesy of BMW OF NORTH AMERICA, INC.Fig. 17: Identifying Brake Pad Wear SensorCourtesy of BMW OF NORTH AMERICA, INC.CARMANUALSUSASaturday, September 05, 2015 9:16:22 AMPage 16 2011 Mitchell Repair Information Company, LLC.
2010 BMW 535xiBRAKES Brakes - Repair InstructionsPress back brake pads and piston with special tool 34 6 320.IMPORTANT: When forcing piston back:Pay attention to brake fluid level in expansion tank; brake fluid that spillsover will damage paintwork.Fig. 18: Pressing Back Brake Pads And Piston With Special Tool 34 6 320Courtesy of BMW OF NORTH AMERICA, INC.Press brake pads inwards and remove.cardiagn.com The two brake pads are seated with a spring in the piston or in the brake caliper housing and must not be mixedup.IMPORTANT: Mark any worn brake pads.In the event of one-sided brake pad wear, do not change brake pads round.Observe MINIMUM THICKNESS OF BRAKE PADS .Clean brake pads.Do not apply grease to brake pad backplate.CARMANUALSUSASaturday, September 05, 2015 9:16:22 AMPage 17 2011 Mitchell Repair Information Company, LLC.
2010 BMW 535xiBRAKES Brakes - Repair InstructionsNOTE:The outer brake pads gradually need to be changed as well.The previous version (A) with retaining spring (1) is replaced by brake pads ofversion (B) without retaining spring!The use of pad sets of version (A) with retaining spring continues to bepermissible!cardiagn.comFig. 19: Identifying Brake PadsCourtesy of BMW OF NORTH AMERICA, INC.Fig. 20: Identifying Brake Pads With/Without Retaining SpringCourtesy of BMW OF NORTH AMERICA, INC.Check minimum brake disc thickness: Position special tool 34 1 280 at three measuring points in area (1) and measure.CARMANUALSUSASaturday, September 05, 2015 9:16:22 AMPage 18 2011 Mitchell Repair Information Company, LLC.
2010 BMW 535xiBRAKES Brakes - Repair InstructionsCompare measurement result and lowest value with SETPOINT VALUE .Fig. 21: Identifying Measuring Points AreaCourtesy of BMW OF NORTH AMERICA, INC.IMPORTANT: New brake pads may only be installed if the brake disc thickness is greaterthan or equal to the MINIMUM BRAKE DISC THICKNESS (MIN TH) (not incl. Mvehicles).In the case of M vehicles and perforated brake discs, new brake pads may onlybe installed if the brake disc thickness is greater than the MINIMUM BRAKEDISC THICKNESS (MIN TH).NOTE:The minimum brake disc thickness is configured in such a way that it lasts thelife of a further set of brake pads (does not apply to M vehicles and perforatedbrake discs).cardiagn.com Check dust sleeve (1) for damage and replace if necessary.Clean contact face (2) of brake piston and apply a thin coating of anti-squeak compound.CARMANUALSUSASaturday, September 05, 2015 9:16:22 AMPage 19 2011 Mitchell Repair Information Company, LLC.
2010 BMW 535xiBRAKES Brakes - Repair InstructionsIMPORTANT: Dust sleeve must not come into contact with anti-squeak compound as thismay cause the dust sleeve to swell.Clean mounting faces (1) and (2) of brake pad hammer heads/brake caliper housing and coat with anti-squeakcompound.NOTE:Grease contact surfaces on brake caliper at top and bottom.cardiagn.comFig. 22: Identifying Dust Sleeve And Contact FaceCourtesy of BMW OF NORTH AMERICA, INC.Fig. 23: Identifying Mounting FacesCourtesy of BMW OF NORTH AMERICA, INC.Clean mounting face (3) of brake caliper and apply a thin coating of anti-squeak compound.CARMANUALSUSASaturday, September 05, 2015 9:16:22 AMPage 20 2011 Mitchell Repair Information Company, LLC.
2010 BMW 535xiBRAKES Brakes - Repair InstructionsClean brake caliper holder at hammerhead guides and apply a thin coating of anti-squeak compound.Refer to BRAKES - OPERATING FLUIDS .cardiagn.comFig. 24: Identifying Mounting FacesCourtesy of BMW OF NORTH AMERICA, INC.Fig. 25: Locating Brake Caliper HolderCourtesy of BMW OF NORTH AMERICA, INC.NOTE:After completing work: Fully depress brake pedal several times so that brake pads contact brakediscs.When installing new brake pads at front and rear axles, brake fluid levelmust be brought up to "MAX" marking.Read and comply with notes on BREAKING IN NEW BRAKE DISCS /BRAKE PADS.When replacing pads, reset CBS display in accordance withCARMANUALSUSASaturday, September 05, 2015 9:16:22 AMPage 21 2011 Mitchell Repair Information Company, LLC.
2010 BMW 535xiBRAKES Brakes - Repair InstructionsMAINTENANCE REMINDER LIGHT RESET PROCEDURES .IMPORTANT: On the E60 M5 and E63/E64 M6 the fault memory entry "Mastervac vacuumpressure sensor" may be stored after the brake pads have been replaced.The fault memory entry must be deleted. The vacuum pressure sensor only hasto be replaced if the fault is entered repeatedly.34 00 017 CHECKING BRAKE BOOSTER (LOW-PRESSURE TEST)Necessary preliminary tasks:Remove LEFT MICROFILTER HOUSING Detach hose from connection piece. Install vacuum tester 34 3 100 between connection piece and vacuumhose of non-return valve.Start engine.Check buildup of partial vacuum.Switch off engine.Press the brake pedal to set a vacuum pressure of not more than 0.8 bar and wait for the value to stabilize.When the brake pedal is not pressed, the vacuum pressure is permitted to drop over a test period of 1minute by max. 0.06 bar. cardiagn.com Fig. 26: Installing Vacuum Tester (34 3 100) Between Connection Piece And Vacuum Hose Of NonReturn ValveCourtesy of BMW OF NORTH AMERICA, INC.If specified values are not reached: Check line connections for vacuum seal.Replace non-return valve.Check seal between brake booster and brake master cylinder (sealing ring) for perfect condition andCARMANUALSUSASaturday, September 05, 2015 9:16:22 AMPage 22 2011 Mitchell Repair Information Company, LLC.
2010 BMW 535xiBRAKES Brakes - Repair Instructions correct seating.If the specified values are not achieved when the test is repeated, you must replace the brake booster.34 11 220 REMOVING AND INSTALLING/REPLACING BOTH FRONT BRAKE DISCSSpecial tools required: 34 1 280Necessary preliminary tasks: Remove wheelsIF NECESSARY, REMOVE AND CLEAN BRAKE PADSAfter completing work, read and comply with notes on BREAKING IN NEW BRAKE DISCS / BRAKEPADS.Observe SAFETY INSTRUCTIONS on raising the vehicle.Check minimum brake disc thickness: Position special tool 34 1 280 at three measuring points in area (1) and measure.Compare measurement result and lowest value with SETPOINT VALUE .IMPORTANT: New brake pads may only be installed if the brake disc thickness is greaterthan or equal to the MINIMUM BRAKE DISC THICKNESS (MIN TH) (not incl. Mvehicles).In the case of M vehicles and perforated brake discs, new brake pads may onlybe installed if the brake disc thickness is greater than the MINIMUM BRAKEDISC THICKNESS (MIN TH).NOTE:cardiagn.com The minimum brake disc thickness is configured in such a way that it lasts thelife of a further set of brake pads (does not apply to M vehicles and perforatedbrake discs).Always replace brake discs in pairs.If the brake discs are replaced, you must also fit new brake pads.CARMANUALSUSASaturday, September 05, 2015 9:16:22 AMPage 23 2011 Mitchell Repair Information Company, LLC.
2010 BMW 535xiBRAKES Brakes - Repair InstructionsRelease screws (1), remove brake caliper and tie up.Installation:Tightening torque 34 11 2AZ .NOTE:Brake hose remains connected.If the brake hose was pulled from the mounting fixture during removal, makesure it is positively attached when installed!cardiagn.comFig. 27: Identifying Measuring Points AreaCourtesy of BMW OF NORTH AMERICA, INC.Fig. 28: Identifying ScrewsCourtesy of BMW OF NORTH AMERICA, INC.Unscrew bolts and take off brake disc.Installation:Tightening torque 34 11 1AZ .CARMANUALSUSASaturday, September 05, 2015 9:16:22 AMPage 24 2011 Mitchell Repair Information Company, LLC.
2010 BMW 535xiBRAKES Brakes - Repair InstructionsClean contact surface of brake disc at wheel hub thoroughly and remove traces of corrosion if necessary.Unevenness on contact surface may result in distortion of brake disc!Fig. 29: Unscrewing BoltsCourtesy of BMW OF NORTH AMERICA, INC.IMPORTANT: Internally ventilated brake discs are balanced.Never remove or reposition balance clips.cardiagn.comIMPORTANT: To release brake disc: Do not under any circumstances strike friction ring witha hammer or similar! If necessary, carefully tap on base of brake disc chamberwith a rubber mallet.Fig. 30: Locating Balance ClipsCourtesy of BMW OF NORTH AMERICA, INC.34 11 250 REMOVING AND INSTALLING / REPLACING A BRAKE CARRIER / BRAKE GUARDPLATE AT FRONTNecessary preliminary tasks: Remove front BRAKE DISKSCARMANUALSUSASaturday, September 05, 2015 9:16:22 AMPage 25 2011 Mitchell Repair Information Company, LLC.
2010 BMW 535xiBRAKES Brakes - Repair InstructionsRelease screws (1) and remove brake guard plate (2).Installation:Fig. 31: Identifying Screws And Brake Guard PlateCourtesy of BMW OF NORTH AMERICA, INC.34 11 519 REMOVING AND INSTALLING/REPLACING LEFT OR RIGHT FRONT BRAKECALIPERNecessary preliminary tasks: Remove wheelsObserve SAFETY INSTRUCTIONS on raising the vehicle.cardiagn.comTightening torque 34 11 5AZ .After completing work: BLEED BRAKING SYSTEMPress clutch pedal down to floor and secure with pedal support.NOTE:The pedal support may only be released when the brake lines are reconnected.This prevents brake fluid from emerging from the expansion tank and air from entering the system when thebrake lines are opened.CARMANUALSUSASaturday, September 05, 2015 9:16:22 AMPage 26 2011 Mitchell Repair Information Company, LLC.
2010 BMW 535xiBRAKES Brakes - Repair Instructionscardiagn.comFig. 32: Locating Pedal SupportCourtesy of BMW OF NORTH AMERICA, INC.Left side: Disconnect plug connection for wear indicator.Release brake hose on brake caliper.Slacken connection for brake hose and brake line.Installation:Tighten brake hose on brake caliper.Tightening torque 34 32 4AZ .Move steering to straight-ahead position.Screw brake hose to brake line, ensuring that brake hose is not twisted.Tightening torque 34 32 1AZ .Release screws (1) and remove brake caliper.Installation:Tightening torque 34 11 2AZ .CARMANUALSUSASaturday, September 05, 2015 9:16:22 AMPage 27 2011 Mitchell Repair Information Company, LLC.
2010 BMW 535xiBRAKES Brakes - Repair Instructions34 11 552 OVERHAULING LEFT OR RIGHT FRONT BRAKE CALIPER (BRAKE CALIPERREMOVED)Special tools required: 34 1 133NOTE:Use repair kitBear in mind that guide sleeves and screws come in different lengths: 16" brake system: two short guide sleeves with two short screws.17" brake system: one long guide sleeve and one short guide sleeve with one long screw and one shortscrew.18" brake system: two long guide sleeves with two long screws.cardiagn.comFig. 33: Identifying ScrewsCourtesy of BMW OF NORTH AMERICA, INC.Take off plastic caps (1).Unscrew guide screws (2).Installation:Only clean guide screws; do not grease. Check guide bolts, replace if necessary.E65 and E66:Tightening torque: 34 11 3AZCARMANUALSUSASaturday, September 05, 2015 9:16:22 AMPage 28 2011 Mitchell Repair Information Company, LLC.
2010 BMW 535xiBRAKES Brakes - Repair InstructionsFig. 34: Identifying Plastic Caps And Guide ScrewsCourtesy of BMW OF NORTH AMERICA, INC.cardiagn.comDismantle brake caliper and remove brake pads.Installation:Press brake pads fully outwards and insert spring (4).Fig. 35: Identifying SpringCourtesy of BMW OF NORTH AMERICA, INC.WARNING: Danger of injury!In the following work step, large forces occur at the brake caliper pistonup to more than 2800 N.Carefully force piston out through connection bore with compressed air.To protect piston, place a protective plate (e.g. hard wood or hard felt) in caliper recess.Do not grip piston with fingers - risk of trapping!CARMANUALSUSASaturday, September 05, 2015 9:16:22 AMPage 29 2011 Mitchell Repair Information Company, LLC.
2010 BMW 535xiBRAKES Brakes - Repair InstructionsCheck guide sleeves (5), fitting repair-kit guide sleeve if necessary.IMPORTANT: Bear in mind that guide sleeves and screws come in different lengths.Long guide sleeve with long screw is seated on disk inlet at bottom, shortsleeve with short screw is seated on disk outlet at top.cardiagn.comFig. 36:
light must light up in the instrument cluster! The brakes must be at normal operating temperature. For this purpose, gently warm up the brake disks/drums while dry by braking the vehicle several times. E65 and E66: Carry out function check on parking brake. Fig. 3: Identifying Brake Test Stands (Dynamic Analyzers) 2010 BMW 535xi