Transcription
Employee Self-Service (ESS)Time and LaborPeopleSoft HR ManagementSystem(HRMS) 9.2 UpgradeOverview of Changes/Updates2
HRMS PeopleSoft 9.2In December of 2017, the home page was upgraded to theFluid Interface and we were aware that the Fluid pageswould be integrated into HRMS once we upgraded to 9.2.The PeopleSoft HRMS system is being upgraded to version9.2 the weekend of 10/13-14.This session will cover the changes in look and functionalityto the Employee Self-Service (ESS) pages.3
Hourly EmployeesHourly employees that punch in/out will utilize a feature called Report Time.Report time is accessed from the Employee Self-Service (ESS) home page andclick on the Time tile.4
Once the Time Tile is selected another page opens up and the left side ofthe page has different links available for quick access. This is called anavigation collection. The navigation collection can be hidden andunhidden by click on the button half way down the page.5
Reporting Time With Multiple JobsHourly employees with multiple jobs will need to select the job they arepunching in/out by selecting a job from the drop down menu. Once the job isselected the steps are the same as below.6
The first link displayed is Report Time. This new feature replaces the classicweb clock. Select the Punch Type In and click on the Submit button. The TimeReporting Code (TRC) defaults to Regular Earnings – H01. Only change this ifdirected by a manager. To punch out navigate to Report Time again and selectPunch Type of Out and click Submit.7
If directed by a manager to select a funding source (combination code) clickopen the Time Details and click on the lookup glass under the combinationcode. The only combination codes that will appear are ones that areattached to the employees department.8
After the punch is submitted the recorded information can be viewed underthe Submitted Hours section.9
The Weekly Time link opens up to a week view. To view other weeks click thearrows next to the date either backward or forward.10
The other links listed in the navigation collection apply to the AbsenceManagement. Information regarding Request Absence, Cancel Absence,View Requests and Absence Balances can be found later in this manual.Temporary (non-benefited) employees that are not eligible for a leave plan will havethe links available but will not have any actions available to take.To navigate to the Time tile click on the compasscorner of the page.in the upper right handClick on Navigator Self Service Time Reporting Report Time Time.11
Salaried EmployeesSalaried employees that need to submit hours will utilize the Timesheet(Non-Exempt employees that are eligible for comp time/overtime). TheTimesheet is accessed from the ESS home page and click on the Time tile.12
Once the Time Tile is selected another page opens up on the left side of the pagehas different links available for quick access. This is called a navigation collection.The navigation collection can be hidden and unhidden by clicking on thebutton half way down the page.13
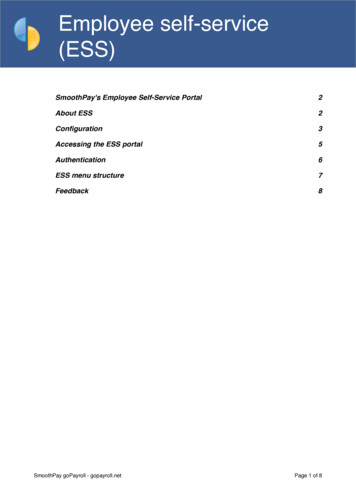
The Timesheet is the first link for salaried employees. Employees enter atotal number of hours worked each day. Salaried non-exempt employees areexpected to enter and submit time only for work weeks where overtime isincurred.Salaried exempt employees are not required to use the timesheet.Employees eligible for comp time (regular/benefited) will have the option toselect Comp Time in lieu of being paid out overtime. Select an OverrideCombo Cd only if directed by a manager.14
15
The other links listed in the navigation collection apply to the AbsenceManagement. Information regarding Request Absence, Cancel Absence, ViewRequests and Absence Balances can be found in the ESS for AbsenceManagement.To navigate to the Time tile click on the compasscorner of the page.in the upper right handClick on Navigator Self Service Time Reporting Report Time Time. Whenusing the navigation Self Service Time Reporting Timesheet it will not enablethe navigation collection.16
Requesting An Absence in ESSClick on the TIME tile to begin the absence request.17
Select Request Absence and the Absence Name selection box will appear. Clickon the dropdown arrow to open the options and select the type of leave; example:Annual, Comp Time, Sick, Dependent Sick, Funeral Leave, Jury Duty, MilitaryLeave, Sick Leave and any other leave you are eligible to select.18
Once you have selected the Absence Name, then the rest of the criteria boxeswill appear. Fill in the Start Date and End Date, the Duration defaults in with afull day of hours per your configured schedule. If you want something other thana full day, you will Click the Arrow on the right border of the Partial Days Box.19
When you click on the dropdown box, you will see All Days, None and Start Day Only.When you select anything other than none, you need to put the number of leave hours youwill be taking in the duration box and those hours will carry over to the previous page. Datayou enter in the Additional Information boxes are for information only, it does not affect thenumber of hours in the duration box.20
Once you have finished entering the leave, you will click on the Submit button.It will then ask you if you are sure you want to Submit your leave and you click Yes.Then you will see a banner across the top stating that the Request has been SubmittedSuccessfully.21
Updating Direct Deposit in ESSAfter logging into HRMS, select the Payroll tile from the Employee Self ServiceHome page:22
Then select Direct Deposit in the navigation collection on the left:23
The Direct Deposit page will appear, showing the bank accounts that are setupcurrently for the employee. To update the Direct Deposit with a new account,select the plus sign on the left side of the page:24
The Add Account window will appear for the employee to enter their bankinginformation. Enter a Nickname for the account they are adding. Under Bank, addthe banks routing number, account number and retype the account number. Thenunder Pay Distribution select from the dropdown an account type which can eitherbe checking or savings and then a deposit type which can be an amount or apercentage of their pay. Enter the amount or percentage that is associated to thisaccount. Click on the green save button.25
Once the employee clicks save it will return to the Direct Deposit page wherethey can verify that the account information is updated and correct.26
If the employee would like to make changes to or remove an existing account,they would click on the arrow on the right side:27
The Edit Account will appear, and they can update their information and thenclick the green save button. They can also remove this account from their directdeposit simply by clicking remove which will prompt a message “Are you sureyou want to remove the account”. Click yes and it will remove the account.28
The other way employees can change direct deposit is by going to thefollowing navigation: Employee Self Service Payroll andCompensation Direct Deposit29
Updating Tax Withholding in ESSAfter logging into HR, select the Payroll tile from the Employee Self ServiceHome page:30
Then select Tax Withholding in the navigation collection on the left:The Tax Withholding page will appear, showing the Company name,Status, Form Types, Jurisdiction and Withholding Details for theemployee.31
To update the Federal withholding status, select the arrow on the right: A window will open with special instructions that the user should read beforecontinuing. It is important to know that when an employee is updating theirfederal tax withholding status, it will NOT automatically update their state taxwithholding status. This is included in the first paragraph of the instructions. Ifthe employee wants to update their state tax withholding status, they can do itseparately starting in the Tax Withholding page.It is also important to note that it is a requirement to use Adobe Acrobat todownload the updateable PDF form. The user might need to change their browsersettings so that the default for PDF forms is Adobe Acrobat. This technology is onlyavailable on a personal computer. It is not currently available using a mobiledevice.32
Select the arrow on the right and the following message will appear.Selecting OK will open the updateable form in PDF format. SelectingCancel will cancel the transaction and the employee can go to their Payrolldepartment to complete the necessary forms to update their taxwithholding status.33
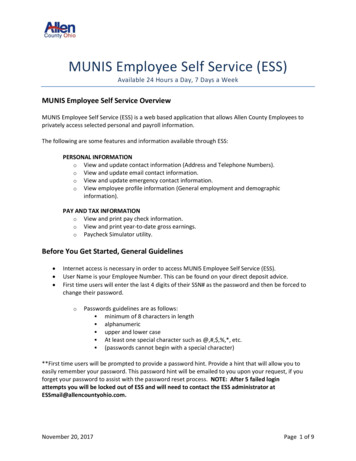
When OK is selected the PDF form will open in a separate window.The user’s Name, SSN, Address, Employee’s Signature, Date,Employer’s name, Employer’s Address and FEIN will all beprepopulated. The SSN is masked and only shows the last 4 digits.Lines 3 through 7 will be editable. The employee completes the formand then selects the Submit button located in the bottom right cornerof the form.34
35
The user is then prompted to enter their User name and Password: The data is then uploaded to the HR system to update the employee’sfederal tax withholding status. The employee can save or print a copy ofthe W-4 for their records36
The employee will also receive an email notification of the update:The employee can then go back to the Tax Withholding page and completethe process for their state tax withholding. They will not be prompted againto enter their User Name and Password if they kept the PDF page open.37
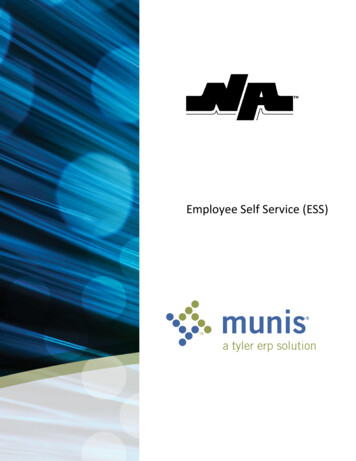
State tax withholding forms are available for every state that has state taxwithholding and they accept the Federal W-4 and/or the state’s own W-4.The SSN is masked in the state forms and only shows the last for digits.38
39
Questions?40
HRMS PeopleSoft 9.2. In December of 2017, the home page was upgraded to the Fluid Interface and we were aware that the Fluid pages would be integrated into HRMS once we upgraded to 9.2. The PeopleSoft HRMS system is being upgraded to version 9.2 the weekend of 10/13-14. This session will cover the changes in look and functionality