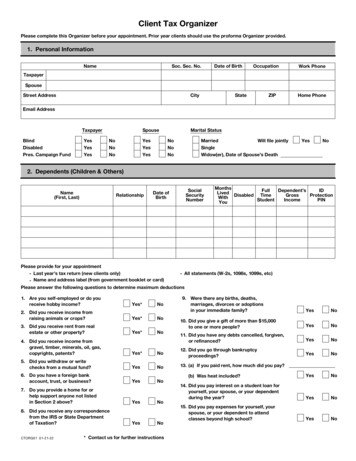
Transcription
Affordable Care Act1095-C Year-End FormsUser Guidewww.greenshades.com7020 A C Skinner Parkway, Suite 100, Jacksonville FL 32256. Phone: (888) 255-3815
1095-Cs Year-End Forms User GuideContents1Getting Started with Year-End Forms . 21.11.1.1Uploading from Greenshades Tax Filing Center . 21.1.2Upload using Microsoft Excel . 51.1.3Uploading from GreenshadesOnline Benefits Module . 91.1.4Uploading from Greenshades Online Connector . 91.22Uploading Forms . 2Configuring a New Formset . 101.2.1Company Information.101.2.2Transition Relief .111.2.3Aggregated ALE Group.121.2.4Self-Insured Indicator .131.2.5Contact Information.131.2.6Employee Count .14Completing Formset Tasks . 152.1Complete Company Setup . 172.2Duplicate Employees . 172.2.1Ignore .172.2.2Combine .172.2.3View/Fix .182.2.4Remove .182.3Employee Identity Verification . 18. 182.4Resolve Warnings with your Forms. 192.5Verify 1094-C Totals . 192.6Manage Employee Access . 202.7Email Employees with links to 1095-C Forms . 212.8Distribute any remaining 1095-Cs to your Employees . 212.8.1Ask Us to Mail Remaining 1095-Cs.22Page 1
1095-Cs Year-End Forms User Guide1 Getting Started with Year-End FormsGreenshades’ Year-End Forms portal is used to complete the year-end process byuploading data from your accounting software, from Greenshades’ Benefits orDynamics Payroll Inspector software, or an Excel spreadsheet. This powerful toolallows you to upload data from multiple databases and store them individually as“formsets.” You can have multiple form types (W-2s, 1099-MISC, 1095-Cs, etc.) storedas individual formsets within your company’s own Year-End Forms workspace.This guide will help familiarize you with uploading 1095-Cs to Year-End Forms andusing the Year-End Forms process to save time and money for your company.1.1 Uploading Forms1.1.1 Uploading from Greenshades Tax Filing CenterIf you already have the Greenshades Tax Filing Center installed and are tracking yourACA data in GP or in the Dynamics Payroll Inspector, you may select ‘Create Year-EndForms’. This will begin the Year-End Forms wizard.The Year-End Forms wizard will request the reporting year and form type to beuploaded. Once you have selected 1095-C, click ‘Next’.Page 2
1095-Cs Year-End Forms User Guide*If you have already imported forms into Year-End Forms, you will be given the option tomerge these forms into that workspace or add these forms to a new workspace.The next step provides a brief summary about the Affordable Care Act. If you havefurther questions about 1095-Cs, click here for additional information. Click ‘Next’ tocontinue.Select the option to ‘Create 1095-C forms with Tax Filing Center’. If you have theBenefits module, you may choose to continue to www.GreenshadesOnline.com toPage 3
1095-Cs Year-End Forms User Guideupload your forms directly from Benefits. You will not see this screen unless you ownthe Benefits Self-Service module.When the forms are uploaded, you will receive an email confirmation. Click ‘Next’ tocontinue.Once your forms have been uploaded, you will need to grant administrator access tothose forms. Check the checkbox in the ‘Authorized’ column next to each administratorwho should have access to those forms. If an administrator needs to be added to thislist, click the ‘Add New Contact’ link. If an existing administrator needs to reset theirpassword, click the ‘Reset Password’ link to do so.After your administrator access has been set up, click ‘Next’ to continue.Page 4
1095-Cs Year-End Forms User GuideYour Year-End Forms are now ready. Click the link provided on this page to direct youto the Year-End Forms portal. You may now click the ‘Finish’ button to close the YearEnd Forms wizard.1.1.2 Upload using Microsoft ExcelIf you do not have the Dynamics Payroll Inspector product or the Greenshades Benefitsmodule, you may upload your forms through a Microsoft Excel format (.xls or.xlsxformat). To use this method, download and complete the Microsoft Excel template filetailored to the type of form you want to upload.*Click here to download a Microsoft Excel template s/2018/1095C.xls)Enter your data into the Excel template you have downloaded. Make sure that you donot modify the columns, column headers, or formatting, as this may render the formatincompatible for importing your data into the website and cause an error. Once youhave populated the Excel template with your employee/form data, navigate to the YearEnd Forms import wizard by:1. Logging into your GreenshadesOnline.com account2. Click on the ‘Year-End Forms’ tab within top navigation3. Click the ‘Click here to import new tax forms into Year-End Forms’ link centeredat the top of the pagePage 5
1095-Cs Year-End Forms User GuideYou will now begin the importing process. Year-End Forms will first gather informationabout your company. If you have previously uploaded to Year-End Forms, you may useyour existing company information by selecting your company from the drop-down list.If you would like to set up a new company, click the ‘Add New Company’ button,complete the required information for you company, and click ‘Save Company’. Allbolded fields are required.This functionality will allow you to add new companies ahead of importing, if needed.Page 6
1095-Cs Year-End Forms User GuideOnce you have selected a company to work with, you will select the Year and FormType for which you want to import. If you are using a company with existing forms, youwill be presented with options to either ‘Replace’ the existing formset or ‘Append’ (addto) the existing formset.Next, upload your completed Microsoft Excel template file. Click the ‘Browse’ button,locate your completed Excel file for import, and click ‘OK’. Then click the ‘Continue’button.Page 7
1095-Cs Year-End Forms User GuideYou may choose to skip the upload and fill in forms manually using Year-End Forms bychecking the checkbox (as seen above), however for this guide we will continue with theuploading method.Next, you will be presented with the option to grant access to administrators within yourcompany to the forms. If you do not already see their name and email address listed,you may add them at a later time. Any administrators selected on this page will be setas Super Administrators. Later in this guide, you walk through how to set limited accessadministrators for W-2 and 1095-C workspaces.Once you’ve selected your administrators, click ‘Continue’. Year-End Forms will beginto import your forms. It may take some time to import your data and create the formsetbased on the size of your excel file and your position the queue.If you remain on the current screen, you will be provided with a ‘Continue’ button whenyour forms have imported successfully. This will open the Welcome Wizard for your new1095-C formset.If you leave the import screen, your new formset will appear on your workspacehomepage and will be listed as ‘New’ when it has completed and succesfully imported.When you are ready, select the formset and complete the welcome wizard as describedin section 1.2 below.Page 8
1095-Cs Year-End Forms User Guide1.1.3 Uploading from GreenshadesOnline Benefits ModuleIf you have the Greenshades Online Benefits Module, you can upload your 1095-Cforms directly from the Greenshades Online Benefits module.GreenshadesOnline Employees Benefits ACA Dashboard Create 1095-Cs1.1.4 Uploading from Greenshades Online ConnectorIf you are tracking ACA information in GP or the Dynamics Payroll Inspector and havethe Greenshades Online Connector installed, but do not have the Benefits module, youmay import your data using the Greenshades Online Connector.Page 9
1095-Cs Year-End Forms User Guide1.2 Configuring a New FormsetOnce your 1095-C form information has been successfully imported into a new formseton Year-End Forms, any authorized administrator can start completing the year-endforms process.The first time that you log into the new formset on Year-End Forms, you will bepresented with a welcome wizard, which will walk you through some setup steps foryour 1095-C formset. The steps for the welcome wizard are explained below.1.2.1 Company InformationFor the first step of the welcome wizard, you must verify the basic company informationand designate a billing contact. This page will ask you for your Official Company Name,EIN, and a billing contact. If the billing contact drop down list does not contain theperson you wish to designate, select “[Add a New Contact]” to enter the correctcontact’s information. This will be the point of contact regarding billable services onYear-End Forms, including: Form UploadsMailing fees for the Greenshades Mail Service, including preference charges,additional pages, and foreign postageFederal E-Filing ServicesForm CD ordersPage 10
1095-Cs Year-End Forms User Guide1.2.2 Transition ReliefPage 11
1095-Cs Year-End Forms User Guide1.2.2.1 Plan Start DateThe Plan Start Date is required and will be applied to all forms. You may edit thePlan Start Date per employee form, if needed. If there was no health plan underwhich coverage was offered to employees in the 2018 year, check the box to theright of the start date field to report “00” on your forms.1.2.2.2 Transition Relief methodIf eligible, select all transition relief options that apply. These selections willcorrelate directly to the data on the 1094-C transmittal form.1.2.3 Aggregated ALE GroupSelect ‘Yes’ if you are a member of an Aggregated ALE Group.Your company may be considered a member of an Aggregated ALE Group if it is under acommon control with a group of corporations, partnerships, proprietorships, affiliates, serviceorganizations, etc. as defined by the IRS code 26 U.S. Code § 414. The collective group ofemployees from all companies within the aggregated ALE group are included in determiningthe ALE (Applicable Large Employer) status for all members of the aggregated ALE group.An employee’s collective hours and wages from all companies within the aggregated ALEgroup are used in determining eligibility and affordability for coverage. An employee’s healthcoverage offerings from all companies within the aggregated ALE group are used toPage 12
1095-Cs Year-End Forms User Guidedetermine if the minimum coverage requirements are met. The employer is responsible forreporting coverage is determined by the employee’s hours worked at each company permonth.If you have included or set up the Aggregated ALE Group member information in theexcel template, Dynamics Payroll Inspector, or Greenshades Benefits module, it will beincluded on import.It is important to note that any company added, edited, or removed as a member withinthe welcome wizard will not update or recalculate the aggregated employee dataimported for your employee’s 1095-C forms.1.2.4 Self-Insured IndicatorWhen importing using the excel template, you can mark each employee withTRUE/FALSE in the ‘Self-InsuredCoverage’ column to indicate if they were offered selfinsured health coverage. If plans were designated as self-insured through DynamicsPayroll Inspector or the Benefits module, the by-employee indication will be passed aswell and ‘Indicated Individually through Import’ will be selected. You may also use thissetting to bulk edit all forms to ‘Yes’ or ‘No’ for self-insured coverage.1.2.5 Contact InformationPage 13
1095-Cs Year-End Forms User GuideThe contact information provided should reflect the company’s ACA contact in the eventthat an employee has questions regarding the information reported on their 1095-Cform. This may differ from your formset administrator or billing contact.If you are a Designated Governmental Entity, select ‘Yes’ and enter the informationbelow.1.2.6 Employee CountThe Employee Count should include full-time, non-full-time, and full-time equivalentemployees for each month.A consistent day should be selected from the drop-down list to designate the day of themonth you calculated employee totals on. Dynamics Payroll Inspector and the Benefitsmodule will pass these totals to the Year-End Forms formset upon import.Page 14
1095-Cs Year-End Forms User Guide2 Completing Formset TasksNow that the 1095-Cs are imported and the Welcome Wizard is complete, you will beable to complete the task-driven checklist. You will see each task checked-off as it iscompleted.Page 15
1095-Cs Year-End Forms User GuidePage 16
1095-Cs Year-End Forms User Guide2.1 Complete Company SetupThe Complete Company Setup task is checked off once you complete the WelcomeWizard. If you need to make any changes or updates to the information within theWelcome Wizard, click the ‘Complete Company Setup’ link to do so.2.2 Duplicate EmployeesThe Duplicate Employees task determines if you have duplicate employees found withinyour formset based on SSN. If no duplicates are found, this task will be automaticallychecked off. If duplicates are found, you will have the option to Ignore, Combine,View/Fix, or Remove the duplicate entries.2.2.1 IgnoreClicking ‘Ignore’ will remove the warning for the duplicate employees with that SSN. TheIgnored entries will be moved to an Ignored grid on the same page in case you wouldlike to address these duplicate entries at a later time. This option will not remove theemployee data or either of their 1095-C forms.2.2.2 CombineClicking ‘Combine’ will allow you to combine the information of the duplicate employeesinto one of the employee IDs selected in the drop down. The ID selected will retain theemployee’s information and Lines 14, 15, and 16 will be combined to the benefit of theemployer based on built-in logic. Covered Individuals will combine based on theindividual’s SSN.Clicking ‘Verify Combined Form’ will display the new combined form for you to review.You will be unable to combine the forms until you check the ‘I have reviewed ’checkbox. Selecting ‘Save’ will combine the forms.Warning: This change cannot be undone without replacing the formset.Page 17
1095-Cs Year-End Forms User Guide2.2.3 View/FixYou may quickly edit one of the duplicate 1095-C employee forms by clicking ‘View/Fix’.2.2.4 RemoveIf the duplicate should be removed completely from your 1095-C forms, you can use the‘Remove’ option.Warning: This change cannot be undone once removed.2.3 Employee Identity VerificationIf you choose, Greenshades can verify the identity of your employees against SSArecords that match names with identification numbers. Any problem(s) found during thisverification will be reported as a new warning with your forms. This service will reduceerrors and penalties when submitting forms to the IRS with incorrect employeeinformation.Identity verification is an optional and free service. If you wish to request the verificationyou may do so by clicking the ‘Start Verification’ button. Depending on the number ofemployees that you have in this formset, the verification may take some time tocomplete. Your submitted verification batches will be available for review through thispage and you may Fix or Ignore any invalid identities returned.Page 18
1095-Cs Year-End Forms User Guide2.4 Resolve Warnings with your FormsGreenshades will warn you of potential problems with your forms. The potential issuewill display the employee’s name, details of the warnings, and the severity. You maymake changes to the form by clicking the ‘Edit’ link to the left of the warning.2.5 Verify 1095-C TotalsYear-End Forms will calculate the totals of your tax forms based on the data that wasimported and includes any changes made to the forms prior to verifying said totals.These totals are provided so that you can verify them against your accounting packagetotals.Once you have reviewed the totals and verified that they are correct, you can select thecheckbox on the ‘Verify Totals’ page as shown below. Clicking the ‘Finish’ button willmark the step as complete within the checklist. Any time an action is taken that modifiesa total after you have verified it, Year-End Forms will automatically reset the checklisttask, verification checkbox, and request that you review and re-verify the totals again.Page 19
1095-Cs Year-End Forms User Guide2.6Manage Employee AccessYou may enable employee electronic access to their 1095-C forms throughGreenEmployee. Select ‘Yes’ under “Should employees be able to view 2015 1095-Cson GreenEmployee.com?”, then click ‘Continue’.Verify the settings and additional options. You may provide a tax preparation couponand choose whether you would like the employee to be able to edit their address, name,or social security number on their form. If you do allow the employees to edit theirPage 20
1095-Cs Year-End Forms User Guideinformation, it will be approved and automatically updated unless “Approval is requiredfor any employee edits” is selected. After an administrator approves the changes, theemployee’s information will be updated within the formset and on their form.2.7 Email Employees with links to 1095-C FormsIf you have imported employee email addresses from GP or through the excel template,you may send an email notification to your employees with a link to the web address toview their 1095-C.2.8 Distribute any remaining 1095-Cs to your EmployeesIn this step, you may Download & Print a batch to distribute 1095-Cs yourself, submit abatch to have Greenshades Print & Mail your forms, or Download a batch for yourrecords/request Greenshades to mail you a CD with the PDF copies of your forms.Page 21
1095-Cs Year-End Forms User Guide2.8.1 Ask Us to Mail Remaining 1095-CsThis option allows you to request Greenshades to Print & Mail the 1095-Cs at a smalladditional fee. You will be directed to the Mail Service Status Page upon selecting thisoption, where you can view previously submitted batches or submit a new batch. Tocreate a new Print & Mail request, select ‘New Order’ at the top of the page.2.8.1.1Mail Service Wizarda) Choose FormsThe first step in the Mail Service Wizard is to select which forms you wouldlike to Greenshades to print and mail.Form selection options: All tax forms in this workspaceo Will include all of your employee forms, regardless of priordistribution status or electronic consent designation.o If any forms within the workspace have been edited/corrected andmarked as such, you will receive an additional option to indicate ifthis batch should include the corrected forms or non-correctedforms. If you require to distribute for both, you will need to submittwo different orders.Page 22
1095-Cs Year-End Forms User Guide All forms that must still be issuedo Will include all employee forms that have not already beendistributed through Print & Mail, Download & Print, or consented bythe employee to receive electronically.o This selection may also include the additional option to designatecorrected or non-corrected forms, if applicable. Select specific forms by searching for themo Allows the administrator to individually select employees to includein the order.b) Resolve WarningsIf you have any high-severity warnings, you will be prompted to either includeor exclude them from the batch when you click ‘Continue’. You may edit theforms prior to submitting the batch, or you can exclude them and submit themin a separate batch once edited.c) Delivery OptionsPage 23
1095-Cs Year-End Forms User GuideYou may select for Greenshades to print the 1095-Cs and mail them directly toyour employees or you can request for them to be printed, sealed, and shippedto your location to distribute.If you would like Greenshades to print, seal, and ship them to your location, youwill select the shipping provider (UPS or FedEx) and your account numberthrough that shipping provider, the delivery timeframe (Overnight, 2nd Day, orGround Shipping), and the address you would like them sent to. Greenshadesprint team may reach out to the contact provided if additional information isneeded.d) Review & MailPage 24
1095-Cs Year-End Forms User GuideYour Batch is now ready to be submitted. You may review the order details andcost breakdown. To finalize the submission, enter your name within the‘Authorization’ field and click ‘Mail Forms’ at the bottom of the page.Return to the Mail Service Status page and click ‘View Details’ next to the batchfor more details on your order.2.8.2 Distribute Remaining/Additional 1095-Cs YourselfYou may create a new PDF batch for self-distribution by clicking the ‘New DownloadBatch’ button at the top of the page.2.8.2.1 Download and Print Wizarda) Choose FormsPage 25
1095-Cs Year-End Forms User GuideThe first step is the same as the Mail Service Wizard and is to select whichforms you would like to include in your downloadable PDF batch.Form selection options: All tax forms in this workspaceo Will include all of your employee forms, regardless of priordistribution status or electronic consent designation.o If any forms within the workspace have been edited/corrected andmarked as such, you will receive an additional option to indicate ifthis batch should include the corrected forms or non-correctedforms. If you require to distribute for both, you will need to submittwo different orders. All forms that must still be issuedo Will include all employee forms that have not already beendistributed through Print & Mail, Download & Print, or consented bythe employee to receive electronically.o This selection may also include the additional option to designatecorrected or non-corrected forms, if applicable. Select specific forms by searching for themo Allows the administrator to individually select employees to includein the order.Page 26
1095-Cs Year-End Forms User Guideb) Resolve WarningsIf you have any high-severity warnings, you will be prompted to either includeor exclude them from the batch when you click ‘Continue’. You may edit theforms prior to submitting the batch, or you can exclude them and submit themin a separate batch once edited.c) Delivery OptionsPage 27
1095-Cs Year-End Forms User GuideYou may select to download a PDF copy of the 1095-C forms into a batch orrequest Greenshades to create and mail you a CD with the PDF batch on it.You may also choose to order the forms in the batch by Last Name, FirstName, City, State, Zip, or Department.d) Advanced OptionsIf you would like to purchase the necessary perforated paper and envelopesthrough Greenshades, you may click the link to navigate to our third-partyvendor’s website to order directly. The paper and envelope codes areprovided as reference for when placing your order.e) Review & DownloadYour Batch is ready to be submitted for processing. You may review thedetails, name the batch, and type your name to authorize. To finalize thesubmission, click ‘Continue’ at the bottom of the page.If you would like these forms to marked as ‘Distributed’, check the checkboxfor ‘Intent to Deliver’.After clicking ‘Continue’, you will be redirected to the Self-Distribute BatchStatus Page where you can download the batch directly to your machine oncethe batch is ‘Processed’.If you need to remove a batch or would like to view the details of the batch,click ‘More Info’.Page 28
1095-Cs Year-End Forms User Guide2.9 E-File US 1095-C ReturnYou may file your 1095-Cs by clicking on ‘File Now’. This will bring you into theE-File Wizard.If you have not validated employee SSNs through the Identity Verification step, you willreceive a warning, as validating SSNs is highly recommended as to ensure SSNs arecorrect to avoid issues or errors when filing.An additional warning will display if there are any high priority warnings within theformset that are also recommended to be resolved prior to filing to avoid issues orerrors.2.9.1 Submitter InformationEnter and/or confirm the submitter’s contact information for the filing. This step includesentering the Business Name Control for your company’s EIN. The Business NameControl is a sequence of characters derived from the taxpayer’s name that is used bythe IRS in processing the 1095-C/1094-C return being filed.Page 29
1095-Cs Year-End Forms User Guide2.9.2 1094-C TotalsThis task item allows you to review the information that comprises the 1094-C. Most ofthis information is determined automatically or set in the welcome wizard. Click ‘Edit’ tomodify some of the items.You may also download a paper copy of your 1094-C from the link in the upperrighthand corner of the page.Page 30
1095-Cs Year-End Forms User Guide2.9.3 Review TotalsYou may review your Employer-Provided Insurance Information once more prior tosubmitting the E-File.2.9.4 Submit E-FileOnce the E-File has been submitted, the status will display on the homepage within thechecklist step.Page 31
1095-Cs Year-End Forms User GuideFor additional support please contact us.(888) 255-3815 e 32
1.1.2 Upload using Microsoft Excel If you do not have the Dynamics Payroll Inspector product or the Greenshades Benefits module, you may upload your forms through a Microsoft Excel format (.xls or.xlsx format). To use this method, download and complete the Microsoft Excel template file tailored to the type of form you want to upload.