Transcription
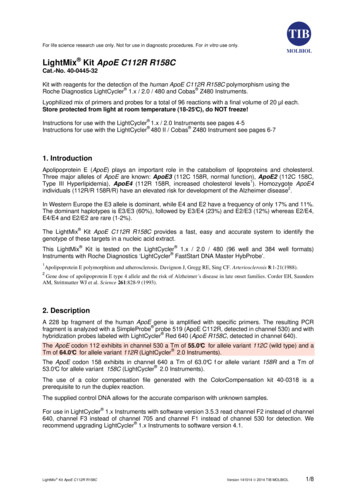
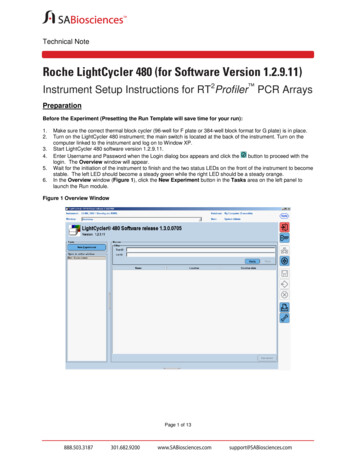
Technical NoteRoche LightCycler 480 (for Software Version 1.2.9.11)Instrument Setup Instructions for RT2Profiler PCR ArraysPreparationBefore the Experiment (Presetting the Run Template will save time for your run):1.2.3.4.5.6.Make sure the correct thermal block cycler (96-well for F plate or 384-well block format for G plate) is in place.Turn on the LightCycler 480 instrument; the main switch is located at the back of the instrument. Turn on thecomputer linked to the instrument and log on to Window XP.Start LightCycler 480 software version 1.2.9.11.Enter Username and Password when the Login dialog box appears and click thebutton to proceed with thelogin. The Overview window will appear.Wait for the initiation of the instrument to finish and the two status LEDs on the front of the instrument to becomestable. The left LED should become a steady green while the right LED should be a steady orange.In the Overview window (Figure 1), click the New Experiment button in the Tasks area on the left panel tolaunch the Run module.Figure 1 Overview WindowPage 1 of 13
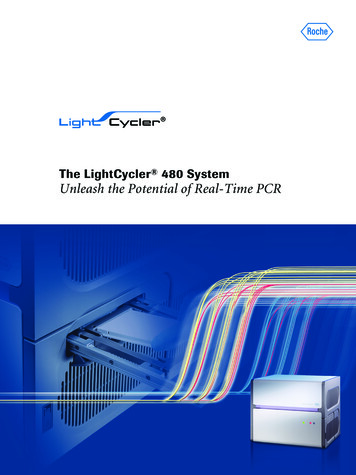
Technical Note7.In the Setup area of the Run Protocol tab (Figure 2), specify the following setup parameters:Detection Format: SYBR Green IBlock Type: should show the correct block formatPlate ID: (Optional)Reaction Volume: 10µµL for G plate or 25µµL for F plateFigure 2 Run Protocol Window8.In the Programs section, click thebutton twice to add two more programs to the initial program.Page 2 of 13
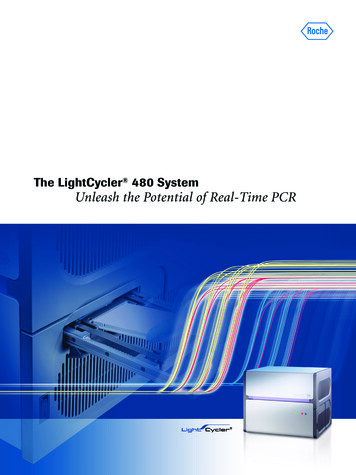
Technical Note9.Change the Program Name of the first program to “Heat activation” and put in “1” for Cycles and “None” forAnalysis Mode. In the Program Temperature Targets section, enter the values for the following parameters(See Figure 3):Target( ate( C/s)4.8*Acquisition(per C)SecTarget( C)0StepSize( C)0*This is the default ramp rate for 384-well block. The default ramp rate for 96-well block is 4.4 C/s.Figure 3 Setup of the 1st Program—Heat ActivationPage 3 of 13StepDelay(cycles)0
Technical Notend10. Change the Program Name of the 2 program to “PCR cycle” and put in “45”** for Cycles and“Quantification” for Analysis Mode. In the Program Temperature Targets section, click thebutton to addone more segment to the default segment. Enter the values for the following parameters (Figure 4):Target( :1500:01:00Figure 4 Setup of the 2ndRampRate( C/s)1.01.0Acquisition(per C)SecTarget( C)00StepSize( C)00StepDelay(cycles)00Program—PCR Cycle**Note: The PCR is run for extra five cycles (i.e. 45 cycles) rather than the typical 40 cycles indicated in the user2manual of the RT Profiler PCR Array as this will allow the use of the Second Derivative Maximum method availablewith the LightCycler 480 software for data analysis. See Data Analysis for further details.Page 4 of 13
Technical Noterd11. Change the Program Name of the 3 program to “Melt Curve” and put in “1” for Cycles and “Melting Curves”for Analysis Mode. In the Program Temperature Targets section, click thebutton to add one moresegment to the default segment. Enter the values for the following parameters (Figure 5):Target( 0:00:15RampRate( C/s)4.8*0.03Acquisition(per C)SecTarget( C)StepSize( C)20*This is the default ramp rate for 384-well block. The default ramp rate for 96-well block is 4.4 C/s.rdFigure 5 Setup of the 3 Program—Melt CurvePage 5 of 13StepDelay(cycles)
Technical Note12. Click the down arrow button ( ) right next to the Apply Template button on the lower left corner of the screen;2select the Save As Template button (Figure 6) to save the run template under the filename RT Profiler PCR2Array384LC for G plate or RT Profiler PCR Array96LC for F plate. Alternatively, download the PCR protocoltemplate file available from SABiosciences website http://www.sabiosciences.com/home.php. Move the cursorto the link for the protocol setup file for Lightcycler 480 you wish to download, and right click on the link and usethe “Save Target As” function to save the file on your desktop. To import into the LightCycler 480 software, goto the Navigator window, click on the Import button at the bottom of the screen and import the protocol setupfile that has been saved on the desktop. Once the file is opened, save the file in the Run Templates folder byclicking thebutton on the right panel.Figure 6 Saving the Run Template FilePage 6 of 13
Technical NotePerforming Real-Time PCR DetectionTo load the PCR Array plate and start the run:1.2.3.When the PCR Array is prepared and centrifuged, bring the plate to the LightCycler 480 instrument to load.Make sure the correct thermal block cycler (96-well for F plate or 384-well block format for G plate) is in place.If the instrument is not on, turn it on using the main switch at the back of the instrument. Turn on the computerlinked to the instrument and log on to Window XP.4. Start LightCycler 480 software version 1.2.9.11.button to proceed with the5. Enter Username and Password when the Login dialog box pops up and click thelogin. The Overview window will appear.6. Wait for the two status LEDs on the front of the instrument to become stable. The left LED should become asteady green while the right LED should be a steady orange.7. Press the push button on the front of the instrument which is located next to the instrument status LEDs. Theplate loader will slide out of the right side of the instrument. Place the PCR Array plate into the loading frame ofthe loader with the flat edge pointing towards the instrument and the short edge with beveled corners pointingaway from the instrument.8. Press the plate loading push button again to retract the loader. Both of the status LEDs should now turn steadygreen.9. In the Overview window, click the New Experiment button in the Tasks area on the left panel to launch theRun module.10. In the Run Protocol tab, click the Apply Template button on the lower left corner of the screen. Select and22double click to open the previously saved RT Profiler PCR Array384LC or RT Profiler PCR Array96LC runtemplate file as appropriate.11. Press the Start Run button on the lower right corner of the screen to initiate the run. When prompted, save thefile under a new filename after which the run will begin.Page 7 of 13
Technical NoteData Analysis1.In the Navigator window (Figure 7), find and open the run file to be analyzed.Figure 7 Opening the Run FilePage 8 of 13
Technical Note2.3.For data analysis using the LightCycler 480 software, we highly recommend the use of the Second DerivativeMaximum analysis method available in this software. This is an algorithm based on the kinetics of a PCRreaction. This method identifies the crossing point (CP) of a PCR reaction as the point where the reaction’sfluorescence reaches the maximum of the second derivative of the amplification curve, which corresponds to thepoint where the acceleration of the fluorescence signal is at its maximum. Hence, this crossing point shouldalways be located in the middle of the log-linear portion of the PCR amplification plot. The advantage of thisanalysis method is that it requires little user input.Obtaining the Crossing Point (CP) Cycle values: Once the selected run file is open, click the Analysis buttonon the left module bar. The Analysis Overview window will open. Click “Abs Quant/2nd Derivative Max” in theCreate new analysis list. The Create new analysis dialog box will then open (Figure 8). Make sure theto confirm the selection.Analysis Type is “Abs Quant/2nd Derivative Max”. ClickFigure 8 Obtaining the Crossing Point (CP) Cycle Values at the Second Derivative Maximum (SDM)Page 9 of 13
Technical Note4.The Analysis Window with the amplification curves will appear (Figure 9). To proceed, click the down arrowbutton ( ) on the lower right corner of the screen to set the analysis to “High Confidence.” Next click the“Calculate” button to generate results. The calculation may take a few minutes.Figure 9 Setting up the Analysis for Calculation of the Crossing Point Cycle ValuesPage 10 of 13
Technical Note5.Once the CP data is generated, move the mouse over to the result window and right click to highlight the resulttable. Click the “Export” button to export the table data (Figure 10). A “Save table data” dialog box will appear.Enter a filename to save the data as a text file. Then click thenow containing the CP data.Figure 10 Exporting the CP ResultsPage 11 of 13button on the right panel to save the run file
Technical Note6.To proceed with the melt curve analysis, click thebutton located on the right of the Analyses line to add anew analysis. The Create new analysis dialog box will open (Figure 11). Select the “Tm calling” for theAnalysis Type. Then clickto confirm the selection.Figure 11 Melt Curve AnalysisPage 12 of 13
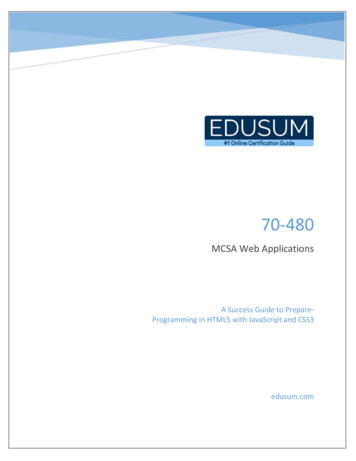
Technical Note7.The Analysis window with the raw melting curves will appear (Figure 12). To proceed, click the down arrowbutton ( ) on the lower right corner of the screen to set the analysis to “SYBR Green I Format.” Next clickthe “Calculate” button to generate results. The calculation may take several minutes. Once the calculatedderivatives of the melting curves appear, check the specificity of each assay by ensuring the presence of asingle melt peak in each well. Then click thethe melt curve analysis.button on the right panel to save the run file now also containingFigure 12 Setup of the Melt Curve AnalysisPage 13 of 13
2. Turn on the LightCycler 480 instrument; the main switch is located at the back of the instrument. Turn on the computer linked to the instrument and log on to Window XP. 3. Start LightCycler 480 software version 1.2.9.11. 4. Enter Username and Password when the Login dialog box appears and click the button to proceed with the login.