Transcription
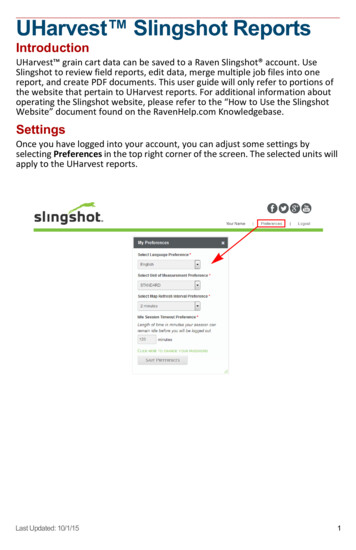
UHarvest Slingshot ReportsIntroductionUHarvest grain cart data can be saved to a Raven Slingshot account. UseSlingshot to review field reports, edit data, merge multiple job files into onereport, and create PDF documents. This user guide will only refer to portions ofthe website that pertain to UHarvest reports. For additional information aboutoperating the Slingshot website, please refer to the “How to Use the SlingshotWebsite” document found on the RavenHelp.com Knowledgebase.SettingsOnce you have logged into your account, you can adjust some settings byselecting Preferences in the top right corner of the screen. The selected units willapply to the UHarvest reports.Last Updated: 10/1/151
NavigationThe Slingshot Online portal has three primary navigation categories: Home,Manage, and Share. These three categories are available in tabs at the top ofalmost every screen.Home TabSelecting the Home tab will take you directly to the Home screen. The Homescreen contains the following information:List of Slingshot Field Hubson the AccountMap of Slingshot Field Hub LocationsList of Recently Uploaded FilesThe Home screen only shows the 10 most recently uploaded files. Select a filename to view the report. Additional files can be accessed with the File Managerscreen described later in this manual.Manage TabSeveral options are listed under the Manage tab, to include:FilesThis link takes you to the File Manager. All UHarvest jobs and reports are saved inthis location.Download ManagerThis screen is used to simultaneously download multiple files from Slingshot toyour personal computer. See the Download Manager section on page 14 formore information.Remote SupportOperators with a Raven field computer and a Slingshot Field Hub can allowremote access to Raven’s technical support representatives. This does notinclude UHarvest.2UHarvest Slingshot Report User Guide
Share Tab“API and Data Access Control” is an option available under the Share tab. Thisscreen lets you set up and monitor third party access to your Slingshot account.Share GroupsYou can create user groups, add users, and set their permission levels. This alsoshows a list of files that have been shared with the group. See the SharingReports section on page 15 for more details.Shared with MeThis shows other user groups that you belong to. Shared files can be found in theFile Manager.API KeysThe API key is a passcode unique to your account. This passcode lets a thirdparty device (e.g. UHarvest processor) send files to your account over theInternet. See the Uploading Jobs section on page 4 for more details.Last Updated: 10/1/153
Uploading JobsUHarvest jobs can be uploaded to Slingshot from your personal computer orwirelessly from the tractor cab.Uploading WirelesslyIn order to send job files from the UHarvest processor to Slingshot, the processorrequires an internet connection and the unique access key for your Slingshotaccount.1. In your Slingshot account, select API and Data Access Control from the Sharetab.2. In the API Keys section, select the Create button.3. Fill in the required information and check the Enabled box.4. Select the Create button to finish.Note: You can email the access key to yourself.5. In the tractor, verify that the processor is connected to an internet source suchas:a. Slingshot Field Hub (connected to Ethernet Port A on the processor).b. UHarvest/Slingshot Mobile app (see the UHarvest operation manual fordetails).6. Using a tablet or smart phone, open UHarvest and select the Slingshot icon.Enter your access key.Note: The access key will only need to be entered once. Enter the code exactlyas it was shown in your Slingshot account.7. Go to the UHarvest file management screen. On the right side of the screen,select Slingshot as the destination.8. Select the jobs you wish to upload to Slingshot. Export All will send every file.Export Selected will only send the files that are checked.9. A message will confirm the file transfer.Note: Uploads may fail due to an incorrect access key or a lost internet signal.Slingshot will not accept job files with zero loads, causing their transfer tofail.4UHarvest Slingshot Report User Guide
Uploading from a Personal Computer1. Transfer UHarvest job files from the processor to a USB flash drive (seeUHarvest operation manual for details).2. Insert the flash drive into your personal computer.3. The jobs will be found in Grower/Farm/Field folder directories. On the mainlevel of the flash drive, highlight all of the Grower folders.4. Right click on the selected folders and select Send To Compressed(Zipped) Folder.5. Go to the File Manager screen in your Slingshot account.6. Select the Import File button along the top task bar. Choose My Library fromthe dropdown.7. Use the browser to find the zipped folder of UHarvest jobs.8. Select the zipped folder that was just created and then select Open.9. A popup message will confirm the transfer.Last Updated: 10/1/155
File Manager ScreenAny UHarvest jobs that have been uploaded to Slingshot will be found in the FileManager. The File Manager can be accessed by selecting Files from the Managetab or by selecting the File Manager icon from the Home screen.InboxSlingshot saves job files to the Inbox found on the left side of the File Managerscreen. By default, files are saved to folders based on the month and year the filewas uploaded to your account. If another Slingshot user has shared files withyou, those files can be found in the “Shared with Me” folder. You can also createcustom folders which will be found under the File Library folder.Add FolderDefault Folders(Year/Month)“Shared with Me”FolderCustomFoldersTo create custom folders:1. In the list of folders along the left side of the screen, select File Library.2. Select the Add Folder button from the top task bar.3. Name the folder and select the Add button. Repeat as needed.4. To create a sub-folder, select the dropdown arrow behind the name of theparent file you want to use and select Add Sub-Folder.5. Name the new folder and select the Add button. Repeat as needed.If you need to rearrange folders, select the dropdown arrow behind the name ofthe file you want to move and select Move To. Select the name of the folder youwish to use.6UHarvest Slingshot Report User Guide
Table InformationAt the center of the File Manager screen, a table shows the list of files that aresaved in the active Inbox folder.Header BarKeywordSearch BoxesHeader ConfigurationRight click on the table's header to select the columns you wish to show in thetable. For UHarvest users, the Grower/Farm/Field columns are suggested.SearchingTo search for a specific file in the table, you can enter keywords in the blank spacebeneath the header. Enter the keyword into the relevant column and then selectoutside of the search box to apply the filter. Keywords can be entered for multiplecolumns.Moving or Deleting FilesFiles can be moved from a folder. Use the checkboxes at the left side of the tableto select the files you want to move. Select the Move Selected icon from the taskbar and choose the destination folder. If you want to delete the selected file, usethe Delete Selected icon.Move SelectedDelete SelectedImportant: Slingshot handles every upload like a unique file. If the exact sameUHarvest file is uploaded twice, Slingshot will treat them like twoseparate files instead of overwriting the first file. To remove duplicatefiles from your Inbox, use the search functions to find all instances of thefile. Verify which version you want to keep and then delete the unwantedduplicates.Last Updated: 10/1/157
UHarvest Job ReportsSlingshot automatically creates reports for any UHarvest jobs uploaded to theaccount. Selecting the job name from the File Manager will open the report in anew window. This is referred to as the Web View report. From the Web View,you can view job data, edit load information, download different formats of thereport, and begin the process of merging multiple reports together.Web ViewDepending on the information contained within a job, the web view has 3 to 5sections: File Details, Job Report Summary, Details, Comment (optional), andMap (optional). The File Details section at the top of the screen shows the Grower, Farm, Field,Crop, and other information for this job. The Job Report Summary section shows an overview of the job results. Job totals: total weight (lbs or kg), total wet yield (bu or kg), total dry yield (buor kg), and average moisture percentage. Pie charts show the percentage of dry grain (bu or kg) that was assigned toindividual trucks, varieties, and destinations. The Details section shows the individual loads within the job. The loads aresorted chronologically. The Load Cell column shows the grain cart scalecalibration number. The Comment section shows a table of notes that have been added to loads.Notes can be added in the field using a tablet connected to the UHarvestprocessor, or they can be added in Slingshot using the File Editor option. Seethe File Editor section on page 10 for more details. The Map section only appears if the job file contains GPS coordinates. If GPScoordinates are logged for a load, the map will show a balloon for that loadnumber. If multiple loads occurred in the same area, click on the balloon to showadditional load balloons.8UHarvest Slingshot Report User Guide
Select individual balloons to see load details.Download and PDFThe Web View allows the user to open the UHarvest report in multiple formats.Near the top left corner of the screen, there will be links for Download and PDF.PDF Link: Select the PDF link to download a PDF version of the UHarvest report. You willbe prompted to open or save the file. The content of the PDF report is very similar to the Web View report. File Details show the Grower, Farm, Field, Crop, and Year of the job. Job Report Summary shows field totals and pie charts of Truck, Destination,and Variety grain distribution. If any loads contain notes, these comments will be shown after the pie charts. The rest of the PDF will show a table of the loads in the job.Note: Maps are not included in the PDF report.Download Link: After selecting the Download link, you will be prompted to open or save azipped folder of various reports. The .GRC file is the original job file as it was uploaded to Slingshot. The Comma Separated Value (.CSV) file is a copy of the original job report, andit can be opened directly in Microsoft Excel . The .CSV file with the word “edited” in the title contains any changes that theuser made using the Slingshot File Editor feature (described later in themanual).Original UHarvest FileExcel Copy of OriginalExcel File Showing Edited LoadsLast Updated: 10/1/159
File EditorUsers can manipulate job information in Slingshot using the File Editor. To accessthe File Editor, open the Web View for a job and then select the File Editor buttonnear the top right corner of the screen. The File Editor will allow the user to editjob details and add/edit/delete individual loads.To edit load information:1. Select the File Editor button from the top right corner of the Web View reportscreen.2. For the load you wish to edit, select the pencil button next to the load.3. In the editor popup window, edit the information you want to change.4. Select the Save button at the bottom of the popup window.5. Select the Save & View File button to apply the changes to the report, or selectCancel to disregard any changes.To delete a load:1. Select the File Editor button from the top right corner of the Web View reportscreen.2. Select the red X ( ) next to the load you wish to delete. You can also use thecheck boxes to select multiple loads, and then select the Delete Selectedbutton.3. Confirm your intention to delete the load(s).4. Select Save & View File to apply the changes to the report, or select Cancel todiscard any changes.To create a new load:1. Select the File Editor button from the top right corner of the Web View Reportscreen.2. Select the Add Custom Load button.3. In the popup window, enter the information for the new load.10UHarvest Slingshot Report User Guide
Note: The window will automatically populate with the exact same informationfrom the last load in the report, but any of those values can be changed forthe custom load.4. Select the Save button at the bottom of the popup window.5. Select Save & View File to apply the changes to the report, or select Cancel todiscard any changes.6. The new load will use the date and time from when it was created and will beadded to the end of the report.Note: All user entered loads will be highlighted in red in the Web View and thePDF file.Merged ReportsUHarvest jobs can be grouped together to make merged reports. If two or moregrain carts were used to harvest a field, all of these UHarvest jobs can be mergedinto a consolidated report for the field. Multiple fields could be merged togetherinto a full harvest summary. You can merge any combination of individual jobs andpreviously merged reports.To create a merged report:1. Open the Web View for one of the individual jobs that will be included in the finalmerged report.2. Near the top right corner of the screen, select the Create Merged Reportbutton.3. A popup window will appear with a list of all UHarvest reports (includingpreviously merged reports). Use the check boxes to select the files you wish tomerge.Last Updated: 10/1/1511
Note: The blank spaces under the table’s header can be used to search forspecific jobs.4. Select the Merge Selected button at the top right corner of the screen.5. The next screen is used to select the loads to include in the merged report. Atthe top of the screen, enter a File Name for the merged report.12UHarvest Slingshot Report User Guide
6. Select the Merge All Loads button to copy every load from every input file. Theloads will be copied to the Details section of the screen. To pick and chooseindividual loads, refer to steps 7 through 9.7. The Input Files section of the screen has a tab for every file that was selectedfor merger. For each tab, use the check boxes to select the loads you wish toinclude in the report.8. Select the Add Selected button to copy the loads into the new report. After theloads have been added, they will be listed in the Details section of the screen.9. Repeat the load selection process for each input file.10.Review the list of loads in the Details section. Individual loads can be added,edited, or deleted.Note: If a load is created or edited, the change will only appear in the merged fileand will not be reflected in the original source file. It is recommended thatall load additions or revisions be made at the individual report level prior tomerging.11.Verify the Grower, Farm, Field, Crop, and Year information at the top of thescreen. By default, these items will be populated to reflect the characteristics ofthe input files. However, the user can enter custom values instead.12.Select the Save & View File button to finish the new report.The merged report will be automatically saved into the File Manager based on themonth and year the report was created. A Web View of the report can be openedfrom the File Manager. A merged report will use tables to show grain distribution by Truck, Variety,Destination, Field name, and Grain Cart ID. The Grain Cart ID is the 4-charactercode from the UHarvest processor. Individual loads are listed chronologically. A PDF version of the report can be downloaded by selecting the PDF link nearthe top left corner of the screen. After a merged report has been created, loads cannot be added, edited, ordeleted from the report.Last Updated: 10/1/1513
Download ManagerThe Download Manager can be used to download UHarvest files from Slingshot toyour PC. Multiple files can be downloaded simultaneously. Once files have beensent to the Download Manager, they will stay there until the user downloads themor removes them from the queue. This screen can be found under the Managetab.To download UHarvest files using the Download Manager:1. Go to the File Manager.2. Use the check boxes to select the reports you want to download.3. In the task bar, select the Download Selected button.4. Choose the file format you wish to download and click on the correspondingsymbol. “Original” is the UHarvest .GRC file. “Shape” is not valid for UHarvest.5. Select the Download button.6. Select Go to proceed to the Download Manager screen or select Add MoreFiles to go back to the File Manager.7. In the Download Manager, review the list of files in the queue.Use the red X ( ) to delete files from the list.8. Select Download All.9. You will be prompted to open or save a zipped folder containing all of thedownloaded files.14UHarvest Slingshot Report User Guide
Sharing ReportsUHarvest reports can be shared with other Slingshot users. This process must beinitiated by the account owner.To share your UHarvest reports with another Slingshot user:1. Go the API and Data Access Control section under the Share tab.2. In the Share Groups section, select the Create button.3. Enter a name for the group that will be created, and select the group owner.4. Select the Create button to save the new group.5. In the Share Groups section, select the magnifying glass icon ( ) behind thegroup name.6. Select the Add button.7. Enter the Slingshot user name for the person you want to view your data, andthen select the Add button.8. The other person will receive an email invitation to join your Share Group. Youcannot share reports until this person has accepted the invitation.Note: If you belong to Share Groups that were not created by you, the list ofthese groups will be shown in the Shared With Me section.9. Go to the File Manager and use the check boxes to select the files you wish toshare.10.From the task bar, select the Share Selected icon.Last Updated: 10/1/1515
11.In the popup window, select a Share Group.12.Use the check boxes to set permission levels for the group. View: The recipient can only view the shared report. Update: The recipient can edit the shared report. Delete: The recipient can delete the file from his File Manager. Send File: The recipient can send the file to additional users outside of yourown Share Group.13.Select the Grant Permission button.After a file has been shared with a group, you can edit permissions or remove theshared file from the group.1. Go the API and Data Access Control screen under the Share tab.2. In the Share Groups section, select the magnifying glass ( ) behind the groupname.3. A popup window will show a list of group members and a list of files shared withthe group.4. Select the red X ( ) button to remove a member from the group or to removea file from the group’s access.5. To change the permission level for a file, select the pencil icon ( ) behind thefile name.16UHarvest Slingshot Report User Guide
8. Select the jobs you wish to upload to Slingshot. Export All will send every file. Export Selected will only send the files that are checked. 9. A message will confirm the file transfer. Note: Uploads may fail due to an incorrect access key or a lost internet signal. Slingshot will not accept job files with zero loads, causing their transfer .
![[Type here] BUG OUT BAG CHECKLIST - Skilled Survival](/img/14/bug-out-bug-out-bag-checklist-v3.jpg)
