Transcription
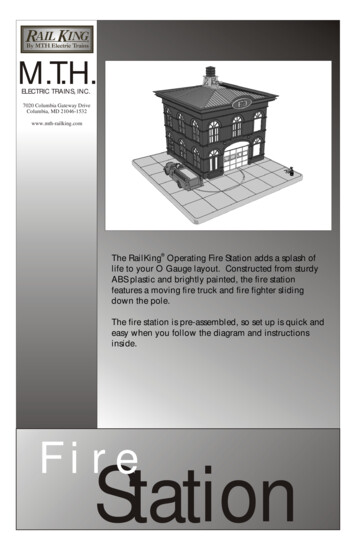
M.T.H.ELECTRIC TRAINS, INC.7020 Columbia Gateway DriveColumbia, MD 21046-1532www.mth-railking.comThe RailKing Operating Fire Station adds a splash oflife to your O Gauge layout. Constructed from sturdyABS plastic and brightly painted, the fire stationfeatures a moving fire truck and fire fighter slidingdown the pole.The fire station is pre-assembled, so set up is quick andeasy when you follow the diagram and instructionsinside.FireStation
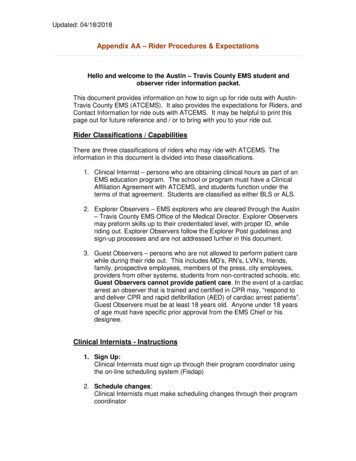
WIRING INSTRUCTIONSThe RailKing Fire Station is made up of three components: the fire stationbuilding and base, the fire truck, and the activation button. Before youplace the fire station on the layout, you must wire the station to theactivation button and power source. In order to connect power to eachcomponent, the six (6) enclosed wires must be connected to the wiring postslocated on the underside of the fire station and the activation button. Wiresfrom ports A-C control the fire truck operation. Wires from ports D-E controlthe lights. Follow the diagram (Fig 1) shown to make the correctconnections.Strip Z-wire cable harnessinsulation to reveal 1/4” ofbare wire.A Connect Red wire totransformer AC andconnect Black wire toactivation buttonB Connect Black wire totransformer groundC Connect Black wire toactivation buttonD Connect Red wire totransformer ACE Connect Black wire totransformer groundABFig 1. Wiring DiagramCDE
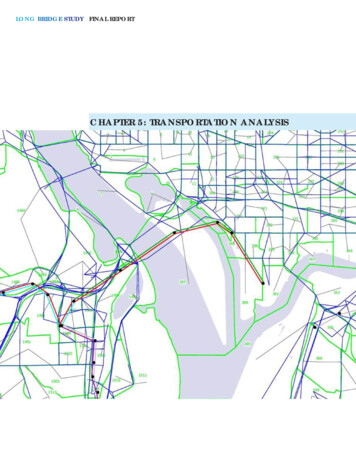
Final Touches: To protect some of the trim from breaking during transit, M.T.H.has packaged it separately, in a small plastic bag. To complete set up, insert thesilver siren into the hole on the top of the fire house and insert the chromeplated light housing into the small holes at the back of the fire truck. You maychoose to set up the Dalmatian and fire hydrant wherever you want or not use itat all.Chrome Plated Light HousingDalmatianHydrantSirenOperating Instructions: Once the fire station is wired to receive a 14-20 voltminimum power supply from the transformer and the transformer is turned on,simply press the activation button to start the fire station sequence.In order to get the fire truck into the fire house, you must press the activationbutton to begin the cycle. Once the small tab that will carry the truck along itstrack has exited the fire house and come to a stop, place the truck onto the tab.When you play the return sequence, the truck will be taken into the fire house.In the beginning sequence, the red warning lights above the garage door willbegin blinking. Then the door will open, as a light comes on and a fire fighterslides down the pole in the front window. Next, you will hear the fire truck startand see it pull out of the station. The truck will leave the bay completely beforemaking a right hand turn and coming to a complete stop. After the truck hasstopped, it will remain stationary until the operator pushes the activation buttonto return it to the station.When you press the activation button a second time, the truck will start up androll backward into the fire station bay. Once it is in the bay, the motor soundwill shut off and the bay door will close, concluding the operation.You can stop the motion and sound at any time by turning the power off or bypressing the transformer's "Direction" button. Once the power is returned, thetruck will return to its starting position without sound effects.
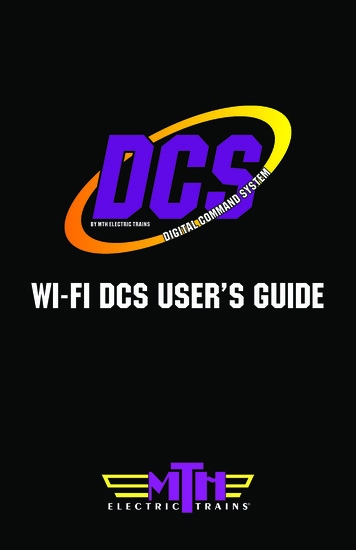
Replacing the Light Bulbs: There are several easy-to-change light bulbs locatedin the fire station. Follow the instructions below to change them.1. Remove the fire truck from the station.2. Turn the building and base upside down, propping it carefully, and removethe ten (10) screws from the base cover. Then remove the three (3) gearscrews clustered at the center of the base (See Fig. 2)3. Carefully remove the base cover.4. Taking careful note of how the gear fits and remove it.5. Remove the ten (10) housing screws (See Fig. 2)6. Carefully turn the fire station back over and tilt the housing away from thebase.7. Replace the lights bulbs as described below (See Fig. 3): Building Lights: Twist the light bulb counterclockwise to remove it.Push the replacement bulb in and twist it clockwise. Fire Pole Light: Pull the light out and gently snap the new one in toreplace it (like Christmas tree lights).Reassemble in the opposite order, taking care to align the gear and its screwholes before replacing the bottom of the base.You can obtain replacement bulbs directly from the M.T.H. parts department(phone: 410-381-2580; e-mail: parts@mth-railking.com; mail: 7020 ColumbiaGateway Drive, Columbia MD 21046-1532).
Remove threegear screwsRemove theseRemove threeove threegear screws ten screwsscrewsRemove the tenhousing screwsmoving the two sets of ten screws to reveal the inside of the buRemove threegear screwsmovingthe setstwoofsetsten screwsto revealthe insidethe bung the twotenofscrewsto revealthe insideof theofbuildinFig 2. Removing the two sets of ten screws to reveal the inside of the buildingBuildingLightsFig 3. Locations of the interior bulbs of the Fire StationFire PoleLight
CAUTION: ELECTRICALLY OPERATED PRODUCT:Not recommended for children under 8 years of age without adult supervision. Aswith all electric products, precautions should be observed during handling and use toreduce the risk of electric shock.WARNING: When using electrical products, basic safety precautions should befollowed including the following: Read this manual thoroughly before using this device. M.T.H. recommends that all users and persons supervising use examine the unitperiodically for conditions that may result in the risk of fire, electric shock, or injuryto persons, such as damage to the primary cord, plug blades, housing, output jacksor other parts. In the event such conditions exist, the unit should not be used untilproperly repaired. This unit is intended for indoor use. Do not use if water is present. Serious injury orfatality may result. Do not operate with damaged wires or clips. Do not use this unit for other than its intended purpose. This unit was designed tooperate with any AC or DC output toy train transformer. See the transformer'soperating instructions for more operating and safety information.
Notes:
How to Get Service Under the Terms of the Limited One-Year WarrantyFor warranty repair, do not return your product to the place of purchase. Instead, follow theinstructions below to obtain warranty service, as our dealer network is not prepared to servicethe product under the terms of this warranty.1. First, write, call or FAX M.T.H. Electric Trains, 7020 Columbia Gateway Drive, Columbia,MD 21046, (Tel: 410-381-2580; FAX : 410-423-0009; e-mail: service@mth-railking.com),stating when it was purchased and what seems to be the problem. You will be given a returnauthorization number to assure that your merchandise will be properly handled upon its receipt.2. CAUTION: Make sure the product is packed in its original factory packaging including itsfoam and plastic wrapping material so as to prevent damage to the merchandise. The shipmentmust be prepaid and we recommend that it be insured. A cover letter including your name,address, daytime phone number, e-mail address (if available), Return Authorization number,a copy of your sales receipt and a full description of the problem must be included to facilitatethe repairs. Please include the description regardless of whether you discussed the problemwith one of our service technicians when contacting M.T.H. for your Return Authorizationnumber.3. Please make sure you have followed the instructions carefully before returning anymerchandise for service.Limited One-Year WarrantyAll M.T.H. products purchased from an Authorized M.T.H. Train Merchant are coveredby this warranty.See our website at www.mth-railking.com or call 1-888-640-3700 to identify an AuthorizedM.T.H. Train Merchant near you.M.T.H. products are warrantied for one year from the date of purchase against defects inmaterial or workmanship, excluding light bulbs and traction tires. We will repair or replace (atour option) the defective part without charge for the parts or labor, if the item is returned toM.T.H. Electric Trains within one year of the original date of purchase. This warranty does notcover damages caused by improper care, handling, or use. Transportation costs incurred by thecustomer are not covered under this warranty.Items sent for repair must be accompanied by a return authorization number, a description of theproblem, and the original sales receipt from an Authorized M.T.H. Train Merchant, whichgives the date of purchase. Call 410-381-2580, fax 410-423-0009, or e-mail the ServiceDepartment at service@mth-railking.com to obtain a return authorization number.This warranty gives you specific legal rights, and you may have other rights that vary from stateto state.Service DepartmentM.T.H. Electric Trains7020 Columbia Gateway DriveColumbia MD 21046-1532
7020 Columbia Gateway Drive Columbia, MD 21046-1532 www.mth-railking.com The RailKing Operating Fire Station adds a splash of life to your O Gauge layout. Constructed from sturdy . First, write, call or FAX M.T.H. Electric Trains, 7020 Columbia Gateway Drive, Columbia, MD 21046, (Tel: 410-381-2580; FAX : 410-423-0009; e-mail: service@mth .