Transcription
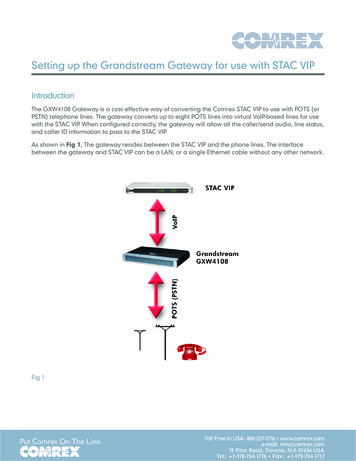
Setting up the Grandstream Gateway for use with STAC VIPIntroductionThe GXW4108 Gateway is a cost-effective way of converting the Comrex STAC VIP to use with POTS (orPSTN) telephone lines. The gateway converts up to eight POTS lines into virtual VoIP-based lines for usewith the STAC VIP. When configured correctly, the gateway will allow all the caller/send audio, line status,and caller ID information to pass to the STAC VIP.As shown in Fig 1, The gateway resides between the STAC VIP and the phone lines. The interfacebetween the gateway and STAC VIP can be a LAN, or a single Ethernet cable without any other network.Fig 1Put Comrex On The Line.Toll Free in USA: 800-237-1776 www.comrex.come-mail: info@comrex.com19 Pine Road, Devens, MA 01434 USATel: 1-978-784-1776 Fax: 1-978-784-1717
Setup of the gateway involves two steps:1) Set up the STAC VIP to register with the gateway2) Configure the gateway correctly to convert the calls from POTS-VoIP and back againThe configuration of FXO gateways can be complex and confusing. This guide will take you step-by-stepthrough the settings that work in our tests. We can’t offer support for modes or settings not outlined in thisguide.Because the STAC VIP has two Ethernet ports, there are several options in how to configure the way thenetwork is designed between the STAC VIP and the gateway. We will outline two of them. In the first, thegateway is attached to the same LAN used for the Web-based Interface and the control surfaces (theprimary Ethernet). This is shown in Fig 2.Fig 2This is the simplest configuration since only one Ethernet port needs to be configured on STAC VIP.
Alternately, you could dedicate the secondary Ethernet port to connect only with the gateway, and usethe primary for control surfaces and the Web-based Interface. This has the advantage of keeping all theVoIP traffic off your LAN. In fact, as shown in Fig 3, a single Ethernet cable can be used as the networkbetween the devices.If you intend to use the second scenario, consult the user manual on how to enable the secondaryEthernet port and configure it for a static address (these functions are performed on the videokeyboard-mouse interface on the rear panel of STAC VIP). You will also need to configure the secondaryEthernet port for SIP operation, and assign the telephone accounts used to the secondary port. This is allexplained in the user manual.Fig 3
Part 1: Configure STAC VIPYou’ll need to start with two pieces of information: The static IP address of the STAC VIP and the staticIP address you intend to use for the gateway. Both devices need a unique static IP address to functionproperly in this configuration. If you do not intend to use a LAN between STAC VIP and the gateway, youcan make up these addresses, (e.g. 10.10.0.2, 10.10.0.3) as long as they are outside the subnet of theprimary Ethernet port.If you’ve previously configured STAC VIP, you already know how to get to the Web-based Configurationpage. If you haven’t, familiarize yourself with the process in the user manual and access the Configpage at the primary IP address of the STAC VIP (default credentials are username: admin password:comrex).You will now create new SIP providers. You will need to create one SIP Gateway Provider for each lineof the gateway device you wish to use. In this example, we are using six lines so we create six providers.Select Line Configuration then VoIP Providers.Click Add Provider.Select SIP Gateway Device.Fig 4
Configure the name and color as you wish. Refer to the STAC VIP user manual if you need help withthis. In the Account Information section of each provider, note the pre-entered Username (e.g.“external-59”) and assign a password. The username will be needed along with the password toconfigure your gateway lines. Generally, it is fine to use the same password for all lines that you areconfiguring in the gateway.In the SIP Settings section, set the IP address to the static address you have chosen for your gateway.Also, take note of the Gateway Binding Port.The final two settings are found under the Advanced Options within the Gateway Setup menu. Toaccess these choose Show Advanced at the bottom of the menu.First, under General Settings, is an option for Network Port Binding. This setting is defaulted to use thePrimary Ethernet port for all the gateway accounts. If you plan to connect your Grandstream gateway tothe secondary Ethernet port (e.g. to use this port exclusively for the gateway) then change this setting toSecondary.Finally, for the GrandStream device to operate properly when making outgoing calls, you need to set aDial Prefix. This option is shown under Advanced Settings in the SIP Gateway configuration screen.By default, the GrandStream needs a dial prefix of 99x where “x” is the POTS line number 1-6. For line1, for example, you would enter 991. Once you have created one SIP Gateway Provider for each line,your VOIP Providers configuration screen should look something like Fig 5.Fig 5
Part 2: Configure GXW4108 GatewayLike STAC VIP, the gateway is configured via a web interface. Also like the STAC VIP, the factory networksetting for the gateway is DHCP. You will need to boot the device on your LAN, use the GrandstreamWindows utility to find it, and open the main configuration page from a browser. These steps areoutlined in the Grandstream manual.If your gateway is not factory new, it’s a good idea to reset it to factory settings. To do this, turn the uniton and allow it to boot. Hold down the reset button (on the rear of the unit next to the power jack – youneed a pointy object to press the button) for about 10 seconds. After a minute or so, the unit will rebootwith factory default settings.When you open the main config page, use the password admin.Fig 6The latest version of the gateway firmware opens to an auto-test page for phone line parameters. This isimportant to do, but we’ll skip it for now so we can focus on the VoIP settings. Click the Accounts tab onthe top banner to get started. Select User Account on the left-hand pane.Fig 7
Enter in the credentials for each line of the gateway that you are going to use. These credentials arethe ones noted from the STAC VIP SIP Gateway configuration process. In this case, we will configuresix lines as SIP gateways for STAC VIP. Be sure to enter the password that you chose into the AuthenPassword field. Note that it does not show once it has been set, which is why it’s empty in the previousscreenshot.Be sure to hit Save at the bottom of the screen when you are done making settings on this tab.Now, jump to the FXO Lines tab and select Settings in the left-hand pane.Under the category labeled FXO Termination, find the Silence Timeout field. Most users will not wantthe call to terminate on silence ever. Change this value to 65535, the longest value possible. (If you wantthe POTS lines to “hang up” after a period of silence, put the value here in seconds).Staying on the FXO Lines tab, select Dialing in the left-hand pane.Fig 8These settings need to be made to enable outgoing calls to work properly.Wait for Dial-Tone should be set to ch1-8:Y;Stage Method(1/2) should be set to ch1-8:1;Be sure to hit Save at the bottom of the screen when you are done making settings on this tab.
For incoming calls to work properly, set the following options. Under Settings tab, select ChannelsSettings and set the User ID (under Calling to VoIP header) as 64;ch7-8:;Where “external-59”, “external-60”, etc., is the username given by the STAC VIP.Note that you will need to enter the STAC VIP SIP Gateway username for each of the assigned lines.Your usernames may not exactly match the line numbers, and may not be sequentially assigned,depending whether you deleted or added additional providers on the STAC VIP.Also, you will need to change the SIP Destination Port to the 5143;ch6:5144;ch7-8:5060;Where “5139”, “5140”etc., are the “Binding Gateway Ports” from the STAC VIP.Fig 9NOTE: The last part of the configuration string tells the gateway in this case that channels 7-8 are notused (empty user ID). The GrandStream gateway seems particularly fussy about having all channelsconfigured, so you will need to specify an empty user ID (and dummy port info) for any lines you are notusing, following this syntax.
As an example, if you were only configuring five lines, the end of the User ID string would readch6-8:; and the end of the SIP Destination Port string would read ch6-8:5060;For more details, see the GrandStream gateway manual or consult with their support.Be sure to hit Save at the bottom of the screen when you are done making settings on this tab.Next, in the Accounts tab, select Account 1, then General Settings page of the gateway configuration.Fig 10You will need to enter the static IP address followed by one of the Gateway Binding Ports of your STACVIP unit (with a “:” in between the IP address and the Gateway Binding Port) into the SIP Server andOutbound Proxy fields. Optionally, you can enter an Account Name, such as STAC VIP.Be sure to hit Save at the bottom of the screen when you are done making settings on this tab.
Next, select SIP Settings on the left hand pane. Change the option called Unregister On Reboot from“No” to “Yes”.Fig 11Be sure to hit Save at the bottom of the screen when you are done making settings on this tab.Finally, select the Networks tab and look under Basic Settings. Here you will change the IP address tostatic, and enter the static IP address and other network info of the gateway, including Subnet Mask,Default Router and DNS entries.
Fig 12Once you enter in your IP settings, be sure to hit Save at the bottom of the screen. The unit will promptyou to reboot.NOTE: The web page of the gateway will come up on the new IP address after reboot. If youhave configured the gateway to use a network on the secondary Ethernet port of the STAC VIP,move it there before reboot.
Log back into the gateway, and click on the Status tab. You should see a screen similar to below.Fig 13If the gateway is properly registering with the STAC VIP, you should see Yes under the registration statusfor each configured line.Under the Status tab, select Network Status, you should see a screen similar to below.Fig 14
Also, if you have the FXO ports connected to active telephone lines, you should see a status for each lineunder PSTN Networks status near the bottom of the screen.Now is a good time to run the “Auto-Detect” tests provided by the gateway when you first log in. Thesetests can be configured to automatically adapt the gateway’s internal settings for volume, impedanceand caller ID aspects of your phone lines. This is particularly important on lines outside North America, asthe defaults of the Grandstream gateway are for North American phone lines.On the STAC VIP, you can check the provider status to see that the gateway has properly registered.Fig 15Be sure to assign your providers to the appropriate lines in your STAC VIP configuration. Generally, ingateway configurations, it’s best to maintain a “1 to 1” configuration throughout the system to reduceconfusion. That is to say, STAC VIP line 1 should be mapped to gateway port 1, and so on, wheneverpossible.
Fig 16Now you can test your gateway lines. First, test calls coming into the STAC VIP by dialing one of thetelephone numbers for a line connected to the gateway.You should see ringing state on the STAC VIP, and you should be able to answer calls and put them to airas you would expect.Fig 17
Next, test outgoing calls by clicking Call on one of the assigned lines. Enter a phone number withappropriate area codes and other dialing digits necessary.Fig 18When you click Send, you should see the proper line status LED light up on the gateway, and the callshould be placed after several seconds. If it looks like the wrong line was used for the call, check thatyou set the dialing prefix properly in the STAC VIP SIP Gateway configuration, and that you are runningversion 1.0-p7 or newer firmware on your VIP.
Toll Free in USA: 800-237-1776 www.comrex.com e-mail: info@comrex.com 19 Pine Road, Devens, MA 01434 USA Tel: 1-978-784-1776 Fax: 1-978-784-1717 Setting up the Grandstream Gateway for use with STAC VIP Introduction The GXW4108 Gateway is a cost-effective way of converting the Comrex STAC VIP to use with POTS (or PSTN) telephone lines.