Transcription
M4200 and M4300 Series ProSAFEManaged SwitchesSof tware Setup ManualSof tware Version 12.0.2July 2016208-10803-03350 East Plumeria DriveSan Jose, CA 95134USA
M4200 and M4300 Series ProSAFE Managed Switches Software Setup ManualSupportThank you for purchasing this NETGEAR product. You can visit www.netgear.com/support to register your product, get help,access the latest downloads and user manuals, and join our community. We recommend that you use only official NETGEARsupport resources.ConformityFor the current EU Declaration of Conformity, visit http://kb.netgear.com/app/answers/detail/a id/11621.ComplianceFor regulatory compliance information, visit http://www.netgear.com/about/regulatory.See the regulatory compliance document before connecting the power supply.Trademarks NETGEAR, Inc., NETGEAR and the NETGEAR Logo are trademarks of NETGEAR, Inc. Any non-NETGEAR trademarks areused for reference purposes only.Revision HistoryPublication Part NumberPublish DateComments208-10803-03July 2016 208-10803-02January 2016 208-10803-01December 2015Changed the subnet over which you can access theEthernet network port to 169.254.0.0/16.Changed the subnet over which you can reach theout-of-band (OOB) port to 192.168.0.0/16 and changed thedefault IP address of the OOB port to 192.168.0.239.Updated the subnet mask information for access to anEthernet network port.Added the subnet and subnet mask information for accessto the OOB port.Original publication2
ContentsChapter 1Get StartedAvailable Publications . . . . . . . . . . . . . . . . . . . . . . . . . . . . . . . . . . . . . . . . . . . . . . . . . 5Overview of the Switch Access Options . . . . . . . . . . . . . . . . . . . . . . . . . . . . . . . . . 5Overview of the Web Management Interface . . . . . . . . . . . . . . . . . . . . . . . . . . . . 6Start the Switch and Observe the Power-On Self-Test . . . . . . . . . . . . . . . . . . . . 6Prepare a Terminal if You Intend to Use a Console Port. . . . . . . . . . . . . . . . . . . . . 7Prepare a Computer With Terminal Emulation Software . . . . . . . . . . . . . . . . . 7Access the Switch Through a Console Port. . . . . . . . . . . . . . . . . . . . . . . . . . . . . 8Set Up or Find the Switch IP Address Configuration . . . . . . . . . . . . . . . . . . . . . . . 8Use the Web Management Interface to Set Up theIP Address Configuration . . . . . . . . . . . . . . . . . . . . . . . . . . . . . . . . . . . . . . . . . . . . 9Use a Console Port and the ezconfig Utility to Set Up theIP Address Configuration . . . . . . . . . . . . . . . . . . . . . . . . . . . . . . . . . . . . . . . . . . . 12Use a Console Port and the CLI to Set Up the IP Address Configuration . . . 17Find the IP Address Configuration Assigned by a DHCP Server . . . . . . . . . . 18Access the Web Management Interface When You Know the IP Address . . . . 18Configure an SNMPv3 User Profile Using the Web Management Interface. . . 19Chapter 2Use the Auto Install ConfigurationAuto Install Configuration Concepts. . . . . . . . . . . . . . . . . . . . . . . . . . . . . . . . . . . .Switch IP Address Assignment Concepts . . . . . . . . . . . . . . . . . . . . . . . . . . . . . . . .TFTP IP Address and Configuration File Name Concepts. . . . . . . . . . . . . . . . . . .About Conflicting TFTP Server Configurations . . . . . . . . . . . . . . . . . . . . . . . . . .About DNS Server Requirements . . . . . . . . . . . . . . . . . . . . . . . . . . . . . . . . . . . . . .About Obtaining a Configuration File . . . . . . . . . . . . . . . . . . . . . . . . . . . . . . . . . . .Host-Specific Configuration File . . . . . . . . . . . . . . . . . . . . . . . . . . . . . . . . . . . .Default Network Configuration File . . . . . . . . . . . . . . . . . . . . . . . . . . . . . . . . . .About Obtaining an Image From a TFTP Server Through Auto Install . . . . . . . .Configure Auto Install . . . . . . . . . . . . . . . . . . . . . . . . . . . . . . . . . . . . . . . . . . . . . . . .Configure Auto Install Through the CLI . . . . . . . . . . . . . . . . . . . . . . . . . . . . . . .Configure Auto Install Through the Web Management Interface . . . . . . . . .Monitor and Complete the Auto Install Process . . . . . . . . . . . . . . . . . . . . . . . .Event Logging for the Auto Install Process . . . . . . . . . . . . . . . . . . . . . . . . . . . .Chapter 32222222323232324252626272829Register Your SwitchRegister Your Switch . . . . . . . . . . . . . . . . . . . . . . . . . . . . . . . . . . . . . . . . . . . . . . . . . 323
1.1Get StartedThis manual describes software configuration tasks that are most commonly used when youinstall a new NETGEAR M4200 or M4300 series ProSAFE managed switch.Use this manual to perform the initial configuration of your switch after you install it as describedin the hardware installation guide. The installation guide that comes with your switch provides anextract of the information that is presented in this software setup manual.This chapter includes the following sections: Available Publications Overview of the Switch Access Options Overview of the Web Management Interface Start the Switch and Observe the Power-On Self-Test Prepare a Terminal if You Intend to Use a Console Port Set Up or Find the Switch IP Address Configuration Access the Web Management Interface When You Know the IP Address Configure an SNMPv3 User Profile Using the Web Management InterfaceNote: For more information about the topics covered in this manual, visit thesupport website at netgear.com/support.Note: Firmware updates with new features and bug fixes are madeavailable from time to time at downloadcenter.netgear.com. Someproducts can regularly check the site and download new firmware, oryou can check for and download new firmware manually. If thefeatures or behavior of your product does not match what isdescribed in this manual, you might need to update your firmware.4
M4200 and M4300 Series ProSAFE Managed Switches Software Setup ManualAvailable PublicationsA number of other publications are available for your switch at downloadcenter.netgear.com,including the following publications: The installation guide for your switch:-Installation NETGEAR ProSAFE Managed Switches, M4200 Series-Installation NETGEAR ProSAFE Managed Switches, M4300 SeriesThe hardware installation guide for your switch:-ProSAFE Managed Switch Series M4200 Hardware Installation Guide-ProSAFE Managed Switch Series M4300 Hardware Installation GuideM4200 and M4300 Series ProSAFE Managed Switches CLI Command ReferenceManualSee this manual for information about the command structure and CLI commands thatyou can use to configure the switch. The manual provides CLI descriptions, syntax, anddefault values. M4200 and M4300 Series ProSAFE Managed Switches Software Administration Manual M4200 and M4300 Series ProSAFE Managed Switches User ManualOverview of the Switch Access OptionsTo configure the switch, you can access it through any of the Ethernet network ports,out-of-band (OOB) port (also referred to as the service port), or one of the console ports: Ethernet network port. Use an Ethernet network connection to access either the webmanagement interface or the CLI through an SSH or Telnet utility. You can use either thedefault IP address of the switch or a custom IP address. For you to access the switchover a custom IP address, you first must configure the IP address, or, if you use a DHCPserver, find the DHCP-assigned IP address, which for an Ethernet network port isreferred to as the management address. OOB port. Use an Ethernet out-of-band (OOB) connection to access either the webmanagement interface or the CLI through an SSH or Telnet utility. You can use either thedefault IP address of the switch or a custom IP address. For you to access the switchover a custom IP address, you first must configure the IP address, or, if you use a DHCPserver, find the DHCP-assigned IP address, which for the OOB port is referred to as theservice port address. Console port. Use the CLI over either a computer with a Windows, MAC, or Linuxoperating system and a terminal emulation program or a VT100/ANSI terminal. Toconfigure the management address and the service port address, you can use either theCLI or the ezconfig tool.For more information about these access and configuration options, see Set Up or Find theSwitch IP Address Configuration on page 8.Get Started5
M4200 and M4300 Series ProSAFE Managed Switches Software Setup ManualOverview of the Web Management InterfaceTo access the switch through the web management interface, use the latest version of a webbrowser such as Google Chrome, Mozilla Firefox, or Microsoft Internet Explorer.The web management interface and CLI differ in various ways. For example, on the webmanagement interface, you can display the entire forwarding database. The CLI displaysonly 10 entries starting at specified addresses.The switch accommodates two types of users: administrative users and guests. Anadministrative user can configure the switch for network application, but a guest cannot. Theguest can only view the settings and status of the network. By default, both users can log inwithout a password. We strongly recommend that you create a unique password for theadministrative user before placing the switch into production.The web management interface lets you configure and use the following types of features: System. Configuration and status information for system features and services such asthe timer, DNS server, IP address, and system resource usage Switching. Features that relate to Layer 2 services such as VLANs, link aggregation,Spanning Tree Protocol, port configuration, and the MAC address table Routing. Layer 3 services such as VLAN routing, port routing, and protocols such as RIP,OSPF, VRRP, and other protocols QoS. Quality of Service features such as DiffServ and CoS queue assignment Security. Security services such as 802.1x port authentication, traffic control with variousforwarding controls, and ACLs Monitoring. Ethernet port statistics, various system logs, and port mirroring Maintenance. Services to perform a firmware upgrade, to save the configuration, and toperform a backup of the configurationStart the Switch and Observe the Power-On Self-TestWhen you supply power to the switch, the switch goes through a power-on self-test (POST).The POST runs every time that the switch initializes and checks the switch hardware beforethe switch boots. If the POST detects a critical problem, the startup procedure stops. Theboot process runs for approximately 60 seconds.If POST passes successfully, a valid executable image loads into RAM. If you connect a localterminal to the switch, POST messages display on the terminal and indicate test success orfailure.Get Started6
M4200 and M4300 Series ProSAFE Managed Switches Software Setup ManualPrepare a Terminal if You Intend to Use a Console PortIf you intend to use one of the console ports for initial configuration of the switch, connect acomputer with a Windows, MAC, or Linux operating system and a terminal emulationprogram or a VT100/ANSI terminal to one of the console ports on the switch.You can use one of the following console ports on the switch: Mini USB console port. The switch comes with a mini USB to USB cable, which you canuse to connect the mini USB console port on the switch to a USB port on a computer witha Windows, MAC, or Linux operating system or a VT100/ANSI terminal.Note: To use the mini USB port, you must install the USB driver on thecomputer. (The Windows USB driver is on the resource CD.) RJ-45 RS232 console port. The RJ-45 RS232 serial port uses the following settings:-Baud rate. 115,200 bps-Data bits. 8-Parity. None-Stop bit. 1-Flow control. NoneYou can use the console cable that comes in the product package to connect the switch’sRJ-45 RS232 console port to the DB9 port on the computer or VT100/ANSI terminal.Prepare a Computer With Terminal Emulation SoftwareIf you use a computer with a Windows, MAC, or Linux operating system instead of aVT100/ANSI terminal, configure the terminal emulation software: On a computer with a Windows operating system, you can use HyperTerminal or TeraTerm. On a computer with a MAC operating system, you can use ZTerm. On a computer with a Linux operating system, you can use TIP.To configure the terminal emulation software:1. Select one of the serial ports to connect to the console.2. Set the data rate, format, and flow control:- Baud rate. 115,200 bps-Data bits. 8-Parity. None-Stop bit. 1-Flow control. None3. Under Properties, select the correct mode.4. Select terminal keys.Get Started7
M4200 and M4300 Series ProSAFE Managed Switches Software Setup ManualAccess the Switch Through a Console PortYou can use a locally or remotely attached terminal to access the switch through a consoleport. To access the switch through a console port:1. Connect a computer with a Windows, MAC, or Linux operating system and a terminalemulation program or a VT100/ANSI terminal and open the appropriate COM port.When the terminal interface initializes, the login user prompt displays.2. Enter your user name and password.The default user name is admin and the password is blank (that is, do not enter apassword).You can now access the switch with its default configuration.For information about how to perform the initial configuration of the switch through eitherthe CLI or the ezconfig tool, see the following sections: Use a Console Port and the CLI to Set Up the IP Address Configuration on page 17 Use a Console Port and the ezconfig Utility to Set Up the IP Address Configuration onpage 12Set Up or Find the Switch IP Address ConfigurationBefore you can use the switch in your network, you must set up its IP address configurationor find the DHCP-assigned IP addresses. The IP address configuration includes the IPaddress, subnet mask, and gateway of the management interface and the IP address, subnetmask, and gateway of the OOB port.For information about which ports you can use to access the switch, see Overview of theSwitch Access Options on page 5.Set up the initial IP address configuration of the switch or find the DHCP-assigned IPaddresses by using one of the following methods: Web management interface. Use the web management interface through the OOB portor any Ethernet network port to access the switch over its default IP address and changethe IP address configuration (see Use the Web Management Interface to Set Up the IPAddress Configuration on page 9).Tip: Use the web management interface for configuration instead of the CLI.Web configuration is quicker and easier than entering the multiplerequired CLI commands. ezconfig. Use the ezconfig utility through the mini USB console port or RJ-45 RS232console port to access the switch and change the IP address configuration (see Use aConsole Port and the ezconfig Utility to Set Up the IP Address Configuration on page 12).Get Started8
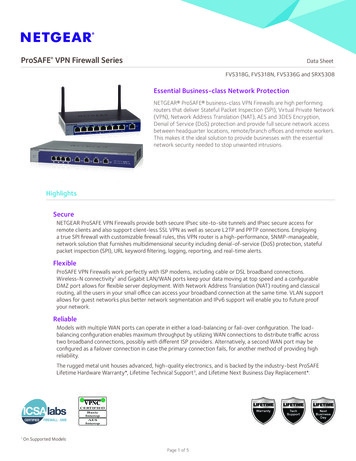
M4200 and M4300 Series ProSAFE Managed Switches Software Setup Manual CLI. Use the CLI through the mini USB console port or RJ-45 RS232 console port toaccess the switch and change the IP address configuration (see Use a Console Port andthe CLI to Set Up the IP Address Configuration on page 17). DHCP server. Connect a DHCP server through the OOB port or any Ethernet networkport, use the CLI through the mini USB console port or RJ-45 RS232 console port toaccess the switch, and find the DHCP-assigned IP addresses (see Find the IP AddressConfiguration Assigned by a DHCP Server on page 18).Use the Web Management Interface to Set Up theIP Address ConfigurationYou can configure the switch IP address configuration through the web managementinterface.For detailed information about how to use the web management interface to configure theswitch with all its options, see the M4200 and M4300 Series ProSAFE Managed SwitchesWeb Management User Manual, which is available at downloadcenter.netgear.com. To set up the switch IP address configuration through the web management interface:1. Prepare your computer with a static IP address: For access over an Ethernet network port, use a static IP address in the169.254.0.0/16 subnet.For example, use 169.254.100.201 for your computer. For access over the OOB port, use a static IP address in the 192.168.0.0/16 subnet.For example, use 192.168.0.201 for your computer.2. Connect an Ethernet cable from an Ethernet port on your computer either to an Ethernetnetwork port on the switch or to the OOB port on the switch.3. Launch a web browser such as Google Chrome, Mozilla Firefox, or Microsoft InternetExplorer.4. Enter the default IP address of the switch in the web browser address field: For access over an Ethernet network port, enter 169.254.100.100. For access over the OOB port, enter 192.168.0.239.The login window opens.5. Enter the user name and password.The default admin user name is admin and the default admin password is blank, that is,do not enter a password.6. Click the Login button.The web management interface menu displays.7. To set up the service port, do the following:a. Select System Management IPv4 Service Port.Get Started9
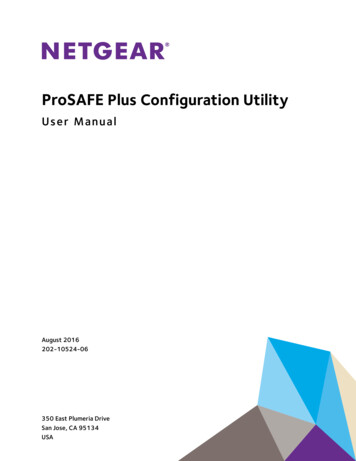
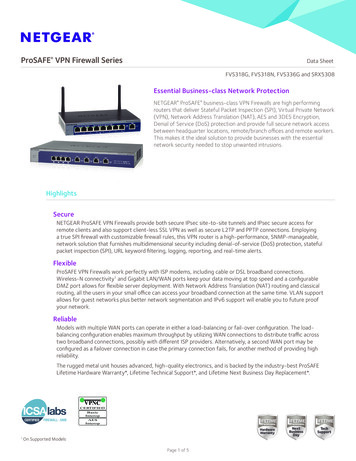
M4200 and M4300 Series ProSAFE Managed Switches Software Setup Manualb. Select the Service Port Configuration Protocol None radio button.c. In the IP Address field, enter the IP address for the service port.For example, enter 172.26.1.110.Note: The OOB port is also referred to as the service port.d. In the Subnet Mask field, enter the subnet mask for the service port.For example, enter 255.255.255.0.e. In the Default Gateway field, enter the default gateway for the service port.For example, enter 172.26.1.1.f.Click the Apply button.Your settings are saved.8. To set up the IP address in the management VLAN, do the following:a. Select System Management IPv4 Management VLAN Configuration.b. In the IP Address field, enter the IP address for the switch.For example, enter 10.100.5.100.Get Started10
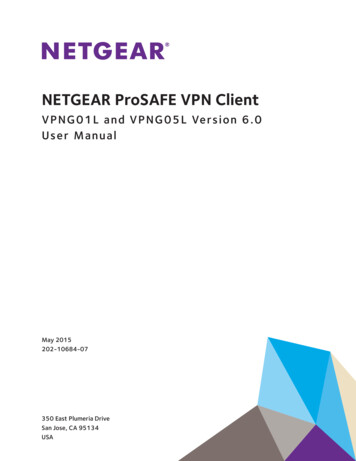
M4200 and M4300 Series ProSAFE Managed Switches Software Setup Manualc.In the Subnet Mask field, enter the subnet mask for the switch.For example, enter 255.255.255.0.d. In the Gateway field, enter the network IP address for the gateway.For example, enter 10.100.5.1.e.Click the Apply button.Your settings are saved.9. To set up the management interface, do the following:a. Select System Management IPv4 Management Interface Configuration.b. Select the Configuration Method Manual radio button.c. In the IP Address field, enter the IP address for the management interface.For example, enter 10.100.4.100.d. In the Subnet Mask field, enter the subnet mask for the management interface.For example, enter 255.255.255.0.e. In the Gateway field, enter the default gateway for the management interface.For example, enter 10.100.4.1.f.Click the Apply button.Your settings are saved.10. Log out of the web management interface.11. Return your computer to its original settings.If you want log in to the web management interface again, you now must use one of thenewly assigned network IP addresses.Get Started11
M4200 and M4300 Series ProSAFE Managed Switches Software Setup ManualUse a Console Port and the ezconfig Utility to Set Up theIP Address ConfigurationYou can manually configure the IP address of the switch through a console port by using theEasy Setup Wizard (ezconfig). The switch provides a mini USB console port and an RJ-45RS232 console port.The ezconfig utility is an interactive utility that provides a simplified procedure for setting upthe following basic switch settings: Switch management interface IP address Switch OOB port (service port) IP address Switch admin user password Switch name and locationYou can enter ezconfig either in Global Config mode (#) or in Display mode ( ).At any point in the setup, you can type Q to abort the program. ezconfig checks for anychanges and prompts you to save the changes. To set up the switch IP address configuration through a console port and start theezconfig utility:1. Connect a computer with a Windows, MAC, or Linux operating system and a terminalemulation program or a VT100/ANSI terminal and open the appropriate COM port.For more information, see Prepare a Terminal if You Intend to Use a Console Port onpage 7.When the terminal interface initializes, the user login prompt displays.2. Enter your user name and password.The default admin user name is admin and the default admin password is blank, that is,do not enter a password.3. Enter the ezconfig command.The utility displays the following text:(Switch) ezconfigNETGEAR EZ Configuration Utility-------------------------------Hello and Welcome!This utility will walk you through assigning the IP address forthe switch management CPU. It will allow you to save the changesat the end. After the session, simply use the newly assigned IPaddress to access the Web GUI using any public domain Web browser.Get Started12
M4200 and M4300 Series ProSAFE Managed Switches Software Setup ManualAdmin password not defined. Do you want to assign the adminpassword (password length should vary in a range of 8 - 64characters)? (Y/N/Q)You are prompted to change the admin password.4. For security reasons, change the default password by typing Y, typing a new password, andconfirming the password.If you already set the password and do not want to change it again, type N.Enter new password:********Confirm new password:********Password Changed!The 'enable' password required for switch configuration throughthe command line interface is currently not configured. Do youwish to change it (Y/N/Q)? yEnter new password:********Confirm new password:********Password Changed!5. To change the management VLAN ID, type Y, and type a new VLAN ID.Current Management VLAN ID: 1Do you want to set new Management VLAN ID (Y/N/Q)?You are prompted to set up the IP address of the switch.6. Set up the IP address of the switch, either manually (type C) or through DHCP (type D):Assigning an IPv4 address to your switch managementCurrent IPv4 Address gement VLAN ID: 1IPv4 Address Assignment Mode: ManualIPv4 Address: 0.0.0.0Subnet Mask: 0.0.0.0Default Router IPv4: 0.0.0.0Routing Mode: EnableIPv4 address has been assigned manually. What do you want to do?C - Change IPv4 address.D - Assign IPv4 address for the switch using DHCP Mode(currentIPv4 address will be lost).Get Started13
M4200 and M4300 Series ProSAFE Managed Switches Software Setup ManualN - Skip this option and go to the next question.Q - Quit.? - Help.(C/D/N/Q/?)?If the switch was already assigned an IP address and you do not want to change the IPaddress again, type N.ezconfig displays the current IP address and subnet mask. By default, the network DHCPserver assigns IP addresses automatically according to DHCP. However, you canoverwrite the DHCP client mode by assigning a fixed IP address here. Once a fixed IPaddress is assigned, ezconfig automatically disables DHCP client mode and assigns thestatic IP address to the management VLAN.7. To set up IPv6 address for management VLAN, type C to assign a new global IPv6 address,or type D to get an IP6 address from an IPv6 DHCP server, or type A to generate the IPv6address automatically.Management VLAN ID: 1IPv6 Address: fe80::6eb0:ceff:fef9:f6e3/64IPv6 Current state: TENTEUI64: DisabledRouting Mode: EnableIPv6 address has been assigned manually. What do you want to do?C - Add IPv6 address.D - Assign IPv6 address for the switch using DHCP Mode.A - Assign IPv6 address for the switch using Auto Mode.N - Skip this option and go to the next question.Q - Quit.? - Help.(C/D/A/N/Q/?)8. To set up an IPv4 address for the OOB port (which is also referred to as the service port),type Y to assign the IPv4 address manually.Current Out of Band(service port) IPv4 Address Configuration-------------------------------IP Address Assignment Mode: DHCPIP Address: 172.26.2.135Get Started14
M4200 and M4300 Series ProSAFE Managed Switches Software Setup ManualSubnet Mask: 255.255.255.0Default Router: 172.26.2.1Do you want to assign IPv4 address manually? (Y/N/Q)?The IPv4 address will be assigned automatically by the DHCP server in your network.You can disable DHCP mode and use a static (fixed) IPv4 address. If fixed IPv4 addressmode is selected, DHCP mode is disabled, and you are prompted to set the values forthese fields.9. To set up an IPv6 address for the OOB port (which is also referred to as the service port),type A to generate an IPv6 address automatically, or type D to get an IPv6 address from theDHCP server, or type C to add an IPv6 address to the OOB port.Service port IPv6 Address Mode: NoneIPv6 Administrative Mode: EnabledService port IPv6 Address Mode autoconfigure: DisabledIPv6 Address: fe80::6eb0:ceff:fef9:f6e1/64Network IPv6 address gateway:IPv6 Default Router: fe80::222:3fff:fe9e:9605EUI Flag: TrueThe IPv6 address has been assigned manually. What do you want todo?A - Assign IPv6 address for the switch using Auto Mode.D - Assign IPv6 address for the switch using DHCP Mode.G - Assign IPv6 Gateway.C - Add IPv6 address.N - Skip this option and go to the next question.Q - Quit.? - Help.10. To change the management interface, type O to select the OOB port (which is also referredto as the service port) as the source IP address of the management protocol such as syslog,SNMP client, and so on. Or type V to select the IP address of the management LAN as thesource IP address of the management protocol.Current Management Interface ment Interface: L3 Management VLANCurrent management interface is L3 Management VLAN. What do youwant to do?Get Started15
M4200 and M4300 Series ProSAFE Managed Switches Software Setup ManualO - Change to Out of Band port (service port).V - Change to L3 Management VLAN.N - Skip this option and go to the next question.Q - Quit.? - Help.(O/V/N/Q/?)11. To enable the routing interface, type Y.Do you want routing to be enabled (Y/N)?12. Assign a switch name and location information.Enter alphanumeric characters only. Characters such as # and are not supported. Thenumber of characters cannot exceed 31 characters.Assigning System Name, System Location and System Contact to yourswitch managementCurrent Configuration-------------------------------System Name:System Location:System Contact:Do you want to assign switch name and location information?(Y/N/Q)Assigning SNTP server for time stamp to your switch managementCurrent Configuration-------------------------------SNTP system clock server: unicastSNTP server:Do you want to enable SNTP system clock server? (Y/N)13. Save the configuration by typing Y.There are changes detected, do you wish to save the changespermanently (Y/N)?yThe configuration changes have been saved successfully.Please enter 'show running-config' to see the final configuration.Thanks for using EzConfig!Get Started16
M4200 and M4300 Series ProSAFE Managed Switches Software Setup ManualYour changes are saved in flash memory (permanent storage).The switch is now ready for web-based management as well as for management throughTelnet and SSH.Use a Console Port and the CLI to Set Up the IP AddressConfigurationYou can manually configure the IP address of the switch through a console port by using theCLI. The switch provides a mini USB console port and an RJ-45 RS232 console port. To set up the switch IP address configuration through a console port and the CLI:1. Connect a computer with a Windows, MAC, or Linux operating system and a terminalemulation program or a VT100/ANSI terminal and open the appropriate COM port.For more information, see Prepare a Terminal if You Intend to Use a Console Port onpage 7.When the terminal interface initializes, the user login prompt displays.2. Enter your user name and password.The default admin user name is admin and the default admin password is blank, that is,do not enter a password.3. Configure the IP address of the switch’s management interface in default managementVLAN 1 by entering the following command:(management switch) (config) #ip management vlan 1 ipaddresssubnetmask4. Configure the IP address of the switch’s gateway by entering the following command:(management switch) (config) #ip default-gateway gateway-addr5. Disable DHCP mode on the switch’s OOB port by entering the following command:(management switch) #serviceport protocol none6. Configure the IP address of the switch’s OOB port (which is also referred to as theservice port) by entering the following command:(management switch) #serviceport ip ipaddress subnetmask [gateway]7. To retain these changes during a reset of the switch, type save at the main menu prompt,and type y to confirm the changes.8. To view the changes and verify the IP address information, enter the following commands: For the management interface: (management switch) #show ip management For the service port: (management switch) #show serviceportThe switch is now ready for web-based management as well as for management throughTelnet and SSH.Get Started17
M4200 and M4300 Series ProSAFE Managed Switches Software Setup ManualFind the IP Address Configuration Assigned by a DHCP ServerIf your network includes a DHCP server, the DHCP server automatically assigns the IPaddress configuration to the switch. By default, the switch functions as a DHCP client,allowing both the management interface and OOB port (which is also referred to as theservice port) to be assigned IP addresses by the DHCP server. The first time that youconnect the switch to the network, the DHCP server configures the switch with the IPaddress, subnet, and other information.If you want the DHCP server to assign a particular IP address to the switch, for example in anIP address–to–MAC address binding configuration, you must preconfigure the DHCP serverwith the IP address and MAC information for the switch. After you configure the DHCP server,the first time that you connect th
To access the switch through the web management interface, use the latest version of a web browser such as Google Chrome, Mozilla Firefox, or Microsoft Internet Explorer. The web management interface and CLI differ in various ways. For example, on the web management interface, you can display the entire forwarding database. The CLI displays