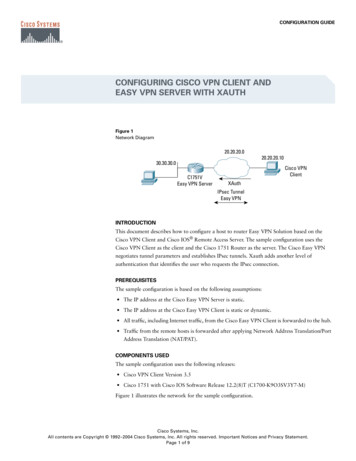
Transcription
NETGEAR ProSAFE VPN ClientVPNG01L and VPNG05L Version 6.0User ManualMay 2015202-10684-07350 East Plumeria DriveSan Jose, CA 95134USA
NETGEAR ProSAFE VPN ClientSupportThank you for selecting NETGEAR products.After installing your device, locate the serial number on the label of your product and use it to register your product athttps://my.netgear.com. You must register your product before you can use NETGEAR telephone support. NETGEARrecommends registering your product through the NETGEAR website.For product updates and web support, visit http://support.netgear.com.Phone (US & Canada only): 1-888-NETGEAR.Phone (Other Countries): Check the list of phone numbers at .aspx.TrademarksNETGEAR, Inc., NETGEAR and the NETGEAR logo are trademarks of NETGEAR, Inc. Any non-NETGEAR trademarks are usedfor reference purposes only.ComplianceFor regulatory compliance information, visit http://www.netgear.com/about/regulatory/.See the regulatory compliance document before connecting the power supply.Revision HistoryPublication Part NumberVersionPublish DateComments202-10684-076.0May 2015Documented VPN Client 6.0 software with newGUI displays. Added the new features, SHA-512,DH groups, and IPv6. The index was removed.202-10684-06–May 2013Color correction and minor nontechnical edits.202-10684-05–April 2013 202-10684-04v1.0April 2012Minor new features and improvements such as theRemote Sharing pane.202-10684-03v1.0May 30, 2011Major revision to document the new format of theuser interface and some new features such as theenhanced capability to change languages.202-10684-02v1.1December 2010Minor editorial changes and addition of an index.202-10684-02v1.0December 2010Reorganization and revision of the entire manual.202-10684-01v1.0June 2010First publication.2Rewrote the manual to be task-based.Described new features, command references,certificates, and global VPN parameters.
ContentsChapter 1IntroductionVPN Client Features . . . . . . . . . . . . . . . . . . . . . . . . . . . . . . . . . . . . . . . . . . . . . . . . . . 7VPN Client Licenses for Lite and Professional . . . . . . . . . . . . . . . . . . . . . . . . . . . . . 9Linux Appliance Support. . . . . . . . . . . . . . . . . . . . . . . . . . . . . . . . . . . . . . . . . . . . . . 10References and Useful Websites . . . . . . . . . . . . . . . . . . . . . . . . . . . . . . . . . . . . . . . 10Chapter 2Install the SoftwareInstall the VPN Client Software . . . . . . . . . . . . . . . . . . . . . . . . . . . . . . . . . . . . . . .Launch the VPN Client . . . . . . . . . . . . . . . . . . . . . . . . . . . . . . . . . . . . . . . . . . . . . . .Use the VPN Client Lite Evaluation Version . . . . . . . . . . . . . . . . . . . . . . . . . . . . . .View the Remaining Days in the Evaluation Period . . . . . . . . . . . . . . . . . . . . .Buy a License When the Evaluation Period Expires . . . . . . . . . . . . . . . . . . . . .License Number Concepts . . . . . . . . . . . . . . . . . . . . . . . . . . . . . . . . . . . . . . . . . . . .Activate the VPN Client License . . . . . . . . . . . . . . . . . . . . . . . . . . . . . . . . . . . . . . .Troubleshoot Software Activation . . . . . . . . . . . . . . . . . . . . . . . . . . . . . . . . . . .Software Upgrade Concepts . . . . . . . . . . . . . . . . . . . . . . . . . . . . . . . . . . . . . . . .Uninstall the VPN Client Software . . . . . . . . . . . . . . . . . . . . . . . . . . . . . . . . . . . . .Chapter 3Overview of the User InterfaceUser Interface Components. . . . . . . . . . . . . . . . . . . . . . . . . . . . . . . . . . . . . . . . . . .VPN Configuration Panel . . . . . . . . . . . . . . . . . . . . . . . . . . . . . . . . . . . . . . . . . . . . .System Tray Icon and System Tray Menu. . . . . . . . . . . . . . . . . . . . . . . . . . . . . . . .System Tray Pop-Up Window . . . . . . . . . . . . . . . . . . . . . . . . . . . . . . . . . . . . . . .Connection Panel. . . . . . . . . . . . . . . . . . . . . . . . . . . . . . . . . . . . . . . . . . . . . . . . . . . .Keyboard Shortcuts . . . . . . . . . . . . . . . . . . . . . . . . . . . . . . . . . . . . . . . . . . . . . . . . .Chapter 413131415151616171718212122232325Configure VPN TunnelsVPN Tunnel Overview . . . . . . . . . . . . . . . . . . . . . . . . . . . . . . . . . . . . . . . . . . . . . . .Configure IKE Authentication Settings. . . . . . . . . . . . . . . . . . . . . . . . . . . . . . . . . .Configure Advanced Authentication Settings . . . . . . . . . . . . . . . . . . . . . . . . . . . .Configure XAUTH . . . . . . . . . . . . . . . . . . . . . . . . . . . . . . . . . . . . . . . . . . . . . . . . .Configure a Redundant Gateway . . . . . . . . . . . . . . . . . . . . . . . . . . . . . . . . . . . .Configure Mode Config Settings . . . . . . . . . . . . . . . . . . . . . . . . . . . . . . . . . . . .Configure Hybrid Mode . . . . . . . . . . . . . . . . . . . . . . . . . . . . . . . . . . . . . . . . . . . .Configure IPSec Settings . . . . . . . . . . . . . . . . . . . . . . . . . . . . . . . . . . . . . . . . . . . . .Configure the Parameter Settings . . . . . . . . . . . . . . . . . . . . . . . . . . . . . . . . . . . . .Open and Close VPN Tunnels . . . . . . . . . . . . . . . . . . . . . . . . . . . . . . . . . . . . . . . . . .327283032343536374041
NETGEAR ProSAFE VPN ClientChapter 5 Advanced SettingsControl How VPN Tunnels Are Opened . . . . . . . . . . . . . . . . . . . . . . . . . . . . . . . . .Open a Tunnel Automatically. . . . . . . . . . . . . . . . . . . . . . . . . . . . . . . . . . . . . . . .Open a Tunnel Before Windows Logon . . . . . . . . . . . . . . . . . . . . . . . . . . . . . . .Open a Tunnel by Double-Clicking on a Desktop Icon . . . . . . . . . . . . . . . . . .Automatically Open a Web Page When a VPN Tunnel Opens . . . . . . . . . . . . .Configure Alternate DNS and WINS Servers . . . . . . . . . . . . . . . . . . . . . . . . . . . . .Configure Scripts. . . . . . . . . . . . . . . . . . . . . . . . . . . . . . . . . . . . . . . . . . . . . . . . . . . .Configure Remote Sharing . . . . . . . . . . . . . . . . . . . . . . . . . . . . . . . . . . . . . . . . . . . .USB Mode. . . . . . . . . . . . . . . . . . . . . . . . . . . . . . . . . . . . . . . . . . . . . . . . . . . . . . . . . .Enable a New USB Drive with a VPN Configuration. . . . . . . . . . . . . . . . . . . . .Configure Tunnels to Open Automatically with a USB Drive . . . . . . . . . . . . .Manage Certificates . . . . . . . . . . . . . . . . . . . . . . . . . . . . . . . . . . . . . . . . . . . . . . . . .Import a PEM Certificate. . . . . . . . . . . . . . . . . . . . . . . . . . . . . . . . . . . . . . . . . . .Import a P12 Certificate . . . . . . . . . . . . . . . . . . . . . . . . . . . . . . . . . . . . . . . . . . .View and Assign Certificates. . . . . . . . . . . . . . . . . . . . . . . . . . . . . . . . . . . . . . . .View Certificate Details . . . . . . . . . . . . . . . . . . . . . . . . . . . . . . . . . . . . . . . . . . . .Use Certificates from USB Tokens and Smart Cards . . . . . . . . . . . . . . . . . . . .Open a Tunnel with Certificates from a USB Token or Smart Card . . . . . . . .Troubleshoot Certificates . . . . . . . . . . . . . . . . . . . . . . . . . . . . . . . . . . . . . . . . . .Manage VPN Configuration Files. . . . . . . . . . . . . . . . . . . . . . . . . . . . . . . . . . . . . . .Import a VPN Configuration . . . . . . . . . . . . . . . . . . . . . . . . . . . . . . . . . . . . . . . .Export a VPN Configuration . . . . . . . . . . . . . . . . . . . . . . . . . . . . . . . . . . . . . . . .Merge VPN Configurations . . . . . . . . . . . . . . . . . . . . . . . . . . . . . . . . . . . . . . . . .Access Control Overview . . . . . . . . . . . . . . . . . . . . . . . . . . . . . . . . . . . . . . . . . . . . .Configure Access Control . . . . . . . . . . . . . . . . . . . . . . . . . . . . . . . . . . . . . . . . . .Remove Access Control . . . . . . . . . . . . . . . . . . . . . . . . . . . . . . . . . . . . . . . . . . . .Hide User Interface Features . . . . . . . . . . . . . . . . . . . . . . . . . . . . . . . . . . . . . . . . . .Hide Links on the System Tray Menu . . . . . . . . . . . . . . . . . . . . . . . . . . . . . . . . .Disable the Systray Pop-Up Screens . . . . . . . . . . . . . . . . . . . . . . . . . . . . . . . . .Hide the Connection Panel . . . . . . . . . . . . . . . . . . . . . . . . . . . . . . . . . . . . . . . . .Configure VPN Client Startup Mode and Network Interface Detection . . . . . .Change the Language . . . . . . . . . . . . . . . . . . . . . . . . . . . . . . . . . . . . . . . . . . . . . . . .Edit a Software Language . . . . . . . . . . . . . . . . . . . . . . . . . . . . . . . . . . . . . . . . . . . 07172727475767777Chapter 6 VPN Client Software Setup and Network DeploymentSoftware Setup and Deployment Concepts . . . . . . . . . . . . . . . . . . . . . . . . . . . . .Software Setup File Example . . . . . . . . . . . . . . . . . . . . . . . . . . . . . . . . . . . . . . .Software Setup Command Requirements . . . . . . . . . . . . . . . . . . . . . . . . . . . . .Examples of Options That You Can Include in a Software Setup File . . . . . .Software Setup Command Reference . . . . . . . . . . . . . . . . . . . . . . . . . . . . . . . . . .Customize VPN Client Display and Access for End Users . . . . . . . . . . . . . . . . . .Display the Configuration Panel After Startup. . . . . . . . . . . . . . . . . . . . . . . . .Display the Connection Panel After Startup. . . . . . . . . . . . . . . . . . . . . . . . . . .Display the System Tray Menu Only After Startup . . . . . . . . . . . . . . . . . . . . .Require a Password to Access the Configuration Panel . . . . . . . . . . . . . . . . .480808181828787888888
NETGEAR ProSAFE VPN ClientLimit Usage to the System Tray Menu and Require aPassword to Access Other Screens . . . . . . . . . . . . . . . . . . . . . . . . . . . . . . . . . . 89Configure Which Items of the System Tray Menu Are Visible . . . . . . . . . . . . 89VPN Client Silent Software Setup Deployment to End Users . . . . . . . . . . . . . . . 90Create a Silent VPN Client Software Setup. . . . . . . . . . . . . . . . . . . . . . . . . . . . 91Deploy a VPN Client Software Setup from a CD . . . . . . . . . . . . . . . . . . . . . . . 91Deploy a VPN Client Software Setup from a Shortcut . . . . . . . . . . . . . . . . . . 92Deploy a VPN Client Software Setup Using a Batch Script. . . . . . . . . . . . . . . 93Deploy a VPN Client Software Setup from a Network Drive . . . . . . . . . . . . . 94Deliver a VPN Configuration to an End User . . . . . . . . . . . . . . . . . . . . . . . . . . . . . 95Embed a VPN Configuration in a VPN Client SoftwareSetup Deployment . . . . . . . . . . . . . . . . . . . . . . . . . . . . . . . . . . . . . . . . . . . . . . . . 96Export and Deploy a VPN Configuration . . . . . . . . . . . . . . . . . . . . . . . . . . . . . . 97Command-Line Interface Command Reference . . . . . . . . . . . . . . . . . . . . . . . . . . 98Customize the VPN Client Using CLI Commands . . . . . . . . . . . . . . . . . . . . . . . . 101Open or Close a VPN Tunnel . . . . . . . . . . . . . . . . . . . . . . . . . . . . . . . . . . . . . . . 101Close All Active Tunnels and Close the VPN Client. . . . . . . . . . . . . . . . . . . . . 102Import, Export, Add, or Replace the VPN Configuration . . . . . . . . . . . . . . . 102Customize How the VPN Client Handles Readers and Certificates . . . . . . . . . 103Customize the vpnsetup.ini File . . . . . . . . . . . . . . . . . . . . . . . . . . . . . . . . . . . . 103Customize the vpnconf.ini File . . . . . . . . . . . . . . . . . . . . . . . . . . . . . . . . . . . . . 106Chapter 7Troubleshoot the VPN ClientVPN Client Troubleshooting Overview . . . . . . . . . . . . . . . . . . . . . . . . . . . . . . . . . 111Resolve Firewall Interference. . . . . . . . . . . . . . . . . . . . . . . . . . . . . . . . . . . . . . . . . 111View and Control VPN Client Log Messages . . . . . . . . . . . . . . . . . . . . . . . . . . . . 111Enable the VPN Console Debugging Mode . . . . . . . . . . . . . . . . . . . . . . . . . . . 112VPN Console Log Errors . . . . . . . . . . . . . . . . . . . . . . . . . . . . . . . . . . . . . . . . . . . . . 113No Response to a Phase 1 Request . . . . . . . . . . . . . . . . . . . . . . . . . . . . . . . . . 116The Console Shows Only SEND and RECV. . . . . . . . . . . . . . . . . . . . . . . . . . . . 116No Response to Phase 2 Requests . . . . . . . . . . . . . . . . . . . . . . . . . . . . . . . . . . 116View VPN Gateway Logs . . . . . . . . . . . . . . . . . . . . . . . . . . . . . . . . . . . . . . . . . . . . 117A VPN Tunnel Is Up but You Cannot Ping the Remote Endpoint . . . . . . . . . . . . 118Appendix AConfigure a NETGEAR VPN GatewayVPN Gateway Overview . . . . . . . . . . . . . . . . . . . . . . . . . . . . . . . . . . . . . . . . . . . . . 121Use the Router’s VPN Wizard to Configure a VPN Gateway . . . . . . . . . . . . . . . 122Edit a VPN Policy . . . . . . . . . . . . . . . . . . . . . . . . . . . . . . . . . . . . . . . . . . . . . . . . . 124Edit an IKE Policy . . . . . . . . . . . . . . . . . . . . . . . . . . . . . . . . . . . . . . . . . . . . . . . . . 125Manually Configure a NETGEAR Router as a VPN Gateway . . . . . . . . . . . . . . . 126Set Up an IKE Policy in the Router . . . . . . . . . . . . . . . . . . . . . . . . . . . . . . . . . . 126Set Up a VPN Policy in the Router . . . . . . . . . . . . . . . . . . . . . . . . . . . . . . . . . . 128Configure a VPN Client to Match the VPN Gateway Settings. . . . . . . . . . . . . . 1305
1.1IntroductionThe VPN Client allows you to establish secure connections over the Internet, for example,between a computer and a remote corporate Intranet. IPSec is the most secure way to connectbecause it provides strong user authentication and strong tunnel encryption and it works withexisting network and firewall settings.Note: To set up a VPN tunnel between a computer and a VPN gateway, firstconfigure the VPN gateway. For information about how to set up aNETGEAR router as a VPN gateway, see Appendix A, Configure aNETGEAR VPN Gateway.This chapter includes the following sections: VPN Client Features VPN Client Licenses for Lite and Professional Linux Appliance Support References and Useful WebsitesNote: For more information about the topics covered in this manual, visit thesupport website at http://support.netgear.com.Note: Firmware updates with new features and bug fixes are madeavailable from time to time on http://downloadcenter.netgear.com.Some products can regularly check the site and download newfirmware, or you can check for and download new firmware manually.If the features or behavior of your product do not match what isdescribed in this guide, you might must update your firmware.6
NETGEAR ProSAFE VPN ClientVPN Client FeaturesThe VPN Client includes the following features.Table 1. List of featuresFeatureSpecificationsSupported operatingsystems LanguagesArabic, Chinese (simplified), Czech, Danish, Dutch, English, Farsi, Finnish, French,German, Greek, Hindi, Hungarian, Italian, Japanese, Korean, Norwegian, Polish,Portuguese, Russian, Serbian, Slovenian, Spanish, Thai, and Turkish.Connection modes Tunneling protocols NAT Traversal erver 2003 32-bitServer 2008 32/64-bit2012 32/64-bitVista 32/64-bit7 32/64-bit8.1 32/64-bit8 32/64-bitSupports peer-to-peer connections (point-to-point connections between twocomputers with the VPN Client installed).Supports peer-to-gateway connections, for example, between a computer with theVPN Client installed and NETGEAR platform that supports VPN.Supports connection types such as dial-up, DSL, cable, GSM/GPRS, 3G, 4G, andWiFi.Allows IP range networking.Runs in a Remote Desktop Protocol (RDP) connection session.Full Internet Key Exchange (IKE) support: the IKE implementation is based on theOpenBSD 3.1 implementation (ISAKMPD). This provides the best compatibilitywith existing IPSec routers and gateways.Full IPSec support:- Main mode and aggressive mode- MD5, SHA-1, and SHA-256 hash algorithms- Change IKE portNAT Traversal Draft 1 (enhanced), Draft 2, and Draft 3 (full implementation),including:- NAT OA support- NAT keep-alive- NAT-T aggressive modeForced NAT Traversal modeSIP/VoIP supportSupport for Session Initiation Protocol (SIP) and Voice over IP (VoIP) traffic in a VPNtunnel on Window Vista, Windows 7, and Windows 8.EncryptionProvides the following encryption algorithms: 3DES, DES, and AES 128/192/256-bit encryption Support for Diffie-Hellman Group 1 (768 bits), Group 2 (1024 bits), Group 5(1536 bits), and Group 14 (2048 bits)Introduction7
NETGEAR ProSAFE VPN ClientTable 1. List of features (continued)FeatureSpecificationsUser authenticationSupports the following user authentication methods: Pre-shared keying and X509 certificate support. Compatible with most of thecurrently available IPSec gateways. Extended authentication (AUTH). Flexible certificates: PEM, PKCS#12 certificates can be directly imported from theuser interface. Ability to configure one certificate per tunnel. Hybrid authentication method.Certificate storage capabilities: USB token and smart card support Personal Certificate Store support VPN configuration fileRemote login: Gina mode is supported on Windows Vista, Windows 2012, Windows 7, Windows8, Windows server 2003, and Windows server 2008 to enable Windows logonusing a VPN tunnel or enable to log in on a local machine. Credential providers are supported on Windows Vista and Windows 7 to enableWindows logon using a VPN tunnel or enabling logging in on a local machine.Dead Peer DetectionDead Peer Detection (DPD) is an IKE extension (RFC3706) for detecting a dead IKEpeer.Redundant gatewayThe redundant gateway feature provides a highly reliable secure connection to acorporate network. The redundant gateway feature allows the VPN Client to open anIPSec tunnel with an alternate gateway if the primary gateway is down or notresponding.Mode ConfigMode Config is an IKE extension that enables the VPN gateway to provide LANconfiguration to the remote user’s machine (that is, the VPN Client). With Mode Config,you can access all servers on the remote network by using their network name (forexample, \\myserver\marketing\budget) instead of their IP address.USB driveYou can save VPN configurations and security elements (certificates, pre-shared key,and so on) to a USB drive to remove security information (for example, userauthentication) from the computer. You can automatically open and close tunnels whenplugging in or removing the USB drive. You can attach a VPN configuration to a specificcomputer or to a specific USB drive.Smart card and USBtokenThe VPN Client can read certificates from smart cards to make full use of existingcorporate ID or employee cards that carry digital credentials.You can easily import smart card ATR codes to enable new smart card and USB tokenmodels that are not yet in the software.Log consoleAll phase messages are logged for testing or staging purposes.Flexible userinterface Silent install and invisible graphical interface allow network administrators todeploy solutions while preventing user misuse of configurations.Small Connection Panel and VPN Configuration Panel can be available to endusers separately with access control.Drag and drop VPN configurations into the VPN Client.Keyboard shortcuts to easily navigate the VPN Client.Introduction8
NETGEAR ProSAFE VPN ClientTable 1. List of features (continued)FeatureSpecificationsScriptsScripts or applications can be launched automatically on events (for example, beforeand after a tunnel opens, or before and after a tunnel is closed).Configurationmanagement Live updateAbility to check for online updates.User interface and command-line interface (CLI).Password-protected VPN configuration file.Specific VPN configuration file can be provided within the setup.Embedded demo VPN configuration to test and debug with online servers.Ability to prevent software upgrade or uninstallation if protected by password.VPN Client Licenses for Lite and ProfessionalYou can download a free 30-day trial version of VPN Client Light software, or you canpurchase VPN Client Lite or VPN Client Professional, which includes more features.Note: After the evaluation period expires, the VPN Client is disabled. Bypurchasing and activating a permanent license, you can transfer thetrial version to a permanent version.The following table lists the features that are included in the VPN Client Lite and VPN ClientProfessional versions.Table 2. VPN Client Lite and VPN Client Professional comparisonVPN Client FeatureLiteProfessionalConnection PanelYesYesConsole logsYesYesSystem tray pop-upYesYesX-AuthYesYesMode ConfigYesYesDNS/WINS server manual configurationYesYesHybrid modeNoYesIKE/NAT-T ports can be modifiedNoYesDisable split tunnelingYesYesDead Peer DetectionYesYesGUI protection (password)NoYesIntroduction9
NETGEAR ProSAFE VPN ClientTable 2. VPN Client Lite and VPN Client Professional comparison (continued)VPN Client FeatureLiteProfessionalAuto Open (Windows on startup on traffic detection)NoYesStart VPN tunnel before Windows logonNoYesMultitunnel configurationsNoYesRedundant gatewaysYesYesEasy deployment by command-line interface (CLI)NoYesScriptsNoYesUSB modeNoYesLinux Appliance SupportThe VPN Client supports several versions of Linux IPSec VPN such as StrongS/WAN andFreeS/WAN. The VPN Client is compatible with most of the IPSec routers and appliancesthat are based on those Linux implementations.References and Useful WebsitesThese references and websites are for the ProSAFE VPN Client Lite and ProSAFE VPNClient Professional, both of which are developed by TheGreenBow: Access to VPNG01L product information and a 30-day trial software version:http://support.netgear.com/product/vpng05l VPNG01L/VPNG05L FAQs:http://kb.netgear.com/app/answers/detail/a id/14903 TheGreenBow IPSec VPN Client:http://www.thegreenbow.com/vpn.html TheGreenBow VPN documentation and manuals:http://www.thegreenbow.com/vpn doc.htmlThe documents that you can access from this link are based on TheGreenBow VPNClient. The NETGEAR ProSAFE VPN Client Lite and ProSAFE VPN Client Professionalare developed by TheGreenBow, so configuration is likely identical or similar.Introduction10
NETGEAR ProSAFE VPN ClientNote: For documentation about the legacy ProSAFE VPN Client that wasdeveloped by SafeNet, see the following NETGEAR 11
2.2Install the SoftwareThis chapter describes installation of the VPN Client and related processes. The chapterincludes the following sections: Install the VPN Client Software Launch the VPN Client Use the VPN Client Lite Evaluation Version License Number Concepts Activate the VPN Client License Uninstall the VPN Client Software12
NETGEAR ProSAFE VPN ClientInstall the VPN Client SoftwareYou can download a free 30-day trial version of VPN Client Lite software, or you canpurchase and download VPN Client Lite or VPN Client Professional software, which includesmore features. (See VPN Client Features on page 7.)Note: If you use the 30-day trial version, when the evaluation period expires,the VPN Client is disabled. By purchasing and activating a permanentlicense, you can transfer the trial version to a permanent version.To download the VPN client software, visit http://support.netgear.com/product/vpng05l. To install the VPN client software:1. To download the VPN client software, visit http://support.netgear.com/product/vpng05l.2. Unzip the file that you downloaded.3. Double-click the file.The Welcome page displays.4. Follow the onscreen prompts to complete installation.5. If you are prompted to restart your computer, than do so.Whether you must restart depends on your operating system. Windows 8, Windows 7, orWindows Vista computers do not need to be restarted.The VPN Client Activation Wizard page displays.How you activate VPN client depends on whether you activate a trial license or a permanentlicense: For information about the free trial software version, see Use the VPN Client LiteEvaluation Version on page 14. For information about software with a permanent license, see Activate the VPN ClientLicense on page 16.Launch the VPN ClientAfter you install the VPN Client software, there are three methods to launch the VPN Client: On your desktop, double-click the VPN Client shortcut In the taskbar, click the VPN Client icon From the Windows Start menu, select the path to the VPN Client, for example, Start AllPrograms NETGEAR NETGEAR VPN Client Professional.Install the Software13.
NETGEAR ProSAFE VPN ClientNote: If your operating system is Windows 8, Windows 7 or Windows Vista,you can select a check box to automatically run the VPN Client aftersoftware installation.The VPN Client creates new rules in the Windows firewall (Vista and later operating systems)so that VPN traffic is enabled: UDP ports 500 and 4500 are authorized both for authentication(phase 1) traffic and for IPSec (phase 2) traffic.If you use an earlier Windows operating system or another firewall, you might need to createfirewall rules to enable the VPN Client. For information, see VPN Console Log Errors onpage 113.Use the VPN Client Lite Evaluation Version To use the VPN Client during the evaluation period:1. On your desktop, double-click the VPN Client shortcut.2. Select the I want to Evaluate the software radio button.You do not need to enter a license number and email address to activate the trialsoftware.3. Click the Next button.The VPN Configuration page displays.During the evaluation period, the Software Activation page displays each time that you startthe VPN Client. The remaining days of the evaluation period are displayed. You can also seethe remaining days of the evaluation period on the About page (see View the RemainingDays in the Evaluation Period on page 15).When the evaluation period expires, the following occurs: The I want to Activate the software radio button is automatically selected. The I want to Evaluate the software radio button is disabled.Install the Software14
NETGEAR ProSAFE VPN Client The message Evaluation period expired displays. The software is disabled.For you to use the VPN Client, you must purchase and activate a permanent license. You canpurchase and activate a permanent license while you are still in the evaluation period or afterthe evaluation period expires.View the Remaining Days in the Evaluation Period To view the remaining days in the evaluation period from VPN Client’s user interface:1. On your desktop, double-click the VPN Client shortcut.The VPN Configuration page displays.2. Select ? About.The About page displays the number of days that remain in the evaluation period.Buy a License When the Evaluation Period ExpiresWhen the evaluation period expires, the VPN Client is disabled. By purchasing and activatinga permanent license, you can transfer the trial version to a permanent version. To buy a permanent license:1. On your desktop, double-click the VPN Client shortcut.The Software Activation page displays. If the trial period expired, the page displaysEvaluation period expired.2. Click the Buy a license link.Install the Software15
NETGEAR ProSAFE VPN ClientThe NETGEAR website displays.3. Follow the instructions onscreen to purchase a permanent license.4. After you purchase a license, activate the permanent license.For more information about how to activate a permanent license, see Activate the VPNClient License on page 16.License Number ConceptsA license number is attached to a single computer after activation. However, you candeactivate the license number (see Uninstall the VPN Client Software on page 18) andtransfer it to another computer.You can also change the license number at any time, but you first must uninstall the VPNClient before you can reinstall the VPN Client with another license number.After activation, save the license key number. You might need it again to reactivate yoursoftware if a problem occurs. Also, keep the CD label for technical support.Activate the VPN Client LicenseWhen you purchase a license, you must activate it before you can use the VPN Client. Youmust activate the VPN Client license on your computer. You need the license number or keyand an email address. To activate your VPN Client license:1. Make sure that your computer is connected to the Internet.2. On your desktop, double-click the VPN Client shortcutThe VPN Configuration page displays.3. Select ? Activation Wizard.Install the Software16.
NETGEAR ProSAFE VPN Client4. Select the I want to Activate the software radio button.5. When prompted, enter your license number.6. If a field displays to enter an email address, complete the field.Your email address is used to send you the activation confirmation.Note: If the network administrator set up VPN Client to suppress the emailaddress field, this field does not display. Some network administratorsuse this method to direct all software activation confirmation email to asingle email address.7. Click the Next button.The Software Activation Wizard connects to the activation server to activate the VPNClient software. The progress bar shows the activation progress. The page displays amessage when activation is complete.8. If an error occurs, click the More information about this error link.For troubleshooting information, see Troubleshoot Software Activation on page 17.9. Click the Run button.The VPN Client relaunches with the new license. The VPN Configuration page displays.Troubleshoot Software ActivationErrors can occur during the activation process. Each activation error type is displ
350 East Plumeria Drive San Jose, CA 95134 USA May 2015 202-10684-07 NETGEAR ProSAFE VPN Client VPNG01L and VPNG05L Version 6.0 User Manual
