Transcription
HP ENVY 7640 e-All-in-One series
Table of contents1 How do I? . 12 Get started . 2Printer parts . 3Control panel and status lights . 5Paper basics . 8Load media . 11Load original . 15Open the HP printer software (Windows) . 16Sleep mode . 17Accessibility . 183 Print . 19Print photos . 20Print documents . 22Print on both sides (duplexing) . 23Print using Near Field Communication (NFC) . 24Print with AirPrint . 25Tips for print success . 274 Use Web Services . 29What are Web Services? . 30Set up Web Services . 31Print with HP ePrint . 33Use HP Printables . 35Use the HP Connected website . 36Remove Web Services . 37Tips for using Web Services . 385 Copy and scan . 39Copy documents . 40ENWWiii
Scan . 41Tips for copy and scan success . 466 Fax . 47Send a fax . 48Receive a fax . 53Set up phone book contacts . 59Change fax settings . 62Fax and digital phone services . 66Fax over Internet Protocol . 67Use reports . 687 Work with cartridges . 72Check the estimated ink levels . 73Replace the cartridges . 74Order ink supplies . 76Use single-cartridge mode . 77Cartridge warranty information . 78Anonymous usage information storage . 79Tips for working with cartridges . 808 Connect Your Printer . 81Set up the printer for wireless communication . 82Change network settings . 87Advanced printer management tools (for networked printers) . 89Tips for setting up and using a networked printer . 919 Solve a problem . 92Jams and paper-feed issues . 93Ink cartridge issues . 98Printing issues . 100Copy issues . 108Scan issues . 109Fax issues . 110Network and connection issues . 119Printer hardware issues . 121HP support . 122Appendix A Technical information . 124Hewlett-Packard Company notices . 125ivENWW
Specifications . 126Environmental product stewardship program . 128Regulatory information . 133Appendix B Additional fax setup . 143Set up faxing (parallel phone systems) . 144Test fax setup . 164Index . 188ENWWv
viENWW
1How do I?Learn how to use your HP ENVY 7640 seriesENWW Get started on page 2 Print on page 19 Use Web Services on page 29 Copy and scan on page 39 Fax on page 47 Work with cartridges on page 72 Connect Your Printer on page 81 Technical information on page 124 Solve a problem on page 921
2Get startedThis section contains the following topics:2 Printer parts Control panel and status lights Paper basics Load media Load original Open the HP printer software (Windows) Sleep mode AccessibilityChapter 2 Get startedENWW
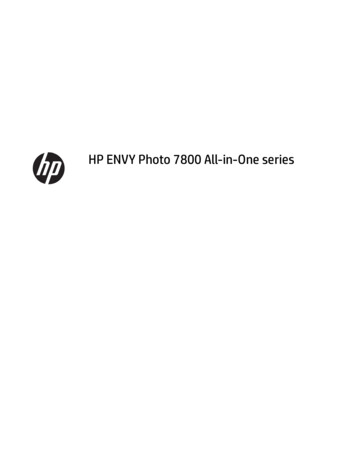
Printer partsFront viewFigure 2-1 Front and top views of HP ENVY 7640 e-All-in-One er glass4Printer model name5Cartridge access door6Memory device area7Cartridge access area8Ink cartridges9Photo tray10On button (also referred to as the Power button)11Wireless status light12Control panel13Output tray14Color graphics display (also referred to as the display)15Automatic output tray extender (also referred to as the tray extender)16Memory card slot17Memory device light18Front universal serial bus (USB) port19Paper trayPrinter parts3
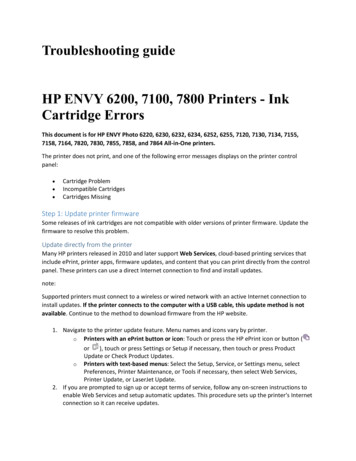
Back viewFigure 2-2 Rear view of HP ENVY 7640 e-All-in-One series4FeatureDescription1Document feeder2Power light. The green light indicates the power cord is installed correctly.3Ethernet network port4Rear USB port5Power connection. Use only the power cord supplied by HP.6Fax ports: 2-EXT (top) and 1-LINE (bottom)Chapter 2 Get startedENWW
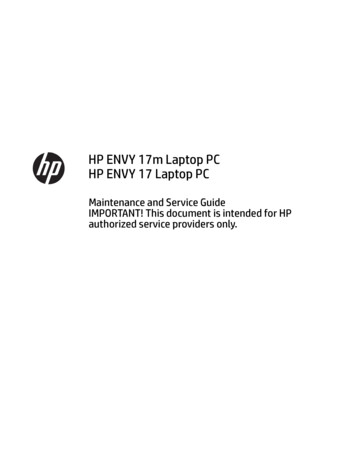
Control panel and status lightsOverview of buttons and lightsThe following diagram and related table provides a quick reference to the printer control panel features.LabelName and Description1Wireless light: Indicates the status of the printer wireless connection. Solid blue light indicates that wireless connection has been established and you can print. Slow blinking light indicates that wireless is on, but the printer is not connected to a network. Make sure your printer iswithin the range of wireless signal. Fast blinking light indicates wireless error. Refer to the message on the printer display. If wireless is turned off, the wireless light is off and the display screen shows Wireless Off.2On button: Turns the printer on or off.3Back button: Returns to the previous screen.4Help button: Opens the Help menu for the current operation.5Home button: Returns to the Home screen, the screen that is displayed when you first turn on the printer.6Control panel display: Touch the screen to select menu options, or scroll through the menu items.7Near Field Communication (NFC) button: Indicates the area where you can print documents and images from a mobile device(such as a smartphone or tablet) by touching the device on the printer.ENWWControl panel and status lights5
Control panel display iconsIconPurposeCopy : Opens the Copy menu where you can select a copy type or change the copy settings.Scan : Opens the Scan menu where you can select a destination for your scan.HP Printables: Provides a quick and easy way to access and print information from the web, such as coupons,coloring pages, puzzles, and more.Photo : Opens the Photo menu where you can view and print photos, or reprint a printed photo.Fax : Displays a screen where you can send a fax, or change fax settings.Setup : Opens the Setup menu where you can change preferences and use tools to perform maintenancefunctions.Help : Opens the Help menu where you can view How To videos, printer feature information, and tips.Near Field Communication (NFC) button: Indicates the area where you can print documents and images from amobile device (such as a smartphone or tablet) by touching the device on the printer.ePrint icon: Opens the Web Services Summary menu, where you can check ePrint status details, change ePrintsettings, or print an Info page.Wi-Fi Direct icon: Opens the Wi-Fi Direct menu where you can turn on Wi-Fi Direct, turn off Wi-Fi Direct, anddisplay the Wi-Fi Direct name and password.6Chapter 2 Get startedENWW
IconPurposeWireless icon: Opens the Wireless Summary menu where you can check wireless status and change wirelesssettings. You can also print a wireless test report, helping diagnose network connection issues.NOTE:(Ethernet) and(Wireless) will not be displayed at the same time. Showing the Ethernet icon orthe wireless icon depends on the way your printer is connected to the network. If the network connection of theprinter has not been set up, by default, the printer control panel display shows(Wireless).Ethernet icon: Shows that an Ethernet network connection exists and also provides easy access to the thenetwork status screen.ECO icon: Displays a screen where you can configure some of the printer environmental features.Fax Status icon: Displays status information for the Auto Answer function, fax logs, and the fax sound volume.Ink icon: Shows estimated ink levels by cartridge. Displays a warning symbol if the ink level is less than theminimum expected ink level.NOTE: Ink level warnings and indicators provide estimates for planning purposes only. When you receive a lowink warning message, consider having a replacement cartridge available to avoid possible printing delays. You donot need to replace cartridges until the print quality becomes unacceptable.ENWWControl panel and status lights7
Paper basicsThe printer is designed to work well with most types of office paper. It is best to test a variety of print papertypes before buying large quantities. Use HP paper for optimum print quality. Visit the HP website atwww.hp.com for more information about HP paper.HP recommends plain papers with the ColorLok logo for printing everyday documents. Allpapers with the ColorLok logo are independently tested to meet high standards ofreliability and print quality, and produce documents with crisp, vivid color, bolder blacks,and that dry faster than ordinary plain papers. Look for papers with the ColorLok logo ina variety of weights and sizes from major paper manufacturers.This section contains the following topics: Recommended papers for printing Order HP paper supplies Tips for selecting and using paperRecommended papers for printingIf you want the best print quality, HP recommends using HP papers that are specifically designed for the typeof project you are printing.Depending on your country/region, some of these papers might not be available.Photo printing HP Premium Plus Photo PaperHP Premium Plus Photo Paper is HP’s highest-quality photo paper for your best photos. With HPPremium Plus Photo Paper, you can print beautiful photos that are instant-dry so you can share themright off the printer. It is available in several sizes, including A4, 8.5 x 11 inches, 4 x 6 inches (10 x 15cm), 5 x 7 inches (13 x 18 cm), and 11 x 17 inches (A3), and in two finishes - glossy or soft gloss (semigloss). Ideal for framing, displaying, or gifting your best photos and special photo projects. HP PremiumPlus Photo Paper delivers exceptional results with professional quality and durability. HP Advanced Photo PaperThis thick photo paper features an instant-dry finish for easy handling without smudging. It resistswater, smears, fingerprints, and humidity. Your prints have a look and feel comparable to a storeprocessed photo. It is available in several sizes, including A4, 8.5 x 11 inches, 10 x 15 cm (4 x 6 inches),13 x 18 cm (5 x 7 inches), and two finishes – glossy or soft-gloss (satin matte). It is acid-free for longerlasting documents. HP Everyday Photo PaperPrint colorful, everyday snapshots at a low cost, using paper designed for casual photo printing. Thisaffordable photo paper dries quickly for easy handling. Get sharp, crisp images when you use this paperwith any inkjet printer. It is available in glossy finish in several sizes, including A4, 8.5 x 11 inches, and10 x 15 cm (4 x 6 inches). It is acid-free for longer lasting documents. 8HP Photo Value PacksChapter 2 Get startedENWW
HP Photo Value Packs conveniently package original HP ink cartridges and HP Advanced Photo Paper tosave you time and take the guesswork out of printing affordable, lab-quality photos with your HPprinter. Original HP inks and HP Advanced Photo Paper have been designed to work together so yourphotos are long lasting and vivid, print after print. Great for printing out an entire vacation's worth ofphotos or multiple prints to share.Business documents HP Premium Presentation Paper 120g MatteThis paper is a heavy two-sided matte paper perfect for presentation, proposals, reports, andnewsletters. It is heavyweight for an impressive look and feel. HP Brochure Paper 180g Glossy or HP Professional Paper 180 GlossyThese papers are glossy-coated on both sides for two-sided use. They are the perfect choice for nearphotographic reproductions and business graphics for report covers, special presentations, brochures,mailers, and calendars. HP Brochure Paper 180g Matte or HP Professional Paper 180 MattThese papers are matte-coated on both sides for two-sided use. They are the perfect choice for nearphotographic reproductions and business graphics for report covers, special presentations, brochures,mailers, and calendars.Everyday printingAll the papers listed for everyday printing feature ColorLok Technology for less smearing, bolder blacks, andvivid colors. HP Bright White Inkjet PaperHP Bright White Inkjet Paper delivers high-contrast colors and sharp text. It is opaque enough for twosided color usage with no show-through, which makes it ideal for newsletters, reports, and flyers. HP Printing PaperHP Printing Paper is a high-quality multifunction paper. It produces documents that look and feel moresubstantial than documents printed on standard multipurpose or copy paper. It is acid-free for longerlasting documents. HP Office PaperHP Office Paper is a high-quality multifunction paper. It is suitable for copies, drafts, memos, and othereveryday documents. It is acid-free for longer lasting documents. HP Office Recycled PaperHP Office Recycled Paper is a high-quality multifunction paper made with 30% recycled fiber.Order HP paper suppliesThe printer is designed to work well with most types of office paper. Use HP paper for optimum print quality.To order HP papers and other supplies, go to www.hp.com . At this time, some portions of the HP website areavailable in English only.HP recommends plain papers with the ColorLok logo for printing and copying of everyday documents. Allpapers with the ColorLok logo are independently tested to meet high standards of reliability and print quality,ENWWPaper basics9
and produce documents with crisp, vivid color, bolder blacks and dry faster than ordinary plain papers. Lookfor papers with the ColorLok logo in a variety of weights and sizes from major paper manufacturers.Tips for selecting and using paperFor the best results, observe the following guidelines.10 Load only one type of paper at a time into a tray or document feeder. When loading the tray and document feeder, make sure the paper is loaded correctly. Do not overload the tray or document feeder. To prevent jams, poor print quality, and other printing problems, avoid loading the following paper in thetray or document feeder:—Multipart forms—Media that is damaged, curled, or wrinkled—Media with cutouts or perforations—Media that is heavily textured, embossed, or does not accept ink well—Media that is too lightweight or stretches easily—Media that contains staples or clipsChapter 2 Get startedENWW
Load mediaSelect a paper size to continue.To load small-size paper1.Pull out the photo tray.Slide the paper-width guides outward, and then remove any previously loaded media.If you do not see the photo tray, remove the output tray from the printer.2.Load paper. Insert a stack of photo paper into the photo tray print side down. Slide the photo paper forward until it stops. Slide the paper-width guides inward until they stop at the edges of the paper.3.Push the photo tray back in.4.Change or retain the paper settings on the printer display.To load full-size paper1.ENWWPull out the paper tray, slide the paper-width guides outward, and then remove any previously loadedmedia.Load media11
2.Load paper. Insert a stack of paper into the paper tray with the short edge forward and the print side down. Slide the paper forward until it stops. Slide the paper-width guides inward until they stop at the edges of the paper.3.Push the paper tray back in.4.Change or retain the paper settings on the printer display.To load legal paper121.Pull out the paper tray, slide the paper-width guides outward, and then remove any previously loadedmedia.2.Unlock and open the front side of the paper tray.Chapter 2 Get startedENWW
3.Load paper. Insert a stack of paper into the paper tray with the short edge forward and the print side down. Slide the paper forward until it stops. Slide the paper-width guides inward until they stop at the edges of the paper.4.Push the paper tray back in.5.Change or retain the paper settings on the printer display.To load envelopes1.Pull out the paper tray, slide the paper-width guides outward, and then remove any previously loadedmedia.2.Load envelopes ENWWInsert one or more envelopes in the center of the paper tray. The print side should face down. Theflap should be on the left side and facing up.Load media13
14 Slide a stack of envelopes inward until it stops. Slide the paper-width guides inward against the stack of envelopes until they stop.3.Push the paper tray back in.4.Change or retain the paper settings on the printer display.Chapter 2 Get startedENWW
Load originalTo load original on the scanner glass1.Lift the scanner lid.2.Load the original print side down on the right front corner of the glass.3.Close the scanner lid.To load an original in the document feederENWW1.Slide paper-width guides outwards.2.Load original print-side up in the document feeder.3.Slide paper-width guides inward until they stop at the edge of paper.Load original15
Open the HP printer software (Windows)After installing the HP printer software, depending on your operating system, do one of the following:16 Windows 8.1: Click the down arrow in lower left corner of the Start screen, and then select the printername. Windows 8: Right-click an empty area on the Start screen, click All Apps on the app bar, and then selectthe printer name. Windows 7, Windows Vista, and Windows XP: From the computer desktop, click Start, select AllPrograms, click HP, click the folder for the printer, and then select the icon with the printer's name.Chapter 2 Get startedENWW
Sleep mode Power usage is reduced while in the Sleep mode. After initial setup of printer, the printer will enter the Sleep mode after five minutes of inactivity. The time to the Sleep mode can be changed from the control panel.To set the Sleep mode time1.ENWWFrom the Home screen, touch( Setup ).2.Touch Preferences .3.Scroll through the options, and then touch Sleep Mode.4.Touch After 5 minutes or After 10 minutes, or After 15 minutes.Sleep mode17
AccessibilityThe printer provides a number of features that make it accessible for people with disabilities.VisualThe HP software provided with the printer is accessible for users with visual impairments or low vision byusing your operating system's accessibility options and features. The software also supports most assistivetechnology such as screen readers, Braille readers, and voice-to-text applications. For users who are colorblind, colored buttons and tabs used in the HP software have simple text or icon labels that convey theappropriate action.MobilityFor users with mobility impairments, the HP software functions can be executed through keyboardcommands. The HP software also supports Windows accessibility options such as StickyKeys, ToggleKeys,FilterKeys, and MouseKeys. The printer doors, buttons, paper trays, and paper-width guides can be operatedby users with limited strength and reach.SupportFor more details about the accessibility of this printer and HP's commitment to product accessibility, visit HP'swebsite at www.hp.com/accessibility.For accessibility information for Mac OS X, visit the Apple website at www.apple.com/accessibility.18Chapter 2 Get startedENWW
3PrintMost print settings are automatically handled by the software application. Change the settings manually onlywhen you want to change print quality, print on specific types of paper, or use special features.This section contains the following topics:ENWW Print photos Print documents Print on both sides (duplexing) Print using Near Field Communication (NFC) Print with AirPrint Tips for print success19
Print photosMake sure photo paper is loaded into the photo tray.To print photos from a memory device1.Insert a memory device into the slot.CAUTION: Do not remove the flash drive from the printer USB port while it is being accessed by theprinter. This can damage the files on the USB flash drive. You can safely remove a USB flash drive onlywhen the USB port light is not blinking.2.On the printer display, select a photo that you want to print and touch Continue.3.Specify the number of photos to print.4.Touch(Edit) to change brightness, crop, or rotate the selected photo, or touchuse such features as Red Eye Removal or Photo Fix.5.Touch Continue and preview the selected photo.6.Touch Print to begin printing.(Print Settings) toTo print a photo from the printer software1.From your software, select Print.2.Make sure your printer is selected.3.Click the button that opens the Properties dialog box.Depending on your software application, this button might be called Properties, Options, Printer Setup,Printer Properties, Printer, or Preferences.4.Select the appropriate options. On the Layout tab, select Portrait or Landscape orientation. On the Paper/Quality tab, select the appropriate paper type from the Media drop-down list in theTray Selection area, and then select the appropriate print quality in the Quality Settings area. Click Advanced to select the appropriate paper size from the Paper Size drop-down list.5.Click OK to return to the Properties dialog box.6.Click OK, and then click Print or OK in the Print dialog box.NOTE: After the printing is finished, remove unused photo paper from the photo tray. Store the photo paperso it does not start to curl, which could reduce the quality of your printout.20Chapter 3 PrintENWW
To print a photo from the computer (OS X)1.Load paper in the tray. For more information, see Load media on page 11.2.From the File menu in your software, choose Print.3.Make sure your printer is selected.4.Set the print options.If you do not see options on the Print dialog, click Show Details.NOTE: The following options are available for a USB connected printer. Locations for the options canvary
affordable photo paper dries quickly for easy handling. Get sharp, crisp images when you use this paper with any inkjet printer. It is available in glossy finish in several sizes, including A4, 8.5 x 11 inches, and 10 x 15 cm (4 x 6 inches). It is acid-free for longer lasting documents. HP Photo Value Packs 8 Chapter 2 Get started ENWW