Transcription
HP ENVY Photo 7800 All-in-One series
Table of contents1 How do I? . 12 Get started . 2Accessibility . 3HP EcoSolutions (HP and the Environment) . 4Printer parts . 8Control panel and status lights . 10Paper basics . 13Load paper . 16Load original . 22Update the printer . 23Open the HP printer software (Windows) . 24Use the HP Smart app to print, scan, and troubleshoot from an iOS, Android, or Windows 10 device . 25Turn the printer off . 263 Print . 27Print using the HP Smart app . 28Print documents using HP printer software . 29Print photos using HP printer software . 30Print on envelopes . 32Print on both sides (duplexing) . 34Print using the maximum dpi . 35Print from apps on mobile devices . 37Tips for successful printing . 384 Copy and scan . 41Copy . 42Scan . 43Tips for copy and scan success . 52ENWWiii
5 Fax . 53Send a fax . 54Receive a fax . 59Set up phone book contacts . 63Change fax settings . 65Fax and digital phone services . 69Fax on Voice over Internet Protocol . 70Use reports . 71Additional fax setup . 756 Web Services . 96What are Web Services? . 97Set up Web Services . 98Use Web Services . 100Remove Web Services . 1027 Work with cartridges . 103Information on cartridges and the printhead . 104Check the estimated ink levels . 105Replace the cartridges . 106Order cartridges . 108Use single-cartridge mode . 109Store printing supplies . 110Cartridge warranty information . 1118 Network setup . 112Set up the printer for wireless communication . 113Change network settings . 117Use Wi-Fi Direct . 1199 Printer management tools . 122The HP Smart app . 123Toolbox (Windows) . 123HP Utility (OS X and macOS) . 125Embedded web server . 12610 Solve a problem . 129Jams and paper-feed issues . 130Cartridge issues . 135Printing issues . 137ivENWW
Copy issues . 146Scan issues . 147Fax issues . 148Network and connection issues . 157Printer hardware issues . 159Get help from the printer control panel . 160Get help from the HP Smart app . 161Understand printer reports . 162Solve problems using Web Services . 163Maintain the printer . 164Restore original factory defaults and settings . 167HP support . 169Appendix A Technical information . 171HP Company notices . 172Specifications . 173Regulatory notices . 175Environmental product stewardship program . 184Index . 191ENWWv
viENWW
1How do I?Learn how to use your HP ENVY Photo 7800 seriesENWW Get started Print Copy and scan Fax Web Services Work with cartridges Network setup Solve a problem1
2Get startedThis section contains the following topics:2 Accessibility HP EcoSolutions (HP and the Environment) Printer parts Control panel and status lights Paper basics Load paper Load original Update the printer Open the HP printer software (Windows) Use the HP Smart app to print, scan, and troubleshoot from an iOS, Android, or Windows 10 device Turn the printer offChapter 2 Get startedENWW
AccessibilityThe printer provides a number of features that make it accessible for people with disabilities.VisualThe HP software provided with the printer is accessible for users with visual impairments or low vision byusing your operating system's accessibility options and features. The software also supports most assistivetechnology such as screen readers, Braille readers, and voice-to-text applications. For users who are colorblind, colored buttons and tabs used in the HP software have simple text or icon labels that convey theappropriate action.MobilityFor users with mobility impairments, the HP software functions can be executed through keyboardcommands. The HP software also supports Windows accessibility options such as StickyKeys, ToggleKeys,FilterKeys, and MouseKeys. The printer doors, buttons, paper trays, and paper-width guides can be operatedby users with limited strength and reach.SupportFor more information about accessibility solutions for HP products, visit the HP Accessibility and Agingwebsite (www.hp.com/accessibility).For accessibility information for OS X and macOS, visit the Apple website at www.apple.com/accessibility.ENWWAccessibility3
HP EcoSolutions (HP and the Environment)HP is committed to helping you optimize your environmental footprint and empowering you to printresponsibly—at home or in the office.For more detailed information about environmental guidelines that HP follows during the manufacturingprocess, see Environmental product stewardship program. For more information about HP's environmentalinitiatives, visit www.hp.com/ecosolutions. Manage Power Quiet Mode Optimize Printing SuppliesManage PowerUse Sleep Mode, Auto-off and Schedule Printer On/Off to conserve electricity. Sleep mode Auto- off Schedule On and OffSleep modePower usage is reduced while in Sleep mode. After initial setup of printer, the printer will enter Sleep modeafter five minutes of inactivity.You can set up the printer to enter sleep mode after some time of inactivity or through pressing(thePower button).To enter sleep mode after some time of inactivityUse the following instructions to change the period of inactivity before the printer sleeps.1.From the printer control panel, do one of the following. Touch or swipe down the tab at the top of the screen to open the Dashboard, touch. Touch or swipe down the tab at the top of the screen to open the Dashboard, touch, and thentouch Power Management.2.Touch Sleep Mode, and then touch the desired option.NOTE: The printer will enter sleep mode when the selected time of inactivity is reached.4Chapter 2 Get startedENWW
To enter sleep mode through pressing(the Power button)You can make the printer enter sleep mode directly by pressing1.Touch2.Touch Power Button, and then select Enters Sleep Mode.3.Press(the Power button)., and then touch Power Management.(the Power button) located on the front left side of the printer to make the printer enter thesleep mode.NOTE:The printer will enter sleep mode 5 seconds after you pressperiod, you can press(the Power button). During this(the Power button) again to make the printer enter sleep mode immediately.Auto- offThis feature turns the printer off after 2 hours of inactivity to help reduce energy use. Auto-Off turns theprinter off completely, so you must use the Power button to turn the printer back on.If your printer supports this energy saving feature, Auto-Off is automatically enabled or disabled dependingon printer capabilities and connection options. Even when Auto-Off is disabled, the printer enters Sleep modeafter 5 minutes of inactivity to help reduce energy use Auto-Off is enabled when the printer is turned on, if the printer does not have network, fax or Wi-FiDirect capability, or is not using these capabilities. Auto-Off is disabled when a printer’s wireless or Wi-Fi Direct capability is turned on or when a printerwith fax, USB, or Ethernet network capability establishes a fax, USB, or Ethernet network connection.Schedule On and OffSchedule On and OffUse this feature to automatically turn the printer on or off on selected days. For example, you can schedulethe printer to turn on at 8 a.m. and turn off at 8 p.m. from Monday to Friday. In this way, you save energyduring the night and weekends.Use the following instructions to schedule the day and time for On and Off.1.From the printer control panel, touch or swipe down the tab at the top of the screen to open theDashboard, touch.2.Touch Schedule On/Off.3.Touch the desired option, and follow the onscreen messages to set the day and time to turn the printeroff and on.CAUTION:Always turn the printer off properly, using either Schedule Off or(the Power button) locatedon the front left side of the printer.If you improperly turn the printer off, the print carriage might not return to the correct position, causingproblems with the cartridges and print quality issues.ENWWHP EcoSolutions (HP and the Environment)5
Quiet ModeQuiet Mode slows down printing to reduce overall noise without affecting print quality. It only works whenprinting on plain paper. Additionally, Quiet Mode is disabled if you are printing using the best or presentationprint quality. To reduce printing noise, turn on Quiet Mode. To print at normal speed, turn Quiet Mode off.Quiet Mode is off by default.NOTE:Quiet Mode does not work if you print photos or envelopes.You can create a schedule by selecting the time when the printer prints in Quiet Mode. For example, you canschedule the printer to be in Quiet Mode from 10 p.m. to 8 a.m. everyday.To turn on Quiet Mode from the printer control panel1.From the printer control panel, touch or swipe down the tab at the top of the screen to open theDashboard, and then touch2.Touch Quiet Mode .3.Turn on Quiet Mode .( Setup ).To create a schedule for Quiet Mode from the printer control panel1.From the printer control panel, touch or swipe down the tab at the top of the screen to open theDashboard, and then touch( Setup ).2.Touch Quiet Mode .3.Turn on Quiet Mode .4.Turn on Schedule, and then change the start time and end time of the schedule.To turn on Quiet Mode while the printer is printing On the printing screen, touchNOTE:job.(Quiet Mode) to turn it on.Quiet Mode is turned on only after the current page is printed and is only used for the current printTo turn Quiet Mode on or off from the printer software (Windows)1.Open the HP printer software. For more information, see Open the HP printer software (Windows).2.Click Quiet Mode .3.Select On or Off .4.Click Save Setting.To turn Quiet Mode on or off from the printer software (OS X and macOS)1.Open HP Utility.NOTE:2.6HP Utility is located in the HP folder in the Applications folder.Select the printer.Chapter 2 Get startedENWW
3.Click Quiet Mode .4.Select On or Off .5.Click Apply Now.To turn Quiet Mode on or off from the Embedded Web Server (EWS)1.Open the EWS. For more information, see Open the embedded web server.2.Click the Settings tab.3.In the Preferences section, select Quiet Mode , and then select On or Off .4.Click Apply.Optimize Printing SuppliesTo optimize printing supplies such as ink and paper, try the following:ENWW Optimize paper usage by printing on both sides of the paper. Change the print quality in the printer driver to a draft setting. The draft setting uses less ink. Do not clean the printhead unnecessarily. Doing so wastes ink and shortens the life of the cartridges. Recycle used original HP cartridges through HP Planet Partners. For more information, visitwww.hp.com/recycle.HP EcoSolutions (HP and the Environment)7
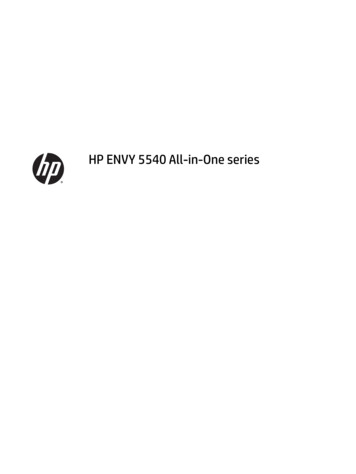
Printer partsFront viewFigure 2-1 Front and top views of HP ENVY Photo 7800 All-in-One series8FeatureDescription1Lid2Lid-backing3Scanner glass4Printer model name5Cartridge access door6Memory device area7Cartridge access area8cartridges9Photo tray10On button (also referred to as the Power button)11Control panel12Output tray13Color graphics display (also referred to as the display)14Automatic output tray extender (also referred to as the tray extender)15Memory card slot16Memory device light17Front universal serial bus (USB) port18Unlatch button19Paper trayChapter 2 Get startedENWW
Printing supplies areaFeatureDescription1Cartridge access door2Printhead3CartridgesNOTE: Cartridges should be kept in the printer to prevent possible print quality issues or printhead damage.Avoid removing supplies for extended periods of time.Back viewFigure 2-2 Rear view of HP ENVY Photo 7800 All-in-One seriesENWWFeatureDescription1Document feeder2Ethernet network port3Rear USB port4Fax ports: 2-EXT (top) and 1-LINE (bottom)5Power connection. Use only the power cord supplied by HP.Printer parts9
Control panel and status lightsOverview of buttons and lightsThe following diagram and related table provides a quick reference to the printer control panel features.LabelName and Description1Power button: Turns the printer on or off.2Back button: Returns to the previous screen.3Help button: Opens the Help menu for the current operation.4Home button: Returns to the Home screen, the screen that is displayed when you first turn on the printer.5Control panel display: Touch the screen to select menu options, or scroll through the menu items.6Wireless light: Indicates the status of the printer wireless connection. Solid blue light indicates that wireless connection has been established and you can print. Slow blinking light indicates that wireless is on, but the printer is not connected to a network. Make sure your printer iswithin the range of wireless signal. Fast blinking light indicates wireless error. Refer to the message on the printer display. If wireless is turned off, the wireless light is off and the display screen shows Wireless Off.Control panel display iconsIconPurposeCopy : Opens the Copy menu where you can select a copy type or change the copy settings.Scan : Opens the Scan menu where you can select a destination for your scan.Apps : Access the apps from your printer.10Chapter 2 Get startedENWW
IconPurposePhoto : Opens the Photo menu where you can view and print photos.Fax : Displays a screen where you can send a fax, or change fax settings.Setup : Opens the Setup menu where you can change preferences and use tools to perform maintenancefunctions.Help : Opens the Help menu where you can view How To videos, printer feature information, and tips.HP ePrint icon: Opens the Web Services Summary menu, where you can check ePrint status details, changeePrint settings, or print an Info page.Wi-Fi Direct icon: Opens the Wi-Fi Direct menu where you can turn on Wi-Fi Direct, turn off Wi-Fi Direct, anddisplay the Wi-Fi Direct name and password.Wireless icon: Opens the Wireless Summary menu where you can check wireless status and change wirelesssettings. You can also print a wireless test report, helping diagnose network connection issues.NOTE:(Ethernet) and(Wireless) will not be displayed at the same time. Showing the Ethernet iconor the wireless icon depends on the way your printer is connected to the network. If the network connection ofthe printer has not been set up, by default, the printer control panel display shows(Wireless).Ethernet icon: Shows that an Ethernet network connection exists and also provides easy access to the thenetwork status screen.ECO icon: Displays a screen where you can configure some of the printer environmental features.Fax Status icon: Displays status information for the Auto Answer function, fax logs, and the fax sound volume.Ink icon: Shows estimated ink levels by cartridge. Displays a warning symbol if the ink level is less than theminimum expected ink level.NOTE: Ink level warnings and indicators provide estimates for planning purposes only. When you receive a lowink warning message, consider having a replacement cartridge available to avoid possible printing delays. You donot need to replace cartridges until the print quality becomes unacceptable.ENWWControl panel and status lights11
Change printer settingsUse the control panel to change the printer function and settings, print reports, or get help for the printer.TIP: If the printer is connected to a computer, you can also change the printer settings using the printermanagement tools in computer.For more information about these tools, see Printer management tools.To change settings for a functionThe Home screen of the control panel display shows the available functions for the printer.1.From the control panel display, select a function tab, touch and slide your finger across the screen, andthen touch the icon to select the desired function.2.After selecting a function, touch( Settings ), scroll through the available settings, and then touchthe setting you want to change.3.Follow the prompts on the control panel display to change the settings.TIP:Touch(Home) to return to the Home screen.To change the printer settingsTo change the printer settings or print reports, use the options available on the Setup menu.1.From the printer control panel, touch or swipe down the tab at the top of the screen to open theDashboard, and then touch( Setup ).2.Touch and scroll through the screens.3.Touch the screen items to select screens or options.TIP:Touch(Home) to return to the Home screen.DashboardThe Dashboard on the printer control panel lets you access the icons on the display, check the status of theprinter, or monitor and manage current and scheduled printer tasks.To open the Dashboard, touch or swipe down the tab12Chapter 2 Get startedat the top of a screen on the control panel.ENWW
Paper basicsThe printer is designed to work well with most types of office paper. It is best to test a variety of print papertypes before buying large quantities. Use HP paper for optimum print quality. Visit the HP website atwww.hp.com for more information about HP paper.HP recommends plain papers with the ColorLok logo for printing everyday documents. Allpapers with the ColorLok logo are independently tested to meet high standards ofreliability and print quality, and produce documents with crisp, vivid color, bolder blacks,and that dry faster than ordinary plain papers. Look for papers with the ColorLok logo ina variety of weights and sizes from major paper manufacturers.This section contains the following topics: Recommended papers for printing Order HP paper supplies Tips for selecting and using paperRecommended papers for printingIf you want the best print quality, HP recommends using HP papers that are specifically designed for the typeof project you are printing.Depending on your country/region, some of these papers might not be available.Photo printing HP Premium Plus Photo PaperHP Premium Plus Photo Paper is HP’s highest-quality photo paper for your best photos. With HPPremium Plus Photo Paper, you can print beautiful photos that are instant-dry so you can share themright off the printer. The printer supports several sizes, including A4, 8.5 x 11 inches, 4 x 6 inches (10 x15 cm), and 5 x 7 inches (13 x 18 cm) in two finishes - glossy or soft gloss (semi-gloss). Ideal for framing,displaying, or gifting your best photos and special photo projects. HP Premium Plus Photo Paper deliversexceptional results with professional quality and durability. HP Advanced Photo PaperThis glossy photo paper features an instant-dry finish for easy handling without smudging. It resistswater, smears, fingerprints, and humidity. Your prints have a look and feel comparable to a storeprocessed photo. It is available in several sizes, including A4, 8.5 x 11 inches, 10 x 15 cm (4 x 6 inches),13 x 18 cm (5 x 7 inches). It is acid-free for longer lasting documents. HP Everyday Photo PaperPrint colorful, everyday snapshots at a low cost, using paper designed for casual photo printing. Thisaffordable photo paper dries quickly for easy handling. Get sharp, crisp images when you use this paperwith any inkjet printer. It is available in glossy finish in several sizes, including A4, 8.5 x 11 inches, 5 x 7inches and 4 x 6 inches (10 x 15 cm). It is acid-free for longer lasting documents.ENWWPaper basics13
Business documents HP Premium Presentation Paper 120g Matte or HP Professional Paper 120g MatteThis paper is a heavy two-sided matte paper perfect for presentation, proposals, reports, andnewsletters. It is heavyweight for an impressive look and feel. HP Brochure Paper Glossy or HP Professional Paper GlossyThese papers are glossy-coated on both sides for two-sided use. They are the perfect choice for nearphotographic reproductions and business graphics for report covers, special presentations, brochures,mailers, and calendars. HP Brochure Paper Matte or HP Professional Paper MatteThes
Figure 2-1 Front and top views of HP ENVY Photo 7800 All-in-One series Feature Description 1 Lid 2 Lid-backing 3 Scanner glass 4 Printer model name 5 Cartridge access door 6 Memory device area 7 Cartridge access area 8 cartridges 9 Photo tray 10 On button (also referred to as the Power button) 11 Control panel 12 Output tray