Transcription
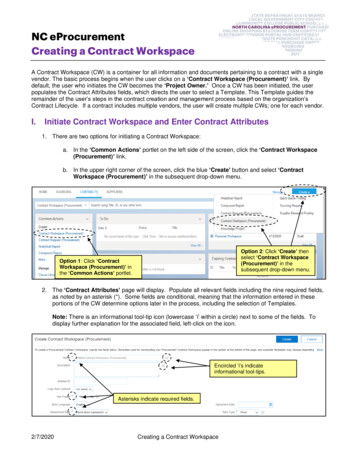
NC eProcurementCreating a Contract WorkspaceA Contract Workspace (CW) is a container for all information and documents pertaining to a contract with a singlevendor. The basic process begins when the user clicks on a ‘Contract Workspace (Procurement)’ link. Bydefault, the user who initiates the CW becomes the ‘Project Owner.’ Once a CW has been initiated, the userpopulates the Contract Attributes fields, which directs the user to select a Template. This Template guides theremainder of the user’s steps in the contract creation and management process based on the organization’sContract Lifecycle. If a contract includes multiple vendors, the user will create multiple CWs; one for each vendor.I.Initiate Contract Workspace and Enter Contract Attributes1. There are two options for initiating a Contract Workspace:a. In the ‘Common Actions’ portlet on the left side of the screen, click the ‘Contract Workspace(Procurement)’ link.b. In the upper right corner of the screen, click the blue ‘Create’ button and select ‘ContractWorkspace (Procurement)’ in the subsequent drop-down menu.Option 2: Click ‘Create’ thenselect ‘Contract Workspace(Procurement)’ in thesubsequent drop-down menu.Option 1: Click ‘ContractWorkspace (Procurement)’ inthe ‘Common Actions’ portlet.2. The ‘Contract Attributes’ page will display. Populate all relevant fields including the nine required fields,as noted by an asterisk (*). Some fields are conditional, meaning that the information entered in theseportions of the CW determine options later in the process, including the selection of Templates.Note: There is an informational tool-tip icon (lowercase ‘i’ within a circle) next to some of the fields. Todisplay further explanation for the associated field, left-click on the icon.Encircled ‘i’s indicateinformational tool-tips.Asterisks indicate required fields.2/7/2020Creating a Contract Workspace
NC eProcurementCreating a Contract Workspace3. Name*: Enter a title for the CW. This title must be a unique value, and if it has already been used, thesystem will alert the user with an error message.4. Description*: Describe the contract being created or loaded.5. Related ID: A free-text field used to note IDs or other tracking numbers created outside of the system.6. Copy from Contract: This field defaults to ‘(no value),’ but a user may initiate the process of copying apreviously-created CW from this drop-down field. A subsequent training document covers this process inmore detail.7. Test Project*: Always select the radio button for ‘No’ in this field. The system allows for the creation ofTest Projects for practice or training purposes, but if the ‘Yes’ option is selected in error, it cannot beundone once the user clicks ‘Create’ at the completion of this screen.8. Base Language: This field defaults to ‘English,’ the only option available.9. Hierarchical Type*: This field defaults to ‘Stand-alone Agreement,’ and although there are two otheroptions in the drop-down menu, do not change from the default.10. Supplier: Select the Supplier entering into the contract. Click the down-arrow at the right of the box andselect ‘Search more’ in the drop-down menu to access the Supplier Search page. On the SupplierSearch page, enter a Supplier Name, Location, or any other term within the default Search Filter free-textfield. Click on the Plus icon to add more search filters and click the down-arrow to select the specific fieldby which to filter if the desired field does not display automatically. Click ‘OK’ when the correct Supplierhas been located to add them to the CW.Note: Only Suppliers with an active registration for NC eProcurement within the NC electronic VendorPortal (eVP) will return in the search results. If a contract has been negotiated with a Supplier who is notactive in eVP, the CW can still be created, but it cannot be Published until that Supplier has an active NCeProcurement registration within eVP and has been added to the CW.Note: As a reminder, CW’s are for one supplier only. If multiple suppliers are on a contract, the usershould create a CW for one of the vendors and then copy it to use as the basis of the CWs for the othervendors.Enter search termsin default filter.Click ‘OK’ once theSupplier has beenlocated to add themto the CW.Click the Plus icon to add more SearchFilters and click the down-arrow to select adifferent Search Field.11. Contract Amount: Enter the exact or estimated dollar value of the contract in USD. This is not arequired field, so it can be left blank or a dollar value of 0 can be entered.2/7/2020Creating a Contract Workspace2
NC eProcurementCreating a Contract Workspace12. Commodity*: Select the Commodity Code that best describes the nature of the contracted item(s). Clickthe down-arrow at the right of the box and select ‘Search more’ in the drop-down menu to access theCommodity Code Search page. Users may search by ‘Name’ or ‘ID.’ After identifying the correct code,check the box next to it and click ‘Done’ to add it to the CW. More than one Commodity Code can beselected per CW if the Contract covers multiple items.Note: The Commodity Codes listed are part of the United Nations Standard Products and Services Code(UNSPSC) commodity code structure. Codes that begin with a ‘7’, ‘8,’ or ‘9’ correspond to Services.Note: UNSPSC codes are organized in groupings of two, four, and six digits, with six-digit codesproviding the most detailed description of the item(s). To search for more specific Commodity Codes inthe search results, click on the Blue Triangle next to the Commodity Code description to drill downfurther.Note: The UNSPSC code search website can also be a helpful resource: https://www.unspsc.org/searchcode.Enter search termsin the search box.Click the Blue Triangle to drill down to seemore detailed Commodity Code searchresults.After identifying the correct six-digitCommodity Code(s), check the box to theleft of the description and then click ‘Done’to add it to the CW.13. Entity: Select the Entity entering into the contract. Click the down-arrow at the right of the box and select‘Search more’ in the drop-down menu to access the Entity Search page. Users may search by ‘Name’or ‘ID.’ For some Entities with multiple levels, it will be necessary to drill down further by clicking on theBlue Triangle next to the Entity’s name. Once the correct Entity has been identified, check the box nextto it and click ‘Done’ to add it to the CW.Note: It is very important to select the correct Entity, as this selection directly impacts the user’s optionsat the Template level.2/7/2020Creating a Contract Workspace3
NC eProcurementCreating a Contract WorkspaceClick the Blue Triangle to drill down to seemore detailed Entity optionsAfter identifying the correct Entity, checkthe box to the left of the description andclick ‘Done’ to add it to the CW.14. Predecessor Project: This field defaults to ‘(no value),’ but a user may link the current CW to acompleted CW from this drop-down field.15. Contract Type*: This field defaults to ‘No Choice,’ but it is required that the user selects the correct typeof contract from the drop-down menu. Four choices are provided, although certain options are notapplicable to the user creating the CW.a. Term Contract Statewide: Option for use by the Division of Purchase & Contract ONLY whencreating Statewide Term Contracts to cover a specific period of time.b. Term Contract Agency Specific: Option for use by any Entity when creating a contract intendedto cover a specific period of time.c.Term Contract IT Convenience: Option for use by the Department of Information TechnologyONLY when creating Statewide IT Term Contracts to cover a specific period of time.d. Agency Contract: Option for use by any Entity when creating a spot-buy (nonrecurring) contract.Note: It is very important to select the correct Contract Type, as this selection directly impacts the user’soptions at the Template level.16. Solicitation Type: This field defaults to ‘No Choice,’ but the user can select either ‘Competition’ or‘Waiver of Competition’ from the drop-down menu should those options better describe the nature of thebidding process for this contract.17. Statewide Contract ID: This field only appears after the selection of either ‘Term Contract Statewide’ or‘Term Contract IT Convenience’ in the ‘Contract Type’ field. Click the down-arrow at the right of thebox and select ‘Search more’ in the drop-down menu to access the list of Statewide Contract IDs andselect the one for which this contract is being loaded.18. Agency Contract ID: This field only appears after the selection of either ‘Term Contract AgencySpecific’ or ‘Agency Contract’ in the ‘Contract Type’ field. This free-text field should be populated withthe Contract ID the Entity uses to label this contract.19. Bid Number: This field defaults to ‘(no value),’ but the user can choose to add the Bid Number IPSassigned to the official competitive bidding event should one have occurred. Click the down-arrow at theright of the box and select ‘Search more’ in the drop-down menu to access the Bid Number Searchpage. Users may search by ‘Bid Number’ or ‘Bid Description.’ Values will be added from IPS on anightly basis.2/7/2020Creating a Contract Workspace4
NC eProcurementCreating a Contract Workspace20. Agreement Date: The date that the contract was awarded to the Supplier. Use the date-picker or typethe date in the correct format (MM/DD/YYYY). Selecting past dates is acceptable.21. Term Type*: This field defaults to ‘Fixed,’ and although two other options are available in the drop-downmenu, always leave this field populated with ‘Fixed.’22. Effective Date*: The date that the contract goes into effect. Use the date-picker or type the date in thecorrect format (MM/DD/YYYY). Selecting past dates is acceptable if the user is loading an alreadyexisting contract. If this date is in the future when the CW is published, the status will be ‘Pending’ untilthe date is reached and the status changes to ‘Published.’23. Expiration Date*: The date that the contract expires and is no longer valid. Use the date-picker or typethe date in the correct format (MM/DD/YYYY).24. Notice Period(in days): Enter the number of days prior to the Expiration Date that the user wishes tobegin receiving reminder email notifications about the contract’s upcoming expiration. The suggestedentry for this field is 120 days, but the user may choose any number of days. By default, the ProjectOwner receives the notifications, but other recipients may be added in the ‘Notice Email Notification’area within a different part of the CW.2/7/2020Creating a Contract Workspace5
NC eProcurementCreating a Contract WorkspaceII. Template SelectionAfter filling out the Contract Attributes fields, the user should navigate down the screen to the ‘Select a template’section. The Template options displayed are based upon the selections made in the ‘Entity’ and ‘ContractType’ fields. Once the user selects the correct Template, they will be prompted to answer additional questionsthat are used to include/exclude different objects in the Contract Workspace (CW).1. In the ‘Select a template’ section of the CW Attributes page, click the radio button next to the appropriateTemplate for the contract being created. The possible options include ‘Statewide Term ContractProcess,’ Statewide IT Procurement Process,’ and ‘Agency Contract Process.’2. The selection of the ‘Statewide Term Contract Process’ prompts the user to answer ‘Is this contractfor Goods or for Services?’ in a drop-down menu. If the answer is ‘Consulting Services’ or ‘GeneralServices,’ an additional question will display: ‘Will Contract Terms for Buying be enforced for thisContract?’ At this time, select ‘No,’ as ‘Contract Terms’ in this context refers to a feature of thesoftware not yet implemented in the system.When the ‘Statewide Term ContractProcess’ Template is selected and theanswer to the question is ‘Goods,’ thereare no further questions.3. The selection of the ‘Statewide IT Procurement Process’ option prompts the user to answer: ‘Is thiscontract for Goods or for Services?’ in a drop-down menu. If the answer is ‘Services,’ an additionalquestion will display: ‘Will Contract Terms for Buying be enforced for this Contract?’ At this time,select ‘No,’ as ‘Contract Terms’ in this context refers to a feature of the software not yet implemented inthe system, but additional training will be added and advertised when this feature becomes available.When the ‘Statewide IT ProcurementProcess’ Template is selected and theanswer to the question is ‘Services,’ anadditional question about ‘Contract Terms’will be asked, and the answer shouldalways be ‘No.’4. The selection of the ‘Agency Contract Process’ option prompts the user to answer two questions in adrop-down menu.2/7/2020Creating a Contract Workspace6
NC eProcurementCreating a Contract Workspacea. The first question is ‘Is this contract for Goods or for Services?’ If the answer is ‘ConsultingServices’ or ‘General Services,’ an additional question will display: ‘Will Contract Terms forBuying be enforced for this Contract?’ At this time, select ‘No’, as ‘Contract Terms’ in thiscontext refers to a feature of the software not yet implemented in the system.b. The second question is ‘Is this an IT Contract?’ and the two options in the drop-down are ‘Yes’or ‘No’.5. After selecting the correct Template and answering all subsequent questions, click the blue ‘Create’button (at either the top or bottom of the screen – there are two instances of this button). This actionsaves the CW in the system and assigns it a unique ID number beginning with ‘CW.’ The site will nowtake the user to the Overview screen where the user can begin managing the various aspects of theContract Workspace.When the ‘Agency Contract Process’Template is selected, the additionalquestion ‘Is this an IT Contract?’ will beasked.Once the Template is selected and allquestions have been answered, the finalstep is to click ‘Create’ to save the CW.III. Overview and Managing TasksAfter clicking ‘Create’ on the Contracts Attributes page, the Contract Workspace (CW) is saved, and theOverview screen is displayed. This screen contains information about the contract captured on the previousContract Attributes page. From this screen, users can access five other tabs for the management of the CW:‘Documents’, ‘Tasks,’ ‘Team,’ ‘Message Board,’ and ‘History.’ At this point, the CW is in ‘Draft’ status.‘Documents’ tab: Place to manage all contract related documents.‘Tasks’ tab: Maps out organization’s standardized process for contract creation in a simple Checklist.‘Team’ tab: Contains a list of individuals and groups considered as ‘Team Members’ who will take various roles inthe CW throughout the contract lifecycle.‘Message Board’ tab: An online discussion page where team members can hold conversations in the form ofposted messages organized in topics.‘History’ tab: A detailed record of all changes to information in the CW over time.2/7/2020Creating a Contract Workspace7
NC eProcurementCreating a Contract Workspace1. Scroll down the screen to verify the accuracy of the information populated in the ‘Overview,’ ‘ContractAttributes,’ and ‘Contract Term Attributes’ sections of the Overview screen.‘Overview’ contains basic information including ‘Contract ID,’ ‘Entity,’ and ‘Description.’‘Contract Attributes’ contains information including ‘Contract Amount,’ ‘Supplier,’ and ‘ContractType.’‘Contract Term Attributes’ contains information including ‘Effective Date,’ ‘Expiration Date,’ and‘Notice Period(in days).’2. To edit any of this information, click on ‘Actions’ in the top-right of each section and select ‘Edit’ from thedrop-down.Access to additional tabs.To edit section information,click on ‘Actions’ andselect ‘Edit Overview.’The ‘Overview’ screen is displayed once CW iscreated. It displays CW information in threesections: ‘Overview,’ ‘Contract Attributes,’ and‘Contract Term Attributes’ (not pictured in thisscreenshot).Note: Contract expiration notifications can be controlled within the ‘Contract Term Attributes’ section ofthe ‘Overview’ screen. There are two different notification email options that serve the same function ofreminding invested users of contract expiration: ‘Expiration Email’ and ‘Notice Email.’ The ProjectOwner receives both emails by default, and other recipients can be included if desired. Users can utilizeboth options if they wish to send notifications to different recipients using different schedules.The ‘Expiration Email’ first sends 30 days before the contract expiration date, and the ‘Notice Email’first sends on the ‘Notice Date,’ which is a specified number of days before the ‘Expiration Date.’These dates, the notification recipients, and the frequency of reminder emails can be edited by clicking‘Actions’ next to ‘Contract Term Attributes’ and selecting ‘Edit Term Attributes.’ Once changes havebeen made, click ‘OK.’2/7/2020Creating a Contract Workspace8
NC eProcurementCreating a Contract Workspace‘Expiration Email’ section.Users can edit the sending date, the recipientlist, and how often reminder emails will be sentfor both the ‘Expiration Email’ and the ‘NoticeEmail.’ Click ‘OK’ once all changes have beenmade.‘Notice Email’ section.3. Click on ‘Tasks’ to navigate to the ‘Tasks’ tab.4. The ‘Tasks’ tab displays two ‘Phases’ that contain various ‘Tasks’ that serve as guidelines for therequired steps for creating and executing the contract. The specific ‘Tasks’ displayed are populatedbased on the selections for ‘Entity,’ ‘Contract Type,’ and ‘Template’ made on the ‘Contract Attributes’page of the CW.‘Phases’ represent groups of activities organized in a specific order. ‘Phase 1’ is for ‘Contract Creation’and guides the user from loading the solicitation documents through creating, reviewing, and approvingthe actual contract document. ‘Phase 2’ is for ‘Contract Execution’ and takes the user from getting thecontract document signed to the final act of ‘Publishing’ the CW to make it official.‘Tasks’ represent individual activities in the CW that are assigned to a user to be completed. Each‘Entity’ sets their default ‘Tasks,’ and although they are all optional, it is suggested that users followthese ‘Tasks’ in order to guide them through the contracting process. Users can add ad hoc ‘Tasks’ ifadditional steps are deemed necessary that are not captured in the default ‘Tasks.’ ‘Tasks’ may have‘Documents’ attached to them, and their ‘Owner,’ current ‘Status,’ and ‘Due Date’ (if there is one) areall indicated on the ‘Tasks’ tab.There are several types of ‘Tasks’ in a CW:a. To Do Task: A simple task that tracks an action.b. Document Task: Associated with a particular document or folder.c.Review Task: Designed to route a document to others for review, and reviewers can usually editand suggest changes.d. Approval Task: Requests approvers to approve deny a contract document before it is finalized.2/7/2020Creating a Contract Workspace9
NC eProcurementCreating a Contract Workspacee. Signature Task: Used with ‘Docusign’ to obtain electronic signatures on contract documents.f.Notification Task: Sends email reminders to users.’Phases’’Tasks’‘Documents’ (if present) associated with‘Tasks,’ along with the ‘Owner,’ ‘Status,’ and‘Due Date’ (if set) are listed to the right of each‘Task.’5. Click on a ‘Task’ to display the ‘Action’ menu for that ‘Task’ and select ‘View Task Details.Clicking on a ‘Task’ displays a dropdown ‘Action’ menu with variousoptions including ‘View Task Details.’6. The ‘Task’ detail page opens and displays the ‘Task’ number and name above a description of the user’sexpected action. Click ‘Mark Started’ to indicate the ‘Task’ has been initiated and ‘Mark Complete’ oncethe activity has been completed. If the ‘Task’ is not a ‘To Do Task,’ the ‘Mark Started’ button will notappear on the detail page but can be selected from the ‘Action’ drop-down. ‘Mark Started’ will changethe ‘Status’ to ‘In Progress.’ ‘Mark Complete’ will change the ‘Status’ to ‘Complete’ and put a greencheckmark next to that ‘Task’ on the ‘Tasks Tab’ so CW stakeholders know where things are in theprocess.2/7/2020Creating a Contract Workspace10
NC eProcurementCreating a Contract Workspace’Task’ numberand name.’Task’ instructions.’Task’ statusbuttons.7. To create a new ad hoc ‘To Do Task’ or ‘Notification Task,’ click ‘Actions’ above the ‘Task’ list andselect the desired ‘Task’ type from the drop-down menu.Click ‘Actions’ and selectthe type of ‘Task’ to create.8. On the ‘New Task’ page, you can set values for fields including ‘Title,’ ‘Description,’ ‘Owner,’ and a‘Due Date.’ By including a ‘Due Date,’ the ‘Task’ will show up in the new owner’s ‘To Do’ portlet. Whenthe details have been completed, click ‘OK’ to send the ‘Task’ to its new owner. The new owner willreceive an email notification alerting them to their new ‘Task.’Add a ‘Title,’ ‘Description,’‘Owner,’ and ‘Due Date’ amongother options.2/7/2020Creating a Contract Workspace11
NC eProcurementCreating a Contract WorkspaceIV. Managing DocumentsThe ‘Documents’ tab is a central storage location for all documents related to a contract. It houses theassociated ‘Solicitation Documents,’ the ‘Contractual Services Agreement,’ which serves as the maincontract document, and any modification documents. Users can upload new documents, edit and replace existingdocuments, and associate ‘Tasks’ with documents to get them reviewed, approved, and signed. Documents areversion controlled and exist in a folder structure.1. Click on the ‘Documents’ tab and note the folder structure as defined by the Template selected. Click ona Blue Triangle to drill down for more options. The document’s ‘Owner’ and ‘Status’ are listed to theright of each item.Click on the ‘Documents’ tab todisplay the document foldersrelated to the CW. Drill downfurther on each folder via the BlueArrow to display the documentswithin each folder. Note the‘Owner’ and ‘Status’ to the right.2. The first document-related ‘Task’ is to ‘Load Solicitation Documents for Reference.’ Click on the‘Solicitation Documents’ folder and select ‘Document’ beneath the ‘Upload’ option in the drop-downmenu. This process works for uploading any document to the Contract Workspace (CW).3. On the ‘Create Document’ page, click ‘Choose File’ to browse through the computer to select the file toupload, or drag-and-drop the file from the computer’s desktop to the ‘Or drop file here’ box. Enter a‘Description’ of the document and click ‘Create’ to finish uploading the file.Upload a document by browsing thecomputer via ‘Choose File,’ ordrag-and-drop the document fromthe computer’s desktop into the ‘Ordrop file here’ box. Enter a‘Description’ for the document andclick ‘Create.’2/7/2020Creating a Contract Workspace12
NC eProcurementCreating a Contract Workspace4. Once the user uploads the document, it will have its own ‘Action’ menu through which the user can doseveral things like creating new ‘Tasks’ for ‘Review,’ ‘Approval,’ and ‘Signature.’ Before creating new‘Tasks,’ the user is advised to ‘Publish’ the document as certain ‘Document Tasks’ cannot be starteduntil the document is published.Click on the document (full namehidden by ‘Action’ menu).Select ‘Publish’ (among otheroptions) from the ‘Action’ menu tochange the document ‘Status’ from‘Draft’ to ‘Published.’5. The next document-related ‘Task’ is to ‘Capture Key Information in Contract Document.’ For this stepthe user clicks on the ‘Contractual Services Agreement’ document within the ‘Contract Document’folder and selects ‘Download Draft’ from the ‘Action’ drop-down menu. This document serves as thebinding contractual agreement between the ‘Supplier’ and the ‘Entity.’6. Open the downloaded MS Word document and fill in the blank portions of the document with the requisitedetails of the contract being entered. All previous versions are saved and made available in the ‘VersionHistory’ tab of the document. Please remember that these changes are executed on a local copy of thedocument.7. When the contract document is complete, upload and ‘Replace’ the original template document in theCW. In the ‘Documents’ tab, click on the ‘Contractual Services Agreement’ document and select‘Replace Document’ from the ‘Action’ drop-down.Note: It is advised to ‘Replace’ the original document to lessen the chance of sending the wrongdocument for ‘Approval’ or ‘Signature.’ All previous versions are saved and made available in the‘Version History’ tab of the document.8. The ‘Replace Document’ screen will appear, and the user can add a ‘Description’ of the documentreplacing the original. Add the file via the ‘Choose File’ or the drag-and-drop option and click ‘Replace.’On the next screen, choose the radio button next to ‘Replace document by the uploaded file’ and click‘OK.’9. The ‘Outline View’ tab for this document displays. The ‘Status’ and ‘Version’ of the document aredisplayed in the top left, and the document’s structure is outlined by ‘Clause’ in the middle of the screen.‘Clauses’ from the original document are labeled by ‘Template’ in the ‘Type’ column, and any clausesthat were added when the user edited the document offline will be labeled as ‘Nonstandard.’ Click‘Done’ and ‘Publish’ the document from its ‘Action’ menu on the next screen.2/7/2020Creating a Contract Workspace13
NC eProcurementCreating a Contract WorkspaceNote: Although it is possible to edit a document in ‘Outline View,’ it is advised that all document edits bemade in MS Word instead.‘Outline View’ tab.‘Clauses’ and ‘Clause Type.’Document ‘Status’and ‘Version.’10. The next ‘Tasks’ to complete are document-related and ask the user to ‘Review’ and then ‘Approve’ thedocument. ‘Review Tasks’ and ‘Approval Tasks’ are initiated in a similar fashion and can be accessedfrom either the ‘Documents’ tab or the ‘Tasks’ tab, although it is advised that these ‘Tasks’ be initiatedfrom the ‘Tasks’ tab.a. From the ‘Documents’ tab, the user can click on the document and select either ‘Review’ or‘Approval’ below ‘Create New Task’ in the drop-down ‘Action’ menu.b. From the ‘Tasks’ tab, click on the ‘Task’ and select ‘View Task Details’ from the drop-down‘Action’ menu.11. On the ‘Review Task’ screen, select the reviewers by clicking the down-arrow in the search box to findthe individual or group that needs to review the document. Click the box next to their name and click‘Done.’Note: A link for ‘New External Reviewer’ is next to the search box and will allow for the document to besent outside the ‘Entity’ via email, but it is advised that all contract reviews be done within the system.12. Select the ‘Approval Rule Flow Type.’ ‘Parallel’ nodes are activated at the same time; ‘Serial’ nodesare activated consecutively, and the second reviewer or approver does not receive the ‘Task’ until thepreceding reviewer or approver completes their ‘Task.’ ‘Serial’ is the most common type to select.13. Specify a ‘Due Date,’ provide a message for the recipient, and click ‘Submit’ to send the document for‘Review.’ The ‘Reviewer’ receives an email notification as well as a ‘To Do Task’ to let them know theyhave been asked to ‘Review’ the document.2/7/2020Creating a Contract Workspace14
NC eProcurementCreating a Contract WorkspaceSelect the ‘Reviewer,’‘Approval Flow Type,’and ‘Due Date.’Include a ‘Message’ forthe ‘Reviewer’ and click‘Submit.’14. The reviewer can mark the document ‘Reviewed’ as-is, or the reviewer can propose changes to thedocument before sending it back. The ‘Project Owner’ will receive an email notification when thedocument has been ‘Reviewed.’15. If the ‘Reviewer’ does not suggest changes, click ‘Mark Complete’ to indicate the ‘Task’ is done and thedocument has been ‘Reviewed.’ A green checkmark appears next to the ‘Task’ on the ‘Tasks’ tab atthis point. If the ‘Reviewer’ makes edits, click the ‘Review Change’ link to view those edits.Click ‘Review Change’to see proposed edits bythe ‘Reviewer,’ or click‘Mark Complete’ if noedits have been made.2/7/2020Creating a Contract Workspace15
NC eProcurementCreating a Contract Workspace16. On the ‘Review Changes’ screen, the user can ‘Process All Changes’ if they agree with the edits, or‘Reject All Changes’ if they do not. The user can also accept or reject changes individually.‘Process’ or ‘Reject’ changestogether or individually.17. Click ‘Save’ on the next screen and then ‘OK’ to mark the ‘Task’ completed. If additional reviews arenecessary, click ‘New Round’ to begin the process again.Click ‘New Round’ to begin theprocess if additional reviews areneeded.18. To send the document for ‘Approval,’ click on the ‘Approve Final Version of Contract Document(Including Award Recommendation)’ link and select ‘View Task Details’ from the drop-down menu.19. On the ‘Approval Task’ screen, click on the ‘Custom’ link to begin adding ‘Approvers.’Click the ‘Custom’ link to add‘Approvers.’20. Click ‘Add Initial Approver’ and select the ‘Approver’ from the drop-down menu and click ‘OK.’Click the ‘Add Initial Approver’ andselect the ‘Approver’ to add fromthe drop-down menu.2/7/2020Creating a Contract Workspace16
NC eProcurementCreating a Contract Workspace21. If additional ‘Approvers’ are needed, click the Blue Arrow before or after the existing ‘Approver’ andadd the new ‘Approver’ in ‘Serial’ or ‘Parallel.’ Specify a ‘Due Date,’ add a message, and click‘Submit.’To add additional ‘Approvers,’click the Blue Triangle wherethe new ‘Approver’ needs to go– before or after the existing‘Approver’ – and add select theindividual or group from the dropdown menu.Note: ‘Approvers’ receive an email notification as well as a ‘To Do Task’ to let them know they have beenasked to ‘Approve’ the document. If an ‘Approver’ is also a ‘Project Owner,’ they will have the ability tomake edits to the document before approving, or they can ‘Approve’ or ‘Deny’ the document as-is. Eachtime the document is approved or denied,
NC eProcurement Creating a Contract Workspace 2/7/2020 Creating a Contract Workspace 3 12. Commodity*: Select the Commodity Code that best describes the nature of the contracted item(s).Click the down-arrow at the right of the box and select 'Search more' in the drop-down menu to access the Commodity Code Search page.