Transcription
Q U I C K P O SS U P P L E M E N TUsing the Commonwealth BankEFTPOS terminal with QuickPOSThis special supplement shows you how to set upand use QuickPOS with the Commonwealth Bank’sEFTPOS terminal.CHAPTER 1It shows you what you need to set up with QuickPOS and therelated hardware. It then shows you what to do.1
IntroductionThis guide shows you how to set up QuickPOS to work with the KeyCorpEFTPOS terminal. It also includes steps on how to carry out basicEFTPOS tasks in QuickPOS.To communicate with the Commonwealth Bank, you will need to use theKeyCorp K74 EFTPOS Controller modem, You can have an approvedtechnician install it within your computer unit or install this as an externaldevice.Setting upWhat you need before setting up 9 pin to 25 pin, female to female adapter (modem cable) You canpurchase this from most electronic stores such as Dick Smith andTandy. Spare COM port on your PC. Card Acceptor Identification Code (CAIC) and Card AcceptorTerminal Identification Code (CATID). These can be obtained fromyour bank.Setting up the hardwareSet up the following devices: Receipt printer in QuickPOS to replace the COM2000 EFTPOSprinter functionality.Removing the KeyCorp EFTPOS terminal from useBefore beginning, shut down your PC and remove the cable from theback of the K24 printer.To remove the need for the EFTPOS printer and use your standard printerto produce receipts, you will need a 9 pin to 25 pin female to femaleadaptor.1. Disconnect the printer cable from the KeyCorp EFTPOS printer andconnect it to the 9-25 pin female to female cable.2
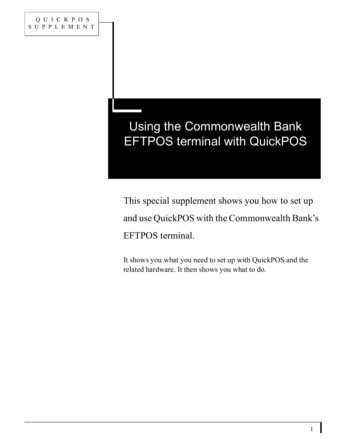
2. Connect the other end of this cable to a spare 9 pin COM port on yourPC as shown in the following diagram.PrinterBoxMobile25 pinPower25 pin25 pinComputer9 pinYou should retain your EFTPOS printer, even though it is not requiredwhen your system is set up as above.Electronic Cash Register modeAfter the initial setup, the EFTPOS terminal may default to Printer mode.You will need to change this to "ECR" mode (Electronic Cash Register).1. From the EFTPOS printer press the blue F key to access the functionmenu.2. Select Special Function and then 3.3. Enter your six digit password and then click OK.(You can obtain your password from your terminal provider.)4. Enter Port Setup, Option 3.5. Enter Device Select, Option 1.6. Select ECR, which is the left hand key (coloured yellow).7. Enter CLR, and CLR again.The device displays a Ready mode to accept EFTPOS transactions fromQuickPOS.3
Note: The modem unit has an incoming line connection and Handsetconnection. Therefore, be aware that the line may be operatingother devices such as fax or telephone.QuickPOSNow that your hardware is ready to support the EFTPOS terminal, youneed to set up three items in QuickPOS: KeyCorp EFTPOS terminal PC Keyboard POS KeyboardKeyCorp EFTPOS terminal1. Choose Tool menu Options from the QuickPOS menu bar.2. Select the EFTPOS tab.QuickPOS displays the EFTPOS tab on the Options window.3. Select from the Type drop-down menu "KeyCorp K71li Keypay(V3.22) for Comm2000".4. Choose from the Connect to drop-down menu the communicationsport that is connected to the KeyCorp EFTPOS terminal.You may also like to change the text captions that appear in theCaptions for combo box.5. Click Settings.6. Enter your merchant CAIC and CATID codes supplied by theCommonwealth Bank. Note that these must be correct as incorrectsettings may stop your EFTPOS system working properly.7. Click OK.8. Click Apply to save and continue making changes to this window.Otherwise, click OK to save and close this window.4
PC KeyboardYou need to assign the EFTPOS function to a keyboard key.1. Choose Tools menu Options.2. Select the Keyboard tab.3. Click Design PC Keyboard Layout.QuickPOS displays the Standard PC Keyboard Layout window.4. Select a keyboard key from the Keyboard Keys column.5. Select Tender EFT from the Functions column.6. Click Use EFTPOS in the Tender EFT Options on the right.7. Click Apply Function to Key.8. Set the Function options to suit your business requirements. Refer topage 7 for a detailed explanation.9. Click OK to exit the PC Keyboard Key Function window.10. Click OK to save and close the Layout window.5
Note: If a function is already assigned to the key you select, QuickPOShighlights this function in the Function list. This means you willneed to assign the Tender EFT function to another key. You canidentify keys without assigned functions because they are shownas "None".If a key is already allocated for manual EFT Tender transactionsselect this key to make adjustments to the function options. Alternatively, select another key for automated EFT transactions.POS KeyboardYou may need to assign the EFTPOS function to a POS key.1. Choose Tools menu Options.2. Select the Keyboard tab.3. Choose a POS Keyboard type from the Type drop-down menu andthen click Design POS Keyboard Layout.QuickPOS displays a layout of the keyboard map.4. Click the POS Functions radio button.QuickPOS displays the POS functions already assigned to thekeyboard.5. Choose an appropriate key labelled (None) and double click this toset up the EFT Tender function.A key labelled (None) indicates that the key has no POS functionallocated to it.6. Select the POS Functions list "Tender EFT".7. Click the option Use EFTPOS.8. Apply the function to the key by clicking Apply.9. Set the Function options to suit your requirements. Refer to page 7for an explanation of what these allow you to do.10. Click OK to exit the POS Keyboard Key Function window.11. Click OK to save and close the [Keyboard] Layout window.6
Function OptionsWhen you apply the EFT Tender to a key from the POS Keyboard KeyFunction or Standard PC Keyboard Layout windows, a series of functionoptions appear at the right hand side of the window. The following tableexplains each option.Note: MOTO and E-COM options do not apply for the KeyCorpEFTPOS terminal.Function NameWhat it doesCaptionText entered here is displayed on screen andprinted on receipts and reports when using theTender EFT key.Open the Cash DrawerSelect this if you want the cash drawer to openwith this Tender EFT transaction.Compulsory Amount TenderSelect this to force the operator to enter thepayment amounts before pressing the TenderEFT key.Entered amount must beroundedSelect this option to enforce a rounded amountto be entered when using this function.Enforce receipt PrintSelect this to have QuickPOS force the TenderEFT transaction to print a receipt regardless ofwhether the Receipt On/Off function is turnedoff.Enforce Invoice PrintSelect this to have QuickPOS force the TenderEFT transaction to print an invoice.Print Duplicate ReceiptSelect this option to have QuickPOS print aduplicate receipt for this Tender EFT transaction.Use EFTPOSSelect this to have QuickPOS look for an integrated EFTPOS terminal and pass the transaction amount to the Ingenico/Westpacterminal. If an EFTPOS terminal is not configured for this QuickPOS computer the option isignored and the transaction treated as a manual EFT Tender.MOTOApplies to Ingenico/Westpac terminals only.ECOMApplies to Ingenico/Westpac terminals only.7
8Function NameWhat it doesMinimum AmountSelect this option to set the minimum saleamount allowed to perform a Tender EFTtransaction. 0.00 indicates that there is no minimum amount.Payment ItemThis option is required to record the transaction in QuickBooks. A default EFT paymentitem is created in QuickBooks during installation of QuickPOS Administrator.Allow Cash OutSelect this option to allow the operator to givecash out to customers who wish to withdrawmoney from their account. The followingoptions must be set up to record the transaction in QuickBooks. Click Cash Out Optionsto set up the following:Caption: Text entered here is displayed onscreen as well as printed on receipts andreports when the Tender EFT key is usedRound Cash Out Amount: Select this forQuickPOS to enforce a rounded cash outamount to be entered.Asset Account Decreased: As Cash Out transactions reduce the cash in hand from the register the amount must be tracked inQuickBooks. Click this button to display a listof accounts to select from. Highlight the appropriate account and select OK.NOTE: Accounts are created in QuickBookswhen QuickPOS Administrator is first opened.If you do not have an appropriate accountalready set up in QuickBooks, QuickPOS recommends ‘Cash Register Funds’ account tobe selected from the list.Asset Account Increased: As Cash Out transactions increase the amount of un-depositedfunds, the amount must be tracked in QuickBooks for bank reconciliation purposes. Clickthis button to display a list of accounts toselect from. Highlight the appropriate accountand select OKNOTE: Accounts are created in QuickBookswhen QuickPOS Administrator is first opened.If you do not have an appropriate accountalready set up in QuickBooks, QuickPOS recommends ‘Undeposited Funds’ account beselected from the listMaximum Cash Out: Set the maximumamount of cash that can be given out to customers.Minimum Amount of Sale: Set the purchaseamount before cash can be withdrawn.
Special Note about logonThe EFTPOS terminal is normally left in an active "Ready" state at alltimes. However, you may choose to shut down QuickPOS at the end ofeach day and restart it without having to initiate a new EFTPOS logon.If power to the EFTPOS terminal is disconnected, you will need to reestablish a connection between the terminal and QuickPOS. You willknow that reconnection is necessary when the EFTPOS terminal displaysa "logon required" message.You can log on as follows.1. In QuickPOS choose Tool menu Options and click the EFTPOStab.2. Tick the Perform an EFTPOS Terminal Logon check box and clickApply, then OK.QuickPOS displays the following messages: The EFTPOS terminalis logging on to the EFTPOS network, please wait. This is followedby Software check. Finally, QuickPOS prints a logon report to thereceipt printer.Performing EFT Tender TransactionsNow that you’ve set up your KeyCorp EFTPOS terminal and PC, POSor Touch keyboard, it’s easy to carry out an EFT Tender transaction!The following section shows you how to carry out some basic EFTTender transactions in QuickPOS.Note that when we refer to actions on ‘the Terminal’, we mean actions onthe KeyCorp EFTPOS terminal. All other user or system actions arecarried out in QuickPOS, which we assume you have up and runningbefore following these instructions.9
Debit Card1. Enter the amount ( ) of the sale into QuickPOS by entering orscanning the product that is being purchased.2. Select the Tender EFT key for the amount to be sent to the terminal.3. Swipe the customer’s card on the Terminal, select an account.4. Get the customer to enter his/her personal PIN.5. Press OK.6. Confirm that the transaction on the terminal has been approved bypressing the OK button in QuickPOS.Credit Card1. Enter the amount ( ) of the sale into QuickPOS by entering orscanning the product that is being purchased.2. Select the Tender EFT key for the amount to be sent to the terminal.3. Swipe the customer’s card on the Terminal, select an account.4. Get the customer’s signature.5. Confirm that the customer has entered their signature by pressingOK/YES on the QuickPOS key pad.Technical ReferenceIf you are not sure computer COM1 settings are correct, the followinginstructions provide guidance on ensuring COM1 is set up correctly.Verify the settings using the following steps.1.Make sure your computer is running and open at the desktop.2. Double click My Computer.3. Double click the Control Panel icon.4. Double click the System icon.5. Click the Device Manager tab.6. Double click on Ports (COM & LPT).7. Click Properties.8. Click the Port Settings tab.10
9. Ensure the following port settings are selected:Bits per second9600Data bits8ParityNoneStop bits1Flow ControlXon/Xoff10. Click OK.TroubleshootingEFTPOS terminal does not communicate with QuickPOS1. Check that connectors, adapters and cables are attached firmly andcorrectly.2. Check to see the Commonwealth Bank network is "live".A message requesting that you use vouchers normally appears onyour terminal when the network is down. However, you can confirmthis occurrence by contacting the Commonwealth Bank Help Desk.3. Check to see that the line is active by either using a fax or phoneconnected to the K74 EFTPOS Communication Controller in theHandset port.Removing the KeyCorp EFTPOS TerminalThe following steps show you how to disconnect the KeyCorp EFTPOSTerminal from QuickPOS.1. Reset the device to printer mode.2. Disconnect the cable connection on your computer’s COM1 port.3. Reconnect the cable to the EFTPOS stand-alone printer.Note: If the K74 Modem and junction box are installed within yourcomputer, an approved technician is required to remove these11
components.12
Swipe the customer's card on the Terminal, select an account. 4. Get the customer to enter his/her personal PIN. 5. Press OK. 6. Confirm that the transaction on the terminal has been approved by pressing the OK button in QuickPOS. Credit Card 1. Enter the amount ( ) of the sale into QuickPOS by entering or scanning the product that is being .