Transcription
Paymark EFTPOS (MOD)Pax S300 Combo (with S800 or S80/c)
CONTENTSTERMINAL HARDWARE3Which Plugs Go Where?3S80c4S8004S300 PINpad4Paper Rolls5SETTING UP YOUR EFTPOS EQUIMENT5TRANSACTIONS OVERVIEW5Contactless Transactions6Electronic Offline Vouchers6Manual (standalone) EFTPOS7Transaction Types7Purchase8Purchase with Signature8Cash Out8Purchase Cash Out8MOTO Purchase9Refund9MOTO Refund9ADMINISTRATIVE FUNCTIONS10Payment Application Menu10Menu Navigation10Common Admin Functions10Manual Logon10Manual Settlement10Print (Shift) Totals10Stored Totals10Settlement Inquiry10Reprint Last Receipt10Offline Transactions10MERCHANT and COMMUNICATION SETTINGS211Print Current Configuration11Configuration Update11Network Comms Check11Network Signal Icons12Broadband/Fibre and Dial-up Settings12TMS12
CONTACTFor EFTPOS terminal enquiries, issues or support contact Smartpay Technical Helpdesk on0800 476 278 or email customer.service@smartpay.co.nzTERMINAL HARDWARESmartpay two-piece countertop EFTPOS is a Pax S300 customer facing touchscreen PINpad pluggedinto a merchant facing Pax S80c or Pax S800 base unit.Which Plugs Go Where?On the back of your S80/c and S800 EFTPOS terminals there are ports available for plugging inthe required cables. These ports are labelled but can be difficult to read. For ease of use we haveincluded diagrams and descriptions.LAN/An Ethernet cable should be plugged in here to connect the terminal to aBroadband/Fibre Internet connection.LINEIf you use a dial-up Internet connection the phone cable should be plugged in here.POWERThe power cable supplied with your terminal plugs in here. Plug the other endinto your wall socket or a power strip.RS232AIf you are using a Keylink interface to your ECR/POS system connect theKeylink cable or accessory supplied here.PINPADPlug the S300 PINpad in here for two-piece EFTPOS setup.NOTE: When the S300 is plugged into an S800 you will need to pull the powercable or turn S800 off at the wall to manually power off the S300.Smartpay User Guide Pax S300 Combo (with S800 or S80/c)3
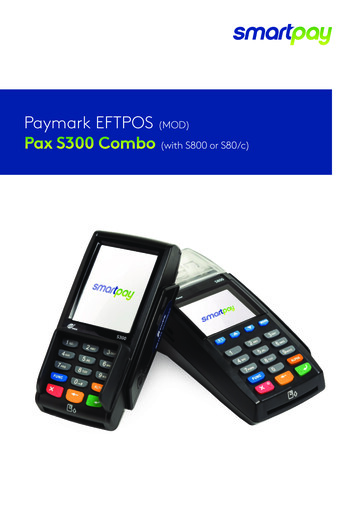
S80cThermal Receipt Printer(lift flap to change paper roll)Paper CutterContactless Reader/LEDsLED Display ScreenPrinter Cover Release KeyF1 - F4Card Swipe ReaderMenu KeyEnter/Accept /Logon KeyPower On/Off KeyCard Chip SlotLAN/S800Paper CutterContactless LEDs(will appear along top of PRESENT CARD)Colour Display ScreenLINE POWER RS232A PINPADPrinter Cover Release Key(lift flap to change paper roll)Card Swipe ReaderMenu KeyEnter/Accept /OK KeyChip Card SlotPage Up/Down ArrowsPOWER LANRS232A MINI USBCancel/Power On/Off KeyClear/Back/NO KeyLINEPINPADS300 PINpadContactless LEDsPINPad Cable(will appear along top of PRESENT CARD SCREEN)(plug other end of cable into base unit PINpad port)Colour Display Touch ScreenCard Swipe ReaderCancel/Power On/Off KeyEnter/Accept /OK KeyClear/Back/NO KeyChip Card Slot4
PAPER ROLLSS80/c and S800 terminals use standard 57mm (w) x 50mm (dia) thermal paper rolls.Replacing printer paper:1.Engage printer cover release flap to open printer bay.2. Remove existing roll core and place new roll in printer well (when replacing a paper roll, thetongue of paper should be feeding up and over; out towards the top of the terminal).3. Pull out tongue of paper so it is coming out of feeder and close the printer cover.To order paper rolls or other accessories please contact Smartpay on 0800 476 278 or visit ourwebsite smartpay.co.nzSETTING UP YOUR EFTPOS EQUIPMENTPlease read the Getting Started Letter that is provided with your Smartpay EFTPOS equipment. Ourtechnical helpdesk team (THD) can be contacted if you would like any assistance and to release thesecurity key and perform your initial Logon.1.Place the S80/c or S800 base unit face down on the counter.2. Plug the barrel end connector of the power adapter cord, into the “POWER” socket.3. Plug the appropriate communication cords into their communication sockets:- For Broadband/Fibre Internet plug the Ethernet cable into the “LAN” socket.- For Dial-up Internet plug the phone cable into the “LINE” socket.4. Plug the S300 cord into the “PINPAD” socket.5. Tuck cables into the recessed cable tidy guides as required.6. Turn all hardware right side up.7.Plug into mains power and switch on by pressing and holding the power button on base unit.8. Terminal will perform boot up sequence.9. Contact Smartpay THD to release security key and perform initial Logon.TRANSACTIONS OVERVIEWFor a more consistent contactless card experience the swipe/insert quick start option has beenremoved. To follow best security practices for payment card handling the customer should alwayspresent their own card (swipe/insert /tap) to the terminal wherever possible.In a 2-piece EFTPOS setup – once the transaction has prompted for a card it can only be cancelled onthe S300 PINpad.Smartpay User Guide Pax S300 Combo (with S800 or S80/c)5
CONTACTLESS TRANSACTIONSSmartpay EFTPOS terminals can accept contactless payment cards and smart devices. Merchants can havecontactless acceptance enabled or disabled through their Merchant bank. If contactless payment functionality isenabled, then once the transaction value is entered the Paywave/Paypass/tap-and-go card PRESENT option will beoffered automatically for valid transaction types.The S300 PINpad prompts the customer to PRESENT / INSERT / SWIPE their card. Merchants should offer the S300 totheir customer to complete the transaction; instructing them (if required) to present their card over the screen wherethe blue light is flashing. It is best security practise for the customer to perform these steps themselves. The merchantshould not take the customers payment card unless necessary.CREDIT CARD is the default account for all contactless transactions. Account selection is not required. Fortransactions over the industry prescribed limit currently (NZD 80) the customer will be prompted to enter their PIN tocomplete the transaction.Contactless available:No contactless available:This is the symbol forcontactless transactions. TheTOTALTOTAL --.-- --.--symbol will be displayed onthe PRESENT CARD screenand coloured LED boxes flashalong the top of the screen:PRESENT CARDSWIPE / INSERT CARDSWIPE / INSERT CARDBLUE LED Awaiting card presentationBLUE YELLOW GREEN LED Card read successfulBLUE YELLOW LED Card presentedRED LED Card read failedELECTRONIC OFFLINE VOUCHERSElectronic Offline Voucher (EOV) enables your business process EFTPOS transactions if your terminal has gone offline.EOV is not designed to function as a secondary connectivity option. EOV allows for emergency processing capabilitywhen unforeseen situations such as a loss of network or connectivity occur. To find out more about EOV, contact thePaymark Customer Care Centre on 0800 729 627.How does it work?If the EFTPOS terminal encounters an issue connecting to the Paymark network, it will automatically revert to offlinemode after two failed transactions. “EFTPOS OFFLINE” will be displayed on terminal screen. Your terminal can storeup to 99 EOV transactions (to maximum allowed value). Once a successful connection has been made with Paymark,the terminal will automatically send stored offline transactions through for processing.All EOV transactions require the customer signature on the Merchant EFTPOS receipts instead of PIN verification.Merchants must keep all signed Merchant Receipts to verify EOV transactions. Refund and Cash Out transactiontypes are not supported in EOV mode.Most customers will automatically be enabled for offline mode but it can be enabled or disabled by your merchant bank.6
MANUAL (STANDALONE) EFTPOS EFTPOS terminal is not connected to POS The idle screen displays transaction options To start a transaction the operator selects transaction type required and types in amountIDLE SCREEN S800 (1 PIECE)dd/mm/yytimeS800 PAGE 2 (1 PIECE)dd/mm/yyPAYMARK EFTPOS1.2.3.4.PURCHASECASHPUR / CASHREFUNDPGUPtime(IF USING 2-PIECE COMBO)dd/mm/yytimePAYMARK EFTPOS1. AUTH2. FINALISEPGDWNIDLE SCREEN S300PGUPPAYMARK EFTPOSPGDWN When in manual mode the S800 (or S80/c) idle screen displays a standard TRANSACTION MENU To start any of the main 4 transaction types – select corresponding keypad number To access secondary transaction types – press up/down ARROW keys To tab between the transaction type screens press up/down ARROW keys Press MENU key to access EFTPOS MAIN MENU Press CANCEL key to access APPLICATIONS MENU(if more than one terminal application is loaded) Press CANCEL MENU (or FUNCTION) key to access APP MANAGERTRANSACTION TYPESPURCHASEStandard Purchase/Sale transaction using an EFTPOS/CREDIT/DEBIT card.CASHCash Out transaction using an EFTPOS/CREDIT/DEBIT card.PUR/CASHCombined Purchase/Sale and Cash Out transaction using an EFTPOS/CREDIT/DEBIT card.REFUNDRefund transaction using an EFTPOS/CREDIT/DEBIT card.AUTHHospitality transaction type to request pre-authorisation of funds on CREDIT card(usually for room or vehicle hire).Hospitality functionality must be approved by Merchant bank before it can be enabled on terminal.FINALISEHospitality transaction type to complete (Finalise) transaction from a previous apre-authorisation on CREDIT card (usually for room or vehicle hire).Smartpay User Guide Pax S300 Combo (with S800 or S80/c)7
PURCHASE1.Operator selects 1.PURCHASE on base unit and types in PURCHASE amount2.Press ENTER on base unit and PINpad will prompt customer to PRESENT INSERT or SWIPE CARD3.Operator gives PINpad to customer4. Customer taps, inserts or swipes carda. Insert or swipe - customer follows screen prompts to select account and enter PINb. Tap - customer follows screen prompts if required5. Base and PINpad display ACCEPTED or DECLINED result6. EFTPOS Receipt will be offered (depending on receipt print/prompt settings)7.EFTPOS terminal returns to idle screen ready for next transactionPURCHASE WITH SIGNATUREIn some cases, the customer may be able to select ENTER instead of using their PIN. If this happens theMerchant Receipt will print with a space for the customer to sign in. The terminal will require the operatorto verify the customer signature and confirm the transaction.Your merchant agreement states you must keep a copy of your signed Merchant Receipts. These will beused to verify the transaction should it be disputed.CASH OUT(Contactless not available with cash out transaction type)1.Operator selects 2.CASH on base unit and types in Cash Out amount2.Press ENTER on base unit and PINpad will prompt customer to INSERT or SWIPE CARD3.Operator gives PINpad to customer4. Customer inserts or swipes card5. Customer follows screen prompts to select account and enter PIN6. Base and PINpad display ACCEPTED or DECLINED result7.EFTPOS Receipt will be offered (depending on receipt print/prompt settings)8. EFTPOS terminal returns to idle screen ready for next transactionPURCHASE CASH OUT(Contactless not available with cash out transaction type)1.Operator selects 3.PUR/CASH on base unit2.Operator type in Purchase amount on base unit then press ENTER3.Operator type in Cash out amount on base unit then press ENTER4. PINpad will prompt customer to INSERT or SWIPE CARD5. Operator gives PINpad to customer6. Customer inserts or swipes card7.Customer follows screen prompts to select account and enter PIN8. Base and PINpad display ACCEPTED or DECLINED result9.EFTPOS Receipt will be offered (depending on receipt print/prompt settings)10. EFTPOS terminal returns to idle screen ready for next transaction8
MOTO PURCHASEMOTO functionality can be enabled for merchants who process telephone or mail order sales. MOTOshould only be used in situations where cardholder authorisation is given for the transaction and thephysical card is not present to be used at the terminal.1.Operator selects 1.PURCHASE on base unit and types in PURCHASE amount2.Press ENTER on base unit and PINpad will prompt user to PRESENT INSERT or SWIPE CARDOn PINpad:On PINpad:3.Operator should press ENTER4. Operator types in 16-digit card number - press ENTER5. Operator types in card expiry date [mm/yy] - press ENTER6. Operator is prompted to enter card CSC - select YES or NO and follow screen prompts7.Operator selects appropriate MOTO TYPE option8. Operator selects CRD account type9.Base and PINpad display ACCEPTED or DECLINED result10. EFTPOS Receipt will be offered (depending on receipt print/prompt settings) - you should always printa copy of MOTO receipts11. EFTPOS terminal returns to idle screen ready for next transactionREFUNDMerchants are enabled for refund transactions and provided a Merchant Refund Card by their merchantbank. Merchants should contact their bank to request this service and the card.1.Operator selects 4.REFUND on base unit and types in REFUND amount2.Press ENTER on base unit and PINpad prompts for MERCHANT REFUND CARDOn PINpad:On PINpad:3.Operator swipes MERCHANT REFUND CARD and enters REFUND PIN4. PINpad will display refund amount and prompt customer to PRESENT INSERT or SWIPE CARD5. Operator gives PINpad to customer6. Customer taps, inserts or swipes carda. Insert or swipe - customer follows screen prompts to select account and enter PINb. Tap - customer follows screen prompts if required7.Base and PINpad display ACCEPTED or DECLINED result8. EFTPOS Receipt will be offered (depending on receipt print/prompt settings)9.EFTPOS terminal returns to idle screen ready for next transactionMOTO REFUNDMOTO Refunds can be performed in the same way as MOTO purchase. Merchant should select Refundtransaction type and use their Merchant Refund Card. The amount being refunded should be creditedback to the card used for the original purchase. Merchants should contact their bank to request thisservice and the card.Smartpay User Guide Pax S300 Combo (with S800 or S80/c)9
ADMINISTRATIVE FUNCTIONSPAYMENT APPLICATION MENUPress MENUMAIN MENU1.2.3.4.5.6. QUICK ACCESSADMINREPORTSUTILITYCONFIGDIAGNOSTICSTo tab between the menu pages press UP/DOWNARROW keys Press CLEAR or CANCEL to go back Press number to select optionMAIN MENU1. SECURITYMENU NAVIGATIONYou can quickly perform common functions by pressing the MENU key required number keys.NOTE: Operator input may be required on the base unit or on the PINpad. We recommend having bothdevices at hand when performing admin or manual transactions or before calling THD for assistance.COMMON ADMIN FUNCTIONSMANUAL LOGONPress MENU 2 1MANUAL SETTLEMENTPress MENU 2 2Note: Terminal will automatically perform Paymark settlement once per day. Forfurther information about auto settlement window you can contact Paymark.PRINT (SHIFT) TOTALSPress MENU 2 4 Press NO to print without clearing totalsOR Press YES to print totals and clear them for next shiftSTORED TOTALSPress MENU 2 [DOWN ARROW] 1SETTLEMENT INQUIRY Press MENU 2 3 Enter required date [dd/mm/yyyy] and press ENTERREPRINT LAST RECEIPTPress MENU 2 5OFFLINE TRANSACTIONSPress MENU 2 6Note: Terminal will automatically send stored offline transactions when theterminal regains connection to the Paymark network.10
MERCHANT & COMMUNICATION SETTINGSEFTPOS requires an active Internet connection to process payments. Broadband/Fibre connection isrecommended over Dial-up as it will be faster and more reliable.PRINT CURRENT CONFIGURATIONQUICK ACCESS1.2.3.4.5.PRINT CONFIGDISPLAYCOMMSPOWER OPTIONSCSEPress MENU 1 1Base unit will print out configuration receipt with currentnetwork and other host and merchant settings.CONFIGURATION UPDATESmartpay offer a range of value-add services like Smartcharge automatic surcharging, Tipping onterminal and Multi merchant. Contact our sales team or THD to discuss activating/deactivating theseservices on your EFTPOS terminal.CONFIG/SETUP1. UPDATE CONFIG2. RESET TERMINAL3. APP INFOFrom time to time Smartpay THD may need to perform aCONFIG UPDATE on the terminal to apply functionality changes. Press MENU 5 Enter the password provided by Smartpay THD operator Press 2 to select UPDATE CONFIGNETWORK COMMS CHECKDIAGNOSTICS1. COMMS TEST2. SELF TEST3. REBOOTThis check can be performed to verify the terminal has aworking network connection.Press MENU 6 1Terminal screen will display ACCEPTED for a workingconnection or PROCESSING NOW DECLINED PLEASETRY AGAIN if the connection is not working.Smartpay User Guide Pax S300 Combo (with S800 or S80/c)11
MERCHANT & COMMUNICATION SETTINGSNETWORK SIGNAL ICONSOn the S300 PINpad you will see one or more of the following icons appear in the top right corner.20/05/17 10:00Not Connected20/05/17 10:00Connecting/Disconnecting20/05/17 10:00Connected20/05/17 10:00Sending20/05/17 10:00ReceivingBROADBAND/FIBRE AND DIAL-UP SETTINGSChanges to comms being used by your EFTPOS terminal are made in the APP MANAGER menu. Pleasecontact Smartpay THD for assistance before you attempt to use this menu. Press CANCEL FUNCTION (or MENU) to exit idle screen and access APP MANAGER MENU Select 1.CONFIG Select 2.COMMSTERMINAL COMMS1. ETHERNET2. DIAL UPREBOOT REQUIREDTERMINAL WILLPOWER DOWN NOW Press 1 to configure Broadband/Fibre Internet connection Press 2 to configure Dial-up Internet connection Terminal requires reboot after any comms changes. If this doesnot happen automatically, please perform a manual reboot bypowering terminal off and back on.)TMSSmartpay Terminal Management System provides remote access software updates and configurationchanges for your terminal.We use this from time to time to ensure our customers have the most up-to-date, secure and bug freesoftware on their units. Please contact Smartpay THD for assistance before you attempt to use this menu. Press CANCEL FUNCTION (or MENU) to exit idle screen and access APP MANAGER MENU Select 2.TMS0800 476 278 - Option 2SP126194251-0217smartpay.co.nz
Smartpay User Guide Pax S300 Combo (with S800 or S80/c) 3 Smartpay two-piece countertop EFTPOS is a Pax S300 customer facing touchscreen PINpad plugged into a merchant facing Pax S80c or Pax S800 base unit. For EFTPOS terminal enquiries, issues or support contact Smartpay Technical Helpdesk