Transcription
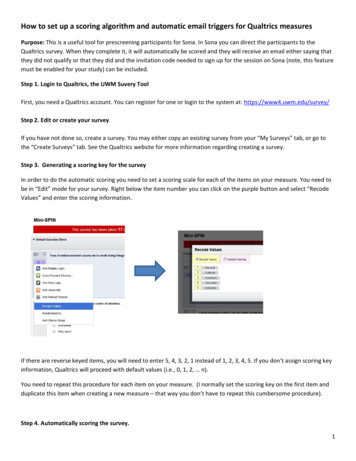
How to set up a scoring algorithm and automatic email triggers for Qualtrics measuresPurpose: This is a useful tool for prescreening participants for Sona. In Sona you can direct the participants to theQualtrics survey. When they complete it, it will automatically be scored and they will receive an email either saying thatthey did not qualify or that they did and the invitation code needed to sign up for the session on Sona (note, this featuremust be enabled for your study) can be included.Step 1. Login to Qualtrics, the UWM Suvery ToolFirst, you need a Qualtrics account. You can register for one or login to the system at: https://www4.uwm.edu/survey/Step 2. Edit or create your surveyIf you have not done so, create a survey. You may either copy an existing survey from your “My Surveys” tab, or go tothe “Create Surveys” tab. See the Qualtrics website for more information regarding creating a survey.Step 3. Generating a scoring key for the surveyIn order to do the automatic scoring you need to set a scoring scale for each of the items on your measure. You need tobe in “Edit” mode for your survey. Right below the item number you can click on the purple button and select “RecodeValues” and enter the scoring information.If there are reverse keyed items, you will need to enter 5, 4, 3, 2, 1 instead of 1, 2, 3, 4, 5. If you don’t assign scoring keyinformation, Qualtrics will proceed with default values (i.e., 0, 1, 2, n).You need to repeat this procedure for each item on your measure. (I normally set the scoring key on the first item andduplicate this item when creating a new measure – that way you don’t have to repeat this cumbersome procedure).Step 4. Automatically scoring the survey.1
Select “Scoring” under “Advanced Options” located in the top right corner.Select “Grade” for the Category option.Below each item, click the button labeled “Auto” then the recoded scoring key information will be displayed. Do this forall items in your measure. Once you click the button, it will change to “Clear.” Of course, you can manually put down anynumbers you want, but it is a lot easier to use the Auto function given you have already entered the scoring keyinformation in Step 1.If you check “Show End Of Survey Summary” in the upper right corner, the survey will display the scoring result to therespondent at the end of the survey. You may or may not want to do this.Step 5. Create a variable for the survey score to determine eligibility.Click on Survey Editor and go to Survey Flow of the measure.Click on “Add a New Element here” and choose “Embedded Data.” Then type “Score” and hit the return key to createthe Score field. Then enter the value on the following field is “ {gr://Grade/Score}” See the example below.The variable name doesn’t have to be “Score” but it should be matching the name of variable you will be linking an emailtrigger to later. The variable name is case‐sensitive.Click on “Save Flow.”2
Step 6. Generate automatic email triggers based on the score – note this is general, see below for more specifics.Under the Advanced Options menu, select Triggers Email Triggers, as seen below.Here, you can set up as many automatic email messages as you wish that will be sent out according to their scores onthe measure. Click on “Add a Condition” The example below shows that when Score (this is the variable you created inthe scoring algorithm – again this is case‐sensitive) is less than or equal to 3, the following email message is sent outautomatically as soon as the survey is completed. The following trigger is set to be sent to the researcher (in this case –leehj@uwm.edu).3
Step 7. How to send an automatic email notification to the RESPONDENT immediately?This step is a bit more complex but I will walk you through that. Once you do it, you will know it’s not a big deal.(a) To do this, you need to have a question receiving their email address in the Qualtrics measure you are administering.Here, Q2 is an email address. The Item Type (top right) should be “Text Entry.”(b) If you click on any part of the text, you will see a blue menu labeled “Piped Text”. Place the mouse cursor at the endof the text, and browse the Piped Text menu down as you see below.“Piped Text Survey Question Q2. Enter your email address Enter your email address”Make sure you will NOT select the “Question Text” at the last step.Then, you will see a strange string at the end of the text such as “ {q://QID6/ChoiceTextEntryValue}”This is the variable that will contain each individual’s email address once they respond to the questionnaire. Please knowthat this value will vary depending on the order of the item created within the measure. So, you can’t simply copy thevalue from this manual. (“QID6” means Question ID #6. It is six because this is the sixth item I made on the survey,although I placed it as a second item in the measure. It seems that Qualtrics remember when each item was created andthat number can’t be changed. So, if you make your email item as the very first item of the measure, your string variablewill be {q://QID1/ChoiceTextEntryValue}You don’t have to worry about this as long as you follow the instructions on how to use the Pipe Text menu.4
(c) Go to the Email Trigger menu under the Advanced Options.As you see in the image above, I added both my email (leehj@uwm.edu) and the weird string value (the email of eachrespondent). Upon completion of the survey, this email will be automatically sent to both the researcher and therespondent. This way, you can send the study code that should be entered to the SONA system only to those who meetthe screening criteria.If they enter a wrong email address in the email field, they will not get this message because the true value of this stringvariable is determined by what they enter into the text box.You can also create a trigger for when the participants DOES meet screening criteria. In this email you may include aninvitation code that will allow them to login to Sona and sign up for your session. See the example below.5
Note that you must have this invitation code entered in your Study Configuration on Sona. This can be set under yourstudy (in Sona) by selecting Change Study Information and entering the invitation code you send to participants underthe Advanced Settings.Another alternative to the automatic email is for the researcher to manually send the participant an email with theinvitation code. Or, rather than using an invitation code you can manually add the participant to the session (see SonaResearcher Instructions). Another useful option you might want to use.If you click on Survey Options, you will see the section named “Survey Termination”Here, you can enter the SONA system address as the Web redirect address. In that case, they will beautomatically transferred to the SONA login page.Step 8. Generate a URL for the survey and insert it into your Sona study descriptionYou will need to generate a URL that participants can use to take the survey. In Qualtrics, under the DistributeSurvey tab, you can generate a URL link.In Sona, under the Study Description (which you can change by selecting Change Study Information) you caninsert the link into the “Detailed Description” section. Be sure to inform participants that they need to completethe survey in order to determine if they meet eligibility quality. The following HTML code will allow you to inserta clickable link in the Detailed Description field.Syntax: a href "url" Link text /a Example: a href "url" https://milwaukee.qualtrics.com/SE/?SID SV e5TKbIwFessadfTriWHy /a 6
the "Create Surveys" tab. See the Qualtrics website for more information regarding creating a survey. Step 3. Generating a scoring key for the survey In order to do the automatic scoring you need to set a scoring scale for each of the items on your measure. You need to