Transcription
TCPIP232POS / ATM AdapterAdapterATM TCP/IP InterfaceStand alone or with VSSI-Pro/VSI-Pro/VSI-Pro MAXPOS TCP/IP InterfaceStand alone or with VSI-Pro /VSI-Pro MaxOPERATION MANUALFebruary 2013
TCPIP232CAUTION!RISK OF ELECTRICAL SHOCK!TO PREVENT ELECTRIC SHOCK, DO NOT REMOVETHE COVER. DO NOT EXPOSE THE EQUIPMENT TORAIN OR MOISTURE. NO USER SERVICEABLE PARTSARE INSIDE. REFER SERVICING TO QUALIFIEDPERSONNEL.WARNING!THIS EQUIPMENT GENERATES, USES, AND CAN RADIATE RADIO FREQUENCY ENERGY AND IF NOT INSTALLED AND USEDIN ACCORDANCE WITH THE INSTRUCTION MANUAL MAYCAUSE INTERFERENCE TO RADIO COMMUNICATIONS. IT HASBEEN TESTED AND FOUND TO COMPLY WITH THE LIMITS FORA CLASS A COMPUTING DEVICE PURSUANT TO SUBPART JOF PART 15 OF FCC RULES, WHICH ARE DESIGNED TO PROVIDE REASONABLE PROTECTION AGAINST SUCH INTERFERENCE WHEN OPERATED IN A COMMERCIAL ENVIROMENT. OPERATION OF THIS EQUIPMENT IN A RESIDENTIAL AREA ISLIKELY TO CAUSE INTERFERENCE IN WHICH CASE THE USERAT HIS/HER OWN EXPENSE WILL BE REQUIRED TO TAKEAVE Multiview UKAVE Multiview USAAVE Thailand Co., Ltd.Endeavor House 3rd FloorCoppers End Rd.,Stansted,Essex, CM24 1SJ, UKTel: 440-845-600-9323Fax: 440-845-600-9363Email: ave-uk@multiview.netwww.multiview.net2300 Central Parkway Suite CHouston, Texas, 77092Tel: 1-281-443-2300Fax: 1-281-443-8915Email: com147 Soi On-Nut 44Sukhumvit 77 Rd., Suan LuangBangkok 10250,ThailandTel: 662-331-9364, 331-9285Fax: 662-331-9365Email: ave@avethailand.comhttp://www.ave.co.th (Thai)http://www.avethailand.com (English)AVE Europe LTD123 Millennium Business ParkBallycoolin, Dublin 15, IrelandTel:353 1 684 7450 Fax: 353 1 684 7451 Email; sales@ave-europe.euCopyright CWebsite: www.ave-europe.euAVE Thailand Co., Ltd. 2000-20122
CONTENTSBOOT MENU.5ITCPIP232 ATM/POS.7TCPIP232 Connections.7TCPIP232 Hardware Configuration.9TCPIP232 Setups.10Stand Alone Setup.10TCP/IP SETTINGS.10INFORMATION SETTINGS.11INTERFACE SETTING.11TIME SYNC SETTINGS.12SENSE.12TRANSACTION ALARM.12FILTER TYPE.12WATCHDOG TIMER.12TCPIP 232 Connecting Diagram and Setting .14TCPIP 232 Connecting with ATM .14TCPIP 232 Connecting with Printer.16TCPIP 232 Connecting with NCRACS.18TCPIP 232 Connecting Diagram with Filter Type Setting as DUMP.20TCPIP 232 Connecting with Cash Register Express(CRE).25TCPIP 232 Connecting with Gilbraco Passport.30TCPIP 232 Connecting with INFO GENESIS.32TCPIP 232 Connecting with DIGISM 5500.34TCPIP232 Micros VSS 3700 UDP Interface.36TCPIP232 Micros VSS 3700 Connections.36TCPIP232 Micros VSS 3700 Hardware Configuration.37TCPIP232 Micros VSS 3700 Setups.38IP Address/Subnet Mask/Gate Way/Port.38TX Baudrate.38Output Type.38Workstations Settings.38VSSI-Pro Setup.40VSI-Pro and VSI-Pro Max Setup.41IP ADDRESS Setup.41INFORMATION DISPLAY Setup.42TCPIP232 LED Indicators.42AVE RS485 Network.42Cables and Pin Assignments.42Firmware Update.44TCPIP232 Testing.46Warranty.473
FIGURESFigure 1: Stand Alone Connection.7Figure 2: VSSI-Pro Interface.7Figure 3: VSI-Pro or VSI-Pro Max Interface.8Figure 4: AVE RS485 Network Interface.8Figure 5: TCPIP232 Silkscreen (Left Corner Back).9Figure 6: ATM Stand Alone Tapping Mode Connection.14Figure 7: ATM Stand Alone Mirror Mode Connection.14Figure 8: ATM with RS485 Network Interface.14Figure 9: Printer Stand Alone Tapping Mode Connection.16Figure 10: Printer stand alone mirror mode connection.16Figure 11: Printer with RS485 Network Interface.16Figure 12: NCRACS Stand Alone Tapping Mode Connection.18Figure 13: NCRACS Stand Slone Mirror Mode Connection.18Figure 14: NCRACS with RS485 Network Interface.18Figure 15: ATM Dump Data Tapping Mode Connection.20Figure 16: ATM Dump Data Mirror Mode Connection.20Figure 17: Printer Dump Data Tapping Mode Connection.20Figure 18: Printer Dump Data Mirror Mode Connection.20Figure 19: Cash Register Express Tapping Mode Connection.25Figure 20: Cash Register Express Mirror Mode Connection.25Figure 21: Cash Register Express Client Server Setting RS485 Network Interface.26Figure 22: Gilbraco PassportStand Slone Tapping Mode Connection.30Figure 23: Gilbraco Passport Stand Alone Mirror Mode Connection.30Figure 24: Gilbraco Passport with RS485 Network Interface.30Figure 25: INFO GENESIS Stand Alone Tapping Mode Connection.32Figure 26: INFO GENESIS Stand Alone Mirror Mode Connection.32Figure 27: INFO GENESIS with RS485 Network Interface.32Figure 28: DIGISM 5500 Stand Alone Tapping Mode Connection.34Figure 29: DIGISM 5500 Stand Alone Mirror Mode Connection.34Figure 30: DIGISM 5500 with RS485 Network Interface.34Figure 31: TCPIP232 Micros VSS 3700 and Micros Workstation Connection.364
BOOT MENUTCPIP232 is able to select upon boot u p to the “TCPIP232 ATM/POS” , “VSS 3700” or“UPDATE FIRMWARE” by connecting the PC/DVR cable (021-037-SF). The connects fromthe TCPIP232 adapter to your laptop. Power up the TCPIP232 RS-232 Port and your laptopand run a serial communications program like Hyper Terminal at baudrate 19200,n,81 withVT100 emulation. Press ESC key (1BH) , [ (5Bh) and S (53H) to enter to the BOOT Menu.You will see the following “Boot Menu”.NOTE : When entering into the TCPIP232 VSS 3700 Main Menu while booting thesystem if TCPIP232 starts or is listening to a UDP message you can not enterprogramming mode until reboot the system again. Therefore disconnect all LANcables from the TCPIP232 prior to entering the Boot Menu.BOOT MENU- TCPIP232 ATM/POS- VSS 3700- UPDATE FIRMWAREPress the Arrow “UP” or “Down” to move the cursor to the proper menu and to selectPress the “Enter” key to select.TCPIP232 ATM/POSSelect the TCPIP232 ATM/POS operating mode by waiting until the Copyright message appears as below. You will then be ready to use theTCPIP232 ATM/POS. (refer to page 7 for operations and programmingdetails)Copyright 2013 by A.V.E. ThailandTCPIP232 V400R23B1 Feb 14 20135
VSS 3700By selecting the VSS 3700 you will enter to the VSS 3700 operating mode.Wait for the TCPIP232 to reboot and show the message as below. You will then be ready touse the TCPIP232 for the Micros VSS 3700 UDP Interface. (refer to page 36 for operationand programming details)TCPIP232 Micros VSS 3700Listening 192.168.2.233 Port 12345UPDATE FIRMWARETo enter to the TCPIP232 UPDATE FIRMWARE mode refer to page 44)6
TCPIP232 ATM/POSThe TCPIP232 Interface is designed to capture ATM or POS transactions on a EthernetLAN system and then convert captrued transactions to a serial port to interface with VSSIPro (ATM Synchronous Serial Interface), VSI-Pro Max or VSI-Pro to overlay the text on thevideo and export the data in formated ASCII to other devices like a DVR. It also allows fullprogramming of the TCPIP232 via on-screen interative menu of the above devices.When used standalone or connected to a DVR, programming is done via any laptop runningHyperTerminal or other communications program. Default is MDI/MDIX but can be jumperconfigured for Tap or Mirror Modes.TCPIP232 Connections1. Stand Alone with Digital Video RecorderThis connection will inteface directly to a DVR which supports Text Insertion. This insertion will interface via RS232C from TCPIP232 rear panel.DVR RS232 communicationsetting to be baud rate 19200,N,8,1 Flow control NONE. So Please consult your DVR manualor contact the DVR manufacturer. The TCPIP232 is programmed by a laptop.MonitorCameraVideo CoaxialRounter/NetworkSwitcherCAT-5Video CoaxialSerialCAT-5TCPIP232AT MDVRFigure 1. Stand Alone Connection2. VSSI-Pro InterfaceThe VSSI-Pro also supports text insertion and programmable gray scale and background of text insertion. Users are able to define the ATM IP Address via Onscreen programming on VSSI-Pro Menu.RS-232RS-232CAT5 LANFigure 2. VSSI-Pro Interface7
3. VSI-Pro or VSI-Pro Max InterfaceThe VSI-Pro and VSI-Pro Max supports Text Insertion and programmable gray scaleand background of text inesertion and can be programmed via the Onscreen display forsetting the ATM or POS IP in addition to PC Programming of both units.Video INCameraCAT-5CAT-5RS232 OutputVideo OUTATMTCPIP232DVRVSI-Pro/MAXFigure 3. VSI-Pro or VSI-Pro Max Interface4. AVE RS485 Network InterfaceThe AVE RS485 Network is a text and information streaming solution that connectsmultiple devices via an RS485 port. There are Master and Slave units for AVE RS485 Network solution. The Master unit is used for polling the data of the slave device and sending thetext and information (Alarm , Time and Date) steaming to the DVR that supports AVE RS485network solution commonly called the VSI-ADD T-5TCPIP232TCPIP232TCPIP232CAM1-4 INPUTRS485RS232DVRHydra/VSI-Pro MAX MasterFigure 4. AVE RS485 Network Interface8
TCPIP232 Hardware Configuration:TCPIP232 hardware operation depends on your network connection. TCPIP232 isable to operate with HUB and Network Switcher. There are 2 hardware configurations:1. Mirror ModeThis Mode supports HUB and Programmable Network Switchers. The user needs toprovide a port for TCPIP232 to capture ATM transactions on the HUB and needs to mirror theATM LAN port for TCPIP232 port to capture data. This kind of switcher we called “programmable network switcher” .2. Tapping ModeThe Tapping mode supports HUB and Typical Network Switcher. Tappping Mode captures ATM transactions by tapping receiving data at the ATM or POS only. So HUB andSwitch will not see TCPIP232 as a network device. see Figure 6Figure 5. TCPIP232 Silkscreen (Left Corner Back)Tapping Mode Setup. (This is a defualt from manufacturer)1. Open JP15,JP162. JP6 Close 1-2,3-4,5-6,11-123. JP18 and JP19 Close 1-2Mirror Mode Setup1. Close JP15, JP162. JP6 Close 1-2,3-4,5-6,11-123. JP18 and JP19 Close 2-39
TCPIP232 SetupsThe user must be careful to unplug the LAN cable from the ATM or POS. The ATM orPOS has the protection when there is no comunication between the ATM and Host Server inlimited time your ATM will be offline automatically. This peroid is called the “ATM Time Out’.This time out depends on your ATM system. It is approximately 6-10 seconds.Stand Alone SetupConnect the PC/DVR cable (021-037-SF) which comes from the TCPIP232 adapterto your laptop. Power up your TCPIP232 and your laptop and run serial program like HyperTerminal at baudrate 19200,n,81 with VT100 emulation. Press ESC key (1BH) , [ (5Bh) andP (50H) to enter to the Main Menu.TCPIP232 SETUP* TCP/IP SETTINGS- INFORMATION SETTINGS- INTERFACE SETTINGS- TIME SYNC SETTINGS- SENSE- TRANSACTION ALARM- FILTER TYPE- WATCHDOG TIMER- EXITAUTOOFFATMONPress the Arrow key to move the cursor or change the configurations Press the Enter key toselect or save the configurations.TCPIP SETTING* IP ADDRESS192.168.0.0- DESTINATION PORTANY- EXITTCP/IP SETTINGSIP ADDRESSP ADDRESSThe IP address will be the same as the ATM or POS machine.DESTINATION PORTPort number of destination 0 to 65535.EXITExit to main menu.10
INFORMATION SETTING* INFORMATION 0- INFORMATION 1- INFORMATION 2- INFORMATION 3- EXITONONONONINFORMATION SETTINGSINFORMATIONThis is a user define for additional information in the transaction to displayspecial information.EXITExit to main menu.INTERFACE SETTING* INTERFACEGENERIC- ID1- EXITINTERFACE SETTINGINTERFACESelections; Generic, RegCom57600, RegCom9600, VnetSelect Generic if you connect with VSSI-Pro/VSI-Pro/Max then select VSSIPro forTCPIP232 will send raw data to VSSI-Pro to analyze the data but theVSSI-Pro is able to use Generic mode by select TCPIP GENERIC when youprogram the VSSI-Pro.Select REGCOM57600 or REGCOM9600 or VNET when you connect withRS485 network. Put jumper on JP9(1-2) , JP10(1-2) and JP11(1-2) for usingAVE RS485 Network.IDUse when you select REGCOM57600 or REGCOM9600 or VNET.EXITExit to main menu.11
TIME SYNC SETTINGS* DATE FORMATMM/DD/YY- TIME SYNCOFFTIME SYNC SETTINGSDATE FORMATP ADDRESSSelect date format to be MM/DD/YY , DD/MM/YY or YY/MM/DDTIME SYNCSync time to the MVDR.EXITExit to main menu.SENSESelect type of LAN cable for Straight Through or Cross Over cable if you selectAUTO then TCPIP232 will select cable type automatically.TRANSACTION ALARMOFFOff transaction alarm function.MVDRSend serial alarm to the MVDR every time that transaction cause .FILTER TYPESelect filter type to be ATM , EPSON , NCRACS ,CRE or DUMPATMATM filter format. Connecting diagram and TCPIP232 setting refer to page 14.EPSONEPSON printer filter format. Default port at 9100 but you can change what everyou want. Connecting diagram and TCPIP232 setting refer to page 16.NCRACSNCR ACS-IR filter format.Connecting diagram and TCPIP232 settingrefer to page 18.GENERIC LAN PRINTERFilter format for GENERIC LAN PRINTER. Default port at 9100 but you canchange what ever you wantConnecting diagram and TCPIP232 setting referto page 16.DUMPCapture all ethernet RAW data and send out to RS-232. Connectingdiagram and TCPIP232 setting refer to page 20.12
CRECash Register Express filter format. Connecting diagram and TCPIP232setting refer to page 25.GILBRACO PASSPORTGILBRACO PASSPORT filter format. Default port at 700 but you can changewhat ever you want. Connecting diagram and TCPIP232 setting refer topage 30.INFO GENESISINFO GENESIS filter format. Default port at 7005 but you can changewhat ever you want. Connecting diagram and TCPIP232 setting referto page 32.DIGISM 5500DIGISM 5500 filter format. Connecting diagram and TCPIP232 setting referto page 34.WATCHDOG TIMERTurn ON or OFF watchdog timer of the system.EXITExit from system setting and back to operation mode.13
TCPIP 232 Connecting Diagram and DettingTCPIP 232 Vonnecting with ATM1. Connecting diagramCameraVideo CoaxialMonitorRouter/Network SwitchATMCAT-5CAT-5VideoSerialTCPIP232DVRFigure 6. ATM Stand Alone Tapping Mode ConnectionMonitorCameraVideo CoaxialRouter/Network SwitchATMCAT-5VideoCAT-5SerialTCPIP232DVRFigure 7. ATM Stand Alone Mirror Mode ConnectionNote : TCPIP232 Tapping Mode and Mirror Mode Setting refer to page 2DVRHydra/VSI-Pro MAX MasterFigure 8. ATM with RS485 Network Interface14
2. Select TCPIP 232 Fiter Type for ATM.TCPIP232 SETUP- TCP/IP SETTINGS- INFORMATION SETTINGS- INTERFACE SETTINGS- TIME SYNC SETTINGS- SENSE- TRANSACTION ALARM* FILTER TYPE- WATCHDOG TIMER- EXITAUTOOFFATMON3. Setting the IP Address in TCP/IP Setting Menu to be an IP of the ATM.TCPIP SETTING* IP ADDRESS192.168.0.0- DESTINATION PORTANY- EXIT4. Exit from TCPIP 232 setting and back to operating mode.5. Try to make some transaction with ATM then transaction data will be display onthe monitor screen and store in the DVR.15
TCPIP 232 Connecting with EPSON or GENERIC LAN PRINTER.1. Connecting re 9. EPSON or GENERIC LAN PRINTER Stand Alone Tapping Mode rDVRFigure 10. EPSON or GENERIC LAN PRINTER Stand Slone Mirror Mode ConnectionNote : TCPIP232 Tapping Mode and Mirror Mode Setting refer to page 9Printer1Cashreg 1Printer2Cashreg M1CAM4Printer4Cashreg CAM1-4RS232EPSON Printer 1 - 4DVRRS485Hydra/VSI-Pro MAXFigure 11. EPSON or GENERIC LAN PRINTER with RS485 Network Interface16
2. Select TCPIP232 Fiter Fype for EPSON or GENERIC LAN PRINTERTCPIP232 SETUP- TCP/IP SETTINGS- INFORMATION SETTINGS- INTERFACE SETTINGS- TIME SYNC SETTINGS- SENCEAUTO- TRANSACTION ALARMOFF* FILTER TYPEEPSON- WATCHDOG TIMERON- EXIT3. Setting the IP Address in TCP/IP setting menu to be an IP of the printer.TCPIP SETTING* IP ADDRESS192.168.0.0- DESTINATION PORTANY- EXIT4. Exit from TCP232 setting and back to operating mode.5. Try to make some transaction with cash register then transaction data will bedisplay on the screen and store in the DVR.17
TCPIP 232 Connecting with NCRACS1. Connecting DiagramCameraVideo CoaxialMonitorRouter/Network SwitchNCRACSCAT-5CAT-5VideoSerialTCPIP232DVRFigure 12. NCRACS Stand Alone Tapping Mode ConnectionCameraMonitorVideo CoaxialRouter/Network SwitchNCRACSCAT-5VideoCAT-5SerialTCPIP232DVRFigure 13. NCRACS Stand Alone Mirror Mode ConnectionNote : TCPIP232 Tapping Mode and Mirror Mode Setting refer to page S485RS232DVRHydra/VSI-Pro MAX MasterFigure 14. NCRACS with RS485 Network Interface18
2. Select TCPIP232 Fiter Type to be NCRACS.TCPIP232 SETUP- TCP/IP SETTINGS- INFORMATION SETTINGS- INTERFACE SETTINGS- TIME SYNC SETTINGS- SENCEAUTO- TRANSACTION ALARMOFF* FILTER TYPENCRACS- WATCHDOG TIMERON- EXIT3. Setting the IP Address in TCP/IP setting menu to be an IP of NCRACS.TCPIP SETTING* IP ADDRESS192.168.0.0- DESTINATION PORTANY- EXIT4. Exit from TCP232 setting and back to operating mode.5. Try to make some transaction with cash register then transaction data will bedisplay on the screen and store in the DVR.19
TCPIP 232 Connecting Diagram with Filter Type Setting as DUMP.1. Connecting diagramRounter/NetworkSwitcherATMCAT-5Hyper Terminal PCCAT-5SerialTCPIP232Figure 15. ATM Dump Data Tapping Mode ConnectionRounter/NetworkSwitcherATMCAT-5Hyper Terminal PCCAT-5SerialTCPIP232Figure 16. ATM Dump Data Mirror Mode ConnectionCash RegisterHyper Terminal PCPrinterCAT-5CAT-5SerialTCPIP232Figure 17. Printer Dump Data Tapping Mode ConnectionRounter/NetworkSwitcherHyper Terminal PCCash RegisterCAT-5CAT-5CAT-5SerialTCPIP232Figure 18. Printer Dump Data Mirror Mode ConnectionNote : TCPIP232 Tapping Mode and Mirror Mode Setting refer to page 920
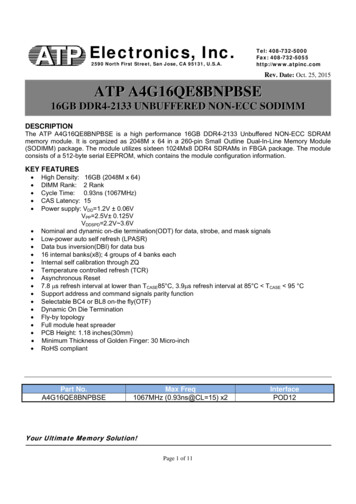
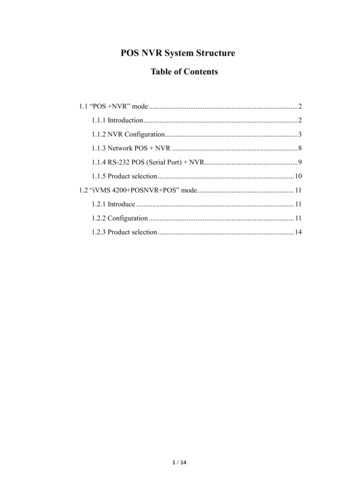
2. Setting TCPIP 232 in Filter Type as DUMP.TCPIP232 SETUP- TCP/IP SETTINGS- INFORMATION SETTINGS- INTERFACE SETTINGS- TIME SYNC SETTINGS- SENCEAUTO- TRANSACTION ALARMOFF* FILTER TYPEDUMP- WATCHDOG TIMERON- EXIT3. Setting the IP Address in TCP/IP setting menu to be an IP of the ATM or Printerthat need to capture data.TCPIP SETTING* IP ADDRESS192.168.0.0- DESTINATION PORTANY4. Open Hyper Terminal program on the PC and setting Set comport at baud rate19200,N,8,1 Flow control NONE.21
5. Select Emulation to be ANSI.6. Click on ASCII setup button then set ASCII Sending and ASCII Receiving asfollows.22
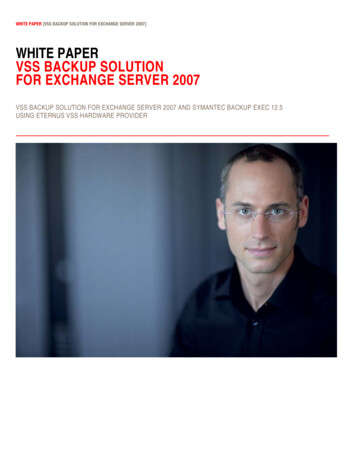
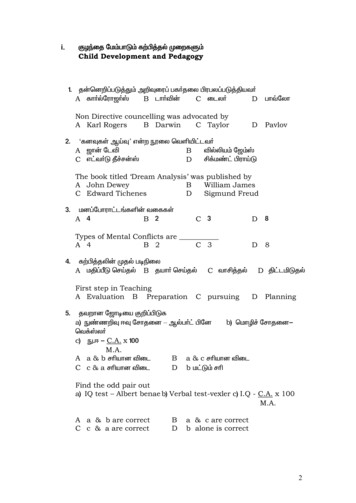
7. Click on Tranfer Menu and select Capture Text8. Locate the file that need to capture.23
9. Click Call menu and select call for ready to receive data from RS232.10. Try to make some transaction from ATM or Cash register and transaction datawill appear on Hyper Terminal screen.11. Click Tranfer menu and seclect Capture Text and click Stop then RAWtransaction data will store in the file where that locate in the PC.24
TCPIP 232 Connecting with Cash Register Express(CRE)Cash Register Express setting to be Client and Server Connecting Diagram1. Connecting DiagramCameraVideoCRE server PCRounter/NetworkMonitorCRE client PCCAT-5CAT-5VideoSerialTCPIP232DVRFigure 19. Cash Register Express Tapping Mode ConnectionCameraVideoRounter/NetworkMonitorCRE client PCCAT-5CRE server PCVideoCAT-5SerialCAT-5TCPIP232DVRFigure 20. Cash Register Express Mirror Mode ConnectionNote : TCPIP232 Tapping Mode and Mirror Mode setting refer to page 925
CAM1CAM3CAM2CAM4CRECRECRECREClient PC 1Client PC2Client PC3Client IP232Rounter/NetworkSwitcherCAM1-4 INPUTRS232CREDVRRS485Hydra/VSI-Pro MAX MasterServer PCFigure 21. Cash Register Express Client Server Setting RS485 Network Interface2. Setting TCPIP 232 in FILTER TYPE to be CRE.TCPIP232 SETUP- TCP/IP SETTINGS- INFORMATION SETTINGS- INTERFACE SETTINGS- TIME SYNC SETTINGS- SENCE- TRANSACTION ALARM* FILTER TYPE- WATCHDOG TIMER- EXIT26AUTOOFFCREON
3. Setting the IP Address in TCP/IP setting menu to be an IP of the Cash RegisterExpress server PC.TCPIP SETTING* IP ADDRESS192.168.0.0- DESTINATION PORTANY- EXIT4. Start cash register express server on the CRE server PC. Then from the loginscreen select file, go to the security tab select “ Start the DVR Server “. And loginto the cash register express.5. Start cash register express client on the CRE client PC. Then from the loginscreen select file, go to the security tab select “ Start the DVR Client “. And loginto the cash register express.27
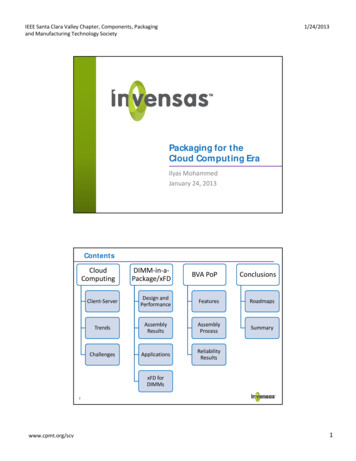
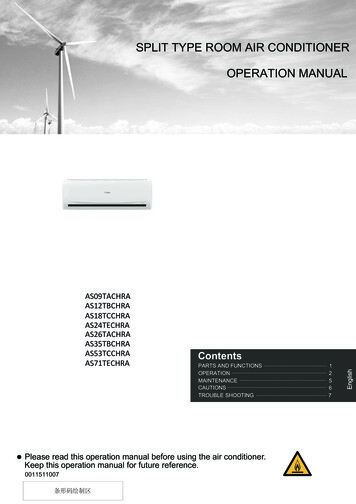
6.Setting network environment of the client Cash Register Express network settingby press Option button.7. Click on “Setup” button(1) and click on “Setup Screen” (2) then Setup Screensetting will appear.28
8. Put the IP of Cash Register Expressx server by click on “Hardware” tab(1) andclick on “Page2” tab(2) and put the IP of the Cash Register Express (3) thatconfiguration to be Cash Register Express server.9. Exit from Cash Register Express setting and back to operating mode.10. Try to make a transaction from Cash Register Express client PC then DVRwill be display invoice transaction display on screen along with cash registernumber.29
TCPIP 232 connecting with Gilbraco Passport1. Connecting ssportCAT-5VideoCAT-5SerialTCPIP232DVRFigure 22. Gilbraco Passport stand alone tapping mode r/NetworkCAT-5VideoSerialCAT-5TCPIP232DVRFigure 23. Gilbraco Passport stand alone mirror mode connectionNote : TCPIP232 tapping mode and mirror mode setting is refer to page 85Hydra/VSI-Pro MAX MasterFigure 24. Gilbraco Passport with RS485 Network Interface30
2. Select TCPIP232 Fiter Type to be GILBRACO PASSPORT.TCPIP232 SETUP- TCP/IP SETTINGS- INFORMATION SETTINGS- INTERFACE SETTINGS- TIME SYNC SETTINGS- SENCEAUTO- TRANSACTION ALARMOFF* FILTER TYPE GILBRACO PASSPORT- WATCHDOG TIMERON- EXIT3. Setting the IP Address in TCP/IP setting menu to be an IP of printer.TCPIP SETTING* IP ADDRESS192.168.0.0- DESTINATION PORTANY- EXIT4. Exit from TCP232 setting and back to operating mode.5. Try to make some transaction with cash register then transaction data will bedisplay on the screen and store in the DVR.31
TCPIP 232 Connecting with INFO GENESIS1. Connecting SCAT-5CAT-5VideoSerialTCPIP232DVRFigure 25 INFO GENESIS Stand Alone Tapping Mode workCAT-5VideoSerialCAT-5TCPIP232DVRFigure 26. INFO GENESIS Stand Alone Mirror Mode ConnectionNote : TCPIP232 Tapping Mode and Mirror Mode Setting refer to page IP232TCPIP232CAM1-4RS232DVRRS485Hydra/VSI-Pro MAX MasterFigure 27. INFO GENESIS with RS485 Network Interface32
2. Select TCPIP232 Fiter Type to be INFO GENESIS.TCPIP232 SETUP- TCP/IP SETTINGS- INFORMATION SETTINGS- INTERFACE SETTINGS- TIME SYNC SETTINGS- SENCEAUTO- TRANSACTION ALARMOFF* FILTER TYPEINFO GENESIS- WATCHDOG TIMERON- EXIT3. Setting the IP Address in TCP/IP setting menu to be an IP of printer.TCPIP SETTING* IP ADDRESS192.168.0.0- DESTINATION PORTANY- EXIT4. Exit from TCP232 setting and back to operating mode.5. Try to make some transaction with cash register then transaction data will bedisplay on the screen and store in the DVR.33
TCPIP 232 Connecting with DIGISM 55001. Connecting SerialTCPIP232DVRFigure 28. DIGISM 5500 Stand Alone Tapping Mode 500CAT-5VideoSerialCAT-5TCPIP232DVRFigure 29. DIGISM 5500 Stand Slone Mirror Mode ConnectionNote : TCPIP232 Tapping Mode and Mirror Mode Setting refer to page 5TCPIP232CAM1-4RS232DVRRS485Hydra/VSI-Pro MAX MasterFigure 30. DIGISM 5500 with RS485 Network Interface34
2. Select TCPIP232 Fiter Type to be DIGISM 5500.TCPIP232 SETUP- TCP/IP SETTINGS- INFORMATION SETTINGS- INTERFACE SETTINGS- TIME SYNC SETTINGS- SENCEAUTO- TRANSACTION ALARMOFF* FILTER TYPEDIGISM 5500- WATCHDOG TIMERON- EXIT3. Setting the IP Address in TCP/IP setting menu to be an IP of printer.TCPIP SETTING* IP ADDRESS192.168.0.0- DESTINATION PORTANY- EXIT4. Exit from TCP232 setting and back to operating mode.5. Try to make some transaction with cash register then transaction data will bedisplay on the screen and store in the DVR.35
TCPIP232 Micros VSS 3700 UDP InterfaceThe TCPIP232 Micros VSS 3700 UDP Interface is used for receiving the UDP messages f
The user must be careful to unplug the LAN cable from the ATM or POS. The ATM or POS has the protection when there is no comunication between the ATM and Host Server in limited time your ATM will be offline automatically. This peroid is called the "ATM Time Out'. This time out depends on your ATM system. It is approximately 6-10 seconds.