Transcription
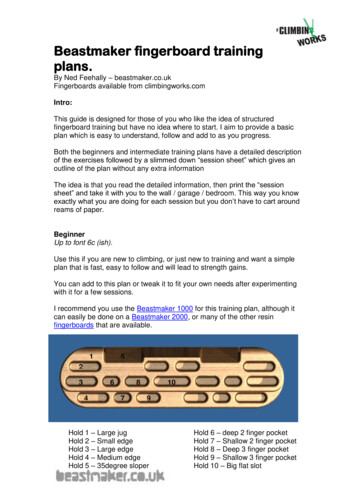
Beastmaker fingerboard trainingplans.By Ned Feehally – beastmaker.co.ukFingerboards available from climbingworks.comIntro:This guide is designed for those of you who like the idea of structuredfingerboard training but have no idea where to start. I aim to provide a basicplan which is easy to understand, follow and add to as you progress.Both the beginners and intermediate training plans have a detailed descriptionof the exercises followed by a slimmed down “session sheet” which gives anoutline of the plan without any extra informationThe idea is that you read the detailed information, then print the “sessionsheet” and take it with you to the wall / garage / bedroom. This way you knowexactly what you are doing for each session but you don’t have to cart aroundreams of paper.BeginnerUp to font 6c (ish).Use this if you are new to climbing, or just new to training and want a simpleplan that is fast, easy to follow and will lead to strength gains.You can add to this plan or tweak it to fit your own needs after experimentingwith it for a few sessions.I recommend you use the Beastmaker 1000 for this training plan, although itcan easily be done on a Beastmaker 2000, or many of the other resinfingerboards that are available.15236487109Hold 1 – Large jugHold 2 – Small edgeHold 3 – Large edgeHold 4 – Medium edgeHold 5 – 35degree sloperHold 6 – deep 2 finger pocketHold 7 – Shallow 2 finger pocketHold 8 – Deep 3 finger pocketHold 9 – Shallow 3 finger pocketHold 10 – Big flat slot
Each hold has a corresponding hold on the other side of thefingerboard. Each hang is done with left hand on the numbered hold and theright hand on the corresponding hold on the right of the fingerboard.Each set of hangs is done with the following format:Hang the hold for 7 seconds, followed by a 3 second rest. This is one rep.Repeat it 6 times. A set of this kind should therefore last approximately oneminute, as shown in the table below:Time on/offOverall time7 seconds hang3 seconds rest7 seconds hang3 seconds rest7 seconds hang3 seconds rest7 seconds hang3 seconds rest7 seconds hang3 seconds rest7 seconds hang3 seconds rest0-7 seconds7-10 seconds10-17 seconds17-20 seconds20-27 seconds27-30 seconds30-37 seconds37-40 seconds40-47 seconds47-50 seconds50-57 seconds57-60 secondsSo what should you do?1 - Warm up on the climbing wall/fingerboard for at least 15mins. Take yourtime with the warm up. If you start training without fully warming up you are ata much greater risk of injury. Finger injuries are nasty and take a long time toheal. You should do your very best to avoid them.2 – 4 finger open handed hang on either hold 3 or hold 4 (2 handed hangusing hold 3 or 4 for the left hand and the corresponding hold for the righthand). This is an open handed hang so don’t put your thumb over your fingers(i.e. the crimp position). Complete the set as detailed above. 3 mins rest.3 – 3 finger open handed hang on either hold 8 or hold 9. Complete set asdetailed above. 3 mins rest.4 – 4 finger hang on slopers (hold 5). Complete set as detailed above. 3 minsrest. To make these easier either pinch below the sloper with your thumb ornestle your index fingers into the edge of the inner sloper for extra grip.
This workout is short (12 mins) but very intense due to the repeated hangsand limited rest periods. If you feel strong/psyched repeat this up to 3 timeswith 10mins rest between each.Beginners Training plan (print this page)This shows the outline of your training plan. I suggest you note down exactlywhich holds you are using for each set, that way you will always train on thesame holds and progress can be measured accurately.warm up – it is very important to warm up properly!1) A set of 4 finger open handed hangs on large or small edge.2) 3 mins rest.3) A set of 3 finger open handed hangs on 3 finger pocket.4) 3 mins rest.5) A set of 4 finger hangs on slopers.Each set 7 second hang followed by 3 second rest, repeated 6 times intotal.Rest for 10-15mins and repeat up to 3 times.
Progression techniques.You can use these in combination or on their own to vary the intensity of eachexercise allowing a lot of adjustment to the difficulty. This helps you to avoidhitting plateaus in your progression.To make the exercises harder you can: Use a smaller hold Hold the hold further out, so your hanging onto less of it making asmaller hold. Reduce your rest times (i.e. from 3 down to 2 mins rest between sets) Add some weight – start with a couple of kgs (held between the feet orin a rucksack). Hang with one hand in a similar, but worse hold , and alternate handsbetween hangs so each hand has hung 3 times off a smaller hold and 3times off a larger hold.To make excercises easier you can: Reduce hanging time and increase resting time for each hang. Instead of7sec hang and 3sec rest, hang for 6 sec and rest for 4, or hang for 5 andrest for 5. Use a bigger hold Put a foot on the wall in front of the fingerboard to take some weight offyour hands. Hang with one hand in a larger hold, and alternate hands between hangsso each hand has hung 3 times off a smaller hold and 3 times off alarger hold. (Sloper specific) Hang slopers with the assistance of a thumb pinchingunderneath the hold. (Sloper specific) Nestle the index fingers into the grooves createdbetween the slopers.
IntermediateFont 6c (ish) to 7c (ish)As with the beginners plan, the idea of this is to provide a basic training planwhich you can easily follow and eventually add to or tweak to suit your needs.I recommend you use a Beastmaker 2000 for this training plan, although itcan easily be done on a Beastmaker 1000 or many of the other resinfingerboards that are available.14257368Hold 1 – 45 degree sloperHold 2 – Large edgeHold 3 – Small edgeHold 4 – 35degree sloperHold 5 – Deep “back 2” pocket9Hold 6 – Shallow 2 finger pocketHold 7 – Deep 2 finger pocketHold 8 – Sloping 2 finger pocketHold 9 – Incut edgeEach hold has a corresponding hold on the other side of the fingerboard.Each hang is done with left hand on the numbered hold and the right hand onthe corresponding hold on the right of the fingerboard.Each set of hangs is done with the following format:Hang the hold for 7 seconds, followed by a 3 second rest. This is one rep.Repeat it 6 times.Time on/offOverall time7 seconds hang3 seconds rest7 seconds hang3 seconds rest7 seconds hang3 seconds rest7 seconds hang3 seconds rest7 seconds hang3 seconds rest7 seconds hang0-7 seconds7-10 seconds10-17 seconds17-20 seconds20-27 seconds27-30 seconds30-37 seconds37-40 seconds40-47 seconds47-50 seconds50-57 seconds
During each 7 second hang lock the arms at 1 of 3 different angles.Each of the individual 7 second hangs in the set should be hung withyour arms locked at different angles, as shown below Hang 1 – arms at 140 degrees – just off being straightHang 2 – arms at 90 degree lockHang 3 – arms at full lockHang 4 – arms at 140degreesHang 5 - arms at 90 degreesHang 6 – arms at full lockAfter at least a 15 min warm up 1 - Front 2 (index and middle fingers) pocket hang on either hold 6, 7 or 8 (orplay around with combinations of these holds). Remember to vary the angle oflock in your arms with each hang.Now have 2 to 3 mins rest.2 - 4 finger open handed hang on hold 3. Complete the set as detailed above.Now have 2 to 3 mins rest.3 - Middle 2 (middle and ring finger) pocket hang on either hold 6, 7 or 8 (orplay around with combinations of these holds). Complete set as detailedabove.Now have 2 to 3 mins rest.4 - 4 finger sloper hang on hold 1 or 4 or a combination of both. Complete setas detailed above. No thumbs on the holds below!Then have 2 to 3 mins rest.5 - 3 finger open handed hang on either hold 3 or hold 2. Complete set asdetailed above.After completing all these exercises take a 10 min rest and the whole lot againand depending on how you feel (still psyched? Still got energy?), repeat it a3rd time.Remember, this is meant to be hard! Make sure you really give it everything.
Intermediate Training Plan (Print this page)Note down exactly what holds/hold combinations you are using for eachexercise and the rest periods that you are taking, so that you can accuratelymeasure progression over time.Warm up – very important to warm up properly. Front 2 finger hang on pockets. 2/3 mins rest 4 finger open handed hang on edges. 2/3 mins rest Middle 2 finger hand on pockets. 2/3 mins rest 4 finger sloper hang. 2/3 mins rest 3 finger open handed hang on small edge.Each set 7 second hang followed by 3 second rest, repeated 6 times intotal. Remember to vary the angle of lock in the arms for maximum trainingbenefit.Rest for 10 mins and repeat up to 3 times.
Progression techniques.You can use these in combination or on their own to vary the intensity of eachexercise allowing a lot of adjustment to the difficulty. This helps you to avoidhitting plateaus in your progression.To make the exercises harder you can: Use a smaller hold Hold the hold further out, so your hanging onto less of it making asmaller hold. Reduce your rest times (i.e. from 3 down to 2 mins rest between sets) Add some weight – start with a couple of kgs (held between the feet orin a rucksack). Hang with one hand in a similar, but worse hold, and alternate handsbetween hangs so each hand has hung 3 times off a smaller hold and 3times off a larger hold.To make exercises easier you can: Reduce hanging time and increase resting time for each hang. Instead of7sec hang and 3sec rest, hang for 6 sec and rest for 4, or hang for 5 andrest for 5. Use a bigger hold Put a foot on the wall in front of the fingerboard to take some weight offyour hands. Hang with one hand in a larger hold, and alternate hands between hangsso each hand has hung 3 times off a smaller hold and 3 times off alarger hold. (Sloper specific) Hang slopers with the assistance of a thumb pinchingunderneath the hold. (Sloper specific) Nestle the index fingers into the grooves createdbetween the slopers.
Advanced Training7c and aboveWhen you are at this level you should experiment with your own training tofind what works for you. Over time you will discover the most effective way foryou to train. You should identify your strengths and weaknesses and use thisinformation to devise your own personalise training plan which should targetyour weaknesses very specifically.You can find more information at:http://beastmaker.co.uk/training%20page2.htm.If you would like help identifying your strengths and weaknesses and/or wanta more personalised training plan for maximum gains, get in touch:nedfeehally@hotmail.com
3 seconds rest 37-40 seconds 7 seconds hang 40-47 seconds 3 seconds rest 47-50 seconds 7 seconds hang 50-57 seconds 3 seconds rest 57-60 seconds So what should you do? 1 - Warm up on the climbing wall/fingerboard for at least 15mins. Take your time with the warm up. If you start training without fully warming up you are at