Transcription
BASIC TECHNICALDRAWINGStudent TextbookGrade 12Prepared by:Amanuel Berhanu (BSc.)Tolossa Deberie (MSc.)Editor:Tolossa Deberie (MSc.)Reviewed by:Abebe BasazeneuNatenael AbebeYared MekuriaFEDERAL DEMOCRATIC REPUBLIC OF ETHIOPIAMINISTRY OF EDUCATIONKURAZ INTERNATIONALPUBLISHER
AcknowledgementsThe redesign, printing and distribution of this student textbook has been funded through theGeneral Education Quality Improvement Project (GEQIP), which aims to improve the quality ofeducation for Grades 1–12 students in government schools throughout Ethiopia.The Federal Democratic Republic of Ethiopia received funding for GEQIP through credit/financingfrom the International Development Associations (IDA), the Fast Track Initiative Catalytic Fund(FTI CF) and other development partners – Finland, Italian Development Cooperation, the Neth‐erlands and UK aid from the Department for International Development (DFID).The Ministry of Education wishes to thank the many individuals, groups and other bodies in‐volved – directly and indirectly – in publishing the textbook and accompanying teacher guide.Every effort has been made to trace the copyright holders of the images and we apologise in ad‐vance for any unintentional omission. We would be pleased to insert the appropriate acknowled‐gement in any subsequent edition of this publication. Federal Democratic Republic of Ethiopia, Ministry of EducationFirst edition, 2003(E.C.)Developed, printed and distributed for the Federal Democratic Republic of Ethiopia, Ministry ofEducation by:Al Ghurair Printing and Publishing House CO. (LLC)PO Box 5613DubaiU.A.E.Second edition,2007 (E.C.)By Tan Prints India Pvt. Ltd.In collaboration withKuraz International Publisher P.L.CP.O. Box 100767Addis AbabaEthiopiaISBN: 978‐99944‐2‐096‐4All rights reserved. No part of this publication may be reproduced, stored in a retrieval system ortransmitted in any form or by any means (including electronic, mechanical, photocopying, record‐ing or otherwise) either prior written permission of the copyright owner or a licence permittingrestricted copying in Ethiopia by the Federal Democratic Republic of Ethiopia, Federal Negarit Ga‐zeta ,Proclamation No. 410/2004 Copyright and Neighbouring Rights Protection Proclamation,10th year, No. 55, Addis Ababa, 19 July 2004.DisclaimerEvery effort has been made to trace the copyright owners of material used in this document. Weapologise in advance for any unintentional omissions. We would be pleased to insert the appro‐priate acknowledgement in any future edition.
Table of ContentsPageUNIT 1. FREE HAND SKETCHING . 11.1 Introduction . 21.2 Uses of Freehand Sketching . 41.3 Types of Freehand Sketching . 41.4 Sketching Materials . 51.5 Fundamentals of Sketching . 8Unit Summary . 29UNIT 2. AUXILIARY VIEWS . 322.1 Introduction . 332.2 Overview of Orthographic Projection . 342.3 Auxiliary Projection of Objects . 442.4 Types of Auxiliary Views . 47Unit Summary . 53UNIT 3. SECTIONAL VIEW . 563.1 Introduction . 573.2 Cutting Plane and Section Lining . 583.3 Visualizing a Sectional View . 603.4 Types of Sectional View . 613.5 Other Sectional View Representation . 673.6 Conventional Representations in sectioning . 69Unit Summary . 72
UNIT 4. DIMENSIONING . 804.1 Introduction . 814.2 Lines and Symbols . 814.3 Reading Direction of Figures . 824.4 Theory of Dimensioning . 834.5 Methods of Dimensioning . 854.6. Placement of Dimension . 89Unit Summary . 92UNIT 5. DEVELOPMENT AND INTERSECTION. 955.1. Introduction . 965.2 Development . 985.3 Intersection Between Geometrical Solids . 114Unit Summary . 122
1 Free hand SketchingUNIT12-DFREEHANDSKETCHING3-DLearning Competencies:Up on completion of this chapter you should be able to: Describe the use and application of freehand sketching; Identify freehand sketching materials; Use freehand sketching material properly; Prepare a sketch of line in freehand; Sketch different types of lines, areas, angles, circles, and arcs byapplying sketching techniques; Layout a sketch using proportion; Sketch multiview drawing of 3D objects; Prepare a freehand sketch of any 3D objects in three types of pictorialdrawing.1
Freehand sketchingnot upon the technique of sketching the idea.1.1. IntroductionSketching, similar to writing, is a skill that Have you ever sketched? If you do what is thething you sketched and why did you sketched it?can be developed through practice. SomeConsider an Architect who wants to design aillustrated. These represent the type ofbuilding, a Mechanical Engineer who wantssketches you might be asked to produce into design a machine or a machine part; anindustry or on the job site. In this unit theIndustrial Engineer who wants to design abasic techniques of both two-dimensionalplant layout; how would he/she start thesketchingdesign? Practically all starts and put theirdiscussed.ideaComparison between freehand sketching andinstrumental drawingwithfreehandsketch.Freehandsketching is one of the most effective ways garearecommunicate a pictorial or verbal idea to aFreehand sketchingInstrumental drawingworkman. Sketching may be schematic, The process ofproducing arough preliminarydrawingrepresentation. A first stage ofthe designprocess. Done in freehand. A stepping toneto the nextsketch ordrawing; whereideas are refined,detailed is addedand new ideasare formed. Used to clarifythe design idea tonon technicalindividuals. Takes less time The process ofproducing a finaldrawing. It’s a final stage ofa design process. Done withinstruments. Used to clarify thedesign to technicalpersonnel. Takes relativelylonger time todraw.expressing new ideas, or instructional toconvey ideas to draftsmen. After these ideas,concepts, and details for a project have beenfinalized, precise technical drawings areproduced using instruments so that partsmaybemanufacturedorconstructed.Freehand sketches are also used by engineersto clarify, evaluate and record preliminaryideas and concepts. Sketches can be used byall persons irrespective of their specializationto support their ideas with figures.The fundamental concepts in technicaldrawing are the same weather instrumentalor freehand drawing is used in representingor transferring ideas. But freehand sketchingis preferable to draw easily and freely ashand writing, and the mind of the sketcherwould be free to concentrate upon an idea,2
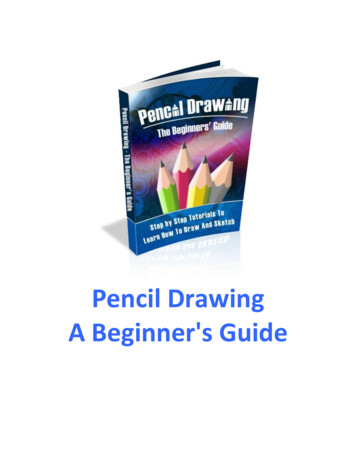
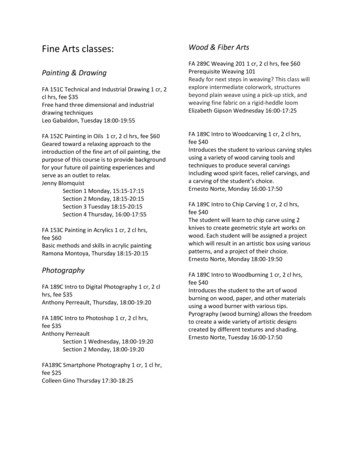
1 Free hand SketchingApplication of sketchingSketch of typical mechanicaltechnology applicationTypical sketch for 2-D statics problemMechanical, chemical or civil engineersmight use this type of sketchMetallurgical engineers sketchmicrostructures of materialsElectrical engineers often sketch circuitsAeronautical engineers typically sketcheffects of forces acting on aircraftSketch of a cellular phoneArchitects often sketch buildingsFig.1.1 Typical applications of freehand sketching3
Freehand sketching1.2. Uses of FreehandSketching What do you think is the use of sketching forengineers and designers?Sketching is as much a thinking process as itis a communication technique and it is arapid method of drawing. In addition togaining speed freehand sketches have thefollowing uses; Transferring information, obtained inthe field or shop, to the engineeringoffice. Conveying the ideas of the designer tothe draftsman. Making studies of the layout of theviews required in an instrumentaldrawing. A means of making preliminarystudies of a design to show how itfunctions. Furnishing a three-dimensional picture of an object; this will help tointerpret the orthographic views.1.3. Types of FreehandSketchingFreehand sketches can be categorized intothree:4Fig. 1.2 Communication of information usingcharts and graphs1. Sketches which communicate techn-2. Sketches which illustrate two dimen-ical data such as charts, graphs,sions of an object such as a multi-maps, and diagrams as shown inview representation of an object asFig.1.2.shown in Fig. 1.3.
1 Free hand Sketching1.4. Sketching Materials What kind of sketching materials do yousuggest from the drawing materials youknow?One of the advantages of freehand sketchingis that it requires only pencil, paper anderaser, items that anyone has for ready use.Pencil: there are different types of pencilFig. 1.3 Multi-view representation of anobject3. Sketches which are two dimensionalrepresentations of three dimensionalobjects such as pictorial sketches ofan object. See Fig. 1.4.usedintechnicaldrawing.Technicalsketching is usually made by the pencils inthe medium group, F, H, and 2H. The Hpencil is more recommended for sketchingpurpose. Sharpeningthesketchingpencil: A sketching pencil should besharpened on a file or piece ofsandpaper to conical point. Thepointthenshouldberoundedslightly on the back of the sketch pador another sheet of paper to thecorrect degree of dullness. TheFig. 1.4 Pictorial representation of an objectalphabets of lines that are sketchedfreehand are all made with the sameCheckpoint 1.1pencil grade. The variation in thelines is achieved by varying thePractice sketching multi-view andpictorial representation of any object,which is familiar to you.sharpness of the pencil point asshown below in Fig. 1.5.5
Freehand sketchingPapers: When sketches are made in thefield, where an accurate record is required, asmall note book or sketching pad isfrequently used. Often clip boards areemployed to hold the paper.Sketching paper might be blank, rectangulargrid, isometric grid or perspective gridpaper.Blank paper: Blank paper of durable andhigh quality can be used as a sketching paperfor all types of sketches. In this course weshall be using the blank paper to learn thedifferent techniques of sketching.Rectangular grid paper: This type ofpaper helps in estimating distances easily. Itis used in sketching two-dimensional figuressuch as multi-view drawings. It is also usedfor making oblique sketches.(a) Rectangular gridFig. 1.5 Pencil points and sketch linesEraser: A good eraser that will not causedirty mark should be used. A soft erasershould be used to remove construction linesand incorrect markings.6(b) Freehand sketching in rectangular gridpaperFig. 1.6 Using rectangular paper grids
1 Free hand SketchingIsometric grid paper: This paperhelps to draw pictorial sketches calledisometricdrawingseasily,whichiscomposed of a series of lines making 600angles with one another. Angles cannotbemeasuredwithaprotractorinPerspective grid paper: Like therectangular coordinate and the isometricruled papers, sketching papers withperspective grids are also available. Thesetypes of papers are used to simplifysketching of pictorial drawings calledperspective drawings.isometric pictorial; they must be drawnby measuring coordinates along the threeaxes of the printed grid.(a)(b)(b)Fig. 1.7 (a) Isometric grid (b) FreehandFig. 1.8 Perspective grid papersketching on Isometric grid paper7
Freehand sketchingCheckpoint 1.2Practice sketching a multi-view on a plainA4 drawing paper and rectangular gridpaper. Then explain the difference betweendrawing sketches on a plain paper and ongrip paper.Practice pictorial sketches on isometric andperspective grid papers.movement. Whenever possible sketch lines in adirection away from the body. As you sketch, rotate the pencilslightly between the thumb andfingers. This helps to preserve thesharpness of the pencil point and tomake uniformly thick lines. Because more freedom of movementis necessary when sketching, avoidfastening the paper to the workingsurface. The paper should be free tomove across the working surface asthe sketch is developed. Final lines on sketches should bebold, dark, and clean-cut. Straight lines should be drawn withminimum waviness. When sketching, avoid using ragged, overlaping strokes.1.5. Fundamentals of SketchingThe chief difference between an instrumentaldrawing and a freehand sketching lies in thecharacteristics of the technique of the lines.A good freehand line should not be rigidlystraight or exactly uniform, as an instrumental line. The effectiveness of an instrumentalline lies in exacting uniformity, while thequality of freehand lines lies in its freedomand variety.Good sketches constitute the followingtechniques. 8When sketching hold the pencilloosely and at a greater distancefrom the pencil point than in normalwriting. This distance may rangefrom about 3 to 5cm. Eye-handcoordination and muscle control areimportant and come with practice. During sketching short lines, usefinger movement keeping the wriststationary. When sketching longer lines, useless finger action with a stiffer arm1.5.1 Sketching Lines1. Straight LinesSince most sketches consist mainly ofstraightlines(horizontal,vertical,andinclined lines), it is important for you tolearn the simple techniques involved insketching these lines.
1 Free hand SketchingThe following steps are recommendedfor sketching straight line:Step 1: Mark the end pointsStep 2: Make a few trial motions betweenthe marked points to adjust theeye and hand to thecontemplated line.Step 3: Sketch a very light line betweenthe points by moving the pencilin two or three sweeps. Whensketching the trial line, the eyeshould be on the point towardb. Vertical LinesVertical lines are usually drawn from top tobottom, with finger and wrist movements,you should be able to develop enough skill todraw uniformly spaced parallel vertical lines.The edge of the drawing surface can be usedfor this as well as demonstrated inFig.1.10(b).c. Inclined linesInclined lines may be made to conform indirection to horizontal or vertical lines byturning the paper slightly (Fig.1.10 (c)).which the movement is directed.Step 4: Darken the finished line, keepingthe eye on the pencil point onthe trial line. The final line,replacing the trial line, should bedistinct,black,uniform,andstraight.a) Horizontal strokesb) Vertical strokesFig. 1.9 Steps in sketching a straight linea. Horizontal LinesThe normal way to draw parallel horizontallines is from left to right for right-handedpeople or right to left for left-handed people.c) Inclined strokesFig. 1.10 Freehand sketching techniquesYou should be able to develop enough skill tod. Sketching Border Linesdraw many evenly spaced horizontal linesBorder lines are a combination of verticaland horizontal lines. Therefore, they can besketched in the manner discussed before.9while leaving uniform spaces between thelines (See Fig.1.10 (a)).
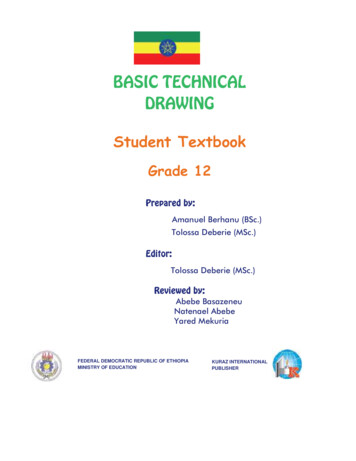
Freehand sketchingFig. 1.11 Sketching a border lineThe following steps may befollowed to sketch boarderline easily;Step 1: Begin by aligning the edgeof the paper with that of theboard.Preventthepaperfrom sleeping by one handwhileholdingthepencilfirmly by the other hand asshown in Fig.1.11 (a).Step 2: Use the idle fingers of thehand holding the pencil as aguide against the edge of theboard (Fig.1.11 (b)).Step 3: Then slowly sketch theline pulling the pencil towardyou (Fig. 1.11 (c)). Here youneed not to sketch a trial line;instead produce a final boldline at the first stroke.Checkpoint 1.3Sketching horizontal, vertical andinclined linesPracticesketchinghorizontal,vertical and inclined lines on a plainsheet of A4 size paper. Sketch aboutten more parallel lines spaced by eyeabout 15mm apart. Try to keep thelines reasonably parallel.Sketching boarder linesSketch several differently spacedboarder lines around the edges of aplain sheet of A4 size paper. Try toproduce neat square corners wherethe lines intersect. Avoid extendingone line beyond another.2. Curved lines1. Have you ever sketched a circle? Howaccurate were you?2. What method do you suggest for accuracy?Curved lines are identified as circles, arcs,ellipse or irregular curves.a. Sketching CirclesCircles can be sketched by using lightguidelines along with centerlines. Since it10
1 Free hand Sketchingis difficult to draw a freehand circle inone continuous line, short arcs are drawnusing the guidelines.The recommended steps to drawcircles are given below.Sm all sizes lip to 25 m m diam etersStep 1Step 2Step 1: Sketch a center line bydrawing a horizontal and avertical line that intersect atthe center of the desiredcircle.Estimate and mark off theradius distance from thecenterpoint on each side ofthe centerline shown in step 1of Fig. 1.12.Step 2: Sketch one quarter of thecircle lightly and then sketchthe other quarter of the circleas shown in step 2 and 3 ofFigure 1.12.Step 3: Sketch the other half ofthe circles in the same manner.Darken the finale circle andchange the light horizontal andverticalconstructionlinesintersecting at the center of thecircle into centerlines as shownin step 4 of Fig.1.12.Step 3Step 4Fig. 1.12 Sketching a circle with diametergreater than 25mmLarge Sizes Greater Than 25 mmDiameterIf the size of the circle is large (greater than25mm diameter) the number of constructionlines used is increased to mark more numberof points on the circle. For example, a circleis sketched as shown in Fig. 1.13 by usingfour construction lines intersecting at thecenter of the circle. By marking off the radiuson each of these lines, eight points are found.These points are joined to sketch therequired circle. The sketching process of acircle is simpler when there are morenumber of points.11
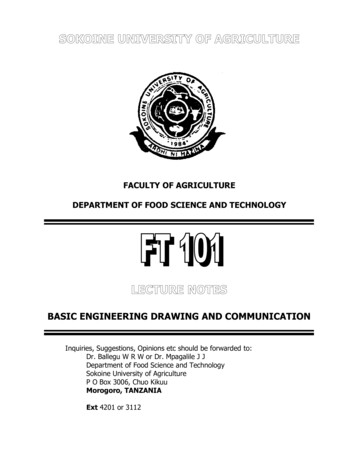
Freehand sketchingb. Sketching ArcsAs an arc is part of a circle, sketching of arcsis similar to that of the circles.Steps to sk etch an arcStep 1: Sketch construction lines intersecting at the center of the arc;more number of constructionlines may be necessary forlarge size arcs.Fig. 1.13 Sketching a circle with diametergreater than 25mmWhen sketching even larger circles, sketch aconstruction square box whose side length isequal to the diameter of the circle asillustrated in Fig. 1.14. This box will help tomake the roundness of the circle as perfect aspossible.Step 2: Mark the radius of the arc on allconstruction lines.Step 3: The marked points are joined tocomplete the arc.Sketching of arcs of different sizes at variousconditions are illustrated in Fig. 1.15.(a)(b)(c)Step 1Fig. 1.14 Sketching a large circle(d)Step 2Checkpoint 1.4Sketching circlesOn an A4 paper sketch as manycircles as you can. Use the samepoint as a center to all circles.Start with a circle of 10mmdiameter.(e)(f)Step 3Fig. 1.15 Sketching arcs12(g)
1 Free hand SketchingCheckpoint 1.5complete the ellipse. Lightly all lines andheavy in the final ellipse.Sketching arcsOn an A4 drawing paper copy thearcs shown in Fig.1.15 to anyconvenient size.Sketching EllipsesIf a circle is viewed obliquely, it appears asan ellipse. With a little practice, you canlearn to sketch small ellipses with a free armmovement. Hold the pencil naturally, restthe weight on the upper part of the forearm,and move the pencil rapidly above the paperin the elliptical path desired; so lower thepencil so as to describe several lightoverlapping ellipses, as shown at I and heavyin the final ellipse II.Fig. 1.17 Sketching ellipse with light enclosingrectangleCheckpoint 1.6Sketching ellipsesPractice sketching ellipses on aplain sheet of A4 size paperwhose major and minordiameters are 50mm and 30mmrespectively.1.5.2 Dividing Lines and AreasEquallyFig. 1.16 Sketching an ellipse with free armmovementAnother method is to sketch lightly theenclosing rectangle, Fig.1.17 (I) mark themidpoints of the sides, and sketch lighttangent arcs, as shown. Then, Fig.1.17 (II)The beginner must recognize the importanceof being able to estimate comparativerelationships between the width, height, anddepth of an object being sketched. Thecomplete problem of proportioning a sketchalso involves relating the estimated13
Freehand sketchingdimensions for any component parts, such asslots, holes, and projections, to the over-alldimensions of the object. This is not thepractices of attempting to estimate actualdimensions.To become proficient at sketching one mustlearn to recognize proportions and be able tocompare dimensions "by eye" until one isable to do so. One cannot really "think withones pencil". Some people can develop akeen eye for proportion with only a limitedamount of practice and can maintain theseestimated proportions when making theviews of a sketch.1. Dividing a line into equal partsTo divide a line into any even num berof equal parts follow the follow ingsteps;Step 1: Estimate the mid-point of theline.Step 2: Estimate the mid points ofeach half.Step 3: Then estimate the mid pointsof the resulting four parts ofthe line and so on.However, you should practice estimatingone-third, one-fifth and one-seventh of shortlines to be able to divide a line into three,five, seven, or a multiple of them. Forexample, to divide a line into ten equal parts,start by estimating the midpoint of the line.Then you should estimate the one-fifth of14each half and mark the division points allover the line. Figure 1.18 shows the stepsinvolved in dividing a line into four equalparts.Given lineStep 1Estimate the centerof the lineStep 2Estimate the centerof each halfFig. 1.18 Dividing a line into four partsCheckpoint 1.7Dividing a line into a requirednum ber of partsSketch four horizontal lineswhich are 100mm long each ona plain sheet of A4 size paper.Carefully divide the first lineinto three equal divisions, thesecond line into five equaldivisions, the third line intoseven equal divisions, and thefinal line into eight equaldivisions.
1 Free hand Sketching3. Dividing the Area of a Rectangle2. Dividing the Area of a TriangleTo divide a triangular area into anynum ber of equal areas follow thefollow ing steps;Step 1: Start by dividing the sides ofIn order to divide the area of a rectangle, itssides should be divided first. Fig.1.20 one-third,inone-the triangle into any number offourth, and one-fifth of a side of a rectangle.parts as discussed above.The mid-point of a rectangle is the point ofStep 2: Then sketch lines by connectingintersection of the diagonals. A line sketchedthe vertex opposite to this sidethrough this point that is perpendicular toandthedivisionpointstodivide the triangle into equalareas.any side will establish the mid-point of thatside. To determine a distance that is equal toone fourth the length of a side, the quarterpoint may be located by repeating thisprocedure for the small rectangle representting the upper left-hand quarter of ABCD.a)b)a)c)Fig. 1.19 Dividing the area of a triangleCheckpoint 1.8Dividing the area of a triangleSketch a triangle whose sides are60mm, 70mm, and 90mm long.Divide it into six equal areas asshown in Fig 1.19.b)Fig. 1.20 Method of proportioningthe area of a rectangle15
Freehand sketchingCheckpoint 1.9Dividing the area of a rectangleSketch a rectangle whose sidesare about 100mm and 50mmlong. Divide its area into 10 equalrectangles.a)b)1.5.3 Sketching AnglesActivity 1.1 How can you estimate a given angle?Discuss and come with practical ideas topresent in group.One of the important sketching skills is theability to approximate a required angle. Asc)d)Fig. 1.21 Sketching approximate angleillustrated in Fig. 1.21, a 90 angle can beapproximatedbysketchingtwonearlyperpendicular lines as shown at Fig 1.12 (a).To sketch a 45 angle, sketch a square andconnect its opposite corners as shown at (b).To sketch a 30 angle, sketch a square and anCheckpoint 1.10Sketching anglesSketch 7 , 15 , 30 , 45 , and 90 angles whose sides are all 50mmlong.arc inside the square as shown at (c). Then,divide the arc into three equal parts andconnect the division points to the vertex ofthe angles. Similarly, a 15 angle can beapproximated by dividing the arc into sixequal parts as shown at (d). Different anglescan be constructed by bisecting angles thatcan easily be approximated. For example, a7 angle can be approximated by bisecting a15 angle. A 22 angle can be approximatedby bisecting a 45 angle.161.5.4 Sketching the Given ObjectsAs stated in section 1.7, in the sketch of anobject, the relative proportions of its primarydimensions (width, height, and depth) aremore important than their actual physicalsizes. A proportion is the ratio between anytwo dimensions of an object. The mostimportant rule in freehand sketching is tokeep the sketch in proportion.
1 Free hand Sketching1. Proportioning Large Objects2. Multi-view SketchingIn sketching from an actual object, you canThere are two recommended procedures foreasily compare various distances on thelaying out multi-view sketches: The outside-object by using the pencil to comparein method and the inside-out method. Bothmeasurements as shown in Fig. 1.22. Bythese methods use construction boxes toholding the pencil between the eye and thefacilitate the sketching process.object, one end of the pencil can be made tocoincide with one end of the object and thenthe thumb is moved along the pencil until itcoincides with the other end of the object.The length may then be used to obtain therelative proportions of the object. Whiledoing this, do not change your position, andalways hold your pencil at arm’s length. Thelength sighted can then be compared insimilar manner with any other dimension ofthe object.Fig. 1.22 Method of obtaining proportionswhen sketching large objectsa) Outside-in MethodThis method is illustrated in Fig 1.23. Thefirst step is to block in the main out line ofthe given object to a desired scale. Theblocking of details follows. Finally, the linesrequired to form the object are darkened.This method is particularly useful for objectswhose outline is made up of straight lines.Activity 1.21. Sketch a simple object from your class room,for example table or chair and show yourinstructor.2. Form a group and share ideas on the conceptof proportion. After this choose a groupleader and let the group leader share yourideas to the other groups, similarly let theother group leader come to you and presentthe idea of others.As you have seen in grade 11 text, projectioncan be classified into parallel and perspective projection. Multi-view, isometric andoblique projection use parallel projection. Inthe following section sketching of eachprojection will be discussed.17
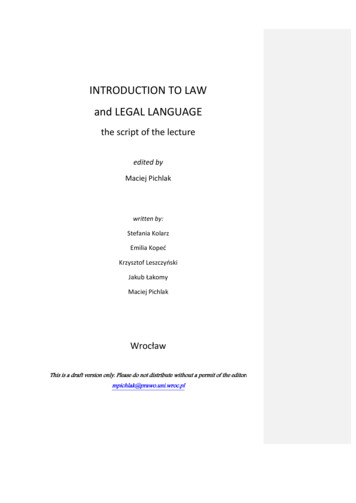
Freehand sketchingb) Inside-out methodGiven objectIn this method, as its name implies,construction is done from inside out. That is,no blocking of the object as a whole isnecessary. Rather starting from a singledetail, construction continues until all detailsare over. Finally, the desired lines aredarkened. This method is illustrated in Fig.1.24.Step 1Sketch center lines and main constructionbox using proportional distances at thedesired enlarged size.This face is trueStep 1Sketchcenterlinesandmainconstruction box using proportionaldistances at the desired enlarged size.Step 2Block in details of the object proportionaldistanceStep 3Darken the final objectFig. 1.23 sketching an object to a reducedscale using the outside-in method18Step 2Block in other details andmark off radii usingproportional distancesStep 3Darken final object
1 Free hand Sketching3. Pictorial sketching1. Recall the types of pictorial drawings youknow from grade 11 parts.2. How do you think pictorial drawing can bedone by sketching?a)b)c)Pictorial sketching is used for preparingpictorial drawings that shows all the threedimensions of an object: width, height anddepth. Sales engineers may frequentlyinclude pictorial sketches with orthographicsketches when preparing field reports on theneeds and suggestions of the firm’scustomers. Students may use pictorialsketches as an aid in visualizing andorganizing problems.d)Fig. 1.24 Sketching an object to a magnifiedscale using the inside – out methodOblique: RecedingParallel linesAxonometric: RecedingParallel lines(a)(b)Check point 1.11Sketch the view of an objectSketch the three views of theobjects shown in Figure (a)and (b) to any convenientmagnified scale.Perspective: RecedingConverging lines(c)a)b)Fig. 1.25 Sketch the three types of pictorialsketches19
Freehand sketchingThe three principal types of pictorialsketches are: Oblique, Axonometric, andPerspective sketches. These forms areillustrated
The redesign, printing and distribution of this student textbook has been funded through the General Education Quality Improvement Project (GEQIP), which aims to improve the quality of education for Grades