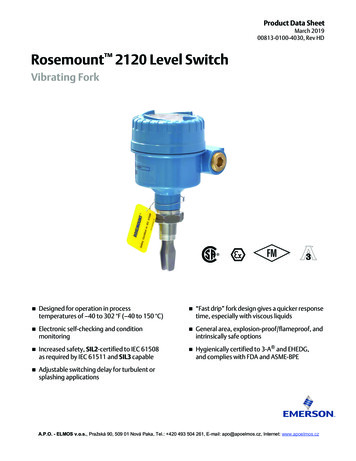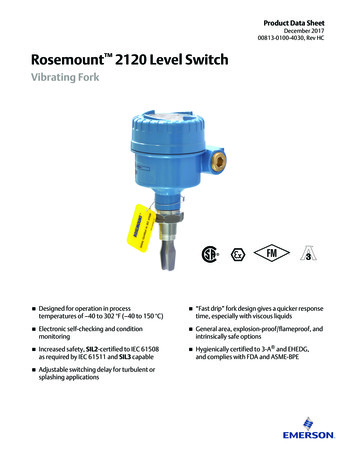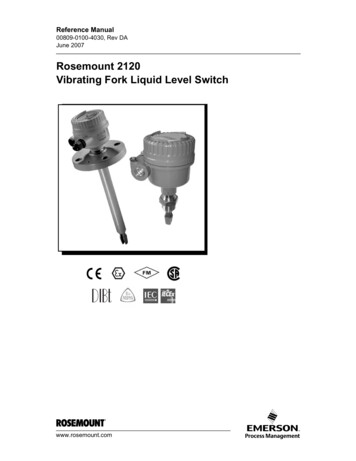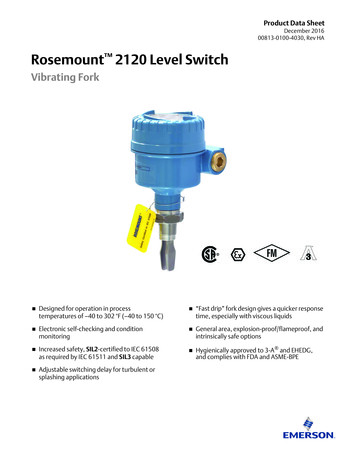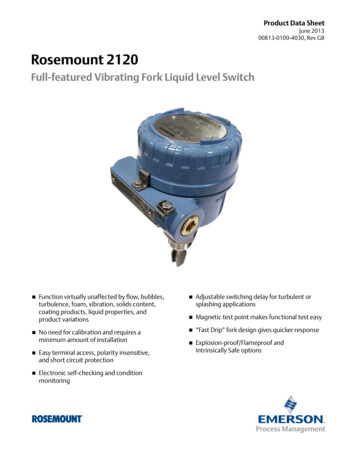
Transcription
2120 SW Poma Drive; Palm City, Florida 34990 772-223-4055 Phone 772-781-7492 Faxwww.sunlastmetal.com sales@sunlastmetal.com
IMPORTANT NOTICEREAD THIS MANUAL COMPLETELY BEFORE BEGINNING INSTALLATION OF THE 5-VCRIMP (KEY WEST SERIES) PANEL SYSTEM. SUNLAST METAL DETAILS MUST BEFOLLOWED TO INSURE APPROPRIATE WARRANTIES REMAIN IN AFFECT.ALWAYS INSPECT EACH AND EVERY PANEL AND ALL ACCESSORIES BEFOREINSTALLATION. NEVER INSTALL ANY PRODUCT IF ITS QUALITY IS IN QUESTION.NOTIFY SUNLAST METAL IMMEDIATELY IF ANY PRODUCT IS BELIEVED TO BE OUTOF SPECIFICATION OR HAS BEEN DAMAGED DURING SHIPPING.IF THERE IS A CONFLICT BETWEEN OUR ENGINEER’S EVALUATION REPORT ANDTHE DETAILS IN THIS MANUAL, THE ENGINEER’S EVALUATION REPORT WILL TAKEPRECEDENCE.Installations contained herein were in effect at the time of this installation manual creation and approved for publishing. Sunlast Metalreserves the right to discontinue products or change specifications at anytime without notice. To ensure that you have the latest materialavailable please contact Sunlast Metal directly. Installation Details are for illustration purposes only can may not be suitable for all buildingdesigns or conditions. All projects should be engineered to conform to applicable building codes and regulations. For completeperformance specifications and any disclaimers, please consult your local Sunlast Metal representative.
OFFICE: (772) 223-4055TOLL FREE: (877) 8-METAL-6FACSIMILE: (772) 781-7492TABLE OF CONTENTSA.B.C.D.E.F.G.H.I.Technical Information Sheet .General Panel Description .Handling & Storage Specifications .Installation Requirements . .Fastener Patterns .General Installation Instructions .General Installation Order .Flashing/Trim Metal Details .Installation Details1. Eave Drip (ED1-5V) .2. Box Gutter (BG1-5V) .3. Gable Rake (GR1-5V) .4. Peak Flashing (PF1-5V) .5. Gambrel Flashing (GF1-5V) .6. Transition Flashing (TF1-5V) .7. Ridge Cap - Notched (RC1-5V) . .8. Ridge Cap - Hemmed (RC2-5V). .9. Hip Cap (HC1-5V) . .10. Valley (V1-5V) . .11. Side Wall Flashing (SW1-5V) .12. End Wall Flashing (EW1-5V) .Page 4Page 5Page 6Page 7Page 8Page 9Page 10Page 12Page 14Page 15Page 16Page 17Page 18Page 19Page 20Page 21Page 22Page 23Page 24Page 25
OFFICE: (772) 223-4055TOLL FREE: (877) 8-METAL-6FACSIMILE: (772) 781-7492TECHNICAL INFORMATION SHEET1. Minimum Recommended Slope is 2:12. For slopes less than 3:12, refer to Florida Building Code(FBC) section 1507.4.2 and/or FBC section 1515.2.2. Support Type:Wood Deck - 15/32” (min) or greater Plywood, orWood Plank (0.42 min specific gravity)3. 5-V Crimp Panels are water shedding panels and due to their ½” rib height, must be installedover a completely waterproofed structure. If the waterproof membrane is mechanically attachedwith metal fasteners of any type, fasteners should be covered to protect the under-side of themetal roof panels. Any mechanically attachment device that does not lay flat on the deck will telegraph through the panels.4. Underlayment specifications will be determined at time of estimate, but all underlayments will bein compliance with FBC Section 1507.4.5.5. Insulation is optional, but must comply with FBC Section 1508. When insulation is incorporated, fastener length shall conform to penetrate through bottom of support a minimum of 3/16”.General Insulation Details:Type:Thickness:Density:Compressive Strength:Rigid Insulation Board3” (Max.)2.25 pcf (lbs/ft³) min., or20 psi (Min.)6. Panels are subject to surface distortion due to improperly applied fasteners. Overdriven fastenerswill cause stress and induce oil canning across the panel at or near the point of attachment. Oilcanning is not a cause for rejection of the panels.7. For the proper fastener application, please see the Fastener Pattern section of this installationmanual. Fastener spacing across the width of the panel are shown on Page 8. For fastener spacing along the length of the panel, use the wind upload table on the bottom of Page 8 in conjunction with the local governing code.8. For continuous panels over 30 feet, please contact Sunlast Metal for direction.SEE SUNLAST FOR CURRENT INFORMATIONSUBJECT TO CHANGE WITHOUT NOTICE
OFFICE: (772) 223-4055TOLL FREE: (877) 8-METAL-6FACSIMILE: (772) 781-7492GENERAL PANEL DESCRIPTIONPANEL NAME:Key West Series (5-V Crimp)PANEL MATERIAL:SteelPANEL THICKNESS:26 Gauge (Min.)PANEL WIDTH:24” (Max.) CoveragePANEL RIB HEIGHT:1/2”YIELD STRENGTH:40 ksi min.CORROSION RESISTANCE:In compliance with FBC Section 1507.4.3ASTM A792 Coated, orASTM A653 - G90 Galvanized SteelCOATINGS / FINISHES:Galvalume Plus w/Additional Acrylume (Mill Finish)Kynar 500 FSF OPTIONAL STIFFENING RIBS:Striations Only (Flat - Standard)SEE SUNLAST FOR CURRENT INFORMATIONSUBJECT TO CHANGE WITHOUT NOTICE
OFFICE: (772) 223-4055TOLL FREE: (877) 8-METAL-6FACSIMILE: (772) 781-7492HANDLING & STORAGE SPECIFICATIONSThe information provided are suggested guidelines and not intended to cover all applications or building requirements.It is the responsibility of the designer/installer to ensure that this information meets particular building conditions and/orcode requirements. It is also the responsibility of the installer to ensure that all OSHA and/or other safety regulationsare understood and upheld. Sunlast Metal will not be held liable for any claim which arise out of handling or installationof the material.PERSONAL HANDLINGPANEL INSPECTIONWhen handling metal panels care should be taken toprotect the panels from scratching or abrasion. Pullingpanels across one another may cause scratches to thesurface film. Individual panels should be carried verticalto the ground to avoid bending the material.All material should be inspected upon delivery. Anydamage or moisture intrusion should be reported to aSunlast office representative within 48 hours andnotated on the Delivery Ticket.MECHANICAL HANDLINGFIELD CUTTINGA forklift or crane can be used to handle unopenedbundles, but care must be taken to ensure equaldistribution of weight across the entire panel. Spreadthe forklift forks to their maximum width in order toensure equal weight distribution. Use of a spreader bar,when using a crane, will enable equal distribution ofweight. Cable supports should be avoided at all costs.Some field cutting and fitting of pre-manufacturedpanels is to be expected. Minor field corrections isconsidered normal operation. Always cut one panel ata time. For small cuts, hand-held shears (tin-snips) canbe used. For best results an electric shear may proveuseful. After cutting metal panels, ensure that all metalshavings are removed from the panel before installationto avoid rust stains, which will void the warranty.PROTECTING & STORINGFASTENING DETAILSMaterial should be left in a secure location to avoid thepossibility of theft. To protect the metal panels fromweather conditions it should be tarped (non-plasticmaterial) and stored at least 4” above ground with oneend elevated slightly higher to allow moisture to run off.If metal panels become wet, they should be individuallyremoved from the bundled stack and dried. Prolongstorage is not recommended. If immediate installationis not possible, additional care should be taken toensure that rust or watermarks do not develop. Do notstore sheet metal roofing materials in contact with othermaterials that might cause staining, denting or othersurface damage. Store sheet metal materials awayfrom uncured concrete or masonry.The use of proper fasteners and installation proceduresis an important factor in the overall appearance andperformance of the metal roofing system. When usingmetal fasteners with weather seal washers (WSW), besure that you do not over tighten - causing the sealingmaterial to extrude beyond the edge of the washer.Also, not tightening the fastener enough will not allowthe proper compression of the washer to seal thepenetration.SEE SUNLAST FOR CURRENT INFORMATIONSUBJECT TO CHANGE WITHOUT NOTICE
OFFICE: (772) 223-4055TOLL FREE: (877) 8-METAL-6FACSIMILE: (772) 781-7492INSTALLATION REQUIREMENTSMETAL PANELS:26 Gauge (Standard) or 24 GaugeINSTALLATION METHOD:Refer to drawings on Page 7ROW SPACING:Refer to Table “A” on Page 7(Along the length of the panel)FASTENER TYPE:Hex-Head Wood Screw with WSWFASTENER SIZE:#10 x 1-1/2”FASTENER CORROSION RESISTANCE:Per FBC Section 1506.6 and 1507.4.4FASTENER STANDARD:Per ANSI / ASME B18.6.4FASTENER SPACING:Nominal pattern of 12” O.C.Along the row, across the panel profile & at top ofcorrugation peaks.MINIMUM FASTENER PENETRATION:Through bottom of support - minimum 3/16”.PANEL RIB INTERLOCK:LappedSEE SUNLAST FOR CURRENT INFORMATIONSUBJECT TO CHANGE WITHOUT NOTICE
OFFICE: (772) 223-4055TOLL FREE: (877) 8-METAL-6FACSIMILE: (772) 781-7492FASTENER PATTERNSSEE SUNLAST FOR CURRENT INFORMATIONSUBJECT TO CHANGE WITHOUT NOTICE
OFFICE: (772) 223-4055TOLL FREE: (877) 8-METAL-6FACSIMILE: (772) 781-7492GENERAL INSTALLATION INSTRUCTIONSThe information provided are suggested guidelines and not intended to cover all applications or building requirements. Itis the responsibility of the designer/installer to ensure that this information meets particular building conditions and/orcode requirements. It is also the responsibility of the installer to ensure that all OSHA and/or other regulations areunderstood and upheld. Sunlast Metal will not be held liable for any claim which arise out of handling or installation of thematerial.GENERALPANEL INSTALLATIONThere are three main measurements that are critical when installing metal roof panels: the length required at the eave,the peak end and the amount of panel lap (if required). In each case a certain measurement is required. Check eachmeasurement to ensure panel placement gives you the distance required at the eave and peak. In most cases, anyvariance can be taken out at the eave or peak. Insure that the structure is square and true before beginning panelinstallation. If the structure is not square, the panels will not properly seal at the side-laps. Start the first panel square tothe eave by using the 3, 4, 5 Triangle Method (See Below). Green or damp lumber is not recommended. Moisturereleased from the damp lumber may damage the metal panels. Nails installed on green or damp lumber may back out. Ifyou wish to pre-drill fastener holes, use a cover sheet to prevent hot shavings from sticking to the metal panels. For bestresults, use a fastener with a Weather Seal Washer. Drive fastener so that the washer is compressed securely againstthe metal. Do not overdrive the fastener as this will cause a dimple to form, which will collect water and cause leakage.Overdriven fasteners will also increase the amount of oil canning that is present in the metal roof panels. Do not leaveany fasteners that missed the substrate or have stripped the holes. Either use #14 (Goof Screw) or completely fill thehole with sealant to prevent leakage. Remove any loose shavings left on the roof immediately to prevent corrosion orrust. After installing the roof system, remove any debris such as leaves or dirt to prevent moisture from getting trappedon the panels.TRIANGLE METHOD1. Establish a line from Point A to Point B by temporarily marking each point with a nail. The line must be parallel to theeave. In this example, we are going to determine that this line is going to be 3 feet in length (This is the “3” side ofthe Triangle). NOTE: For larger 3, 4, 5 Triangles - multiply each side of the triangle by the desired increase in size.For example, if the roof panels are 25 feet from the Eave to Ridge, multiply each side by a factor of 6 for an 18, 24,30 Triangle. Obviously the shorter the vertical length of the triangle is, the better accuracy you will have when squaring off.2. Using two tape measures, locate Point C by hooking one tape measure to the nail at Point A and a second tapemeasure at Point B. Extend the tape measures until they cross and meet at 4ft on the Point A tape measure and 5fton the Point B tape measure. Then place another temporary nail at this juncture.3. Hook a chalk line onto Point A and pull it in line with Point C and then mark you chalk line on the roof deck. This willbe your square reference line for the panel installation.4. Mark chalk lines parallel with the square reference line out ahead of the panel installation so that panel square canbe checked as the panels are installed. Suggested line spacing is one foot beyond 3 panels wide or about 7 feet.5. Check for square by measuring the distance from the installed panel edge to the chalk line at both the eave andridge ends. If the measurements match, then the installed panels are square, if not, adjustments must be made tobring the panels back to square. NOTE: Please take care when attempting to adjust for square. If completed improperly then oil canning will become present.6. See the following pages for a step-by-step process.SEE SUNLAST FOR CURRENT INFORMATIONSUBJECT TO CHANGE WITHOUT NOTICE
TOLL FREE: (877) 8-METAL-6FACSIMILE: (772) 781-749267OFFICE: (772) 223-40551221RIDGEThese are the 4ft and 5ft sidesof the 3.4.5.Triangle.RAKEROOF SLOPERAKEPOINT AUsing two tape measures, locate Point Cby hooking one tape measure to Point Aand the other tape measure to Point B,then extending both tape measures untilthey cross at the 4ft and 5ft increments(shown here). Then place a temporary nailat this intersection.334POINT C452POINT B12EAVE31Establish a line from Point A to Point Bby temporarily marking each point with anail. The line must be parallel to the eaveand in this example 3ft Long (This is the“3” side of the 3.4.54Triangle).POINT CRIDGE3POINT ASEE SUNLAST FOR CURRENT INFORMATIONRAKENOTE:ROOF SLOPERAKEConnect a chalk line to Point A’s nailand then pull it to Point C’s nail. Thenmark your chalk like on the roof deck.This is your square reference line foryour panel installation.For larger distances just multiply eachside of the triangle by the desired size.For instance if the Eave to Ridge heightis 25ft then multiply each side by 6 toget an 18.24.304 Triangle.EAVESUBJECT TO CHANGE WITHOUT NOTICE
OFFICE: (772) 223-4055TOLL FREE: (877) 8-METAL-64FACSIMILE: (772) 781-7492Use two tape measures, on at the ridgeand eave ends of the Square ReferenceLine and measure out 1 foot past 3 panelwide, or up to a maximum of 10 feet.Then hammer another temporary nail atthe eave and run a chalk line to the ridgeat the same length.RIDGE234512345678910789106RAKEROOF SLOPESQUARE REFERENCELINERAKE1EAVE5Check for square by measuring thedistance from each installed panel edge to thechalk line at both the eave and ridge. If themeasurements do not match, then theinstalled panels are not square and need to beadjusted. Be careful not to cause oil canningwhen attempting to adjust panels.RIDGE212RAKERAKE1EAVESEE SUNLAST FOR CURRENT INFORMATIONSUBJECT TO CHANGE WITHOUT NOTICE
OFFICE: (772) 223-4055TOLL FREE: (877) 8-METAL-6FACSIMILE: (772) 781-7492INSTALLATION SEQUENCES1. Moisture Barrier - InstallMoisture Barrier according to themanufacturer instructions.2. Fascia Trim - Install the fascia trimalong all eaves and rakes.3. Eave Trim - Install the Eave Trimalong all eaves lapping over FasciaTrim.4. Valley Trim - Install the ValleyTrim over the Eave Trim, workingfrom the Eave to the Valley Peak.5. Metal Roof Panels - Install thepanels over the Eave and Valley Trims.Do not install panels where the trimlaps under the panels.6. Hip Trim - Install the Hip Trim overthe Metal Roof Panels just installed.7. Ridge Trim - Install the RidgeTrim over the Hip Trim intersectionand valley peak.8. Transition Trim - Install the Transition Trim over the low slope panels andmoisture barrier.9. Metal Roof Panels - Complete thepanel installation - installing the highpanels over the Trim Transition and theremaining exposed locations.SEE SUNLAST FOR CURRENT INFORMATIONSUBJECT TO CHANGE WITHOUT NOTICE
OFFICE: (772) 223-4055TOLL FREE: (877) 8-METAL-6FACSIMILE: (772) 781-7492INSTALLATION SEQUENCES - CONTINUED10. Rake Trim - Install the RakeTrim over the panels along all GableRake edges.11. Peak Trim - Install the Peak Trimover the panels.12. Ridge Trim - Install the Ridge Trimover the Panels.13. Side Wall Trim - Install SidewallTrim over the panels.14. Side Wall Trim (Rear View)15. End Wall Trim - Install End WallTrim over the panels.SEE SUNLAST FOR CURRENT INFORMATIONSUBJECT TO CHANGE WITHOUT NOTICE
OFFICE: (772) 223-4055TOLL FREE: (877) 8-METAL-6FACSIMILE: (772) 781-7492FLASHING / TRIM METAL DETAILSEAVE DRIP (DRIP EDGE)BOX GUTTER (6” STANDARD)3"1"3/4"2-1/2"1"6"5"3"6"Standard 3”(S.O. 6”)S.O. 23-1/4” (Standard)GABLE RAKEPEAK / HIGH END FLASHING5"3"1"3/4"1/4" Closed Hem2-5/8"to3-1/4"1/2"5"1/2" (Cleat Receiver)S.O. 7– 7/8” to 8 1/2”S.O. 10-3/4”GAMBREL FLASHINGTRANSITION FLASHING6"6"6"6"1/4" Closed Hem3/4"S.O. 12-1/4””SEE SUNLAST FOR CURRENT INFORMATIONS.O. 12-3/4””SUBJECT TO CHANGE WITHOUT NOTICE
OFFICE: (772) 223-4055TOLL FREE: (877) 8-METAL-6FACSIMILE: (772) 781-7492FLASHING / TRIM METAL DETAILSRIDGE CAP (NOTCHED)RIDGE CAP (HEMMED)5-1/4"5-1/4"3/4"1/4"Closed HemS.O. 12”S.O. 11” (Must Use Closures)HIP CAPVALLEY1"5-1/4"9"9"3/4"S.O. 12”S.O. 20”SIDEWALL FLASHINGENDWALL FLASHING4"4"3/4"5-1/2"4"S.O. 9-3/4”SEE SUNLAST FOR CURRENT INFORMATION1"1/4"S.O. 9-3/4”SUBJECT TO CHANGE WITHOUT NOTICE
ED1 - 5V#10 x 1-1/2" Hex-Head Wood ScrewSunlast Metal, Inc.Inside Closure (Foam)DRAWNName#30 Felt (Min.)JARCHECKEDNameJREave Drip 1 - 5-VENGINEERNamePlywood Decking (15/32" Min)JARAPPROVEDNameSCALE 2 : 1JRSIZEAREVDWG NUMBERED1-5VASHEET1 OF 1
BG1-5V#10 x 1-1/2" Hex-Head Wood Screw#10 x 1" Pancake-Head Wood ScrewStainless Steel Pop Rivet1/2" Buytl TapeInside Closure (Foam)Box Gutter Strap (Sized to Gutter)Sunlast Metal, Inc.Box Gutter (6" x 6" Standard)DRAWNName#30 Felt (Min.)JARCHECKEDNameJRBox Gutter 1 - 5-VENGINEERNamePlywood Decking (15/32" Min)JARAPPROVEDNameSCALE 2 : 1JRSIZEAREVDWG NUMBERBG1-5VASHEET1 OF 1
GR1-5V#10 x 1-1/2" Hex-Head Wood Screw1/2" Buytl Tape#30 Felt (Min.)Plywood Decking (15/32" Min)Sunlast Metal, Inc.DRAWNNameJARCHECKEDNameJRGABLE RAKE 1 - 5-VENGINEERNameJARAPPROVEDNameSCALE 2 : 1JRSIZEAREVDWG NUMBERGR1-5VASHEET1 OF 1
PF1-5V 2-1/2" Cleat#10 x 1-1/2" Hex-Head Wood Screw#10 X 1" Pancake-Head Wood Screw1/2" Buytl TapeCleat (Highlighted in Red)Outside Closure (Mandatory)Sunlast Metal, Inc.DRAWN#30 Felt (Min.)NameJARCHECKEDNameJRENGINEERPlywood Decking (15/32" Min)NameJARAPPROVEDNameSCALE 2 : 1JRPEAK FLASHING 15-VSIZEAREVDWG NUMBERPF1-5VASHEET1 OF 1
GF1-5V#10 x 1-1/2" Hex-Head Wood ScrewInside ClosureOutside Closure#30 Felt (Min.)Plywood Decking (15/32" Min)Sunlast Metal, EDNameSCALE 2 : 1JRGAMBRELFLASHING 1 (5-V)SIZEAREVDWG NUMBERGF1-5VASHEET1 OF 1
TF1-5V#10 x 1-1/2" Hex-Head Wood Screw1/2" Buytl TapeInside ClosureOutside ClosureSunlast Metal, Inc.#30 Felt (Min.)DRAWNNamePlywood Decking (15/32" LE 2 : 1JRTRANSITIONFLASHING 1 (5-V)SIZEAREVDWG NUMBERTF1-5VASHEET1 OF 1
RC1-5V (NOTCHED)#10 x 1-1/2" Hex-Head Wood Screw WSWFASTENING PATTERN - RIDGE(5-V CRIMP)#10 x 1-1/2" Hex-Head Wood Screw1/2" Buytl TapeOutside Closure#30 Felt (Min.)Sunlast Metal, Inc.DeckingDRAWNNameJARCHECKEDNameJRRidge Cap 1 - 5-VENGINEERNameJARAPPROVEDNameSCALE 2 : 1JRSIZEAREVDWG NUMBERRC1-5VASHEET1 OF 1
RC2-5V (HEMMED)#10 x 1-1/2" Hex-Head Wood Screw WSWFASTENING PATTERN - RIDGE(5-V CRIMP)#10 x 1-1/2" Hex-Head Wood Screw1/2" Buytl TapeOutside Closure#30 Felt (Min.)Sunlast Metal, Inc.DeckingDRAWNNameJARCHECKEDNameJRRidge Cap 2 - 5-VENGINEERNameJARAPPROVEDNameSCALE 2 : 1JRSIZEAREVDWG NUMBERRC2-5VASHEET1 OF 1
HC1-5V2"Max.#10 x 1-1/2" Hex-Head Wood Screw1/2" Buytl TapeUniversal Closure#30 Felt (Min.)DeckingSunlast Metal, Inc.DRAWNNameJARCHECKEDNameJRHip Cap 1 - 5-VENGINEERNameJARAPPROVEDNameSCALE 2 : 1JRSIZEAREVDWG NUMBERHC1-5VASHEET1 OF 1
HC2-5V2"1"1"Z-Closure1"#10 x 1-1/2" Hex-Head Wood ScrewZ-Closure1/2" Buytl TapeUniversal ClosureStainless Steel Pop Rivet#30 Felt (Min.)Sunlast Metal, Inc.DRAWNNameJARCHECKEDDeckingNameJRHip Cap 2 - 5-VENGINEERNameJARAPPROVEDNameSCALE 2 : 1JRSIZEAREVDWG NUMBERHC2-5VASHEET1 OF 1
V1 - 5V4"(Min)#10 x 1-1/2" Hex-Head Wood Screw WSWFASTENING PATTERN - VALLEY(5-V CRIMP)#10 x 1-1/2" Hex-Head Wood ScrewButyl Tape SealantInside Closure (Foam)Sunlast Metal, Inc.DRAWN#30 Felt (Min.)NameJARValley 1 - 5-VCHECKEDNameJRENGINEERPlywood Decking (15/32" Min.)NameJARAPPROVEDNameSCALE 2 : 1JRSIZEAREVDWG NUMBERV1-5VASHEET1 OF 1
SW1 - 5V#10 x 1-1/2" Hex-Head Wood Screw#10 x 1" Pancake-Head Wood ScrewSealantSunlast Metal, Inc.#30 Felt (Min.)DRAWNNameJARSide Wall 1 - 5-VCHECKEDPlywood Decking (15/32" Min.)NameJRENGINEERNameJARAPPROVEDNameSCALE 2 : 1JRSIZEAREVDWG NUMBERSW1-5VASHEET1 OF 1
EW1 - 5V#10 x 1-1/2" Hex-Head Wood Screw#10 x 1" Pancake-Head Wood ScrewSealantSunlast Metal, Inc.Outside Closure (Foam)DRAWNNameJARCHECKED#30 Felt (Min.)NameJRNameJARAPPROVEDPlywood Decking (15/32" Min.)End Wall 1 - 5-VENGINEERNameSCALE 2 : 1JRSIZEAREVDWG NUMBEREW1-5VASHEET1 OF 1
2120 SW Poma Drive; Palm City, Florida 34990 772-223-4055 Phone 772-781-7492 Fax www.sunlastmetal.com sales@sunlastmetal.com