Transcription
Dynamic Milling
mastercam x getting started tutorialsDynamic MillingDecember 2011Be sure you have the latest information!Information might have been changed or added since this document waspublished. Contact your local Reseller for the latest information.
II DYNAMIC MILLINGMastercam X6 Dynamic MillingDate: December 2011Copyright 2011 CNC Software, Inc.— All rights reserved.First Printing: December 2011Software: Mastercam X6TERMS OF USEUse of this document is subject to the Mastercam End User License Agreement.A copy of the Mastercam End User License Agreement is included with theMastercam product package of which this document is part. The MastercamEnd User License Agreement can also be found at:www.mastercam.com/legal/licenseagreement/
ContentsIntroduction . 1XTutorial Goals. 2General Tutorial Requirements . 31. Dynamic Milling Overview. 5XXXXXXChain Selection for Dynamic Toolpaths. 5Dynamic Area Mill . 6Dynamic Rest Mill. 7Dynamic Core Mill . 7Dynamic Contour . 8Dynamic Milling Parameters . 92. Chain and Entry Selection.XXXXXLesson Goals . 11Exercise 1: Preparing Mastercam for Toolpath Creation . 11Exercise 2: Creating a Dynamic Toolpath. 13Exercise 3: Adding Chains to an Operation . 16Exercise 4: Selecting an Entry Method . 183. Dynamic Area Mill Toolpath .XXXXX1121Lesson Goals . 21Exercise 1: Preparing Mastercam for Toolpath Creation . 21Exercise 2: Creating a Dynamic Area Mill Toolpath . 22Exercise 3: Creating a Pocket Toolpath. 27Exercise 4: Comparing the Operations . 30
IV DYNAMIC MILLING4. Dynamic Rest Mill Toolpath.XXXXXLesson Goals . 33Exercise 1: Preparing Mastercam for Toolpath Creation. 33Exercise 2: Creating a Dynamic Rest Mill Toolpath . 34Exercise 3: Creating a Rest Mill Toolpath. 37Exercise 4: Comparing the Operations . 405. Dynamic Core Mill Toolpath.XXXXXXXXX43Lesson Goals . 43Exercise 1: Preparing Mastercam for Toolpath Creation. 43Exercise 2: Creating a Dynamic Core Mill Toolpath. 44Exercise 3: Creating a Pocket Toolpath . 47Exercise 4: Comparing the Operations . 506. Dynamic Contour Toolpath.X3353Lesson Goals . 53Exercise 1: Preparing Mastercam for Toolpath Creation. 53Exercise 2: Creating a Dynamic Contour Toolpath. 54Exercise 3: Creating a Contour Toolpath . 57Exercise 4: Comparing the Operations . 59Conclusion . 60XXMastercam Resources . 61Mastercam Documentation . 62Contact Us . 62
INTRODUCTIONMastercam’s 2D high speed dynamic milling toolpaths utilize the entire flute lengthof their cutting tools to achieve great efficiency in milling. They are designed tomaximize material removal while minimizing tool wear.Additional benefits you gain by using high speed dynamic milling toolpaths include: Tool burial avoidance Minimum heat buildup Better chip evacuationThis tutorial introduces you to all of the following intelligent application-specific 2Dhigh speed dynamic milling toolpaths available in Mastercam.Dynamic Area Mill—Machines pockets using one or more chains to drive the toolpath. The chain that encompasses the largest 2D area contains the toolpath; allsubsequent chains are considered islands. Use Dynamic Area Mill for parts younormally would machine with a Pocket toolpath.Dynamic Core Mill—Machines open pocket shapes or standing core shapes using theoutmost chain as the stock boundary. The tool moves freely outside of this area. UseDynamic Core Mill on parts where you need to face an area, generally on the outsideof a part.
2 TUTORIAL GOALSDynamic Contour—Mills material off walls supporting closed or open chains. Thetool motion converts to dynamic in areas where the tool would bind or encountertoo much material. Use Dynamic Contour on walls or contours that contain smallradii.Dynamic Rest Mill—Targets material left from previous operations. Dynamic motionis used to rapidly remove material left by previous operations or by a specified toolsize. Use Dynamic Rest Mill when the roughing tools used leave material in cornersor narrow part areas.Tutorial Goals Learn the benefits and uses of the Dynamic toolpath types Understand chaining and entry options specific to Dynamic toolpaths Create basic Dynamic toolpaths Compare and contrast the Dynamic toolpaths with their non-DynamiccounterpartsDYNAMIC MILLING
INTRODUCTION 3IMPORTANT: Screen colors in the tutorial pictures were modified toenhance image quality; they may not match your Mastercam settings orthe tutorial results. These color differences do not affect the lesson orthe exercise results.General Tutorial RequirementsAll Mastercam tutorials have the following general requirements: You must be comfortable using the Windows operating system. The tutorials cannot be used with Mastercam Demo/Home LearningEdition (HLE). The Demo/HLE file format (EMCX-6) is different fromMastercam (MCX-6), and basic Mastercam functions, such as fileconversions and posting, are unavailable. Each lesson in the tutorial builds on the mastery of preceding lesson’s skills.We recommend that you complete them in order. Focus Series and Exploring Series tutorials require, at minimum, a mastery ofthe basic Mastercam skills taught in the Getting Started Series modules. Ageneral knowledge of machining principals and practices is also required. You must have a seat of Mastercam X6 Design or higher to complete most ofthe tutorials in the Getting Started Series. The Basic 2D Machining module in the Getting Started Series requires, atminimum, a seat of Mill Entry or Router Entry. The Basic 3D Machining module in the Getting Started Series requires MillLevel 3 or Router Pro. Additional files may accompany a tutorial. Unless the tutorial providesspecific instructions on where to place these files, store them in a folder thatcan be accessed from the Mastercam workstation, either with the tutorial orin any location that you prefer. The Getting Started Series tutorials are available in an Adobe Flash compatible video format. Additional tutorial videos may also be available.Contact your local Mastercam Reseller for more information. You must install Adobe Flash Player to display tutorial videos. You candownload Adobe Flash Player from www.adobe.com.DYNAMIC MILLING
4 TUTORIAL GOALS All Mastercam tutorials require you to configure Mastercam to work in adefault metric or English configuration. The tutorial provides instructionsfor loading the appropriate configuration file.DYNAMIC MILLING
LESSON 1Dynamic Milling Overview1Mastercam’s 2D high speed toolpaths (HST) contain several types that utilizedynamic motion: Dynamic Area Mill Dynamic Rest Mill Dynamic Core Mill Dynamic ContourDynamic toolpaths utilize as much of the tool’s flute length as possible, while minimizing tool burial. This method enables the toolpath to rapidly and efficientlyremove the maximum amount of material and extend tool life at the same time.Chain Selection for Dynamic ToolpathsDynamic Area, Dynamic Core, and Dynamic Rest milling require a unique way ofunderstanding chain selection. These toolpaths must have at least one closed chainin order for a toolpath to be generated. The chain that encompasses the largest 2Darea is considered to be the toolpath boundary. All remaining chains are treated asgeometry to avoid. The exception to that is when an open chain is selected for use asan entry method.
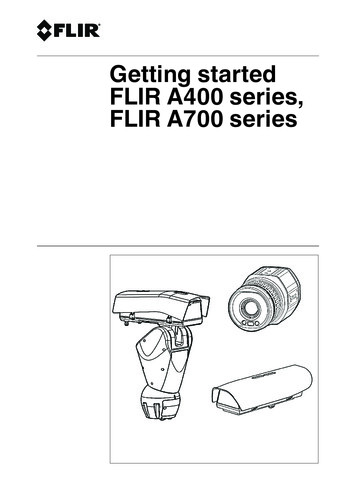
6 DYNAMIC AREA MILLDynamic Contour does not require a closed chain to calculate a toolpath. All geometry selected will be cut by the tool motion.Chaining options are explored further throughout subsequent lessons.Dynamic Area MillDynamic area mill is a pocket toolpath that utilizes dynamic motion. A boundary isselected; islands, bosses, and geometry to avoid are added; tooling, parameters,entry method, and linking values are entered; and the toolpath is generated. Materialis removed from the inside to the outside in a highly efficient manner.DYNAMIC MILLING
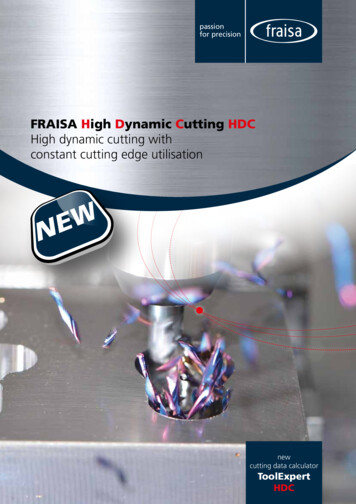
DYNAMIC MILLING OVERVIEW 7Dynamic Rest MillDynamic rest mill specializes in removing material left by previous operations usingdynamic motion. The material to remove is calculated by previous operations orprevious roughing tools. Only unmachined areas are processed for a Dynamic RestMill operation.Dynamic Core MillDynamic core mill is a facing operation that has island avoidance capabilities. Thetoolpath is created using dynamic motion for maximum efficiency. The tool removesmaterial from the outside to the inside. This movement creates a toolpath that isallowed to move outside the selected boundary.DYNAMIC MILLING
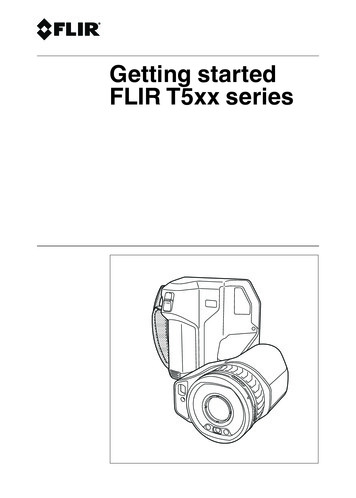
8 DYNAMIC CONTOURDynamic ContourDynamic contour creates a familiar contour operation using dynamic motion andspecialized options found in the dynamic toolpath parameters. The dynamic motionprevents tool burial and binding in small radii corners. In addition, parameters areprovided for you to instruct Mastercam on the material left on the walls to bemachined.DYNAMIC MILLING
DYNAMIC MILLING OVERVIEW 9Dynamic Milling ParametersSeveral parameter options separate the Dynamic operations from their standard 2DHST counterparts. Micro lift Entry methods Entry feeds/speeds Contour wallMicro lift options allow the tool to rise above the floor of the part for the portion ofthe toolpath that is not removing material. Benefits of micro lift include chip clearingand avoiding excess tool heat. The feedrate is controllable for the back move as well.Entry methods provide several ways to enter the material for a Dynamic Area Milloperation. Options range from a simple helix to a medial path with trochoidalmotion to a selected open chain. Mastercam’s Help contains detailed information oneach of the methods available.Use entry feeds and speeds to avoid placing too much load on the tool upon entry.Set a short dwell interval after entry to allow the spindle to reach the necessary speedbefore beginning material removal.DYNAMIC MILLING
10 DYNAMIC MILLING PARAMETERSContour wall parameters provide input for remaining stock and previous tool information. The values entered help Mastercam to calculate the most efficient materialremoval strategy when machining part walls.Dynamic milling toolpaths create highly efficient motion based on selected chains.They are part of the 2D HST family of toolpaths with many similarities, but with thestated enhancements. They are an incremental step in the evolution of high speedmachining options provided by Mastercam. The high speed toolpaths themselvesare a leap ahead of the standard pocket, face, and contour operations.Creating and reviewing the motion of dynamic toolpaths is the best way to learnabout the benefits and uses. Continue on to Lesson 2 to learn about chain and entryselection and the effect it has on your toolpath.DYNAMIC MILLING
LESSON 2Chain and Entry Selection2Lesson 1 provided a brief overview of Mastercam’s Dynamic toolpath options. Thislesson focuses on chain and entry selection using simplified examples. The techniques and behavior demonstrated are easily translated to the more complicatedand intricate parts you deal with on a daily basis. The geometry, selections, andparameters are simplified to ensure the methods and results are the focal points.Detailed steps on such actions as selecting a machine definition, changing thegraphics view or construction plane, making levels visible, and backplotting will notbe provided. Please review the Basic 3D Design and Basic 3D Machining tutorialsbefore continuing if you are n
All Mastercam tutorials require you to configure Mastercam to work in a default metric or English configuration. The tutorial provides instructions for loading the appropriate configuration file. LESSON 1 1 Dynamic Milling Overview Mastercam’s 2D high speed toolpaths (H ST) contain several types that utilize dynamic motion: Dynamic Area Mill Dynamic Rest Mill Dynamic Core Mill Dynamic .