Transcription
Snagit beta Version Comparison Guide for WindowsUsersBeta ReleaseDecember 2009 2009 TechSmith Corporation.All rights reserved.
ContentsContentsSummary .1Capture.2Working with the Capture Window .2All-in-One Capture mode .3Window Capture mode .5Change the Capture Keyboard Shortcuts .5Canvas .6Tray .7Drawing Tools and Styles .8Sharing Your Captures . 10File Formats . 10www.techsmith.comi
Comparison Guide for Snagit Windows UsersSummaryThis guide is for Snagit Windows 9.1.3 users new to Snagit beta for Mac. This guide introduces the featuresand workflow in the Snagit beta.For a comprehensive guide to the Snagit beta, select Snagit Beta Snagit Help in the product.To provide feedback or feature suggestions, visit Get Satisfaction.www.techsmith.com1
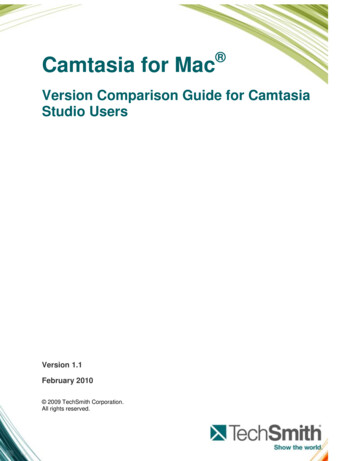
Comparison Guide for Snagit Windows UsersCaptureUse the Snagit beta to capture anything on your screen.Working with the Capture WindowSnagit beta condensed the capture options and modes into a smaller window than in Snagit version 9.1.3.The Capture window is located in the upper right corner of the screen by default. When you hover your cursorover the capture application the capture options expand.You can drag the Capture window to any location on your desktop. To hide the Capture window, pressCommand-H.www.techsmith.com2
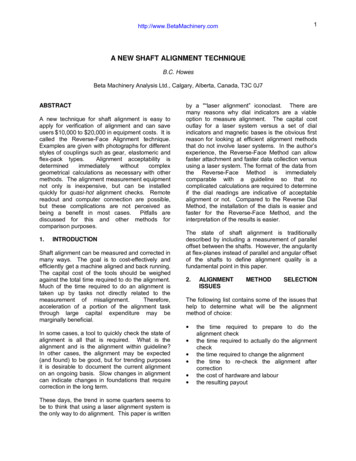
Comparison Guide for Snagit Windows UsersCapture Options & ProfilesCapture options such as changing the capture keyboard shortcuts, capturing the cursor, copying to theclipboard, setting a capture delay, and previewing after capture are available from any of the followinglocations:The Capture windowSelect the menu bar icon menu Capture Options.Control-click on the dock icon and select Capture Options.Select Snagit Preferences Capture tab.The Snagit beta does not include capture profiles. Use the All-in-One Capture mode to capture a region,window, the full screen, or a scrolling window.All-in-One Capture modeThe All-in-One Capture mode combines the Region, Window, Full Screen, and Scrolling window capturesprofiles into one. With the All-in-One Capture mode, you can quickly capture items in your screen withoutneeding to switch profiles.To take a capture with the All-in-One Capture mode:1. Click the Capture mode dropdown and select All-in-One.2. Click the Capture button or press the All-in-One keyboard shortcut, Command-Control-1.To capture a region:Click and drag to select a region using the crosshairs. Use the magnifier for pixel perfect accuracy.To capture a window:www.techsmith.com3
Comparison Guide for Snagit Windows Users1. Hover your cursor over the window or area inside the window.2. A yellow border appears around the window. Click to select the window.To capture a scrolling window:1. Hover your cursor over the window or area inside the window.2. Click an arrow to take a capture of the horizontal scrolling area, vertical scrolling area, or the entirescrolling area.Capture the entire screen:Click anywhere on the screen to capture the entire screen.www.techsmith.com4
Comparison Guide for Snagit Windows UsersWindow Capture modeThe Window capture mode allows you to quickly locate a window to capture from all open windows. Use thiscapture mode to capture a window that is hidden behind other open windows. Window capture also capturesany transparency within a window.1. Select Window capture from the capture mode dropdown.2. Click the Capture button or press the Window capture keyboard shortcut (Command-Control-2).3. Hover your cursor over the desired window and click to capture the highlighted window. Snagit capturesthe entire window.The Window capture does not capture the cursor.Change the Capture Keyboard ShortcutsDefault keyboard shortcuts:All-in-One Capture mode: Command-Control-1Window Capture mode: Command-Control-2To change the default keyboard shortcuts in the Capture window:1. Select the capture mode from the dropdown on the Capture window.2. Click within the keyboard shortcut field.3. Enter a new keyboard shortcut using the keyboard or click the Undo button to reset to the previouskeyboard shortcut. Keyboard shortcuts can be any 1-3 keys on the keyboard.Any Mac system or Snagit program keyboard shortcuts are not available as capture keyboardshortcut options.To change the default keyboard shortcuts in the Preferences:1. Select Snagit Preferences Capture tab.2. Click within the field for the keyboard shortcut to change. The current keyboard shortcut clears.3. Enter a new keyboard shortcut using the keyboard or click the Undo button to reset to the previouskeyboard shortcut. Keyboard shortcuts can be any 1-3 keys on the keyboard.Any Mac system or Snagit program keyboard shortcuts are not available as capture keyboardshortcut options.www.techsmith.com5
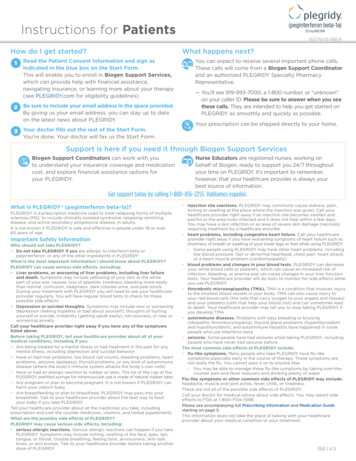
Comparison Guide for Snagit Windows UsersCanvasThe canvas displays the selected capture within the tray. Use the canvas to preview a capture, combinecaptures, add and arrange objects within a capture, and edit captures.Trim a captureDrag the handles to remove the unwanted portions from a capture. When you save a capture, only thehighlighted portion of the canvas is saved in the final image.TransparencyThe canvas is transparent by default. Any checkerboard area on the canvas appears transparent when savedas a .png, .bmp, .gif, .tiff, or .snagproj file.www.techsmith.com6
Comparison Guide for Snagit Windows UsersTrayThe tray shows your recent captures or opened images.Navigating within the TrayThe capture selected in the tray is shown on the canvas. Click the leftor right arrowsabove thetray to control which image appears on the canvas. Click the close icon on a capture in tray to remove thecapture from the tray. Closing the capture does not delete the capture.Unsaved Captures FolderAny unsaved captures appear in the tray. Unsaved captures are automatically stored in the Snagit’sAutosaved Captures folder as Snagit project files (.snagproj). To view the captures located in this folder, clickthe folder buttonClickabove the tray.to hide or show the tray.www.techsmith.com7
Comparison Guide for Snagit Windows UsersDrawing Tools and StylesThe drawing tools appear on the right side of the screen. Click to select a tool. The preset styles andproperties appear below in the pane.Quick StylesThe style gallery provides preset styles. You can add customized styles to the gallery or delete the presetstyles.To restore the deleted preset styles, select Snagit Preferences Advanced tab Restore GalleryStyles.To add a style to a capture on the canvas:1.2.3.4.Click the Tools tab.Select the desired tool. The styles available appear below the tools.Click to select a style from the style gallery.Click and drag on the desired location on the canvas to add the style.To customize a style:1. Click the Tools tab.2. Select the desired tool and edit the Properties.www.techsmith.com8
Comparison Guide for Snagit Windows Users3. Click the Add button next to the Properties. The tool and the selected properties are added as a style inthe gallery.www.techsmith.com9
Comparison Guide for Snagit Windows UsersSharing Your CapturesWith the Snagit beta, share your captures by:Email (Entourage or Mail).Copying a capture to the Clipboard to paste into a document or application.Saving as one of seven file formats.Tell us how you would like to share your captures in the Snagit beta.File FormatsSelect File Save As or press Command-Shift-S to save a capture as any of the following file formats.To save the transparency in the capture, save to any of the following file formats: .snagproj, .png, .tiff, .gif,.bmp.SNAGPROJ: Snagit Project File Type is a Snagit mac only file format that retains vector-based objects.Other file formats flatten all vector objects to make the objects a permanent part of the image.SNAGPROJ files allow you to edit captures and vector objects at a later time.At this time, the Snagit Project File type (.snagproj) and the Snagit Capture file (.snag) cannot beshared across operating systems.PNG: Portable Network Graphic. PNG format is a lossless compression file format, which makes it acommon choice for the web. PNG is good for storing line drawings, text, and iconic graphics at a smallerfile size. Use this format when you want to saveJPEG: This format is a lossy compressed file format. Useful for storing photographs at a smaller size thana BMP. JPG is a common for use on the web since it is compressed. For saving line drawings, text, andiconic graphics at a smaller file size, GIF or PNG are better choices since they are lossless.JP2: JPEG 2000 image.TIFF: Tiff image.GIF: Graphics Interchange Format.BMP: Windows bitmap image.www.techsmith.com10
Comparison Guide for Snagit Windows Userswww.techsmith.com11
Snagit beta condensed the capture options and modes into a smaller window than in Snagit version 9.1.3. The Capture window is located in the upper right corner of the screen by default. When you hover your cursor over the capture application the capture options expand. You can drag the Capture window to any location on your desktop. To hide the Capture window, press Command-H. Comparison Guide .