Transcription
Camtasia for Mac Version Comparison Guide for CamtasiaStudio UsersVersion 1.1February 2010 2009 TechSmith Corporation.All rights reserved.
ContentsContentsSummary .1Version Comparison Chart .2File Formats & Sharing .5Share Your Project on Another Computer .6Share Your Source Files Between Platforms (Windows & Mac) .6Recording .7Select a region to record .9Record a PowerPoint or Keynote Presentation . 10Editing . 11Preview Media . 11Control the Display of Media within your video . 12Picture-in-Picture . 14Show a Window or Region from the Original Recording . 16Working on the Timeline . 18About Timeline Tracks . 19Arranging Media on the Timeline Tracks . 20Separate the Video and Audio into Separate Tracks . 20Video Enhancements . 21Add a Title . 21Add a Callout . 24Add a Custom Callout (Image) . 25Add a Watermark . 26Add Effects . 27Add a Transition . 29SmartFocus . 30Audio Editing. 33Replace a Section of the Audio . 33Presets and Production . 35Produce Consistent Looking Flash Videos . 36www.techsmith.comi
Version Comparison for Camtasia Studio UsersSummaryThis guide is for Camtasia Studio version 6.0.3 users new to Camtasia for Mac. This guide introduces thebasic recording, editing, and sharing concepts in Camtasia for Mac. This guide describes the how to completethe basic tasks available in Camtasia Studio version 6.0.3 on Camtasia for Mac.For more detailed information on Camtasia for Mac, see the Camtasia help file or visit the Camtasia for MacLearning Center.www.techsmith.com1
Version Comparison for Camtasia Studio UsersVersion Comparison ChartThe following chart compares the features in Camtasia Studio version 6.0.3 and Camtasia for Mac version 1.0.The See Also column provides links to further information on how to complete similar tasks in Camtasia forthe Mac.RecordAvailable inCamtasia StudioAvailable inCamtasia for MacFull ScreenYesYesRegionYesYesWeb cameraYesYesDV cameraNoYesMicrophone audioYesYesSystem audioYesYesVoice narration onlyYesYesReplace a Section of the AudioPause recordingYesYesRecordingScreenDrawYesNoAdd markersYesNoPowerPoint Add-inYesNoFeature or TaskSee AlsoShow a Window or Region fromthe Original RecordingRecordingSelect a region to recordRecord a PowerPoint orKeynote PresentationEditAvailable inCamtasia StudioAvailable inCamtasia for MacShare project and filesacross computersYesExport Project as ZipYesCreate a standaloneprojectShare Your Project onAnother ComputerPreview Clips and VideoYesYesPreview MediaSmartFocusYesYesSmartFocusCaptionsYesNoTitle ClipsYesYesAdd a TitleCalloutsYesYesAdd a CalloutVideo & Audio Effects(Actions, Filters,Transitions)Transitions-YesYesAdd EffectsDirect manipulation ofmediaNoYesControl the Display ofMedia within your videoTransitionsYesYesAdd a TransitionFeature or Taskwww.techsmith.comSee Also2
Version Comparison for Camtasia Studio UsersAvailable inCamtasia StudioFeature or TaskQuizzing and SurveysYesAudioAvailable inCamtasia for MacSee AlsoNoAudioEnhancementsFade in/Fade outMuteIncrease/DecreasevolumeReplace withsilenceIncrease/decreasevolumeFade In/OuttransitionMuteAudioenhancements:Clicking reduction,clipping reduction,and noisereduction.PitchAudio EditingShareAvailable inCamtasia StudioAvailable inCamtasia for MacShare project and files acrosscomputersYes“Export Projectas Zip”Yes“Create astandaloneproject”Share Your Project on AnotherComputerPresetsYesYesPresets and ProductionAdd or Edit PresetsYesNoProduction PreviewYesNoBatch ProductionYesNoUpload video toScreencast.comYesYesPresets and ProductionUpload video onto YouTubeNoYesPresets and ProductionUpload video onto iTunesNoYesPresets and ProductionUpload video by FTPYesNoPresets and ProductionEmbed in HTMLYesYesPresets and Production andProduce Consistent LookingFlash VideosFlash OptionsYesNoProduce video with OnyxFlash templateYesYesTable of ContentsYesNoCustomize the Flash ControlsYesNoCustomize the Flash AboutBoxYesNoCustomize the Start and EndScreensYesNoFeature or Taskwww.techsmith.comSee AlsoProduce Consistent LookingFlash Videos3
Version Comparison for Camtasia Studio UsersFeature or TaskInclude Watermarkwww.techsmith.comAvailable inCamtasia StudioAvailable inCamtasia for MacYesYesSee AlsoAdd a Watermark4
Version Comparison for Camtasia Studio UsersFile Formats & SharingThe recording and project file formats in Camtasia Studio for Windows and Camtasia for Mac are notcompatible across platforms at this time.Camtasia Studio File Formats:Camtasia Studio project file (.camproj):Saves all media in the Clip Bin, clips and effects on the Timeline, any editingcompleted on the Timeline, and the selected project settings.Camtasia Studio recording file (.camrec):Default recording file format. Proprietary TechSmith file format used to store screenand camera recording plus metadata about various streams into a single package.To add markers, apply SmartFocus, or record a Web camera, you must record withthis format (Camtasia Studio only).Audio Video Interleave (.avi):Record .avi files to share the recording outside of Camtasia Studio. To change therecording file format in Camtasia Studio, choose Camtasia Recorder Tools Options Capture tab Save as .avi.Camtasia for Mac File Formats:Camtasia project files (.cmproj):Saves a copy of the recordings, library files, and edits completed within one file.When you save a project, enable the "Create standalone project" option to includeall source files within a project to allow you to share the project with otherCamtasia for Mac users.Camtasia recording files (.cmrec):Screen recording file recorded with Camtasia for Mac. The recording files may alsoinclude audio and camera video. Recording files are automatically saved to Users Movies Camtasia temporary recordings folder. You can apply SmartFocus andWindow Spotlight effects to Camtasia recording files.www.techsmith.com5
Version Comparison for Camtasia Studio UsersShare Your Project on Another ComputerIn Camtasia for Mac, save your project as a standalone project file to:Transfer the project to another computer or a new locationShare the project and source files for collaboration with othersSave as a Standalone Project File1. In Camtasia for Mac, select File Save As.2. Select the Create standalone project option.3. Click Save.Share Your Source Files Between Platforms(Windows & Mac)The recording and project file formats in Camtasia Studio for Windows and Camtasia for Mac are notcompatible across platforms at this time.Use the following recommendations when sharing recording and source files between the Windows and Macplatforms:TechSmith only supports importing files between Camtasia for Mac version 1.0 or later and CamtasiaStudio version 6.0.3 or later. Camtasia recording files (.cmrec) created in version 1.1 cannot be importedinto Camtasia Studio version 6.0.3 at this time.Import Camtasia for Mac files into Camtasia Studio:Screen video, camera video, and audio components from Camtasia recording file: In Finder, selectthe Camtasia Recording file (.cmrec). Control-click and select Show Package Contents. Importscreen.mov (screen video), camera.mov (camera video), and audiotrack0.wav (audio).MOV files exported from Camtasia for Mac: In Camtasia for Mac, select Share Advanced Export Export to QuickTime Movie.Import Camtasia Studio files into Camtasia for Mac:AVI recordings: In Camtasia Recorder, select Tools Options Capture tab Save as .avi.Extract AVI from CAMREC recording files: In Windows Explorer, right-click on the .camrec file andselect Extract. An .avi file is created in the same folder.Video files produced in Camtasia Studio with AAC audio and H.264 encoding (.mpeg-4, .mov,or .m4v): Produce the contents of the Camtasia Studio timeline in the Production Wizard.www.techsmith.com6
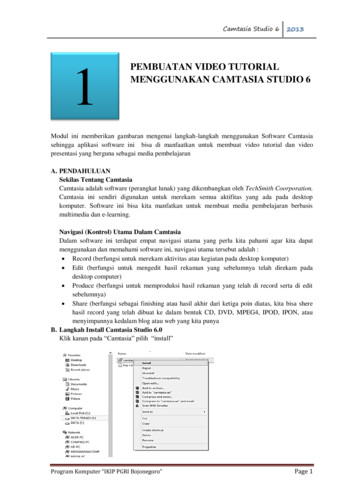
Version Comparison for Camtasia Studio UsersRecordingCamtasia for Mac records all the activity on the screen within the selected recording area. Choose to recordmicrophone audio, system audio, and a web or digital video camera.Camtasia records the entire screen to help capture the context of the menu bar and doc on the desktop.Camtasia’s canvas gives you the control to crop to a specific window or region in the original recording duringediting.Record the Screen:1. Open Camtasia or select File New Recording.2. Click the screen dropdown to select the screen area to record:Record the full screen (select the monitor to record if you have multiple monitors).Record a region (preset, custom, or recently recorded region).Disable the Screen button to record audio or camera only.3. Select the audio and camera options:www.techsmith.com7
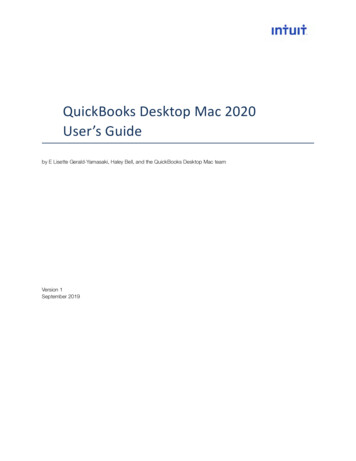
Version Comparison for Camtasia Studio UsersClick to enable camera video. Select the camera (such as the built-in iSight or a USB camera) fromthe dropdown. A preview of the camera appears.Microphone audio is recorded by default. Click the down arrow to select the audio device.Click to enable system audio recording (the sound from your computer such as mouse click sounds,audio playing from your speakers, etc.) . If SoundFlower is not currently installed, Camtasia promptsyou to install the device.4. If recording a region, click the Select Area button to select the area on your screen to record. Make sureto resize windows and set up the location for the recording content before clicking the Select Area button.See Select a region to record.5. Click the Rec button or press Command-Shift-2.6. Press Command-Shift-2 to pause the recording or Command-Option-2 to stop recording.www.techsmith.com8
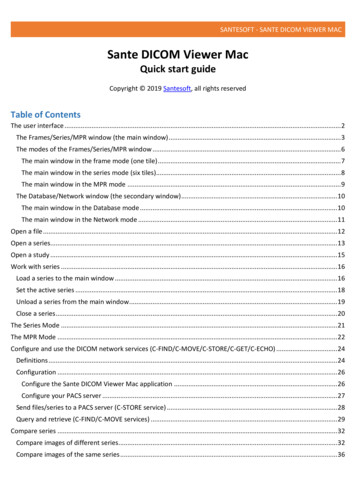
Version Comparison for Camtasia Studio UsersCamtasia adds the Camtasia recording file (.cmrec) into the Media Bin and onto the timeline. By default, fullscreen recordings appear at 50% of their original size on the canvas and region recordings appear at theiroriginal size on the canvas.To learn how to show only a region of the original recording in the final video, see Show a Window orRegion from the Original Recording.Select a region to recordCamtasia records all activity on the screen within the selected recording area.Custom regionSelect Custom to select a custom region on the screen or to record specific dimensions. Camtasia's selectiontool makes it easy to select a custom area or specific window on your screen.1. Open Camtasia or select File New Recording.2. Select Custom Region from the dropdown.3. Click the Select Area button.4. The crosshairs appear.You cannot move or resize windows while selecting a recording area. Click the Cancel Selectionbutton or press Esc to edi
into Camtasia Studio version 6.0.3 at this time. Import Camtasia for Mac files into Camtasia Studio: Screen video, camera video, and audio components from Camtasia recording file: In Finder, select the Camtasia Recording file (.cmrec). Control-click and select Show Package Contents. Import screen.mov (screen video), camera.mov (camera video), and audiotrack0.wav (audio). MOV files exported .