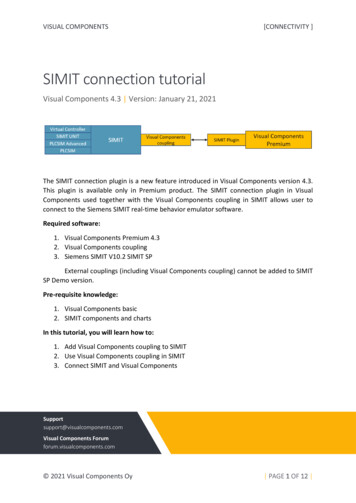
Transcription
IntroductionThis document describes how to setup WireShark as a temporary MCU Syslog server for troubleshooting. Eventhough this guide is written towards use with an MCU, the same principals apply to all devices using WireShark as atemporary Syslog server.Contributed by Matt Limbrick, Cisco TAC Engineer.RequirementsCisco recommends that you have knowledge of these topics: Wireshark "display filters" and "capture filters"Codian MCU menu navigationComponents UsedThe information in this document is based on these software and hardware versions: Windows 7 VM hosting Wireshark (ver 1.12.7) IP: 14.80.98.182Codian 8510 MCU ver 4.5(1.55) IP: 14.80.76.9The information in this document was created from the devices in a specific lab environment. All of the devicesused in this document started with a cleared (default) configuration. If your network is live, make sure that youunderstand the potential impact of any command.
Wireshark as a Syslog serverWireShark is a network protocol analyzer that allows you to run packet captures on a computer running theapplication. As WireShark can be used to capture all types of traffic, it can be handy to use for a temporary Syslogserver when you are without one. Most of the time, customers will already have this tool installed on their PC whichprevents having to find and download a syslog server and get approval. To get started, you will 1st need todownload and install e simplest way to use Wireshark is to point the Syslog configuration of your device to a PC running Wireshark.Use the "display filter" of "syslog" to see the results and then export this data as a packet capture or as a text file.As you can see below, I have captured a SIP call connecting to a conference and then disconnecting. At this point, Ido not have the log levels turned up so there is minimal details here.
Using WireShark with an MCU as a Syslog serverTo use WireShark as a Syslog server, you want to 1st be sure that the computer hosting WireShark is able to receivepackets from the MCU. To do so, start WireShark with "display filter" of "icmp". From the (MCU Network Connectivity tab), type the IP of the computer hosting WireShark and click on "Test Connectivity". (i.e.14.80.98.182)In the WireShark application you should now see the ICMP (ping) packets from the MCU (i.e. 14.80.76.9) whileusing the "display filter" of "icmp".Now that you have verified packets from the MCU can route to the computer hosting WireShark, we can configurethe syslog settings of the MCU (or other device) to point to WireShark. On the MCU, go to (MCU Logs Syslogtab) and apply the IP address of the computer hosting WireShark (i.e. 14.80.98.182), then click "Update syslogsettings". The option for Facility value is ok to leave as "1 - user level".
Now with this done and a "display filter" of "syslog", you should be able to see events start to appear in WireSharksuch as below. You can also point multiple devices' syslog configuration to the same PC running WireShark andlater filter all the collected data by IP address. This may be helpful when you are trying to track 2 different devicesand want to be able to match up which event happened in which specific order real time.These are the basic steps to configure WireShark as a Syslog server for any device.
Advanced configurationsOn an MCU, the Event Logs only contain the last 1999 lines of logs which overwrite and cycle through with thenewest entries. If you need to enable Trace level of debug logging, you may fill up this log in a couple minutesdepending on the event you are trying to monitor. This is the benefit of a Syslog server. It will take all the logs yousend it and keep them without overwriting. (Please see your specific Syslog server documentation to furthervalidate).To best make use of WireShark as a Syslog server, there are settings we can configure to minimize packet capturesize. Typical syslog messages are UDP using port 514. As such, we can create a "Capture Filter" in WireShark toonly capture packets destined for UDP port 514. Do begin, in WireShark, go to (WireShark Capture Options)In the field next to the "Capture Filter" button, type "udp port 514 and host ip of wireshark " i.e. 14.80.76.9. If thesyntax is correct, the field should highlight green. If so, click Start. If we want to capture syslog event from multipleIP addresses, just use "udp port 514" as a "capture filter". That way you can sort the data later as desired.
Now with the "capture filter" above applied, Wireshark will only capture UDP packets from 14.80.76.9:514. Allother packets will be ignored. Notice there is no "Display Filter" needed as we are already filtering which packets tocapture. We can now safely run the WireShark capture for several hours without worry of size as we are onlycapturing a minimal amount of packets.
Enable increased MCU loggingThere are times where we will want to run a test for an extended period with increased log levels, for instance a SIPcall. Typically the H.323/SIP logs (MCU Logs H.323/SIP Logs) when enabled will capture most of the dialogneeded (also know as Protocol logs depending on MCU version), but if more detail is needed, we can enable EventCapture Filters for specific issues. This will increase the Event log output, which is what is sent to the Syslog server.H.323/SIP (or Protocol) logs are only stored locally and are not sent to the syslog server. TelePresence MCU's havethe ability starting in 4.1(1.79) to transfer the Protocol logs to a HTTP(S) client (not covered in this article). Formore details please see the article below: (Cisco ePresenceServer/ta-p/836459When in need to increase debug logging, go to (MCU Logs Event Capture Filters).By default, all logging is set to "Errors, warnings and information" (EWI). This is the log level that should be set fornormal use. When in need to increase logging, you will want to select "Errors, warnings, information and trace"(EWIT). Once you have made your selection, click "Update Settings". You will be prompted to confirm yourselection as this may effect performance. Ideally you would want to run these log levels when there is low systemutilization. As you see below, I have enabled SIP debug levels to (EWIT) and have a warning next to it (afterupdating the settings) to inform this may affect system performance. Keep in mind if there is an issue, there isusually good reason we need to run these traces.Note: Please be sure to set the log levels back to (EWI) once done testing.
Now looking at Wireshark, we will have a lot more activity, especially when running another SIP call as before. Asyou can see below, a lot more details are logged on the MCU. Keep in mind this is not a port span of the MCU, soyou will not see the entire SIP dialog messages as you will in the Protocol logs, but this will display how the MCUprocesses these messages internally. If you want to capture the SIP dialog messages, use the Protocol logs or a portspan.
Saving the WireShark dataAfter you stop the capture, having collected the data you were looking for in WireShark from the syslogs, you canexport as a new packet capture or text file. In WireShark, go to (File Export Specified Packets.). This is typicallyused when you have a large capture and you want to export currently showing packets displayed on screen from aspecific "Display Filter". If you have only a "Capture Filter" enabled, you can save the WireShark capture as anormal pcap file (File Save As.).To Export to a text file, I recommend (File Export Packet Dissections as "CSV" (Comma Separated Valuespacket summary) file.) formatI find it is easier to look at and closely resembles the WireShark display output when viewing with Excel.
Alternatively, to export the capture as a text file, go to (File Export Packet Dissections as "Plain Text" file.).This view is not formatted as clean as the CSV format
As such, we can create a "Capture Filter" in WireShark to only capture packets destined for UDP port 514. Do begin, in WireShark, go to (WireShark Capture Options) In the field next to the "Capture Filter" button, type "udp port 514 and host ip of wireshark " i.e. 14.80.76.9. If the syntax is correct, the field should highlight green.