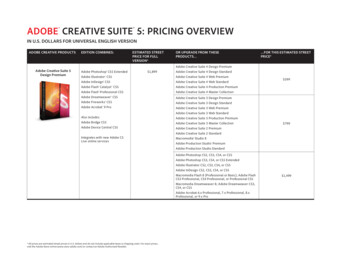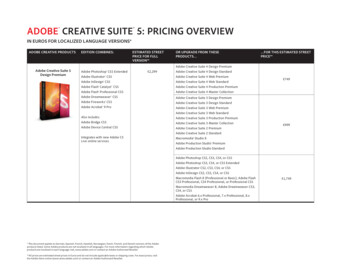
Transcription
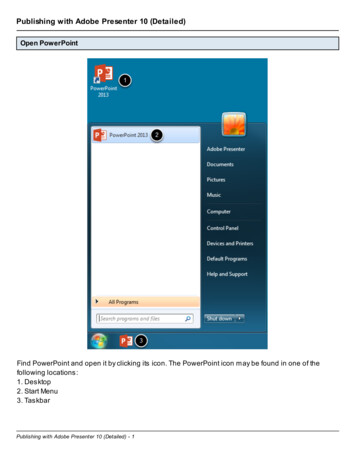
Publishing with Adobe Presenter 10 (Detailed)Open PowerPointFind PowerPoint and open it by clicking its icon. The PowerPoint icon may be found in one of thefollowing locations:1. Desktop2. Start Menu3. TaskbarPublishing with Adobe Presenter 10 (Detailed) - 1
Create a new, or open an existing, PowerPoint presentationClick Open Other Presentations to browse to and open an existing PowerPoint presentation orclick on one of the rectangular templates to create a new PowerPoint Presentation.Verify the presentation is saved in the current PowerPoint formatAdobe Presenter 10 does not work with presentations made in or saved as the PowerPoint97-2003 format with the file extension .ppt.New presentations must be saved as a PowerPoint presentation before audio can be recorded.Older presentations are identified by the words [Compatibility Mode] in the title bar and must besaved in the new PowerPoint format with the file extension .pptx.In either case, click the File tab to save the presentation in the new PowerPoint File format toproceed.Publishing with Adobe Presenter 10 (Detailed) - 2
Save the presentation in the new PowerPoint file format1. Click Save As2. Select where the file should be saved3. Name the presentation and select PowerPoint Presentation from the dropdown menu4. Click SaveClick the record button to begin recording audioVerify that [Compatibility Mode] is no longer in the title bar. Repeat the previous step if it is present.Plug in the microphone and click the Record button to begin narrating the presentation.Publishing with Adobe Presenter 10 (Detailed) - 3
Set the microphone recording levelRead the message into the microphone to set the microphone recording level.The red box will turn green and display a message once the recording level has been set.Click OK to proceed. A new window will open.Begin RecordingClick the red button to begin recording.Publishing with Adobe Presenter 10 (Detailed) - 4
Narrate presentationClick the1. Pause button to pause recording2. Stop button to stop recording3. Arrow button to advance slidesSave or discard the recordingClicking the Stop button reveals two more buttons.1. The Save button saves everything that has been recorded since the last time the Save buttonwas pressed2. The Discard button discards everything that has been recorded since the last time the Savebutton was pressed3. Press the X button to exit the recording screen AFTER saving or discarding the recording.Preview the narrated presentationClick the Preview button to preview the narrated presentation.Publishing with Adobe Presenter 10 (Detailed) - 5
These step by step instructions will demonstrate how to successfully upload your publishedAdobe Presenter Presentation to the web server through FTP.Once your presentation has been created and saved, Click on Publish on the AdobePresenter ribbon.Click the My Computer tab and Click Choose to select a location of where you would like tosave the file.Adobe Presenter - Uploading Adobe Presenter Presentation Through FTP - 1
Choose a folder to publish the file in.1.2.3.4.Right click on the location you would like to save the presentation in.Go to new and select FolderType a name for the folder (preferab ly without spaces or special characters)Make sure the newly created folder is selected and click OK.NOTE: There will already b e a folder created with the name of your PowerPoint presentation, thisfolder will b e contains source files created b y Adob e Presenter. Do not publish to this folder.Adobe Presenter - Uploading Adobe Presenter Presentation Through FTP - 2
Under the Publish Format, make sure that option "HTML5" is selected. Click Publish.Once the publishing process has been completed. Open the FileZilla Client.You can find The FileZilla Client either on your desktop or under All Apps/Programs in your Startmenu.Adobe Presenter - Uploading Adobe Presenter Presentation Through FTP - 3
Once FileZilla Client is opened, type in authentication information1.2.3.4.5.In the Host field type sftp://connect.uthsc.eduType your UTHSC NetID and password in the username and password fieldsIn the Port field type in the number 22Click on Quickconnect to connectIf the connection to the server was successful, you will see success on the last Status lineTransferring the files1.2.3.4.On the right hand side in the Remote site section expand the folder that's labeled with yourNetID to reveal the public html folderOn the left hand side under Local site, find the folder that you saved your presentation in(step 3).Drag it to the public html folder under your NetID that's located in the Remote site section onthe right hand side. This will start the trans fer process.Once the files have been transferred, you will see File transfer successful.NOTE: Make sure to always drag the folder into the public html folder on the server.Adobe Presenter - Uploading Adobe Presenter Presentation Through FTP - 4
Accessing and Sharing the PresentationNow that the files have been uploaded to the server, open up a web browser and type in theaddress bar: connect.uthsc.edu/ netid/Folder NameThis is the URL to your presentation, you can use it to share your presentation.NOTE: Folder Name is the name you gave your folder in step 3.Adobe Presenter - Uploading Adobe Presenter Presentation Through FTP - 5
Adobe Presenter - Uploading Adobe Presenter Presentation Through FTP - 2 Choose a folder to publish the file in. 1. Right click on the location you would like to save the presentation in. 2. Go to new and select Folder 3. Type a name for the folder (preferably without spaces or special characters) 4. Make sure the newly created folder is .