Transcription
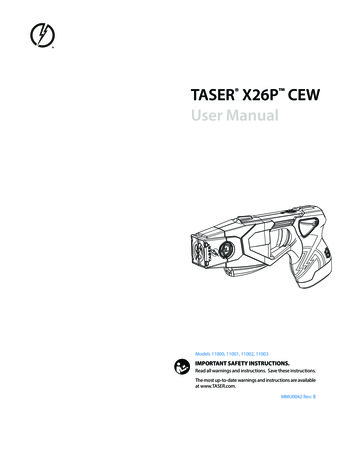
TASER X26P CEWUser ManualModels 11000, 11001, 11002, 11003IMPORTANT SAFETY INSTRUCTIONS.Read all warnings and instructions. Save these instructions.The most up-to-date warnings and instructions are availableat www.TASER.com.MMU0042 Rev: B
Contents4445Chapter 1: WarningsImportant Safety and Health InformationUse of Force PolicyFirmware Update6667Chapter 2: General InformationWhat is the TASER X26P CEW?Neuro Muscular Incapacitation (NMI)Basic X26P CEW Electrical Theory8 Chapter 3: Features8 X26P CEW Features8 Safety Switch9 LASER9 Mechanical Sights9 Tactical Accessory Power Interface9 Performance Power Magazine (PPM) Battery Pack10 Changing the Battery Pack11 Tactical Performance Power Magazine (TPPM) Battery Pack11 eXtended Performance Power Magazine (XPPM) Battery Pack11 Automatic Shut-Down Performance Power Magazine (APPM) Battery Pack12 eXtended Automatic Shut-Down Performance Power Magazine (XAPPM) Battery Pack12 Advanced Central Information Display (CID)12 System Status Icons13 Battery Level Icons14 Spark Duration14 Sample CID Displays15 LED Flashlight15 Selector Switch (LASER and LED Flashlights)16 Trigger Switch17 Ergonomic Grip Design1818181919Chapter 4: Cartridges & CEW OperationRemoving the Shipping Cover from the Cartridge15, 21, LS, and XP25 TASER CartridgesAFIDLoad the TASER Cartridge2
32020202121212223LoadingUnloadingAiming and Probe Placement"Silence Is Golden"Potential Causes of Reduced or No EffectivenessElectrodesDrive-Stun BackupRecommended Drive-Stun Areas for Maximum ter 5: Maintenance/TroubleshootingFunction TestFunction Test InstructionsWhat to Do Following CEW UseConsiderations for Handling Used ProbesEffects On AnimalsPolice/Military K-9 CautionUploading Firmware RevisionsDataport Download KitUSB Connection StatusEVIDENCE Sync Offline SoftwareTrilogy LogEvent LogPulse LogEngineering LogTime SynchronizationX26P CEW Maintenance and CareDropped or Wet X26P CEWTASER Online Troubleshooting GuideProduct Returns3131313132Chapter 6: Optional AccessoriesEVIDENCE.comEVIDENCE Sync Offline SoftwareTASER CAM HD RecorderHolsters33333334Chapter 7: Additional ItemsAdditional InformationTASER Training AcademyMedical ResearchContents
1WarningsImportant Safety and Health InformationRead, understand and follow the most current product warnings, safety instructions, and training materials. Allproduct warnings are not included in this Manual. A Product Warnings document is included with this conductedelectrical weapon (CEW) and the most current warnings are posted on our website at www.TASER.com. The mostcurrent training materials are available by contacting TASER’s Training Department. Do not attempt to use thisCEW until you have completed training with a TASER International, Inc. (TASER) Certified Instructor.WARNINGComplete Training FirstSignificant differences exist between each of the TASER CEW models. Do not use or attempt to use any CEW model unless youhave been trained and certified by a Certified TASER Instructor on that particular model.Read and ObeyRead, study, understand, and follow all instructions, warnings, information, training bulletins and TASER training materialsbefore using the TASER X26P CEW. Failure to comply with the product instructions, warnings, information, trainingbulletins, and TASER training materials could increase the risk of or result in death or serious injury to the user, forcerecipient, and others.Obey Applicable LawsUse the CEW only in accordance with applicable federal, state, and local laws and other regulations or legal requirements.Your agency’s guidance must also be followed. Any CEW use must be legally justifiable.TASER CEWs are designed in probe-deployment mode to temporarily incapacitate a person from a safer distancewhile reducing the likelihood of serious injuries or death. When used as directed, TASER CEWs have been foundto be safer and more effective than other traditional use-of-force tools and techniques. However, it is importantto remember that the use of force and physical incapacitation, by their very nature, involve risk that someonewill get hurt or may even die from factors that include, but are not limited to: physical resistance, exertion,individual susceptibilities, and/or unforeseen circumstances. Any use of force or physical exertion involves risksthat a person may get hurt or die.Use of Force PolicyEach agency is responsible for creating its own use-of-force policy and determining how TASER CEWs fit its theiruse-of-force matrix based on legal and community standards. Make sure your agency has a use-of-force policy4
that addresses TASER CEW use and that this policy is clearly addressed during end-user training.Firmware UpdateBefore using your X26P CEW, confirm with your armorer or other qualified person that the X26P firmware hasbeen updated.5Chapter 1Warnings
General Information2What Is the TASER X26P CEW?The X26P CEW is a software upgradable weapon manufactured by TASER International, Inc.The X26P CEW uses a replaceable cartridge containing compressed nitrogen to deploy two small probes thatare attached to the X26P CEW cartridge by insulated conductive wires. The cartridges are available with variouswire lengths from 15' to 25' (4.6 m to 7.6 m). Sale of cartridges with wire length longer than 15' is limited to lawenforcement and military only.The X26P CEW’s Trilogy log can be uploaded securely to EVIDENCE.com. The X26P CEW has an internal memorythat stores the operating software and a deployment record. See the Trilogy Log section in this manual formore details. Those who do not have an EVIDENCE.com account can use the Offline EVIDENCE Sync software todownload a simplified log to a local computer.The X26P CEW has an estimated useful life of 5 years.Neuro Muscular Incapacitation (NMI)TASER technology is designed to use electrical impulses similar to those in your body’s nervous system to causestimulation of the sensory and motor nerves. Neuro Muscular Incapacitation (NMI) occurs when a CEW is ableto cause involuntary stimulation of both the sensory nerves and the motor nerves. It is not dependent on painand can be effective on subjects with a high level of pain tolerance.Previous generations of stun guns primarily affected the sensory nerves only, resulting in pain compliance. Asubject with a very high tolerance to pain (e.g., a drug abuser, person in serious psychological distress, or a trained,focused fighter) may not be affected by the pain or might be able to fight through the pain of a traditional stun gun.6
Basic X26P CEW Electrical Theory Electricity must be able to flow between the probes to deliver an electrical charge and will generallyfollow the path of least resistance between the probes. The greater the spread between the probes on the target, generally the greater the effectiveness. Electricity will generally not pass to others in contact with the subject unless contact is made directlybetween or on the probes, or the wires are touched. Electricity can arc through most clothing, and even some bullet-resistant materials. Exposure to water will not cause electrocution or increase the power to the subject (the electricalcharge is fixed inside the TASER CEW, and will not increase significantly even with environmentalchanges). The Current Metering technology is designed to deliver optimal charge. Medical studies have found that modern pacemakers and implanted cardiac defibrillators withstandexternal electrical defibrillators many orders of magnitude stronger than the TASER CEW conductedenergy pulses.7Chapter 2General Information
3FeaturesX26P CEW FeaturesGet to know the X26P CEW:Illumination SelectorMechanical SightsTASER CartridgeProbeWireAFIDsBlast DoorSafety SwitchTriggerPPM Release ButtonTextured Grip ZonesPerformance PowerMagazine (PPM)Cartridge Release TabLASERLow Intensity Lights (LEDs)NOTE: The serial number is located inside the cartridge bay.Ensure the CEW is unloaded, the safety is in the down (SAFE) position, and your fingers are away from thetrigger before reading the serial number.Safety SwitchAmbidextrous safety can be operated from either side of the CEW. Safety switch down (SAFE). Safety switch up (ARMED) and ready to deploy. Do not block the safety on one side of the X26P CEW while attempting to move it on the other side. Thiscan break the safety and disable the CEW. With default settings, if the X26P CEW’s safety switch is left in the up (ARMED) position for more than 20minutes, the system goes into low power mode to reduce the amount of power consumed, and the CEWwill not fire. Although the CEW will not fire, power is still consumed and will eventually drain the battery ifthe safety switch remains in the ‘ARMED’ position. To re-arm the CEW, shift the safety to the down (SAFE)position, and then shift it back to the up (ARMED) position.8
Up (ARMED)Down (SAFE)LASERThe LASER installed in the X26P CEW is oriented with the mechanical sights. At 15 feet (4.6 m), the aiming pointis aligned to the approximate trajectory of a cartridge’s top probe.Mechanical SightsThe mechanical sights on the X26P CEW are molded to provide manual aiming of the CEW. The mechanical sightsare set to coincide with a top probe’s trajectory at a 15' (4.6 m) distance.Front Mechanical SightRear Mechanical SightTactical Accessory Power InterfaceTactical Accessory Power InterfaceThis is a power plug for future X26P accessories.Performance Power Magazine (PPM) Battery PackThe Performance Power Magazine is a lithium energy cell power supply system for the X26P CEW.NOTE: X26P battery packs will not work with the X3 or X26 CEWs, and battery packs designed for the X3 orX26 CEWs will not work with the X26P CEW. Battery packs designed for the X2 CEW will work in the X26P CEW.Do not store the PPM anywhere that the gold contacts on the top of the PPM may touch metal objects. If you9Chapter 3Features
cause an electrical short between these contacts, the short will drain the battery and may cause the pack itselfto become dangerously hot.The PPM battery has enough power for approximately 500 five-second discharges depending on temperature,environment, use of the flashlight, and other factors. The PPM battery will deplete faster in colder weather thanwarm weather. Likewise, the battery will deplete faster with the flashlight active.For more information on installing the PPM, see the Changing the PPM Battery Pack section in this manual.NOTE: Other battery pack options are available for the X26P CEW. See the Tactical Performance Power Magazine(TPPM) Battery Pack, Automatic Shut-Down Performance Power Magazine (APPM) Battery Pack, and eXtendedPerformance Power Magazine (XPPM) Battery Pack sections in this manual.Changing the Battery PackTo change the battery pack:1 Point the CEW in a safe direction.2 Ensure the safety switch is in the down (SAFE) position.3 Safely remove the TASER cartridge (do not place any body parts in front of the cartridge). See the Unloadingsection in this manual for more information.4 To unload the battery pack, depress the battery pack release button and remove the battery pack from thehandle of the CEW.Release Button5 Inspect the battery contacts. Ensure that they are appear in working order and are free from dirt or otherresidue that may interrupt the battery connection to the CEW.6 Install the new battery pack and ensure that it is fully inserted in the X26P CEW. Apply sufficient force toensure the battery pack is fully seated. When the battery pack seats properly, the release button should popout from the recessed portion with an audible click.Chapter 3Features10
Tactical Performance Power Magazine (TPPM) Battery PackThe optional TPPM has an extension to provide a larger grip on the CEW. The TPPM does not hold an extra cartridge.eXtended Performance Power Magazine (XPPM) Battery PackTo install a TASER standard cartridge in an XPPM:1 Ensure the cartridge cover is removed. See the Removing the Shipping Cover from the Cartridge section inthis manual for more information.2 Keeping your hand away from the blast doors, depress the tabs on the sides of the cartridge.3 Insert the cartridge in the XPPM so the blast doors face forward, toward the front of the CEW.To remove the cartridge, keeping your hand away from the blast doors, depress the tabs again and pull thecartridge out of the XPPM.Automatic Shut-Down Performance Power Magazine (APPM) Battery PackThe optional APPM is a modified battery pack that shuts down the output of the X26P CEW after 5 seconds andalso contains a built-in speaker that alerts you to the impending shut down.Under stressful situations, audio exclusion might prevent you from hearing the alert from the APPM.The APPM provides an audible beeping alert for the last 2 seconds of a trigger-initiated cycle before automaticallyshutting down the cycle. After 5 seconds’ deployment duration, the energy burst will stop even if your finger isstill pulling the trigger switch. To reenergize the deployed cartridge, first ensure that your finger is off the triggerswitch, and then press the trigger again.Your CEW will recognize the APPM as a unique type of battery pack. If you remove the APPM and replace itwith a different type of battery pack, the X26P CEW will return to its normal configuration. That is, there will nolonger be an audio alert, and the energy cycle will continue after 5 seconds if your finger is still holding down11Chapter 3Features
the trigger switch. Always confirm that the CEW performs as expected before returning it to duty after changingany battery pack.Remove the cartridge before testing the CEW function. See the Unloading section in this manual for moreinformation.eXtended Automatic Shut-Down Performance Power Magazine (XAPPM)Battery PackThe XAPPM holds an extra TASER standard cartridge like the XPPM and features an automatic output shut downafter 5 seconds like the APPM.Advanced Central Information Display (CID)The CID is a monochrome organic light emitting display on the back of the X26P CEW. When the safety switchis shifted into the up (ARMED) position, the CID will display the battery status.Energy Cell Indicator:61-80% RemainingSystem Status IconsThe system status icons are designed to inform you of the system status of the X26P CEW. It is the user’sresponsibility to conduct proper maintenance, and ensure that the CEW is working properly before any use.Failure to heed the system status icons could cause serious injury or death.Major Fault indication. A yellow triangle indicates that the logging or date and timefunctions are not working properly. The CEW will still produce an electrical output(e.g., the CEW should still arc and deploy cartridges), but the accountability functionsare compromised.Shift the safety switch to the down (SAFE) position and then to the up (ARMED)position; the fault may clear. If the fault does not clear, it may still be possible to usethe CEW for a short time.Whether the fault clears or not, it will be recorded in the Engineering log. If the faultdoes not clear, and the CEW is still under warranty, send the CEW to TASER for repair.Chapter 3Features12
Critical Fault indication. A yellow stop sign in the upper-right side of the CID indicatesa system failure.Critical faults are rare. Shift the safety switch to the down (SAFE) position and thento the up (ARMED) position; the fault may clear.If the fault does not clear, do NOT attempt to use the CEW. The CEW may need to berepaired or replaced. See the Product Returns section in this manual for instructions.Invalid Battery Pack. If you see a blinking exclamation point and battery icon, thisindicates that the CEW did not recognize the battery correctly. Remove the batterypack and reinsert it. If the error is still present, try another battery pack. If the iconstill displays, the CEW should be sent in for service if it is still under warranty.An APPM or XAPPM battery pack is installed in the CEW.A TASER CAM HD recorder is installed in the CEW.A TASER CAM HD recorder with the automatic shut-down feature is installed inthe CEW. This recorder offers an audio warning and shut-down feature like that ofan APPM battery pack.The USB connection status icon displays when the USB connection is good.Battery Level IconsWhen the safety switch is in the up (ARMED) position, the CID will display the percentage of battery powerremaining. Remaining capacity will display in 19 percent increments.When the battery level drops to 20 percent, TASER recommends that the battery pack be replaced.Battery81– 100%Battery61– 80%Battery41– 60%Battery21– 40%When the battery capacity is at 1–20 percent, the CID will flash thewarning LO BATT on the CID when the safety switch is cycled to theup (ARMED) position.13Chapter 3Features
If the battery capacity is at 1–20 percent, and the CEW is beingdischarged, this icon displays in the lower-right portion the CID.Battery01– 20%BlinkingWhen the TASER CAM HD battery is depleted, the CID will flash thewarning RECHARGE BATTERY on the CID when the safety switch iscycled to the up (ARMED) position.When the PPM, TPM, APPM, XPPM, or XAPPM battery pack is depleted,the CID will flash the warning CHANGE BATTERY on the CID whenthe safety switch is cycled to the up (ARMED) position.BatteryDepletedSpark DurationThe CID displays a count indicating how many seconds the deployment cycle lasts. The CEW will count up fromthe number 1 up to 99. At 99 seconds, the count will restart at 1.Sample CID DisplaysThe CID below shows the X26P CEW with a TASER CAM HD recorder installed and a battery capacity of 61–80percent.TASER CAM HDRecorderBattery:61-80% RemainingThe CID below shows a CEW that has been discharging for 4 seconds, with a battery pack that is at 41–60 percentcapacity.CountBattery:41- 60% RemainingThe CID below shows a CEW with an APPM battery pack installed that has a battery capacity of 61–80 percent.Chapter 3Features14
APPM InstalledBattery:61-80% RemainingThe CID below shows a CEW with a battery pack error.InvalidBattery PackThe CID below shows a CEW that is 4 seconds into an energy burst, has a battery pack that is 81–100 percentcharged, and a major fault with the CEW.Major FaultCountBattery:81- 100% RemainingLED FlashlightThe X26P CEW has a high intensity white LED to aid the user in dark environments.Selector Switch (LASER and LED Flashlights)You can select four modes of illumination when using the X26P CEW. To change the illumination setting:1 Point the CEW in a safe direction.2 Ensure the safety switch is in the down (SAFE) position.3 Keeping your hand away from the blast doors, depress the tabs on the sides of the cartridge and remove.4 Press and hold the selector switch for approximately 1 second until the CID display illuminates.15Chapter 3Features
NOTE: Using pens or paper clips to press the selector switch may damage it. Only use your finger to press theselector switch.5 Press and release the selector switch to toggle through the four available settings until the setting you desireis designated on the CID. Stop when the setting you desire is displayed.OO: Neither the LASER nor the Flashlight will illuminate.LO: Only LASER will illuminateOF: Only Flashlight will illuminateLF: LASER and Flashlight both illuminateThe selected mode displays for 5 seconds, and will be the default mode the next time the safety switch is movedto the up (ARMED) position.The selector switch may also be used to activate the Stealth Mode, which will shut off the LASER and flashlight,and dim the CID display. To do this, press the selector switch when the safety is in the up (ARMED) position. Totake the CEW out of Stealth Mode, press the selector switch again or shift the safety to the down (SAFE) position.You will have to reactivate the Stealth mode each time you place the safety in the up (ARMED) position.Trigger SwitchUnlike a firearm trigger, the X26P CEW trigger is a momentary electrical switch. The switch is operational onlywhen the safety switch is in the up (ARMED) position. Pulling and releasing the trigger switch will result inan approximately 5-second discharge cycle unless the safety switch is shifted to the down (SAFE) position todiscontinue the 5-second cycle. Pulling and holding the trigger switch for more than 5 seconds will result ina continuous discharge until the trigger switch is released, or the battery is depleted—whichever comes first.An X26P CEW equipped with the APPM battery pack is limited to 5-second discharges and emits an audio alert2 seconds before the end of the cycle. See the Automatic Shut-Down Performance Power Magazine (APPM)Battery Pack section in this manual for more information.In the event of an accidental discharge, immediately move the safety switch to the down (SAFE) position tostop the discharge cycle.Chapter 3Features16
Trigger SwitchErgonomic Grip DesignThe handle of the X26P CEW is optimized for comfort with specific features for safe and effective use for peopleof most sizes.17Chapter 3Features
Cartridges & CEW Operation4Removing the Shipping Cover from the CartridgeCartridges are sold separately from the CEW. Cartridges are shipped with a shipping cover in place. Carefullyremove these covers before attempting to load a cartridge into the X26P CEW. Be careful to not allow any bodypart to be in front of the cartridge. Static electricity can discharge a cartridge, and injuries have occurred. Acartridge cannot be loaded into the CEW with the cover in place. Once the cartridge cover is removed, it can bedisposed of.1 Before removing the covers, make sure the front of the cartridge does not point at any body part or at anyone.2 Carefully place the cartridge with cover face down (blast door down) onto a stable/solid surface, i.e., a table.3 Place your index and middle fingers onto the sides of the cartridge where the wedges/electrodes are locatedand place your thumbs onto the locking portions of the cover.4 Push in with your fingers and pull outward with your thumbs and the cartridge will pop upward, releasingit from the cover.NOTE: The cartridge may pop upward quickly when the pressure is released from the locking portions of the cover.15, 21, LS, and XP25 TASER CartridgesNever attempt to open or modify a TASER cartridge. Tampering with a live TASER cartridge could cause it tofire or malfunction (which may result in serious injury).Handle all TASER cartridges with care. Probes may deploy unexpectedly if exposed to physical shock, orstatic electricity.TASER cartridges should be kept away from conditions known to create an electrostatic discharge, such as rubbingcloth (e.g., jacket liner or uniform pants) across a cartridge in an environment known to create static shocks.Cartridge blast doors can be knocked off the front of a cartridge. Because those cartridges cannot be relied uponto consistently discharge, TASER recommends removing those cartridges from service. Attempting to deploy18
a cartridge with no blast doors could result in a charge being created and held in the wires. Any conductivematerial that comes into contact with the front of the cartridge, even after the cycle has ended, could draw thecharge to the ignition pin and deploy the probes.TASER offers a Blast Door Repair Kit that can be used to replace blast doors that come off. Cartridges with replacedblast doors should only be used for training and should not be deployed to the field. Go to www.TASER.com formore information on the Blast Door Repair Kit.AFIDEvery time a TASER cartridge is deployed, approximately 20–30 small confetti-like Anti-Felon Identification (AFID)tags are ejected. Cartridges can be assigned to individual users, as each is serialized. Each AFID tag is printedwith the corresponding serial number of the cartridge deployed, allowing determination of which user deployedthe particular cartridge.Load the TASER CartridgeNever place your hands or fingers in front of the cartridge. This is especially important when loading andunloading the cartridge. Serious injury could result. When loading and unloading always hold the cartridgeon the sides or top.TASER cartridges are shipped with a shipping cover in place. Remove these covers before attempting to loada cartridge into an X26P CEW. See the Removing the Shipping Cover from the Cartridge section in this manualfor more information.Loaded19Chapter 4Cartridges & CEW OperationUnloaded
Load the TASER CartridgeLoading1 Point the CEW in a safe direction.2 Ensure that the safety switch is in the down (SAFE) position.3 Make sure the protective shipping cover is removed from the TASER cartridge.4 Keeping your hand away from the blast doors, place the cartridge (with the cartridge cover removed) intothe front of the CEW until an audible click is heard.5 Verify that the cartridge is secure by pulling on the sides of the cartridge.Load the TASER CartridgeUnloading1 Point the CEW in a safe direction.2 Ensure that the safety switch is in the down (SAFE) position.3 Keeping your hand away from the blast doors, depress the tabs on the sides of the cartridge and remove.The 15-, 21-, and 25-foot (4.6-, 6.4-, and 7.6-meter, respectively) TASER cartridges are specifically designed sothere is no “up” or “down” position – enabling you to quickly reload one in a stressful situation without worryingabout putting it in upside down.Aiming and Probe PlacementLevelTiltedFor most deployments, hold the CEW level. Do not tilt the CEW unless it is necessary to do so to align the CEWwith the target.All TASER CEW deployments should be in accordance with current TASER training and warnings, and departmenttraining, policies, and procedures.Normally, aim the LASER at the preferred target areas of the body, which are the lower center-mass (below thechest) and legs when the subject is facing you, or the subject’s back if the subject is turned away from you.When possible, avoid intentionally targeting the CEW on sensitive areas of the body such as the head, throat,chest/breast, or known pre-existing injury areas without legal justification.The top probe impacts the target near the LASER beam; however, the probe impact distance from the LASERwill vary depending on the distance between the CEW and the target, type of cartridge, etc. At 15' (4.6 m), theChapter 4Cartridges & CEW Operation20
LASER’s position corresponds to the trajectory of a 25' (7.6 m) cartridge’s top probe at the same range.The bottom probe impacts at an 8-degree angle from the top probe. This results in a spread of approximately 1'(0.3 m) for every 7' (2.1 m) of distance from the CEW. Greater probe spread increases effectiveness.“Silence Is Golden”The TASER CEW’s electrical current is relatively quiet when both probes make direct contact with a human or ananimal. In contrast, some practice conductive targets are loud because the energy is arcing in the air.If electrical current is loud during field deployment and the subject is not reacting as expected, the electricalcircuit may not be completed or the current may be shorting out and may not be effective. Deploy a secondcartridge or consider other options in accordance with your agency's policies.Potential Causes of Reduced or No Effectiveness Loose or Thick Clothing. If the probes lodge in clothing and are too far away from the subject, CEWeffectiveness is reduced and can be eliminated. Miss or Single Probe Hit. The current must pass between the probes. If one probe misses, a secondcartridge should be deployed if practical and legally justifiable. Also, using the X26P CEW in the drive-stunmode as described below may complete the circuit between the single probe and the CEW electrode. Low Nerve or Muscle Mass. If the probes impact in an area where there is very little muscle mass (e.g.,the side of the rib cage), the effectiveness can be significantly diminished. Limited Probe Spread. Probe spreads of less than 4 inches (10 cm) (including drive-stun) may result inlittle or no effect and become primarily a pain compliance option. Wires Break. If a wire breaks (e.g., during a struggle), the current will not flow to the probes and anadditional deployment may be required. Drive-stun may still be available.Do not become over-dependent on the TASER CEW. No force option, including CEWs, is 100% effective inevery situation. Do not deploy the CEW without following your department policies and procedures.ElectrodesThe front of the X26P CEW has two metal electrodes. These electrodes direct the charge to the electrodes on thecartridge to initiate deployment of the probes. In addition, the electrodes provide the ability to use the X26PCEW in a “drive-stun” mode as a traditional stun-gun type CEW.21Chapter 4Cartridges & CEW Operation
ElectrodeElectrodeDrive-Stun BackupDrive-stun capability is available with or without a TASER cartridge installed. To apply a drive-stun, place the safetyin the up (ARMED) position and pull the trigger. The drive-stun mode is not designed to cause incapacitation andgenerally becomes primarily a pain compliance option. Probe deployment is usually considered more desirable ifincapacitation is the desired objective, even at close range. Some of the advantages of probe deployment include: Drive-stun is only effective while the CEW is in contact with the subject or when pushed against thesubject’s clothing. As soon as the CEW is moved away, the energy being delivered to the subject stops.Deploying the probes allows the user to separate from the subject while maintaining control. Due to automatic reflex actions, most subjects will struggle to separate from the CEW. Each time the CEWcomes back in contact with the subject, another set of marks may be visible on the subject’s skin. Usingthe probes allows for one point of discharge. If the probes are deployed, even at very close range, the user may drive-stun to another portion of thebody that is further away from the probes, thereby increasing the possibility of inducing incapacitation.If the dri
LASER The LASER installed in the X26P CEW is oriented with the mechanical sights. At 15 feet (4.6 m), the aiming point is aligned to the approximate trajectory of a cartridge's top probe. Mechanical Sights The mechanical sights on the X26P CEW are molded to provide manual aiming of the CEW. The mechanical sights