Transcription
ACN Iris WG4K Video Screen Ribbon Cable ReplacementACN Iris WG4K Video Screen Ribbon CableReplacementReplace your malfunctioning or damaged video screen ribbon cable.Written By: Itze Kenney iFixit — CC BY-NC-SAwww.iFixit.comPage 1 of 12
ACN Iris WG4K Video Screen Ribbon Cable ReplacementINTRODUCTIONThe video screen ribbon cable is a part of the device used for transferring encrypted data betweenthe video screen and the motherboard. Consider checking this guide before moving ahead to videoscreen replacement, since you might just have a disconnected or faulty ribbon connector.TOOLS:Phillips #0 Screwdriver (1)Spudger (1) iFixit — CC BY-NC-SAwww.iFixit.comPage 2 of 12
ACN Iris WG4K Video Screen Ribbon Cable ReplacementStep 1 — Handset Press upwards with your index finger on the 4P4C connector as shown in the image. Pull the connector gently out of its socket.Step 2 — Lower Case iFixit — CC BY-NC-SAwww.iFixit.com Flip the main body of the videophone so that the bottom is facingup. Use the Phillips #0 Screwdriver toremove the four Phillips headscrews (6 mm) highlighted by thered circles.Page 3 of 12
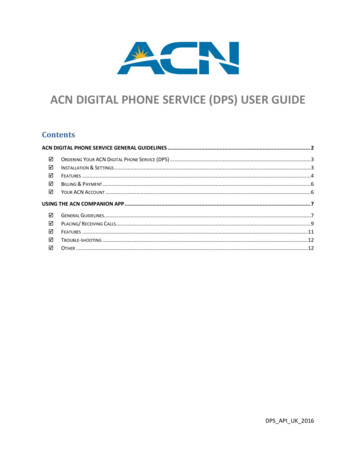
ACN Iris WG4K Video Screen Ribbon Cable ReplacementStep 3 Lift the back case upwards to expose the inside components. Red rectangles indicate the three ribbon cables. The orange square indicates the blade connector.Step 4 Disconnect the three ribbon cables from their insulation-displacement connectors by flipping up theblack plastic clip. Gently pull the ribbon cables out of their insulation-displacement connectors. iFixit — CC BY-NC-SAwww.iFixit.comPage 4 of 12
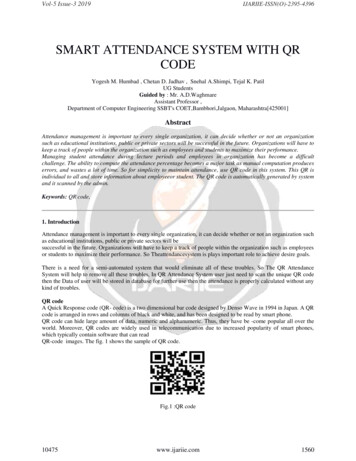
ACN Iris WG4K Video Screen Ribbon Cable ReplacementStep 5 Disconnect the blade connector from the blade receptacle by gripping the exposed area of theblade connector. Gently pull the blade connector out of the blade receptacle.Step 6 iFixit — CC BY-NC-SAwww.iFixit.comGently lift up the lower case toseparate it from the top case.Page 5 of 12
ACN Iris WG4K Video Screen Ribbon Cable ReplacementStep 7 — Blade Connector Use the Phillips #0 Screwdriver toremove the four Phillips headscrews (6 mm) highlighted by thered circles. Gently lift up on the upper case toseparate it from the keypad/speakerpanel.Step 8 iFixit — CC BY-NC-SAwww.iFixit.comPage 6 of 12
ACN Iris WG4K Video Screen Ribbon Cable ReplacementStep 9 Use the Phillips #0 Screwdriver toremove the two Phillips head screws(5 mm) located on the upper case. Rotate the top case 180 degrees sothat the video screen is closest toyou. Lift up the bottom up so that it isperpendicular to the table (this helpsyou reach the two top screws). The four Phillips head screws (6mm) are highlighted by the redcircles.Step 10 iFixit — CC BY-NC-SAwww.iFixit.comPage 7 of 12
ACN Iris WG4K Video Screen Ribbon Cable ReplacementStep 11 Use the Phillips #0 Screwdriver toremove the four Phillips headscrews (6 mm). Flip the top case so that the videoscreen is facing up.Step 12 iFixit — CC BY-NC-SAwww.iFixit.comPage 8 of 12
ACN Iris WG4K Video Screen Ribbon Cable ReplacementStep 13 Rotate the top case 180 degrees. Gently lift up on the video screenand the blade and ribbon connectorto give you more slack to work with. Place the video screen face down toexpose the two screws. The screwsare indicated by the red circles.Step 14 iFixit — CC BY-NC-SAwww.iFixit.comPage 9 of 12
ACN Iris WG4K Video Screen Ribbon Cable ReplacementStep 15 Use the Phillips #0 Screwdriver to remove the two Phillips head screws (6 mm)Step 16 Pull the ribbon connector and blade connector through the top case. iFixit — CC BY-NC-SAwww.iFixit.comPage 10 of 12
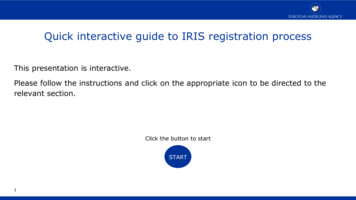
ACN Iris WG4K Video Screen Ribbon Cable ReplacementStep 17 — Video Screen Ribbon Cable Note that the video screen is nolonger attached to the top case,place in on a flat surface. Gently lift of the silver casing.Step 18 The two ribbon connectors are indicated by the red rectangles. Disconnect the two ribbon cables from their insulation-displacement connectors by flipping up theblack plastic clip. Gently pull out the ribbon cables. Gently pull out the ribbon cables.To reassemble your device, follow these instructions in reverse order.This document was last generated on 2017-06-18 07:03:31 PM. iFixit — CC BY-NC-SAwww.iFixit.comPage 11 of 12
ACN Iris WG4K Video Screen Ribbon Cable Replacement iFixit — CC BY-NC-SAwww.iFixit.comPage 12 of 12
Step 3 Lift the back case upwards to expose the inside components. Red rectangles indicate the three ribbon cables. The orange square indicates the blade connector. Step 4 Disconnect the three ribbon cables from their insulation-displacement connectors by flipping up the black plastic clip. Gently pull the ribbon cables out of their insulation-displacement connectors.