Transcription
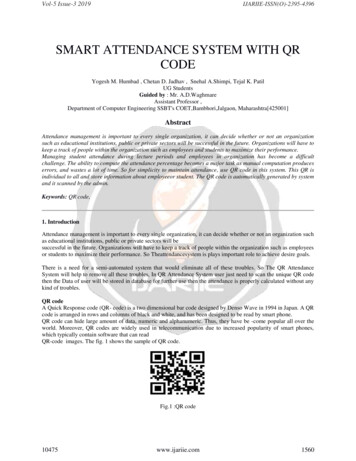
Instruction ManualAcuRite Iris (5-in-1) Weather Sensor(Single Solar Panel)model 06004Package Contents1. AcuRite Iris Sensor2. Mounting Hardware3. Sensor Mounting Bracket4. Instruction ManualIMPORTANTPRODUCT MUST BE REGISTEREDTO RECEIVE WARRANTY SERVICEPRODUCT REGISTRATIONRegister online to receive 1-year warranty tions? Visit www.acurite.com/supportSAVE THIS MANUAL FOR FUTURE REFERENCE.
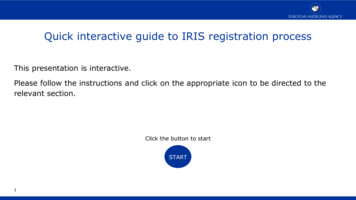
Features & Benefits7129113 458610AcuRite Iris SENSOR5. Temperature & Humidity Sensors1. Rainfall Collector Funnel(internal)2. Solar Cell Panel6. Mounting PointConverts sunlight into power to runinternal aspirating fan.7. Wind Speed AnemometerInternal Aspirating Fan8. Wind Direction Vane(not shown)Draws ambient air intosensor to reduce solar radiationheating, resulting in more accuratetemperature measurement.9. Mounting Bracket10. Mounting Hardware Includes 5 anchors & the following screws:Qty DiameterLength5#43/4”1#41/2”1#61/2”3. A-B-C SwitchID code that must match display’sA-B-C switch to ensure unitssynchronize.11. Debris FilterPre-installed to prevent debris fromentering the rain gauge.4. Battery Compartment2
SETUPAcuRite Iris Sensor Setup1 Set the A-B-C SwitchLocate the A-B-C switch inside thebattery compartment. Set the A-B-Cswitch to A, B or C. You must select thesame letter choice for both the sensorand the companion unit (not included) inorder for the units to synchronize.The AcuRite Iris sensor requires lithiumbatteries in low temperature conditions.Cold temperatures can cause alkalinebatteries to function improperly. Uselithium batteries in the AcuRite Iris sensorfor temperatures below -4ºF / -20ºC.Remove Rain Gauge StabilizerInstall or Replace BatteriesLocate and remove the rain gauge2 Batteries MUST be installed for thisproduct to operate. AcuRite recommendshigh quality alkaline or lithium batteriesfor the best product performance. Heavyduty or rechargeable batteries are notrecommended.3 stabilizer (plastic tab) taped into thebottom of the sensor. The rain gauge willnot function until this is removed.ABC1A-B-C Switch23Install Batteries 4 AA BatteriesRain Gauge StabilizerRemove and discardPLEASE DISPOSE OF OLD OR DEFECTIVE BATTERIES IN AN ENVIRONMENTALLY SAFEWAY AND IN ACCORDANCE WITH YOUR LOCAL LAWS AND REGULATIONS.BATTERY SAFETY: Clean the battery contacts and also those of the device prior to battery installation. Remove batteries from equipment that will not be used for anextended period of time. Follow the polarity ( /-) diagram in the battery compartment. Promptly remove dead batteries from the device. Dispose of used batteries properly. Onlybatteries of the same or equivalent type as recommended are to be used. DO NOT incinerate used batteries. DO NOT dispose of batteries in fire, as batteries may explode or leak.DO NOT mix old and new batteries or types of batteries (alkaline/standard). DO NOT use rechargeable batteries. DO NOT recharge non-rechargeable batteries. DO NOT short-circuitthe supply terminals.3
Placement for Maximum AccuracyAcuRite sensors are sensitive to surrounding environmental conditions. Proper placement ofthe sensor is critical to the accuracy and performance of this product.AcuRite Iris Sensor PlacementThe AcuRite Iris sensor is designed to remain outdoors all year long.Choose an open location with no obstructions above or around the sensorfor the most accurate measurements.Important Placement GuidelinesSensor must be within 330 feet (100 m) of companion unit (not included).MAXIMIZE WIRELESS RANGEP lace sensor away from large metallic items, thick walls, metal surfaces, or other objectsthat may limit wireless communication.LOCATE AWAY FROM HEAT SOURCESPosition sensor away from heaters, air conditioners, chimneys, exhaust vents, asphalt andconcrete (surfaces that radiate heat).LOCATE AWAY FROM HUMIDITY SOURCESAvoid installing the sensor near pools, spas, or other bodies of water. Water sources mayimpact humidity accuracy.LOCATE AWAY FROM SPRINKLER HEADSDO NOT install the sensor where it will be sprayed by a sprinkler system. This may forcewater inside the sensor.LOCATE AWAY FROM WIND & RAIN OBSTRUCTIONSDO NOT mount the sensor with obstructions around it. Consider a location that is a wideopen area, with few structures around to ensure accurate wind measurement.4
AcuRite Iris Sensor Installation GuidelinesINSTALLATION HEIGHT Mount the sensor at least 5 feet (1.5 meters) off the groundin an open area. Higher is better for wind measurement- the National Weather Servicerecommends 33 feet (10 meters) high!MOUNTING OPTIONS The included mounting bracket is designed to screw directlyonto wooden posts or surfaces that are 2”x 4” or larger. The sensor can also be mounteddirectly to 3/4” steel pipe (available at hardware stores and home centers).LEVEL INSTALLATION Use the bubble level on the top of the sensor to ensure levelinstallation for accurate wind and rainmeasurement.SOLAR CELL INSTALLATION Install the sensorwith the solar cell facing SOUTH. This ensuresthe cell receives as much sun as possible andorients wind direction.NO OBSTRUCTIONSABOVE OR AROUNDTHSOUAcuRite Iris Sensor Installation1. Fasten mounting base (included) to a post or pole(not included) using the 4 longer screws includedin the hardware bag.2. Insert the mounting base into the hole on thebottom of the sensor.3. Make sure the arrows on the top of the sensorare pointed in the proper direction and thebubble level is centered. The solar cell shouldbe facing south to properly orient the winddirection.4. Fasten the sensor into the mounting base usingthe 2 shorter screws included in the hardwarebag.(1.5 meters)The AcuRite Iris sensor is now ready to use.Basic Setup is CompleteThe AcuRite Iris sensor will now synchronize with the companion unit. It may take a fewminutes for synchronization to complete.5
Calibrate the Rain GaugeThe rain gauge on the AcuRite Iris sensor can be calibrated to improve accuracy.Items Needed: AcuRite Iris sensor, companion unit, plastic cup, pin, screw driver1. First, ensure AcuRite Iris sensor is perfectly level using built-in bubble level.2. Use compatible companion unit or AcuRite software to monitor during calibration.3. Make a pin hole in the bottom of a plastic cup. Hold the cup over the rain gauge andfill it withexactly 1 cup (8oz) of water, allowing the water to drip into the rain gauge. You should hear the internalbuckets tip and see water drain through the rain gauge.4. A few seconds after each bucket tip, the companion unit displays rainfall in approximately 0.01” ormore increments.5. The cup of water should take more than 20 minutes to empty; a quicker period will result in inaccuratecalibration. Try to simulate a normal steady rainfall. When cup is empty of water, companion unitshould register 1.06”Tips There should be nearly an equal number of water drops (about 25 water drops) between bucket tips.If not, adjust the calibration screws on the bottom of the AcuRite Iris sensor until an equal number ofwater drops are tipping the buckets.AdjustmentIf the rain gauge doesn’t register close to 1.06”, make an EQUAL adjustment to the two calibration screwson the bottom of the AcuRite Iris sensor. Turning screws clockwise increases rainfall; counter clockwisedecreases rainfall. To adjust the rainfall reading by 2% turn both screws 1/8 of a turn. To adjust the rainfall reading by 4% turn both screws 1/4 of a turn. To adjust the rainfall reading by 8% turn both screws 1/2 of a turn.SpecificationsTEMPERATURE RANGEOutdoor: -40ºF to 158ºF; -40ºC to 70ºCHUMIDITY RANGEOutdoor: 1% to 99%WIND SPEED0 to 99 mph; 0 to 159 kph; 0 to 86 knotsWIND DIRECTION INDICATORS16 pointsRAINFALL0.01 inches (0.25 mm) and up330 ft / 100 m depending on home construction materials433 MHz4 x AA alkaline or lithium batteriesWIRELESS RANGEOPERATING FREQUENCYPOWERDATA REPORTINGWind Speed: 18 second updates; Direction: 36 second updatesOutdoor temperature & humidity: 36 second updates6
Customer SupportAcuRite customer support is committed to providing you with best-in-class service. Forassistance, please have the model number of this product available and contact us in anyof the following ways:Chat with our support team at www.acurite.com/supportEmail us at support@chaney-inst.com Installation Videos Instruction Manuals Replacement PartsIMPORTANTPRODUCT MUST BE REGISTEREDTO RECEIVE WARRANTY SERVICEPRODUCT REGISTRATIONRegister online to receive 1-year warranty ted 1-Year WarrantyWe expressly disclaim all liability for special, consequential, orAcuRite is a wholly owned subsidiary of Chaney InstrumentCompany. For purchases of AcuRite products, AcuRite provides the incidental damages, whether arising in tort or by contract from anybreach of this warranty. Some states do not allow the exclusion orbenefits and services set forth herein.limitation of incidental or consequential damages, so the aboveFor purchases of Chaney products, Chaney provides the benefitslimitation or exclusion may not apply to you.and services set forth herein. We warrant that all products weWe further disclaim liability from personal injury relating tomanufacture under this warranty are of good material andits products to the extent permitted by law. By acceptance ofworkmanship and, when properly installed and operated, will befree of defects for a period of one year from the date of purchase. any of our products, the purchaser assumes all liability for theconsequences arising from their use or misuse. No person, firmAny product which, under normal use and service, is proven toor corporation is authorized to bind us to any other obligation orbreach the warranty contained herein within ONE YEAR fromliability in connection with the sale of our products. Furthermore,date of sale will, upon examination by us, and at our sole option,no person, firm or corporation is authorized to modify or waive thebe repaired or replaced by us. Transportation costs and chargesterms of this warranty unless done in writing and signed by a dulyfor returned goods shall be paid for by the purchaser. We hereby authorized agent of ours.disclaim all responsibility for such transportation costs and charges.In no case shall our liability for any claim relating to our products,This warranty will not be breached, and we will give no credit forproducts which have received normal wear and tear not affecting your purchase or your use thereof, exceed the original purchasethe functionality of the product, been damaged (including by acts price paid for the product.of nature), tampered, abused, improperly installed, or repaired orApplicability of Policyaltered by others than our authorized representatives.This Return, Refund, and Warranty Policy applies only to purchasesRemedy for breach of this warranty is limited to repair ormade in the United States and Canada. For purchases made in areplacement of the defective item(s). If we determine that repaircountry other than the United States or Canada, please consultor replacement is not feasible, we may, at our option, refund thethe policies applicable to the country in which you made youramount of the original purchase price.purchase. Additionally, this Policy applies only to the originalTHE ABOVE-DESCRIBED WARRANTY IS THE SOLE WARRANTY purchaser of our products. We do cannot and do not offer anyFOR THE PRODUCTS AND IS EXPRESSLY IN LIEU OF ALL OTHER return, refund, or warranty services if you buy products used orWARRANTIES, EXPRESS OR IMPLIED. ALL OTHER WARRANTIES from resale sites such as eBay or Craigslist.OTHER THAN THE EXPRESS WARRANTY SET FORTH HEREINGoverning LawARE HEREBY EXPRESSLY DISCLAIMED, INCLUDING WITHOUTThis Return, Refund, and Warranty Policy is governed by the laws ofLIMITATION THE IMPLIED WARRANTY OF MERCHANTABILITYAND THE IMPLIED WARRANTY OF FITNESS FOR A PARTICULAR the United States and the State of Wisconsin. Any dispute relating tothis Policy shall be brought exclusively in the federal or State courtsPURPOSE.having jurisdiction in Walworth County, Wisconsin; and purchaserconsents to jurisdiction within the State of Wisconsin.7
www.AcuRite.comPrinted in China06004RMA1 INST 080621 Chaney Instrument Co. All rights reserved. AcuRite is a registered trademarkof the Chaney Instrument Co., Lake Geneva, WI 53147. All other trademarks andcopyrights are the property of their respective owners. AcuRite uses patentedtechnology. Visit www.acurite.com/patents for details.
6 Calibrate the Rain Gauge The rain gauge on the AcuRite Iris sensor can be calibrated to improve accuracy. Items Needed: AcuRite Iris sensor, companion unit, plastic cup, pin, screw driver 1. First, ensure AcuRite Iris sensor is perfectly level using built-in bubble level.