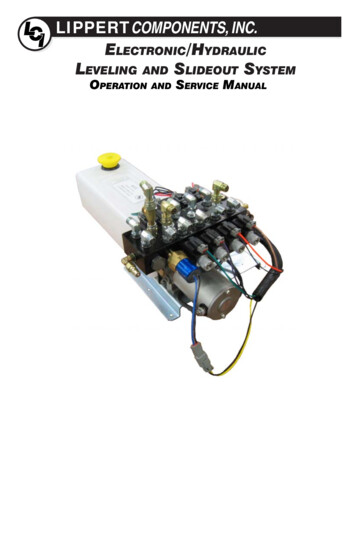
Transcription
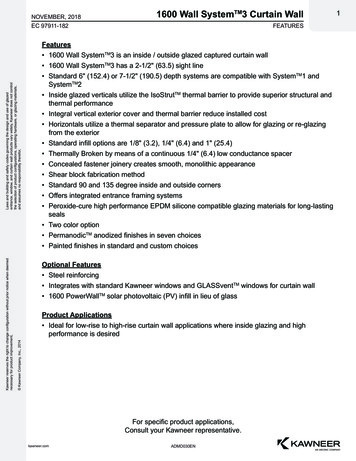
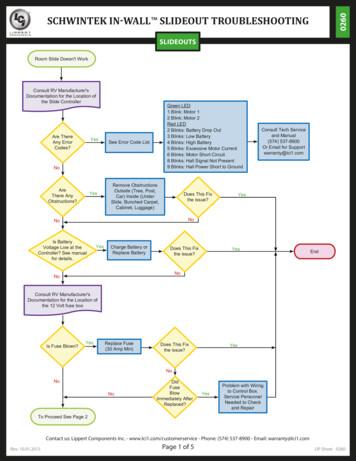
0260SCHWINTEK IN-WALL SLIDEOUT TROUBLESHOOTINGSLIDEOUTSRoom Slide Doesn't WorkConsult RV Manufacturer'sDocumentation for the Location ofthe Slide ControllerAre ThereAny ErrorCodes?YesGreen LED1 Blink: Motor 12 Blink: Motor 2Red LED2 Blinks: Battery Drop Out3 Blinks: Low Battery4 Blinks: High Battery5 Blinks: Excessive Motor Current6 Blinks: Motor Short Circuit8 Blinks: Hall Signal Not Present9 Blinks: Hall Power Short to GroundSee Error Code ListNoAreThere AnyObstructions?YesRemove ObstructionsOutside (Tree, Post,Car) Inside (UnderSlide, Bunched Carpet,Cabinet, Luggage)Does This Fixthe issue?Consult Tech Serviceand Manual(574) 537-8900Or Email for Supportwarranty@lci1.comYesNoNoIs BatteryVoltage Low at theController? See manualfor details.YesCharge Battery orReplace BatteryDoes This Fixthe issue?YesEndNoNoConsult RV Manufacturer'sDocumentation for the Location ofthe 12 Volt fuse boxIs Fuse Blown?YesReplace Fuse(30 Amp Min)Does This Fixthe issue?YesNoNoNoDidFuseBlowImmediately AfterReplaced?YesProblem with Wiringto Control Box.Service PersonnelNeeded to Checkand RepairTo Proceed See Page 2Contact us: Lippert Components Inc. - www.lci1.com/customerservice - Phone: (574) 537-8900 - Email: warranty@lci1.comRev: 10.01.2013Page 1 of 5LIP Sheet - 0260
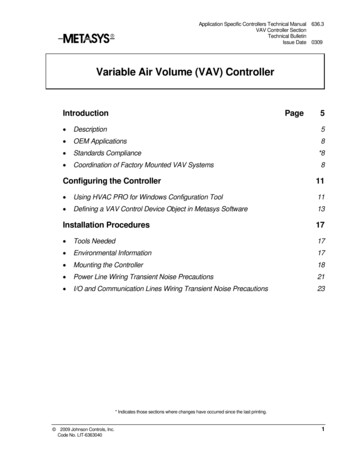
0260SCHWINTEK IN-WALL SLIDEOUT TROUBLESHOOTINGSLIDEOUTSContinued from Page 1Does Only 1Side Move?YesWillNonMoving SideMove with Helpfrom Switch?YesYesMotor Shaft isBroken; ReplaceMotorDisengageMotor. CanSlide be MovedManually?YesGear Box Failure.Replace MotorIs ThereDebris in GearRack?YesNoYesYesNoYesDoes This Fixthe Issue?NoNoDo StatusLED's Lighton ControllerWhen DirectionSwitch isPushed?Does This Fixthe Issue?Motor Stalling;Increase MotorAmperageNoNoNoCanNonMovingSide be MovedManually?Board Failure.Replace BoardYesDoes This Fixthe Issue?Remove DebrisDrive Failure.Replace Slide UnitDoes This Fixthe Issue?NoYesNoNoUnplug and Replugthe Direction SwitchConnection on theBoardYesDoes This Fixthe Issue?NoSwitch or SwitchWiring Failure.Replace or Repair.Does This Fixthe issue?NoYesEndConsult Tech Service and Manual(574) 537-8900Or Email for Support warranty@lci1.comContact us: Lippert Components Inc. - www.lci1.com/customerservice - Phone: (574) 537-8900 - Email: warranty@lci1.comRev: 10.01.2013Page 2 of 5LIP Sheet - 0260
0260SCHWINTEK IN-WALL SLIDEOUT TROUBLESHOOTINGSLIDEOUTS1. Electronic Manual Override (available on board revision C1and newer):Fig. 1A. Locate the circuit board.B.Press the “mode button” six times quickly, thenpress a seventh time and hold for approximately fiveseconds (Fig. 1).C.The red and green LED lights will begin to flash,confirming the override mode.ModeButtonD. Release mode button.E.Fig. 2Back inside coach; use the normal slide controlswitch to retract the room.2. Manually Push Room in Override:A. Locate the circuit board.B.Unplug both motors from circuit board (releasesmotor brake). (Fig. 2).C.Push or pull slide room in as desired; larger roomsmay require several people to push.Fig. 3D. Keep both sides of room relatively even.E.MotorRetentionScrewWhen room is completely in, plug both motors backinto the control board (this applies the brake forroad travel).3. Disengage Motors, Manually Retract Room and Travel Lock:Fig. 4A. Locate and remove motor retention screw locatednear the top of each vertical column (Fig. 3).B.Bend back wipe seal & visually locate motor (Fig. 4).C.Pull the motor up until disengaged, about ½”.Replace the motor retention screw to hold the motorin this position (Fig. 5).D. Repeat this process for both sides of the slide room.E.Push or pull room back in to the opening, keepingsides relatively even.F.Re-engage motor to be ready for travel.Fig. 5G. The room must be travel locked to keep room inplace for road travel.½"Contact us: Lippert Components Inc. - www.lci1.com/customerservice - Phone: (574) 537-8900 - Email: warranty@lci1.comRev: 10.01.2013Page 3 of 5LIP Sheet - 0260
0260SCHWINTEK IN-WALL SLIDEOUT TROUBLESHOOTINGSLIDEOUTSError codesDuring operation when an error occurs the board will use the leds to indicate where the problem exists. Formotor specific faults the green LED will flash once for Motor 1, and two times for Motor 2. The red LED willflash from two to nine times, depending on the error code.The error codes are as follows:2. Battery drop out: Battery capacity low enough to drop below 6 volts while running.3. Low battery: Voltage below 8 volts at start of cycle.4. High battery: Voltage greater than 18 volts.5. Excessive motor current: High amperage, also indicated by 1 side of slide continually stalling.6. Motor short circuit: Motor or wiring to motor has shorted out.8. Hall signal not present: Encoder is not providing a signal. Usually a wiring problem.9. Hall power short to ground: Power to encoder has been shorted to ground.Usually a wiring problem.When an error code is present, the board needs to be reset. Energizing the extend/retract switch resets theboard. Energize the extend/retract switch again for normal operation.Checking FusesThe Schwintek In-Wall Slide requires a minimum of 30 amp fuse. Check the 12 volt fuse box for blownfuses, and replace any if necessary. Consult the RV manufacturers documentation for the location of the12 volt fuse box, and the location of the Room Slide Controller’s fuse. If the fuse blows immediately uponreplacement, there is a problem with the wiring to the In-Wall Slide control box. Have qualified servicepersonnel check and repair.ObstructionsCheck outside the RV for possible obstructions: tree, post, car, etc. Check inside the RV for any obstructions:luggage, furniture, open cabinets, etc. Also check for smaller objects that may be wedged under the floor orin the sides of unit. Remove obstructions before proceeding.Error CodesConsult RV manufacturer’s documentation for the location of the In-Wall Slide Controller. See page 1 for adescription of the error codes, and possible problems.Low VoltageThe Schwintek In-Wall Slide Controller is capable of operating the room with as little as 8 volts. But at theselower voltages the amperage requirement is greater. Check voltage at the controller. If voltage is lowerthan 11 volts, it is recommended that the battery be placed on a charger until it is fully charged. It may bepossible to ’jump’ the RV’s battery temporarily to extend or retract the room. Consult the RV manufacturer’sowners manual on the procedure for ‘jumping’ or charging the battery.Contact us: Lippert Components Inc. - www.lci1.com/customerservice - Phone: (574) 537-8900 - Email: warranty@lci1.comRev: 10.01.2013Page 4 of 5LIP Sheet - 0260
0260SCHWINTEK IN-WALL SLIDEOUT TROUBLESHOOTINGSLIDEOUTSNever ‘jump’ or charge the battery from the power connections on the In-Wall Controller. Always dothis at the battery.Only one side movingThe Schwintek In-Wall Room Slide has a separate motor to operate each side of the room. Does only oneside of the room move a short distance (two to four inches) and stop?Will non-moving side move with help?If only one side of the room is moving, then with someone’s assistance press the switch to extend or retractthe room while pushing the non-moving side in the appropriate direction. On larger rooms it may benecessary to have two or more people pushing the room.Non-moving side moved manuallyTry to push the non moving side in and out. If a motor shaft has broken then it will be possible to move thatside of the room several inches by hand. Larger rooms may require several people to push.Debris in the rackCheck all four gear racks on the side of the room for debris.Do status LEDs lightConsult the RV manufacturers documentation for the location of the Room Slide Controller. When the roomslide direction switch is actuated, do the status led’s light up? Check this in both the extend and retractmodes.Contact us: Lippert Components Inc. - www.lci1.com/customerservice - Phone: (574) 537-8900 - Email: warranty@lci1.comRev: 10.01.2013Page 5 of 5LIP Sheet - 0260
This manual has been provided courtesy ofMy RV Works, Inc.www.myrvworks.comYou can find more RV service manuals here:www.myrvworks.com/manualsOver the years of running a mobile RV repair service, having a dedicated placeto access service manuals for all the different appliances and componentsfound on RVs was something that I always had a desire to create.I hope this resource makes your RV repairs easier, as it has mine, but pleasebe careful and follow proper safety practices when attempting to repairyour own RV.If in doubt, please consult with a professional RV technician!DARREN KOEPP - OWNER, MY RV WORKS, INC.All service manuals provided on www.myrvworks.com are believed to bereleased for distribution and/or in the public domain.
Or Email for Support warranty@lci1.com No No No No Does This Fix the Issue? Does This Fix the Issue? Gear Box Failure. Replace Motor Does This Fix the Issue? Is There Debris in Gear Rack? Disengage Motor. Can Slide be Moved Manually? No Switch or Switch Wiring Failure. Replace or Repair. Will Non-Moving Side Move with Help from Switch? Can Non .