Transcription
App Cam Solo Quick Start Guide
What’s in the BoxApp Cam Solo Camerax1Mounting Strapx1RechargeableBatteryx1Reset Needlex1Silicone WeatherproofCoverx1Screw Kitx2Flat Mountx1Screw Mountx1Mounting Templatex2The camera and the rechargeable battery are packed separately in the same package.Please dress the camera with the Silicone Cover for better weatherproof performancewhen you install the camera outdoors.Twin Pack includes 2 single packs of AppCam Solo .Triple Pack includes 3 single packs of AppCam Solo .Quad Pack includes 4 single packs of AppCam Solo .2Power Cablex1
Optional AccessoriesSolar Panel(SPS-01)x1Battery Pack(BPS-01)x1Visit the App Cam Solo page on the website for more information on the availabilityof optional accessories:www.uniden.com.au for Australia3
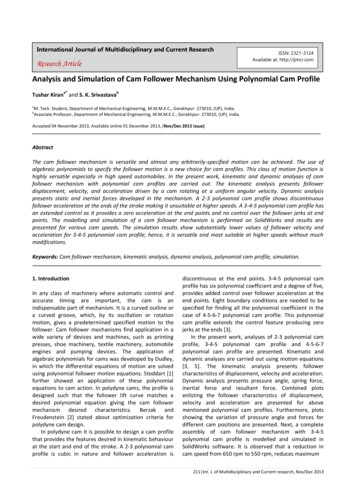
General IntroductionMicro SD Card SlotReset ButtonDaylight SensorLensStatus LEDBuilt-in MicBuilt-in PIR Motion SensorSpeakerRed LED (WiFi connection failed)Blinking: Standby statusOn: Working statusBlue LED (WiFi connection succeeded)Blinking: Standby statusOn: Working status4
Install the Rechargeable Battery to the CameraPlease press the button (on the top of the back housing), and slide the back housingdownward to close it. The button needs to be closed firmly for ultimate weatherproofperformance.For weatherproof performance, always cover the charging port with the rubber plug5
Charge the Battery1. You can charge the battery when it’s installed to the camera.2. You can charge the battery separately.3. You can charge the battery with Uniden Solar Panel (SPS-01).Please note that the solar panel is NOT included in the package.LED Battery StatusThere is a status LED under the micro USB port of the battery, indicating the battery chargingstatus.Green LED: Fully chargedRed LED: Charging6
!Important Safeguards on Battery Use1. Please charge your rechargeable battery with a standard and high-quality DC5Vbattery charger.2. If you want to power the camera via solar panel, please note that the camera is ONLYcompatible with Uniden Solo Panel (SPS-01). You cannot charge the battery withother solar panel brands.3. Please charge the battery in temperature between 0 C and 45 C!Important Note!Uniden App Cam Solo is not designed for 24/7 full capacity running or around-the-clocklive streaming. It’s designed to record motion events and remotely view live streaming onlywhen you need it.Please note that a fully charged battery will support up to 180 days in standby mode, or960 minutes (IR LEDs off in daytime) of motion triggered recording and live view.7
Install Uniden Solo App112:00There are two ways to get the Uniden Solo App: Search “Uniden Solo” in App Store (for iOS),download and install the app. Search “Uniden Solo” in Google Play (for Android),download and install the app.Set up the CameraPlease follow the prompt tone toconfigure the cameraCamera has been startedup. Please run app, add thecamera and set it up.1. Please click the “” button in thetop right corner to add the camera.8212:00
:00Uniden Wi-FiNote:When the setup for thecamera is completed, yourfamily can access thecamera simply by clicking“Access Cameras” withoutreconfiguring it.2. Scan the QR code on the backof the camera.3. Click “Connect to Wi-Fi” tocontinue.9
03312:0012:004412:00512:00512:00Uniden Wi-Fi4. Click the button “I have heard the voiceprompt” to enter the next page.612:00Uniden Wi-Fi5. Enter the Wi-Fi password of the selectedWi-Fi network and press “I have enteredthe correct information” to enter thenext page.If you did not hear the voice prompt, pleasepress “I did not hear the voice prompt” forhelp.10612:00
412:005612:0012:00712:00About20cmUniden Wi-FiI heard “Connection to the rScan succeeds. Camera is connecting to the router. Please wait.6. A QR code will be generated on the phone. Please place the QR code on your phone towardsApp Cam Solo camera’ lens at a distance of about 20cm to let the camera scan the QR code.Please make sure that you’ve ripped the protection film of the camera’s lens.11
6612:00712:007812:0012:00812:00912:00I heard “Connection toI theheardrouter“Connectionsucceeded.”to the router succeeded.”I heard “Connection toI theheardrouter“Connectionfailed! ” to the router failed! ”Connection to the router failed!7. If you hear the above voice prompt, pleasepress “I heard ‘Wi-Fi connection failed’ ”for help.12Connection to the router succeeded.8. If you hear the above voice prompt, pleasepress “I heard ‘Connection to the routersucceeded.’ ” to finish the quick setup.912:00
891012:0012:0012:001012:00Solo I heard “Connection to the router succeeded.”9. Name your camera and create a password (at least 6 characters), tap “Create Password”, slide thepage to read the tips and tap “finish” to start the Live View. Tapto go to the “Devices” menu.Note:“Name your camera” field refers to the display name of the camera rather than the login username.“Playback” only displays when you’ve inserted a micro SD card into the camera. Make sure that the SDcard is recognized by the camera.13
9101012:0012:00Solo 10. Please tap the camera and follow the steps tosync the time, and then start live view or goto “Device Settings” for more configurations.14
Device Menu01012:00MenuSolo Add New DeviceEnable/Disable PIR Motion Sensor(the PIR sensor is enabled by default)Device SettingsAccess Live ViewBattery Status15
Adjust the Detecting Distance of the PIR SensorThe default sensitivity of the PIR sensor is at “Mid” and the detecting distance is 6 meters. If you wantto adjust the sensitivity, please launch your Uniden Solo App, and then click “Device Settings” - “PIRSettings” and click the “save” button to save the settings.1SensitivityDetecting Distance(For moving andliving things)Detecting Distance(For moving vehicles)LowUp to 4 metersUp to 10 metersMidUp to 6 metersUp to 12 metersHighUp to 9 metersUp to 15 metersNote:Higher sensitivity offers longer detecting distance, but it wouldlead to more false alarms.You are advised to set up the sensitivity level to “Low” or “Mid”when you install the camera outdoors.16
!Important Notes for Reducing False AlarmsFor reducing false alarms, please note that: Do not install the camera facing any objects with bright lights, including sunshine,bright lamplights, etc.Do not place the camera too close to a place where there are frequently movingvehicles. The recommended distance between the camera and the vehicle is15 metersStay away from the outlets, including the air conditioner vents, humidifier outlets,the heat transfer vent of projectors, etc.Do not install the camera facing the mirror.Keep the camera at least 1 meter away from any wireless devices, including Wi-Firouters and phones in order to avoid wireless interference.17
Cover the Monitoring AreaWhen installing the camera, it’s not suggested tomake the PIR sensor vertically face the movingobject. Please note that if the moving objectapproaches the PIR sensor vertically, the PIR sensormay not detect the motion events. You are advised toinstall the camera angularly (the angle between thePIR sensor and the detected object is larger than 10 )for effective motion detection.The path of themoving objectFor reference: The PIR sensor’s detecting distance: 6m(by default) The PIR sensor’s detecting angle: 120 (H)It’s not suggested to makethe PIR sensor verticallyface the moving object.10 Entrance18
The Ideal Viewing DistanceThe ideal viewing distance is 2-10 meters,which enables you to recognize a human.Ideal Viewing Distance:2-10 meters19
How to Install the Skin to the CameraPlease dress the camera with the skin for better weatherproof performance whenyou install the camera outdoors.Step 1Please dress the App Cam Solo camera with the silicone cover provided in the package.Step 2The cover has an anti-falling safetyrope. Please fasten the other end ofthe rope to the wall mount whenmounting it to the wall.20Step 3Stick the camera on the wall mountand twist the camera in any directions you want.
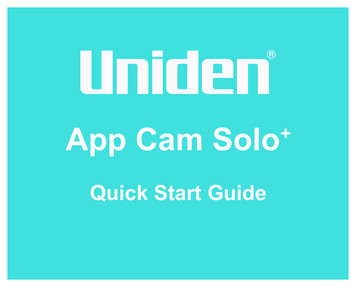
How to InstallWall MountStep 3Latch the security mount on its plate(Make sure the top edge of the backing plate is inserted into the mount.)Step 1Press the button to release theplate from the screw mount.Step 2Screw the security mount plateinto the wall.Step 4Press the security mount buttonuntil its plate clicks into the mount.Step 5Screw the camera, adjust its directionand tighten the knob to fix it.21
Tree MountStep 1Press the button to release theplate from the screw mount.Step 2Thread the hook & strap throughthe slots.Step 3Fasten the warp strap to the tree.Step 4Latch the security mount on its plate(Make sure the top edge of the backing plate is inserted into the mount.)Step 5Press the security mount buttonuntil its plate clicks into the mount.Step 6Screw the camera, adjust its directionand tighten the knob to fix it.22
How to Remove the CameraStep 1Press the security mount buttonto pull the mount out.Step 2Unscrew the camera from thescrew mount.23
WARRANTYUniden App Cam Solo Important:Satisfactory evidence of the original purchase is required for warranty service. Please refer to our Unidenwebsite for any details or warranty durations offered in addition to those contained below.Warrantor:The warrantor is Uniden Australia Pty Limited ABN 58 001 865 498 (“Uniden Aust”).Terms of Warranty: Uniden Aust warrants to the original retail purchaser only that the Uniden App Cam Solo Single/Twin/Quad Pack (“the Product”), will be free from defects in materials and craftsmanship for the duration ofthe warranty period, subject to the limitations and exclusions set out below.Warranty Period: This warranty to the original retail purchaser is only valid in the original country of purchase for aProduct first purchased either in Australia or New Zealand and will expire, as indicated below, from the date of originalretail sale.Product1 YearAccessories and Battery90 DaysIf a warranty claim is made, this warranty will not apply if the Product is found by Uniden to be:A. Damaged or not maintained in a reasonable manner or as recommended in the relevant Owner’s Manual;B. Modified, altered or used as part of any conversion kits, subassemblies or any configurations not sold by UnidenAust;C. Improperly installed contrary to instructions contained in the relevant Owner’s ManualD. Repaired by someone other than an authorized Uniden Repair Agent in relation to a defect or malfunctioncovered by this warranty; orE. Used in conjunction with any equipment, parts or a system not manufactured by Uniden.
Parts Covered: This warranty covers the Product and included accessories.User-generated Data: This warranty does not cover any claimed loss of or damage to user-generated data(including but without limitation phone numbers, addresses and images)that may be stored on your Product.Statement of Remedy: If the Product is found not to conform to this warranty as stated above, the Warrantor, at itsdiscretion, will either repair the defect or replace the Product without any charge for parts or service. This warrantydoes not include any reimbursement or payment of any consequential damages claimed to arise from a Product’sfailure to comply with the warranty.Our goods come with guarantees that cannot be excluded under the Australian Consumer Law. You are entitledto a replacement or refund for a major failure and for compensation for any other reasonably foreseeable loss ordamage. You are also entitled to have the goods repaired or replaced if the goods fail to be of acceptable qualityand the failure does not amount to a major failure.This warranty is in addition to and sits alongside your rights under either the COMPETITION AND CONSUMERACT 2010 (Australia) or the CONSUMER GUARANTEES ACT (New Zealand) as the case may be, none of whichcan be excluded.Procedure for Obtaining Warranty Service: Depending on the country in which the Product was first purchased,if you believe that your Product does not conform with this warranty, you should deliver the Product, together withsatisfactory evidence of your original purchase (such as a legible copy of the sales docket) to Uniden. Please referto the Uniden website for address details. You should contact Uniden regarding any compensation that may bepayable for your expenses incurred in making a warranty claim. Prior to delivery, we recommend that you makea backup copy of any phone numbers, images or other data stored on your Product, in case it is lost or damagedduring warranty service.UNIDEN AUSTRALIA PTY LTDPhone number: 1300 366 895Email address: custservice@uniden.com.au
THANK YOU FOR BUYING A UNIDEN PRODUCT 2018 Uniden Australia Pty Limited V1.1Printed in PRC
Latch the security mount on its plate (Make sure the top edge of the back-ing plate is inserted into the mount.) Step 4 Press the security mount button until its plate clicks into the mount. Step 5 Screw the camera, adjust its direction and tighten the knob to fix it. Step 1 Press the button to release the plate from the screw mount. Step 2