Transcription
an ISO 9001:2015 Registered Company1970-72 Chevelle/Monte CarloControl Panel Kit(473072)HIOFFDA SHFLRDE FACCOL DHO TLIGHTERPROGSNSK5236P/S4118865 Goll St. San Antonio, TX 78266Phone: 800-862-6658Sales: sales@vintageair.comTech Support: tech@vintageair.comwww.vintageair.com903072 REV G 05/26/21, PG 1 OF 8
www.vintageair.comTable of ContentsCover. 1Table of Contents. 2Packing List/Parts Disclaimer. 3OEM Control Panel Removal. 4Control Panel Installation, Final Steps. 5Wiring Diagram. 6Operation of Controls. 7Packing List. 82903072 REV G 05/26/21, PG 2 OF 8
Packing List:Control Panel Kit (473072)www.vintageair.comNo.1.2.Qty.11Part No.473091232007-VURDescriptionControl Panel AssemblyControl Harness, Gen IV Universal** Before beginning installation, open all packages and check contents of shipment.Please report any shortages directly to Vintage Air within 15 days. After 15 days,Vintage Air will not be responsible for missing or damaged items.HIO FFDASHDE FFL RACCO LDHOT12NOTE: Images may not depict actual parts and quantities.Refer to packing list for actual parts and quantities.3903072 REV G 05/26/21, PG 3 OF 8
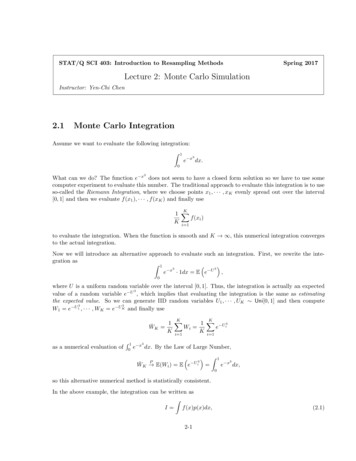
OEM Control Panel Removalwww.vintageair.comNOTE: Removal of dashboard is required for control panel installation. Vintage Air recommends usingthe factory service manual to disassemble and reassemble the dashboard.Perform the Following:1. Disconnect battery.2. Remove the dash pad by removing (6) screws (retain).3. Lower the steering column and protect it with a cloth.4. Disconnect all cables and wires from the instrument panel, speedometer, control panel and radio. NOTE:When using a Vintage Air supplied control panel, connect the tan wire from the Gen IV Evaporatorwiring harness (232600-VUA) to the factory dash lights to enable panel backlighting.5. Remove the retaining screws at the top, bottom, and side of instrument panel.6. Remove the control panel from the instrument panel.FANAIR CONDITIONINGLOOFFMAX NORMVENTHEATINGHTR DEF DEICEHOTCOLDHILIGHTERPROGSNSK5236P/S41Figure 14903072 REV G 05/26/21, PG 4 OF 8
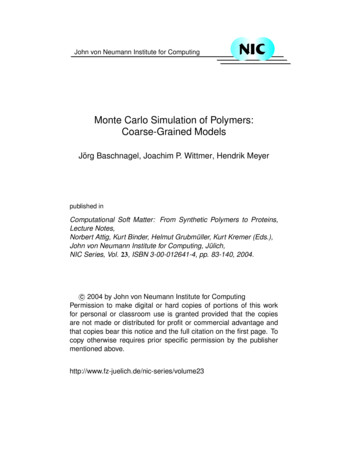
Control Panel Installationwww.vintageair.com1. Install the control panel assembly into the back side of the instrument panel as shown in Figure 2, below.2. Secure the control panel assembly to the instrument panel using (5) OEM screws as shown in Figure 2,below.3. Plug the control panel harness into the ECU as shown in Figure 2, below. Plug the opposite end of theharness into the control panel as shown in Figure 2, below.NOTE: When using aVintage Air suppliedcontrol panel, connectthe tan wire from theGen IV Evaporatorwiring harness (232600VUA) to the factory dashlights to enable panelbacklighting.Back Sideof DashNOTE: ECU module is locatedon evaporator sub case.Control PanelAssembly473069ECUPlug FromControl PanelHarness232007-VURPlug FromWiring Harness232600-VUAFigure 2(5) OEMScrewsFinal Steps1. Reinstall all previously removed items (instrument panel, radio and wiring).2. Reinstall the dash pad using (6) OEM screws.HIOFFDAS HFLRDEFACCOLDHOTLIGHTERPROGSNSK5236P/S415903072 REV G 05/26/21, PG 5 OF 8
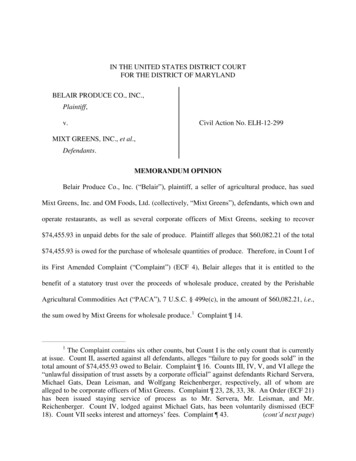
Wiring REDWHT/REDWHT/YELWHT/GRNAC ANNUNCIATORBACKLIGHT POSBACKLIGHT NEGGND5V-SWTEMP WIPERMODE WIPERFAN WIPERPRE-WIREDVIEWED FROM WIRE SIDE232002-VUAA/C(IF USED)GEN IV ECUGEN IV WIRING DIAGRAMREV E, 10/6/2017TEMPMODEFANPROGRAM* DASH LAMP(IF USED)*** WIDE OPENTHROTTLESWITCH(OPTIONAL)** CIRCUITBREAKER30 AMPHEATERCONTROL VALVE* Dash lamp is used only with type 232007-VUR harness.** Warning: Always mount circuit breaker as close to the battery as possible. (NOTE: Wire betweenbattery and circuit breaker is unprotected and should be carefully routed to avoid a shortcircuit).*** Wide open throttle switch contacts close only at full throttle, which disables A/Ccompressor.6903072 REV G 05/26/21, PG 6 OF 8
Operation of Controlswww.vintageair.comOn Gen IV systems with three lever/knob controls, the temperature control toggles between heat and A/Coperations. To activate A/C, move the temperature lever/knob all the way to cold and then back it off to the desiredvent temperature. For heat operation, move the temperature lever/knob all the way to hot and then adjust to thedesired vent temperature. The blower will momentarily change speed, each time you toggle between operations, toindicate the change.Blower SpeedThis lever/knob controlsblower speed, fromOFF to HI.Mode ControlThis lever/knob controlsthe mode positions,from DASH to FLOORto DEFROST, with ablend in between.BlowerSpeedTemperature ControlThis lever/knob controlsthe temperature,from HOT to COLD.DASHHOTModeControlTemperatureControlA/C Light(When Lit, Compressoris Engaged)A/C OperationBlower SpeedAdjust to desiredspeed.Mode ControlAdjust to desiredmode position(DASH positionrecommended).Temperature ControlFor A/C operation, adjust tocoldest position to engagecompressor (Adjust betweenHOT and COLD to reachdesired temperature).DASHHOTHeat OperationBlower SpeedAdjust to desiredspeed.Mode ControlAdjust to desiredmode position(FLOOR positionrecommended).Temperature ControlFor maximum heating, adjustto hottest position (Adjustbetween HOT and COLD toreach desired temperature).DASHHOTDefrost/De-fog OperationBlower SpeedAdjust to desiredspeed.Temperature ControlAdjust to desiredtemperature.Mode ControlAdjust to DEFROST position for maximum defrost, orbetween FLOOR and DEFROST positions for a bi-levelblend (Compressor is automatically engaged).7DASHHOT903072 REV G 05/26/21, PG 7 OF 8
Packing List:Control Panel Kit (473072)www.vintageair.comNo.1.2.Qty.11Part No.473091232007-VURDescriptionControl Panel AssemblyControl Harness, Gen IV UniversalChecked By:Packed By:Date:HIO FFDASHDE FFL RACCO LDHOT21NOTE: Images may not depict actual parts and quantities.Refer to packing list for actual parts and quantities.8903072 REV G 05/26/21, PG 8 OF 8
When using a Vintage Air supplied control panel, connect the tan wire from the Gen IV Evaporator wiring harness (232600-VUA) to the factory dash lights to enable panel backlighting. . AIR CONDITIONING TING DEICE T NORM VENT HTR DEF. 5 www.vintageair.com 903072 REV G 05/26/21, PG 5 OF 8