Transcription
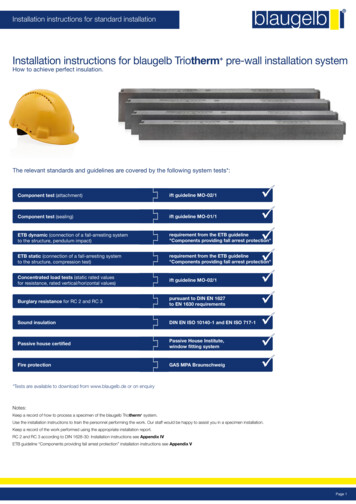
Installation instructions for standard installationInstallation instructions for blaugelb Triotherm pre-wall installation systemHow to achieve perfect insulation.The relevant standards and guidelines are covered by the following system tests*:Component test (attachment)ift guideline MO-02/1Component test (sealing)ift guideline MO-01/1ETB dynamic (connection of a fall-arresting systemto the structure, pendulum impact)requirement from the ETB guideline"Components providing fall arrest protection"ETB static (connection of a fall-arresting systemto the structure, compression test)requirement from the ETB guideline"Components providing fall arrest protection"Concentrated load tests (static rated valuesfor resistance, rated vertical/horizontal values)ift guideline MO-02/1Burglary resistance for RC 2 and RC 3pursuant to DIN EN 1627to EN 1630 requirementsSound insulationDIN EN ISO 10140-1 and EN ISO 717-1Passive house certifiedPassive House Institute,window fitting systemFire protectionGAS MPA Braunschweig*Tests are available to download from www.blaugelb.de or on enquiryNotes:Keep a record of how to process a specimen of the blaugelb Triotherm system.Use the installation instructions to train the personnel performing the work. Our staff would be happy to assist you in a specimen installation.Keep a record of the work performed using the appropriate installation report.RC 2 and RC 3 according to DIN 1628-30: Installation instructions see Appendix IVETB guideline “Components providing fall arrest protection” installation instructions see Appendix VPage 1
Installation instructions for blaugelb Triotherm pre-wall installation systemHow to achieve perfect insulation.Please read these installation instructions carefullybefore commencing installation!Please note that you should fit a "specimen" of the blaugelb Triotherm profiles on the structure before starting installation work. This is so thatyou can verify whether the blaugelb Hybrid Polymer Power Fix establishesa connection between the profile and the anchor base. The anchor basemust be firm and stable. The client, architect, site manager or structuralengineer is responsible for ensuring that the anchor base is firm and stable.The anchor base must be free of loose parts and bituminous or greasyseparating layers (e.g. bituminous seals, oil released on concrete structures,tiles, foils, etc.)If there is a separating layer on the anchor base, this can be removed usinga diamond cup wheel (e.g. Forum diamond cup wheel 125 mm, itemno. 6602027196).Documentation:This must be done using the report provided. The report must be filed inthe relevant construction records.Safety note:While creating and loading the test specimen, please observe all accidentprevention and essential health and safety measures. It is imperative toavoid injuries to the person carrying out the work or to bystanders.Note on dovetail joints:To seal before joining, apply a little blaugelb Hybrid Polymer Power Fixin a U shape.Time:At least 24 hours before actually starting to install the blaugelb Triotherm systemSpecimen size:At least 200 mm of the blaugelb Triotherm profile to be usedProcedure:Apply two beads of sealant (blaugelb Hybrid Polymers Power Fix) to thespecimen of blaugelb Triotherm profile and position it on the anchor base.Warning: Do not screw it to the anchor base.Evaluation:After at least 24 hours (at least 48 hours if under 5 C), load the testspecimen with approx. 800 N (81.5 kg).Page 2In the area of the dovetail joint a screw connection (to the profile above)must be made at a distance of 100 mm from the joint, regardless of theusual fixing spacings.
Direction of cutting 2nd cut1st cutProfile trimmingat bottomCan be extended infinitelyby dovetail jointThe socket is positioned on the wallside (at bottom). The tail is pressed intothe socket from above.3rd cutProfile trimmingat side4th cutProfile trimmingat top5th cutProfile trimmingat sideStarter piecenew frameCorner constructions and butt jointsThe minimum length of the blaugelbTriotherm profiles for extending is250 mm.min.250 mmNote on screwing blaugelb Triotherm profiles:Set the torque of the cordless screwdriver to the required level. Note thatyou should start screwing the blaugelb Frame screw Fix FK-T30 onto theblaugelb Triotherm profile slowly.Page 3
Installation instructions for blaugelb Triotherm pre-wall installation systemHow to achieve perfect insulation.Preparing for installation:2. Bind/remove normal construction dust on the anchor base(at the desired position for the profile) with the aid of a damp brush.Inspecting the anchor baseThe surfaces of the anchor base must be checked for flatness and verticaland horizontal alignment. Make allowance for centre line tolerances andmasonry tolerances.Fabricating the profiles:1. Check the supporting anchor base for loose parts, bituminous and/orseparating coatings. If there are any separating layers on the anchor base,these must be removed, e.g. using a diamond cup wheel.Complete element width planned connecting joint dimension (2x 10 mm) cross-section of the side profile (2x 85 mm) final dimension of the horizontal profiles1a. Required length of the lower and upper profile:1b. Required length of the side profiles:Complete element height planned connecting joint dimension (1x 10 mm) final dimension of the vertical profilesPage 4
2. Cut off the "socket" on the outer blaugelb Triotherm profile.4. Saw the blaugelb Triotherm profiles to the correct length3. Join the blaugelb Triotherm profiles together by dovetailing. Alwaysstart with the offcut from the piece previously cut to size. The offcut shouldbe no shorter than 250 mm. To join together, apply a little blaugelb HybridPolymer Power Fix in a U shape to create the seal.Recommended tool: Mitre saw with coarse longitudinal-cut blade(e.g. blaugelb HW Saw Blade 250x3.2/2.2x30 mm Z24 W item no. 0399564).Applying the sealant:1. Open the tubular bag containing the blaugelb Hybrid Polymer Power Fixand insert it into a sealant gun for tubular bags.2. Use the supplied 6 mm triangular nozzle to apply the sealant. There is amarking on the nozzle to facilitate precise application.Transfer the length dimension to the assembled profiles.3. Apply the blaugelb Hybrid Polymers Power Fix on the side facing thewall. The two beads must be applied at a sufficient distance from the edge.We recommend applying the adhesive promptly onto all profiles for anopening in the structure.Recommended tool:Cordless gun for 600 ml tubular bag (item no. 9066040) for uniformapplication of the sealant requiring less physical effort.Page 5
Installation instructions for blaugelb Triotherm pre-wall installation systemHow to achieve perfect insulation.2. Press the prepared blaugelb Triotherm profile firmly against theanchor base, making sure it remains in the marked position. The profilecan be pressed on firmly using a hammer with rubber attachment.Note: Under normal conditions (23 C and 50% relative humidity)the sealant will start to form a skin after approx. 5 minutes.Fitting the profiles on the anchor base:1. The specific position of the horizontal base should be marked on theanchor base according to the planned position of the element (central oraxial installation). The centre markings on the profile and anchor baseindicate the precise position for vertical alignment. For horizontal alignment,use the breast edge of the element opening as a guide or a heightpreviously clearly marked using the reference marker. We recommendalways aligning using the reference marker.Page 6The applied blaugelb Hybrid Polymer Power Fix works immediately asan ancillary fixative. Its high initial adhesion means that the profile adheresimmediately at the intended position. Slight adjustments to its alignmentwill be possible for up to about 20 minutes after applying to the anchorbase.3. Bring the blaugelb Triotherm profile into the desired horizontal positionand align it using a long spirit level or a laser.
4. Seal the butt joint between the horizontal and vertical profiles on oneside using blaugelb Hybrid Polymer Power Fix. Bring the prepared sideblaugelb Triotherm profiles into the correct position and press themfirmly onto the anchor base.Drilling the holes:1. Mark the attachment points on the blaugelb Triotherm profilesas specified. For optimal load transfer, the defined corner distance forthe lower blaugelb Triotherm profile as seen from outside is 150 mm(65 mm from the inside edges). Depending on the element width, furtherfixing screws may need to be screwed in so that the maximum spacingbetween the screws is not exceeded.5. Fit the upper blaugelb Triotherm profile. Seal the butt joints of the sideprofiles using blaugelb Hybrid Polymer Power Fix.Always work on the basis of 200 mm from the inside corners, except inthe case of the lower profile.6. Position the blaugelb Triotherm profile and press it firmly onto theanchor base and the side profiles.Page 7
Installation instructions for blaugelb Triotherm pre-wall installation systemHow to achieve perfect insulation.2. Drill the attachment points on the masonry. To do so, drill directly throughthe blaugelb Triotherm profiles at the marked points as far as the specifiedscrew-in depth.2. Fix the blaugelb Multifunctional Tape TrioSDL600 on the inside ofthe blaugelb Triotherm profiles on three sides (top and both sides)in accordance with the guidelines for proper window fitting.Screwing the profiles on:Once the upper tape has been fixed in position, use theblaugelb 40x60x10 mm Spacer Block (item no. 0416311) tomark the space that the upper tape needs in order to expand.1. Attach the blaugelb Triotherm profiles using the blaugelb Framescrew Fix FK-T30 of the appropriate length for the anchor base andnecessary screw-in depth.The side multifunctional tapes can then be fitted.Fitting the window element:The sealing method shown here using multifunctional tape and blaugelbHybrid Polymer Power Fix is provided solely by way of illustration. Thesealing method can be freely selected in accordance with the guidelinesfor proper window fitting.1. Select the blaugelb Multifunctional Tape TrioSDL600 according to theplanned joint width and contact area between the blaugelb Triotherm system and the element profile.Please note that it is not the construction depth of the element that iscritical for the choice of multifunctional tape, but the actual contact area.If the multifunctional tape expands because it is too wide, its functionswill be impaired.Page 8
3. Apply a trace of blaugelb Hybrid Polymer Power Fix to the lowerblaugelb Triotherm profile as a sealant.2. Note the fixing specifications / fixing spacings (Appendix III)when screwing the window frame into the blaugelb Triotherm . It isessential that you observe these. Use only the blaugelb Frame screwsFK/ZK-T30 7.5 mm to fix the window elements directly in the blaugelbTriotherm profile. Do not pre-drill the blaugelb Triotherm profiles.Recommendations for installation:- plastic window: blaugelb Frame screw Fix FK-T30 7.5 mm- wooden window: blaugelb Frame screw Fix ZK-T30 7.5 mm- wood/aluminium window: blaugelb Frame screw Fix ZK-T30 7.5 mm- aluminium window: blaugelb Frame screw Fix ZK-T30 7.5 mm4. The window frame is then fitted into the frame aperture using theblaugelb Sill Connection Profile EPS.Determine the length of screw required:Window frame width (view from inside) planned joint width screw-in depth in blaugelb Triotherm profile (min. 60 ------------------------ minimum screw lengthFixing the window element:1. Align the window element vertically and horizontally and fix it in thecorrect position using window fixing pads.Page 9
Installation instructions for blaugelb Triotherm pre-wall installation systemHow to achieve perfect insulation.Appendix I:Edge distances for the blaugelb Triotherm pre-wall installation systemOutside8510-12mind. 60mind. 2015mind.1070mind. 30ETB 405142210max. 25InsideConcreteSand-lime brickHollow brickPorous concreteWoodmind. 355151014152251Page 10blaugelb Multifunctional Tape TrioSDL600blaugelb Hybrid Polymer Power Fixblaugelb Frame screw Fix ZK-T30 7.5 x Lblaugelb Frame screw Fix FK-T30 7.5 x Lblaugelb Triotherm profile 70x85 mmSupporting wall structuremin. 40 mmmin. 60 mmmin. 142 mmmin. 142 mmmin. 60 mm
Appendix II:Rated resistances of the blaugelb Triotherm pre-wall installation systemFV, Rd vertical load (rated value of the resistance in the window plane)FH, Rd horizontal load (rated value of the resistance in the window plane)Figure1blaugelbTriotherm profiles70 x 85 mmFV, RdFH, Rdin NValues in NWall materialqualityConcreteSand-lime brickHollow brickHollow brickPorous concreteC25Comp. strength class 12Comp. strength class 8Comp. strength class 12PP4Porous concretePP2in Nin Nin Nin Nin Nin N2.5601.5711.5711.5711.5711.571without support21 screw70 x 85 mmValues in kg260160160160160160Values in N2.7301.8401.6001.600xxwithout support32 screws70 x 85 mmValues in kg278187163163xxValues in N4.9404.260xxxxwith support43 screwsValues in kg503434xxxx100 x 85 mmValues in N1.270914xxxxwithout support51 screw100 x 85 mmValues in kg13093xxxxValues in N1.7301.250xxxxwithout support62 screws100 x 85 mmValues in kg176127xxxxValues in N4.2503.0602.7542.7542.7542.754with support150x100x85 mm73 screwsValues in kg433312280280280280120 x 85 mmValues in N1.270914914914914xValues in kg13093939393xValues in N1.7101.2751.2751.2751.2751.275without support81 screw120 x 85 mmwithout support92 screws120 x 85 mmValues in kg174130130130130130Values in N4.1502.9902.7542.7542.7542.754with support150x120x85 mm103 screws140 x 85 mmValues in kg423304280280280280Values in N1.7101.231xxxxwithout support112 screws140 x 85 mmValues in kg174125xxxxValues in N4.6003.3122.7542.7542.7542.754with support150x140x85 mm123 screws160 x 85 mmValues in kg468337280280280280Values in N2.4002.6501.8051.8051.8051.805with support150x160x85 mm133 screwsValues in kg244270184184184184180 x 85 mmValues in N3.3602.6481.8051.8051.8051.805with support150x180x85 mm144 screws200 x 85 mmValues in kg342270184184184184Values in N3.3602.6481.8051.8051.8051.805with support150x200x85 mm154 screws230 x 85 mmValues in kg342270184184184184Values in N3.8262.7551.7101.7101.7101.710Values in kg390280174174174174with support200x230x85 mm4 screwsPage 11
Installation instructions for blaugelb Triotherm pre-wall installation systemHow to achieve perfect insulation.Appendix II:Screw-in depths of the blaugelb Triotherm pre-wall installation systemScrew-in depths in baseblaugelbTriotherm profilesScrewinformation70 x 85 mm100 x 85 mm120 x 85 mm140 x 85 mm160 x 85 mm180 x 85 mm200 x 85 mm230 x 85 mmBase materialQualityConcreteSand-lime brickHollow brickorous concrete TimbeWoodC25Compressive strength class 12Compressive strength class 8PP4 / PP2 450 kg/m³Screw-in depth in mmmin. 40min. 60min. 142min. 142min. 60Screw length in mm112132212212132Pre-drilling in baseØ 6 mmØ 6 mmØ 5 mmnoØ 6 mmScrew-in depth in mmmin. 40min. 60min. 142min. 142min. 60Screw length in mm132*152*252252152*Pre-drilling in baseØ 6 mmØ 6 mmØ 5 mmnoØ 6 mmScrew-in depth in mmmin. 40min. 60min. 142min. 142min. 60Screw length in mm182182252*252*182Pre-drilling in baseØ 6 mmØ 6 mmØ 5 mmnoØ 6 mmScrew-in depth in mmmin. 40min. 60min. 142min. 142min. 60Screw length in mm182212300300212Pre-drilling in baseØ 6 mmØ 6 mmØ 5 mmnoØ 6 mmScrew-in depth in mmmin. 40min. 60min. 142min. 142min. 60Screw length in mm212212*300300212*Pre-drilling in baseØ 6 mmØ 6 mmØ 5 mmnoØ 6 mmScrew-in depth in mmmin. 40min. 60min. 142min. 142min. 60Screw length in mm212*252300**300**252Pre-drilling in baseØ 6 mmØ 6 mmØ 5 mmnoØ 6 mmScrew-in depth in mmmin. 40min. 60min. 142min. 142min. 60Screw length in mm252252*350350252*Pre-drilling in baseØ 6 mmØ 6 mmØ 5 mmnoØ 6 mmScrew-in depth in mmmin. 40min. 60min. 142min. 142min. 60Screw length in mm300300350**350**300Pre-drilling in baseØ 6 mmØ 6 mmØ 5 mmnoØ 6 mm*: Countersink screws for securing profile 10 mm in blaugelb Triotherm profile*: Countersink screws for securing profile 20 mm in blaugelb Triotherm profilePage 12
Appendix III:Legend for the following installation drawingsOptional supportDepending on wall structure and forces exerted,see Appendix II: Rated resistances and screw-in depths30RR30150R85B30R30blaugelb Frame screw Fix FK-T30 7.5 x L / ZK-T30 7.5 x LFixing the window frame into the blaugelb Triotherm systemL screw-in depth in the blaugelb Triotherm system min. 60 mm, for RC 2 / RC 3 min. 70 mmPblaugelb ProtectFixing the window frame into the anchor baseusing the blaugelb Frame screw Fix FK-T30 7.5 x LL s crew length of the blaugelb Frame screw Fix FK-T30 7.5 x L and length of the adjusting screw,see blaugelb Protect installation instructionsRblaugelb Frame screw Fix FK-T30 7.5 x LFixing the Triotherm profile in the anchor baseL s crew length depending on wall structure and forces exerted,see Appendix II: Rated resistances and screw-in depthsSblaugelb Plinth Thermal Insulation Profile EPSblaugelb Plinth Thermal Insulation Profile IHP/EPSblaugelb Plinth Thermal Insulation Profile PVC/EPSWblaugelb Assembly bracketFixing the blaugelb Plinth Thermal Insulation Profile into the anchor baseusing the blaugelb Frame screw Fix FK-T30 7.5 x LL s crew length depending on the anchor base;dimensioning depending on the height of the blaugelb Plinth Thermal Insulation ProfileXblaugelb Sill Connection ProfilePlaced directly on the blaugelb Triotherm profile with blaugelb Hybrid Polymer Power FixYStructure heights(floor structure, roller shutter structure)#Joint dimensionAccording to the elongation (ΔT) of the frame materialPage 13
Installation instructions for blaugelb Triotherm pre-wall installation systemHow to achieve perfect insulation.Attachment points of the blaugelb Triotherm pre-wall installation system on the anchor base85max.67682020010085min. 35min. 258540 4545 00600820max.max.530 820Can be moved into openingup to max. 25 mmRR8545 40ROptional support100150Page 14max.480820max.640 820150
Attachment points of the element on the blaugelb Triotherm pre-wall installation systemmax. 700BBBmax. 700BB##BB150#max. 700X150Bmax. 700Page 15
Installation instructions for blaugelb Triotherm pre-wall installation systemHow to achieve perfect insulation.Attachment points of the blaugelb Triotherm pre-wall installation system – combined diagramR85max.820441200max.409820max. 700B20085max. 700R zu B max.80RRRBBBmax.80RBB##Rmax.80max. 700max. 700 max.80max.560820max.820560BB15020085#XR zu BBR85200R150BRR max.80R zu BBRPage 16R150max. 700max. 700max.820577max.543820150
Appendix IV:Attachment points of the element on the blaugelb Triotherm pre-wall installation system – RC 2R85200200max.200141BR zu Bmax.415430max.399430 max.8018 19max.80RR85max.141200 max.8018RBRBR max.80R zu Bmax.133200BR150 max.80max.415 430RR20085RRRBRR zu B178200RR100BXmax. 341430RB 19max.80BBB 19max.80R436max.430RRBB max.8018# max.15# max.15max. 430369BB max.8023BBB10085# max.15 max.80max.416430max.132200150Page 17
Installation instructions for blaugelb Triotherm pre-wall installation systemHow to achieve perfect insulation.Appendix IV:Attachment points of the element on the blaugelb Triotherm pre-wall installation system – RC 3150PR85150200200max.600448100Bmax.600448 max.80R zu B max.80R100 max.80R#PBBPBPBRB150max.573600100150 max.80 max.80R zu B100BRPPage 18 max.80max.600448 max.80max.600448100150150150150PRRRBRRRR zu B85200187RRBBPP573max.600B max.80BRR##PPR200B max.80PBB10085R85
Appendix V:Attachment points of the element on the blaugelb Triotherm pre-wall installation system – ETBR150max.80R#BBBRRBBBPfostenmax.792820max.762700 max.80RBR zu WWR100150Optionalsupportmax. 80Rmax.792 820max. 82085RRRBRR zu BR zu BRY 35220030max.76270030R120 max.80BWWWSBRmax.804820max.792700#RBBBBWWR120 max.80Breastwork asspecified by buildinginspectorate85Y 3522003030Rmax.762700max.762700 max.80max.792820max.792820C3Glazing accordingto DIN 18008-4 max.80AR max.8030max.762700#max.80R max.8085Y 200200 85150Y 200200 85max.804820 max.80 max.80#Rmax.651700559 700 30 80-230185 80-23018530max.max.80200150R zu Bmax.820693max.310200 9200B85Rmax. 80626 800max.max.820671max.800626100 100max.626820100 100max.883800max.928820100150SWRPage 19
Expert. Honest. Reliable.April 2020 - ME WS 0001For more information, please visitwww.blaugelb.de
Keep a record of how to process a specimen of the blaugelb Triotherm system. Use the installation instructions to train the personnel performing the work. Our staff would be happy to assist you in a specimen installation. Keep a record of the work performed using the appropriate installation report.


