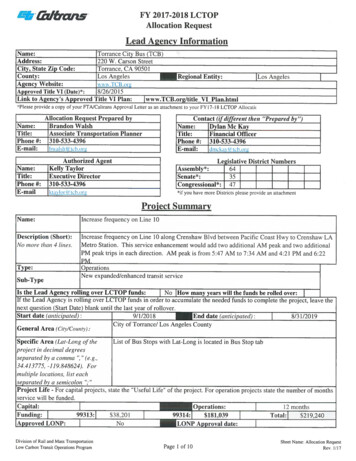
Transcription
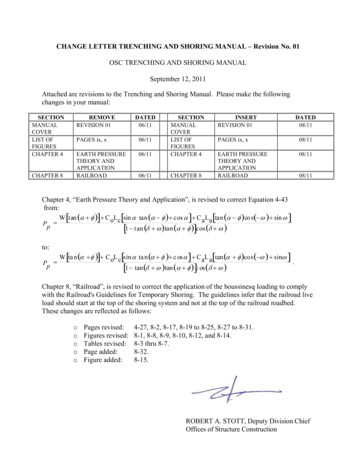
CHANGE LETTER TRENCHING AND SHORING MANUAL – Revision No. 01OSC TRENCHING AND SHORING MANUALSeptember 12, 2011Attached are revisions to the Trenching and Shoring Manual. Please make the followingchanges in your manual:SECTIONMANUALCOVERLIST OFFIGURESCHAPTER 4REMOVEREVISION 01CHAPTER 8DATED06/11PAGES ix, x06/11EARTH PRESSURETHEORY ANDAPPLICATIONRAILROAD06/11SECTIONMANUALCOVERLIST OFFIGURESCHAPTER 406/11CHAPTER 8INSERTREVISION 01DATED08/11PAGES ix, x08/11EARTH PRESSURETHEORY ANDAPPLICATIONRAILROAD08/1108/11Chapter 4, “Earth Pressure Theory and Application”, is revised to correct Equation 4-43from:W [tan (α φ )] C oLc [sin α tan (α φ ) cos α ] C a La [tan (α φ ) co s( ω ) sin ω ]Pp to:P p[1 tan (δ ω )tan (α φ )]cos (δ ω )[][[][]W ta n (α φ ) C oL c sin α ta n (α φ ) c os α C aL a tan (α φ )cos ( ω ) sinω.1 tan (δ ω )tan (α φ ) c os (δ ω )]Chapter 8, “Railroad”, is revised to correct the application of the boussinesq loading to complywith the Railroad's Guidelines for Temporary Shoring. The guidelines infer that the railroad liveload should start at the top of the shoring system and not at the top of the railroad roadbed.These changes are reflected as follows:oooooPages revised:Figures revised:Tables revised:Page added:Figure added:4-27, 8-2, 8-17, 8-19 to 8-25, 8-27 to 8-31.8-1, 8-8, 8-9, 8-10, 8-12, and 8-14.8-3 thru 8-7.8-32.8-15.ROBERT A. STOTT, Deputy Division ChiefOffices of Structure Construction
STATE OF CALIFORNIADEPARTMENT OF TRANSPORTATIONTRENCHINGANDSHORINGMANUALISSUED BYOFFICES OF STRUCTURE CONSTRUCTIONCopyright 2011 California Department of Transportation.All rights reserved.Revision 1August 2011
TABLE OF CONTENTSCHAPTER 1 LEGAL REQUIREMENTS1.01.11.21.31.41.51.61.7LEGAL REQUIREMENTS AND RESPONSIBILITIES . 1-1LABOR CODE. 1-3Cal/OSHA . 1-4STATE STATUTES. 1-7FEDERAL HIGHWAY ADMINISTRATION (FHWA) . 1-7RAILROAD RELATIONS AND REQUIREMENTS. 1-8SHORING PLANS. 1-9SUMMARY . 1-11CHAPTER 2 Cal/OSHA2.02.12.22.32.42.5Cal/OSHA . 2-1SOME IMPORTANT CalOSHA DEFINITIONS . 2-3SOME IMPORTANT Cal/OSHA REQUIREMENTS . 2-52.2.1 General Requirements Section 1541. 2-52.2.2 Protective System Selection. 2-62.2.3 Soil Classification . 2-82.2.4 Sloping or Benching Systems . 2-102.2.5 Timber Shoring for Trenches . 2-122.2.6 Aluminum Hydraulic Shoring for Trenches . 2-142.2.7 Shield Systems . 2-15MANUFACTURED PRODUCTS . 2-15ALTERNATE DESIGN CONSIDERATIONS . 2-17INFORMATION ABOUT TEXT FORMATTING IN THE CONSTRUCTION SAFETYORDERS . 2-17CHAPTER 3 SOILS3.03.13.23.33.43.53.63.73.8INTRODUCTION. 3-1SOIL IDENTIFICATION, CLASSIFICATION, DESCRIPTION AND PRESENTATION. 3-1SOIL PROPERTIES and STRENGTH. 3-3STANDARD PENETRATION TEST (SPT). 3-4CONE PENETRATION TEST (CPT) . 3-6FIELD and LABORATORY TESTS. 3-8SHEAR STRENGTH . 3-9CONTRACTOR SOIL INVESTIGATIONS. 3-10SPECIAL GROUND CONDITIONS . 3-11CHAPTER 4 EARTH PRESSURE THEORY AND APPLICATIONi
CT TRENCHING AND SHORING MANUAL4.04.14.24.34.44.54.64.74.8GENERAL . 4-1SHORING TYPES . 4-14.1.1 Unrestrained Shoring Systems. 4-14.1.2 Restrained Shoring Systems . 4-1LOADING. 4-2GRANULAR SOIL . 4-44.3.1 At-Rest Lateral Earth Pressure Coefficient (K0). 4-104.3.2 Active and/or Passive Earth Pressure . 4-114.3.2.1Rankine’s Theory . 4-114.3.2.2Coulomb’s Theory . 4-14COHESIVE SOIL . 4-19SHORING SYSTEMS AND SLOPING GROUND. 4-244.5.1 Active Trial Wedge Method . 4-254.5.2 Passive Trial Wedge Method . 4-274.5.3 Culmann’s Graphical Solution for Active Earth Pressure . 4-284.5.3.1Example 4-1 Culmann Graphical Method . 4-334.5.3.2Example 4-2 Trial Wedge Method . 4-374.5.3.3Example 4-3 (AREMA Manual page 8-5-12) . 4-394.5.3.4Example 4-4 (AREMA Manual page 8-5-12) . 4-434.5.3.5Example 4-5 (AREMA Manual page 8-5-13) . 4-454.5.3.6Example 4-6 (AREMA Manual page 8-5-13) . 4-48EFFECT OF WALL FRICTION . 4-50LOG SPIRAL PASSIVE EARTH PRESSURE. 4-504.7.1 Composite Failure Surface. 4-524.7.1.1Force Equilibrium Procedures . 4-524.7.1.2Moment Equilibrium Procedures. 4-554.7.2 Noncomposite Log Spiral Failure Surface. 4-604.7.2.3Force Equilibrium Method. 4-604.7.2.4Moment Equilibrium Method . 4-61SURCHARGE LOADS . 4-704.8.1 Minimum Construction Surcharge Load . 4-704.8.2 Uniform Surcharge Loads . 4-714.8.3 Boussinesq Loads. 4-724.8.3.1Strip Load. 4-724.8.3.2Line Load . 4-734.8.3.3Point Load . 4-744.8.4 Traffic Loads . 4-764.8.4.1Example 4-7 Sample Problem – Surcharge Loads . 4-794.8.5 Alternate Surcharge Loading (Traffic) . 4-80CHAPTER 5 STRUCTURAL DESIGN OF SHORING SYSTEMS5.05.1INTRODUCTION. 5-1ALLOWABLE WORKING STRESSES . 5-1ii
TABLE OF CONTENTS5.25.35.45.1.1 Timber. 5-15.1.2 Steel. 5-2MECHANICS OF STRESS ANALYSIS . 5-5OVERSTRESS. 5-7LAGGING. 5-7CHAPTER 6 UNRESTRAINED SHORING SYSTEMS6.06.16.26.36.4TYPES OF UNRESTRAINED SHORING SYSTEMS . 6-1LATERAL EARTH PRESSURES FOR UNRESTRAINED SHORING SYSTEMS . 6-2EFFECTIVE WIDTH. 6-9DEFLECTION . 6-11SOIL PRESSURE DISTRIBUTION FOR LAYERED SOIL . 6-136.4.1 Example 6-1 Cantilevered Soldier Pile Wall . 6-146.4.2 Example 6-2 Cantilevered Soldier Pile Wall . 6-176.4.3 Example 6-3 Deflection of a Cantilevered Soldier Pile Wall . 6-23CHAPTER 7 RESTRAINED SHORING SYSTEMS7.07.17.27.3LATERAL EARTH PRESSURES FOR RESTRAINED SHORING SYSTEMS . 7-1COHESIONLESS SOILS . 7-2COHESIVE SOILS . 7-57.2.1 Stiff to Hard . 7-57.2.2 Soft to Medium Stiff . 7-6CALCULATION PROCEDURES. 7-87.3.1 Single Tieback/Brace System . 7-87.3.2 Multiple Tieback/Brace System . 7-107.3.3 Deflection. 7-137.3.4 Example 7-1 Single Tieback Sheet Pile Wall . 7-147.3.5 Example 7-2 Multiple Tieback Sheet Pile Wall . 7-23CHAPTER 8 RAILROAD8.08.1INTRODUCTION. 8-1SELECTED EXCERPTS FROM “Guidelines for Temporary Shoring” . 8-28.1.1 Scope. 8-28.1.2 General Criteria . 8-28.1.3 Types of Temporary Shoring . 8-48.1.3.1Shoring Box . 8-48.1.3.2Restrained Systems . 8-48.1.3.3Unrestrained Systems. 8-48.1.3.4Cofferdam . 8-48.1.4 General Shoring Requirements . 8-5iii
CT TRENCHING AND SHORING MANUAL8.1.58.28.3Information Required . 8-68.1.5.1Field Survey . 8-68.1.5.2Geotechnical Report. 8-68.1.5.3Loads. 8-78.1.5.4Drainage (AREMA 8.20.2.4) . 8-88.1.5.5Structural Design Calculations . 8-88.1.5.6Computation of Applied Forces . 8-88.1.5.7Structural Integrity . 8-9EXAMPLE 8-1 (Railroad Example) . 8-14DEFLECTION CALCULATION . 8-27CHAPTER 9 CONSTRUCTION AND SPECIAL CONSIDERATIONS9.09.19.29.39.49.5SPECIAL CONDITIONS . 9-1ANCHOR BLOCK. 9-29.1.1 Anchor Block in Cohesionless Soil . 9-39.1.2 Anchor Block in Cohesionless Soil where 1.5 D/H 5.5 . 9-99.1.3 Anchor Block in Cohesive Soil near the Ground Surface D H/2 . 9-109.1.4 Anchor Blocks in Cohesive Soil where D H/2 . 9-129.1.4.1Example 9-1 Problem – Anchor Blocks . 9-13HEAVE . 9-169.2.1 Factor of Safety Against Heave . 9-189.2.1.1Example 9-2 Problem – Heave Factor of Safety . 9-20PIPING . 9-219.3.1 Hydraulic Forces on Cofferdams and Other Structures . 9-21SLOPE STABILITY . 9-239.4.1 Rotational Slides . 9-249.4.2 Fellenius Method . 9-289.4.2.1Example 9-3 Problem – Fellenius Method . 9-299.4.3 Bishop Method . 9-319.4.3.1Example 9-4 Problem – Bishop Method . 9-329.4.4 Translational Slide . 9-339.4.4.1Example 9-5 Problem – Translational Slide . 9-369.4.5 Stability Analysis of Shoring Systems. 9-379.4.6 The Last Word on Stability. 9-37CONSTRUCTION CONSIDERATIONS . 9-389.5.1 Construction. 9-389.5.2 Encroachment Permit Projects . 9-419.5.3 Tieback Systems . 9-449.5.3.1Construction Sequence. 9-449.5.3.2Tieback Anchor Systems . 9-449.5.3.3Tieback Anchor . 9-479.5.3.4Forces on the Vertical Members . 9-509.5.3.5Testing Tieback Anchors . 9-51iv
TABLE OF CONTENTS9.69.5.3.6Proof Testing . 9-539.5.3.7Evaluation of Creep Movement . 9-559.5.3.8Wall Movement and Settlement. 9-569.5.3.9Performance Testing . 9-569.5.3.10 Lock-Off Force . 9-579.5.3.11 Corrosion Protection . 9-589.5.3.12 Steps for Checking Tieback Shoring Submittal . 9-599.5.3.13 Example 9-6 Tieback Testing . 9-60SUMMARY . 9-62Appendix A CALIFORNIA OCCUPATIONAL SAFETY AND HEALTHSTANDARDS FOR EXCAVATIONSAppendix B MemosAppendix C SurchargesAppendix D Sheet PilesAppendix E ExamplesAppendix F BrochuresAppendix G Notes & FAQ’sv
CT TRENCHING AND SHORING MANUALvi
LIST OF FIGURESFigure 3-1. Cone Penetration Test (CPT) Boring . 3-6Figure 3-2. Typical CPT Plot . 3-7Figure 3-3. Mohr-Coulomb Criteria . 3-9Figure 4-1. Active and passive earth pressure coefficient as a function of wall displacement . 4-2Figure 4-2. Comparison of Plane versus Curve Failure Surfaces . 4-4Figure 4-3. Lateral Earth Pressure Variation with Depth . 4-5Figure 4-4. Mohr Circle Representation of Earth Pressure for Cohesionless Backfill . 4-7Figure 4-5. Rankine’s active wedge. 4-12Figure 4-6. Rankine’s passive wedge . 4-13Figure 4-7. Coulomb’s active wedge . 4-15Figure 4-8. Coulomb’s passive wedge . 4-16Figure 4-9. Mohr Circle Representation of Earth Pressure for Cohesive Backfill . 4-19Figure 4-10. Tension crack with hydrostatic water pressure . 4-20Figure 4-11. Cohesive Soil Active Passive Earth Pressure Distribution . 4-21Figure 4-12: Load Distribution for Cohesive Backfill. 4-22Figure 4-13. Sloping Ground . 4-24Figure 4-14. Active Trial Wedge . 4-26Figure 4-15. Passive Trial Wedge. 4-27Figure 4-16. Single Wedge and Force Polygon . 4-28Figure 4-17. Culmann Trial Wedges . 4-30Figure 4-18. Culmann Graphical Solution to Scale . 4-32Figure 4-19. Retaining Wall with Irregular backfill by Culmann Method . 4-33Figure 4-20. Culmann Trial Wedge Method to Scale . 4-34Figure 4-21. Culmann Graphical Solution Using Force Polygon . 4-36Figure 4-22. Critical Active Wedge. 4-37Figure 4-23. Culmann AREMA page 8-5-12 . 4-39Figure 4-24. Culmann Trial Wedge . 4-40Figure 4-25. Culmann Graphical Solution Using Force Polygon . 4-42Figure 4-26. Critical Active Wedge Method . 4-43Figure 4-27. Retaining Wall with Irregular backfill . 4-45Figure 4-28. Culmann Trial Wedge . 4-46Figure 4-29. Culmann Force Polygon . 4-47Figure 4-30. Critical Active Wedge. 4-48Figure 4-31. Passive Active failure surface; straight line versus spiral surface of sliding. . 4-50Figure 4-32. Geometry of the developing mobilized failure plane (Shamsabadi, et al,. 2005) . 4-51Figure 4-33. Geometry of the failure surface and associated interslice forces. 4-54Figure 4-34. Geometry of the failure surface due to weight. 4-55Figure 4-35. Geometry of the failure surface due to cohesion. . 4-56Figure 4-36. Moment Method . 4-57Figure 4-37. Passive earth pressure coefficient (Caquot and Kerisel, 1948). 4-59Figure 4-38. Mobilized full log spiral failure surface . 4-60Figure 4-39. Mobilized full log spiral failure surface for cohesion component . 4-61Figure 4-40. Log Spiral – Forces Method – Full Log Spiral – Trial . 4-62Figure 4-41. Log Spiral – Forces Method – Full Log Spiral – No Trial. 4-63Figure 4-42. Log Spiral – Forces Method – Composite Failure Surface . 4-64Figure 4-43. Log Spiral – Modified Moment Method – Composite Failure Surface . 4-65vii
CT TRENCHING AND SHORING MANUALFigure 4-44. Log Spiral – Moment Method – Full Log Spiral Failure Surface . 4-66Figure 4-45. Log Spiral – Moment Method – Composite Failure Surface . 4-67Figure 4-46. Log Spiral – see Figure 4-37 . 4-68Figure 4-47. Minimum Lateral Surcharge Load . 4-70Figure 4-48. Boussinesq Type Strip Load . 4-72Figure 4-49. Boussinesq Type Line Load. 4-73Figure 4-50. Boussinesq Type Point Load. 4-74Figure 4-51. Boussinesq Type Point Load with Lateral Offset . 4-75Figure 4-52. Alternate Traffic Surcharge Loading . 4-80Figure 5-1. Soil Arching . 5-7Figure 6-1. Sheet Pile Wall with Cap Beam . 6-1Figure 6-2. Soldier Pile Wall with Cap Beam . 6-2Figure 6-3. Cantilever Retaining Walls . 6-3Figure 6-4. Loading Diagram for Single Layer . 6-4Figure 6-5. Loading Diagram for Multi-Layer Soil . 6-5Figure 6-6. Loading Diagram for Multi-Layer . 6-6Figure 6-7. Loading Diagram for Multi-Layer . 6-7Figure 6-8. Loading Diagram for Multi-Layer . 6-8Figure 6-9. Soldier Pile with Arching. 6-9Figure 6-10. Deflected Shape for Unrestrained System . 6-12Figure 6-11. Multilayer soil pressure. 6-13Figure 6-12. Example 6-1 . 6-14Figure 6-13. Pressure Loading Diagram. 6-15Figure 6-14. Force Loading Diagram . 6-16Figure 6-15. Soldier pile with sloping ground Example 6-2 . 6-17Figure 6-16. Active and Passive Earth Pressure Coefficients. 6-18Figure 6-17. Pressure Diagram . 6-20Figure 6-18. Location of Zero Shear and Maximum Moment. 6-21Figure 6-19. Loading Diagram . 6-24Figure 6-20. Shear Diagram. 6-24Figure 6-21. Moment Diagram . 6-25Figure 6-22. Deflected Shape . 6-25Figure 6-23. Moment Area diagram . 6-26Figure 6-24. Redeveloped shear and moments diagrams . 6-28Figure 6-25. Loading Diagram . 6-30Figure 6-26. Shear Diagram. 6-30Figure 6-27. Moment Diagram . 6-30Figure 6-28. Deflection Diagram.
Sep 12, 2011 · CHANGE LETTER TRENCHING AND SHORING MANUAL – Revision No. 01 OSC TRENCHING AND SHORING MANUAL . September 12, 2011 . Attached are revisions to the Trenching and Shoring Manual. Please make the followin