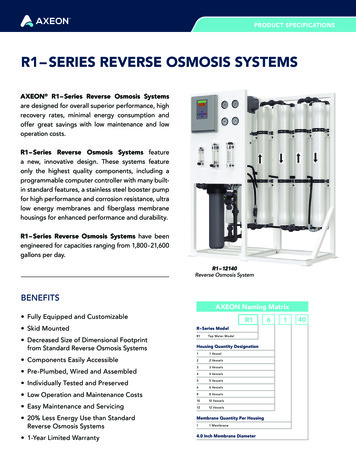
Transcription
Rainsoft Division of Aquion, Inc2080 East Lunt AvenueElk Grove Village, Illinois, 600071.847.437.9400 or 1.800.860.7638www.rainsoft.comUF SERIESREVERSE OSMOSISDRINKING WATER SYSTEM This product is manufactured in an ISO 9001: 2008 certified facility.Models UF50N-CBVOC and UF50T-CBVOC are tested and certified by NSF International against NSF/ANSIstandard 58 for the reduction of claims specified on the performance data sheet. Refer to the manufacturer’s Performance Data Sheet for the specific reduction claims.Not approved for use in California. Please request California-specific product literature from your local Rainsoft Dealer.Part No.: 15417Rev: I 03/27/12
Table of ContentsInformation on Reverse Osmosis . 3Product Certification Information. 3Operational Specifications. 4Items Required for Installation. 4Installation Instructions. 5System Start Up. 6Routine System Maintenance . 6Periodic System Maintenance . 7RainSoft Replacement Part Numbers . 7How to Change the Filters. 8Troubleshooting Guide . 9Exploded View and Parts List . 10Warranty Information . 11Installer Specification Sheet . 122
Congratulations on your purchase of one of the finest ReverseOsmosis Systems available to homeowners.This Owner’s Manual is designed to assist with the operation, maintenance, and installation of the Reverse Osmosis System. It is our sincerehope that this manual is clear, concise, and helpful to you as a newowner.Questions? If you have any questions regarding the installation, operation or servicing of this system, please contact your local RainSoftDealer. Your RainSoft Dealer will be familiar with your particular situation, your water conditions, etc. and should be able to address yourconcerns promptly and efficiently.Information on Reverse OsmosisOsmosis is a natural process that occurs in most living things. Inplants, osmosis permits the absorption of water and nutrients throughthe root system and in people, osmosis permits the absorption ofnutrients through the blood stream. To achieve Reverse Osmosis, yourRainSoft system will utilize pressure to reverse the normal osmosisprocess.In the Reverse Osmosis process, your water supply will flow over thesurface of a semi-permeable membrane to a less concentrated solution.The treated water is then stored in the storage tank. The tank is pressurized with air (5 psi), which forces the treated water through anactivated carbon post-filter and up to the new Reverse Osmosis faucetslocated throughout your home (see figure 1).Figure 1R.O. MODULESEMI-PERMEABLEMEMBRANEFAUCETWATER PRESSURE40 PSI (275.8 kPA)OR MOREBLADDERSYSTEM5 PSI AIRPRE CHARGEPOSTFILTERProduct Certification InformationModels UF50T-CBVOC and UF50N-CBVOC conform to NSF/ANSI58 for the specific performance claims as verified and substantiated bytest data. See performance data sheets for specific reduction claims.Models UF50T-CBVOC and UF50N-CBVOC conform to NSF/ANSI58 for VOC reduction. See performance data sheets for individualcontaminants and reduction performance.Water treatment devices sold to retail consumers in California, accompanied by certain health claims, must be certified by the State ofCalifornia Department of Public Health. This product is not certifiedin the State of California for the purpose of making health claims.3
Operational SpecificationsWorking Pressure40 psi 100 psi (275 kPa 689 kPa)Operating Temperatures50 F 100 F (10 C 38 C)pH Range2 11Maximum TDS Level1400 parts per million!Important Note: This Reverse Osmosis Systemcontains replaceable treatment components,critical for the effective reduction of totaldissolved solids (TDS). The product watershould be tested periodically to verify that thesystem is performing properly. See your localRainSoft Dealer for details.!Important Note: If the hardness is greater than5 grains, the system will still perform properly,but the longevity of the membrane may beaffected.*UF22N-CB and UF22T-CB are tested by manufacturer internally in accordance withNSF/ANSI standard 58.UF50N-CBVOC and UF50T-CBVOC are testedby NSF International against NSF/ANSI 58.Maximum Turbidity Influent Level11 NTU (nephelometric turbidity units)Maximum Hardness Level5 grainsCapacity for VOC ReductionModels UF50T-CBVOC and UF50N-CBVOC: 100 gallons (378 liters)Additional Specifications The inlet water should be free from iron, manganese, and sulfur. This system has been tested for the treatment of water containingpentavalent arsenic (also known as AS (V), As ( 5), or arsenate) atconcentrations of 0.30 mg/L or less. This system reduces pentavalentarsenic, but may not remove other forms of arsenic. This system is tobe used on water containing a detectable free chlorine residual or onwater supplies that have been demonstrated to contain only pentavalentarsenic. Treatment with chloramine (combined chlorine) is not sufficient to ensure complete conversion of trivalent arsenic to pentavalentarsenic. Please see the Arsenic Facts section of the performance datasheets for further information. Do not use this product with water that is microbiologically unsafe orof unknown quality without adequate disinfection before or after thesystem. Systems certified for cyst reduction may be used on disinfectedwaters that may contain filterable cysts. This system must be installed in accordance with all applicable stateand local laws and regulations. This system must be installed in an area not affected by extreme heat,cold or the elements. The selected installation area must be adequatefor easy service of all parts. This system is designed to treat cold water only. The installation mustbe on a cold water supply.Efficiency rating means the percentage of theinfluent water to the system that is available tothe user as reverse osmosis treated waterunder operating conditions that approximatetypical daily usage.Recovery rating means the percentage of theinfluent water to the membrane portion of thesystem that is available to the user as reverseosmosis treated water when the system isoperated without a storage tank or when thestorage tank is bypassed.Data ChartModelDailyProduction RatesEfficiency Rating*Recovery Rating*UF22T-CB, UF 22N-CB8.45 gpd/31.98 L/day10.58%24.54%UF50T-CBVOC, UF50N-CBVOC 13.01 gpd/49.25 L/day5.49%16.05%Items Required for InstallationTools: Drill, drill bits, tube cutter, screwdrivers, adjustable wrench, andvinyl gloves.Parts: RainSoft faucet, inlet shut off valve, 1/4 inch O.D. tubing, 3/8 inchO.D. tubing, and screws.4!Important Notes: The installation location ofthe system must be determined beforepurchasing a faucet. If you are mounting thesystem under a kitchen sink, an air gap faucetwill be required. If you are mounting thesystem in a different location, a non-air gapfaucet will be required, along with a separateair gap device.The tubing used for installation must be offood grade type. John Guest or Parker brandtubing is recommended for their compatibilitywith the fittings on your system.
Installation Instructions1. Install the Filters and Membrane Cartridge Wearing sterile gloves, remove the two filters and membranecartridge from the sterile packaging and place them in the appropriate housings (see figure 2).Helpful Tip: Be careful not to contaminate thefilters and membrane cartridge by touching nonsterile objects.2. Mount the System Use screws (not supplied) to secure the mounting bracket(supplied) to the desired location.3. Install the Faucet (Not Supplied) Select a location for the faucet (not supplied) to be mounted. Drill a hole according to the manufacturer’s recommendations.Once the hole has been drilled, mount the faucet.Helpful Tip: The proper drill bit should be selectedaccording to the type of material at the desiredinstallation location. Use 3/8 inch tubing (not supplied) to connect the faucet to thesystem outlet (see figure 2).4. Install the Inlet Shut Off Valve (Not Supplied) Turn off the cold water supply and open the cold water faucet torelieve any line pressure. Install an inlet shut off valve (not supplied) between the existingshut off valve and the kitchen faucet, in a way that conforms tostate and local plumbing codes.! Use 3/8 inch tubing (not supplied) to connect the inlet shut offvalve to the system inlet (see figure 2).Important Note: The inlet shut off valve musthave a 3/8 inch connection.Helpful Tip: To secure the connection, press thetubing in firmly.5. Install the Storage Tank Select a location for the storage tank. The storage tank can beinstalled vertically or horizontally.Helpful Tip: If the desired installation location isin the basement, the storage tank can bemounted in between the floor joists. The closerthe storage tank is to the faucet, the greater theflow of water.The storage tank can be installed vertically orhorizontally. Verify that the o-ring on the storage tank is in place. Install the shut off valve (supplied) onto the storage tank (seefigure 2). The shut off valve must be in the open position.Helpful Tip: Additional tubing may be required. Use the 3/8 inch x 4 foot tubing (supplied) to connect the storagetank shut off valve to the tank port on the control head (seefigure 2). Additional tubing may be required6. Connect the Drain Outlet Use 1/4 inch tubing (not supplied) to connect the drain outlet tothe appropriate drain connection (see figure 2).7. Secure the Connections Attach the red locking clips (supplied) to the connection fittings.Figure 2!Important Note: The drain connection mustconform to state and local plumbing codes.If the system is mounted under a kitchen sink, anair gap faucet will be required. If the system ismounted in a different location, a non-air gapfaucet will be required, along with a separate airgap device on the drain line (see figures below-Air Gap-floor drain, Air Gap-Mr.Drain).STORAGE TANKINLETDRAIN OUTLETTANK PORTAIR GAP - floor drainAIR GAP - Mr. Drain1/2 " DRAIN LINEGAP-A-FLOW AIR GAPDRAINSTACK"Mr. Drain"AIR GAPOUTLETSTAND PIPEFORWASHER,SHUT OFF VALVEPRE-FILTERMEMBRANEPOST FILTERFLOOR DRAIN5
System Start Up1. Turn on the Water Supply Allow the system to start filling with water.2. Fast Flush the System Open the R.O. faucet and position the drain barrel in the fast flushposition (see figure 3).Figure 3!!Important Note: Air trapped in the system willpurge during this procedure.!!!Important Note: This procedure will flush anyremaining residue from the storage tank.Important Note: Do not attempt to reset orremove the drain barrel screw. The drain barrelscrew is preset by your RainSoft Dealer andshould only be adjusted by a qualifiedRainSoft Technician. Tampering with this partmay result in poor system performance, leaksin the equipment and/or personal injury.FAST FLUSHPOSITION3. Reposition the Drain Barrel Once the air has been purged from the system, position the drainbarrel in 1 of the 2 service positions (see figure 4). The storage tankwill continue to fill with water.DRAIN BARRELSERVICEPOSITION 2Figure 4DRAIN BARRELSERVICEPOSITION 14. Check for Leaks If a leak is present, make the necessary repairs.5. Fill the System When the water stops flowing to the drain, the system should befully pressurized and the storage tank should be filled with water.6. Drain the Storage Tank Open the R.O. faucet and drain all the water from the storage tank.7. Complete the Installation If a 24 hour-flush pre-installation is not performed by your localdealer, it is important to open the faucet, let the system drip for 24hours first. After the 24 hour water flush , close the R.O. faucet and allow thestorage tank to fill with water. When the storage tank is full, thesystem will be ready for operation.Important Note: The 24 hour flush will ensurethe proper rinsing of the R.O. Membrane.Important Note: It is common to experiencecloudy water, cloudy or hazy ice cubes and/orair bubbles when the system is new or after thefilters/ cartridges have been changed.Routine System MaintenanceThe storage tank should be drained and the system should be fast flushed1 to 2 times per week. To drain the storage tank, open the R.O. faucet andlet the water run until the flow turns into small drips. Close the R.O.faucet and rotate the drain barrel 90o to the fast flush position(see figure3).The sound of rushing water should now be heard. Allow the system tofast flush for 5 to 7 minutes and then rotate the drain barrel to position#2(see figure4).6Helpful Tips: Maintaining a fresh water supplyin the storage tank will promote better operation of the membrane cartridge.The next time you drain the storage tank,reverse the rotation of the drain barrel.When you go on vacation, close the cold waterinlet valve. When you return from vacation,open the cold water inlet valve, drain thestorage tank and fast flush the system.
Periodic System MaintenanceTesting Your Water If you are relying on this system for nitrate reduction, we recommendtesting your water periodically (2 times a year minimum) with anitrate test kit (supplied) to ensure that the system is performingproperly. Additional nitrate test kits (part number 12061) can bepurchased from your local RainSoft Dealer.!Important Notes: Nitrate reduction units areacceptable for treatment of influent concentrations of no more than 27 ppm nitrate and 3 ppmnitrite in combination (measures as “N”) and arecertified for nitrate/nitrite reduction only forwater supplies with a pressure of 40 psi orgreater. If you are relying on this system for VOC reduction, we recommendtesting your water periodically (2 times a year minimum) to ensurethat the system is performing properly. Your local RainSoft Dealercan arrange this testing for a nominal fee. If you are relying on this system for cyst reduction, we recommendtesting your water periodically (2 times a year minimum) to ensurethat the system is performing properly. Your local RainSoft Dealercan arrange this testing for a nominal fee. If you are relying on this system for any other health claims, pleaserefer to the performance data sheets on pages 12 15. See your localRainSoft Dealer for additional information.For Wisconsin Residents Only: The State of Wisconsin requires thatyour water be tested 2 times a year minimum for total dissolved solids(to ensure that the system is performing properly). Your local RainSoftDealer can arrange this testing for a nominal fee.System ComponentsPre-filterThe pre-filter (see figure 5) removes particles and sediment as small as5 microns in size from the water supply. The pre-filter requiresperiodic replacement every 6 to 12 months after installation. Yourwater quality and water usage may affect this replacement schedule.Please refer to the chart on page 8 for replacement part numbers.Membrane CartridgeThe membrane cartridge (see figure 5) is a spiral wound, semipermeable cartridge that requires periodic replacement approximatelyevery 18 months after installation. Your water quality and water usagemay affect this replacement schedule. Please refer to the chart on page8 for replacement part numbers.Post-filterThe post-filter (see figure 5) will remove unwanted tastes and odorsfrom the water. The post-filter requires periodic replacement every 6to 12 months after installation. Your water quality and water usagemay affect this replacement schedule. Please refer to the chart on page8 for replacement part numbers.STORAGE TANKINLETFigure 5DRAIN OUTLETTANK PORTOUTLETSHUT OFF VALVEPRE-FILTERMEMBRANEPOST FILTER7
!How to Change the Filters1. Turn off the cold water supply to the RO system.2. Close the storage tank shut-off valve and then open the RO faucet.3. Place a drip pan or bucket if necessary to catch the water from the filtercanisters to prevent spillage.4. To replace the filters, use the filter wrench (not supplied) and unscrewthe filter housings from the cap (see figures 6 and 7). Replace thefilters and reassemble (see helpful hints).Important Note: This Reverse Osmosis Systemcontains replaceable components critical tothe efficiency of the system. Replacement ofthe Reverse Osmosis components should beone of identical specifications, as defined bythe manufacturer, to assure the same efficiency and contaminant reduction performance.Helpful Tips: To avoid contamination, werecommend the use of sterile gloves whilechanging the system components.When changing the membrane cart- ridge,verify that the rubber brine seal and O-ringsare secure and in place. Always lubricate the orings with a non-petroleum based lubricant toensure the longevity of the o-rings. Neverover-tighten the housing to the cap HAND5. Once assembled, open the flush valve (see figure 3 on page 6).6. Turn on the inlet water to the RO system.7. Open the storage tank valve and RO faucet. Allow the water system toflush for 15 minutes.TIGHT ONLY!8. Close the flush valve and faucet and allow a minimum of 2 hours forthe tank to fill up.Figure 7Figure 6PRE-FILTERMEMBRANEPOST FILTERFILTER WRENCHRainSoft Replacement PartsThe following RainSoft replacement parts are available through yourlocal RainSoft escriptionPart NumberSlim Line Spanner Wrench13203If you are unable to order replacement parts from your local RainSoftDealer, please contact RainSoft at 1-800-860-7638 for assistance.8!Important Note: It is important to maintain the quality of your system by usingonly genuine RainSoft replacementfilters and cartridges. Other “made-tofit” alternative filters and cartridgesclaim to perform the same duties as theoriginal RainSoft parts, but these itemsare not approved for use in your system!“Made-to-fit” alternative filters andcartridges will increase the probabilityof leaks, putting your entire system atrisk!When “made-to-fit” alternative filtersand cartridges are placed into yourRainSoft Reverse Osmosis System, theproduct warranty will become null andvoid and the system will lose the NSFcertification. To guarantee proper operation and certification of your RainSoftReverse Osmosis System, please usegenuine RainSoft parts.
Troubleshooting GuideSymptom1. No Water2. Film on Water orCloudy WaterCauseSolution1. The water supply is turned off.1. Turn on the water.2. Faulty valve.2. Replace or repair the valve.3. The water supply is blocked.3. Clear the blockage.4. The membrane cartridge is fouled.4. Replace the membrane cartridge.5. The product line is crimped.5. Remove the crimp.6. Defective storage tank.6. Replace the storage tank.7. The air valve is leaking.7. Replace the air valve and rechargethe storage tank to 5 psi.1. Air is trapped in the water.1. Common at the time of installationor after a filter change.The air will dissipate as the filterbecomes saturated. Several tanks ofwater may be used before thisprocess is complete.If the troubleshooting guide did not resolve the symptom, please contact your local RainSoft Dealer for service. Ifyou cannot locate your local RainSoft Dealer, please contact RainSoft Customer Service at 1-800-860-7638 or logonto www.rainsoft.com for the name and location of your nearest Dealer.9
Exploded View and Parts rt NumberPart Description1218665.375 Slimline Cap2118669RO Unibody Assy3118328Triple Housing Bracket4121369110-3/4 Phillips Pan Head Screw5312994O-Ring - 2376118557Carbon Block Filter with Sediment Sleeve12448High Flow Unibody Element TFC (UF22T-CB, UF22N-CB)18644Element Membrane TFC 50 GPD (UF50T-CBVOC, UF50N-CBVOC)18557Carbon Block Filter with Sediment Sleeve (UF22T-CB, UF22N-CB)18773VOC Carbon Block Filter with Sediment Sleeve (UF50T-CBVOC, UF50N-CBVOC)71819312993Slim Line Sump, White10117034Ball Valve11117541RO Storage Tank Assembly122187723/8 Hard PVC Tubing13419005Locking Clip, 3/8in John Guest
LimitedLifetime WarrantyFor as long as you own the equipmentRainSoft Division of Aquion, Inc. , believing itsREVERSE OSMOSIS SYSTEMto be of exceptional quality, hereby warrants said equipment to its first purchaser at retail as follows:THE STORAGE TANK HOUSING, FILTER HOUSING, MEMBRANE HOUSING AND UNIBODY CONTROLARE WARRANTED AGAINST DEFECTS IN MANUFACTURE FOR THE LIFETIME OF THE FIRSTPURCHASER AT RETAIL.THE MEMBRANE IS PRO-RATA WARRANTED AGAINST DEFECTS IN MANUFACTURE FOR 18 MONTHS(CREDIT 1/18 TH OF REPLACEMENT COST FOR EACH UNUSED MONTH).THE ELECTRICAL COMPONENTS (IF APPLICABLE) ARE WARRANTED AGAINST DEFECTS IN MANUFACTURE FOR 12 MONTHS.THE PRE- AND POST-FILTER SERVICE LIFE IS DEPENDENT ON SPECIFIC WATER CONDITIONS ANDUSAGE. REFER TO THE OWNER’S MANUAL FOR RECOMMENDED REPLACEMENT FREQUENCY.This warranty begins at the time the equipment is first connected for use, and is contingent upon the return of a signed owner's registration card.This warranty does not require replacement of the entire unit. If the equipment does not perform properly, you should request servicefrom the dealer that sold you the equipment. If you are not satisfied, you should notify our Customer Service Manager. If we are notable to arrange local servicing, you should send the defective part(s) (or, if you prefer, send the entire unit,) directly to the manufacturer, freight prepaid, with proof of purchase and a copy of this warranty. The defective part(s) (or entire unit) will either be repairedor new RainSoft part(s) furnished, for a nominal charge to cover labor, handling, packing and the increase, if any, in the retail priceof the part(s) since the date of purchase. Genuine RainSoft parts must be used. Failure to use genuine RainSoft parts will void thewarranty and certifications.This warranty does not include labor charges, and does not cover installation, transportation, or any other claims or torts. Some statesdo not allow the exclusion or limitation of incidental or consequential damages, so parts of the above limitation or exclusion may notapply to you.This warranty gives you specific legal rights, and you may also have other rights which vary from state to state. You also have impliedwarranty rights. In the event of a problem with warranty service or performance, you may be able to go to a small claims court, a Statecourt, or a Federal District Court.This warranty is void if equipment is not installed and operated according to instructions. It does not apply to damage caused byabuse, accident, neglect, freezing, fire, or other abnormal conditions beyond the company’s control. This warranty is void on any partfrom which the manufacturing date has been removed or made illegible.Benefits will be provided by various types of RainSoft equipment when installed and operated according to the manufacturer's recommendations. Operational, maintenance and replacement requirements are essential for the product to perform as advertised. Allclaims are based on the best available information at the time of printing. Manufacturer makes no representations as to the suitabilityof this equipment for a particular application. Buyer relies entirely on the dealer's recommendations in the purchase of this equipment.Independent RainSoft dealers may include, together with your RainSoft product, a product or component that is not manufacturedby RainSoft or their parent company, Aquion, Inc. Any non-RainSoft product may be covered by the manufacturer of that product,and is not covered by the RainSoft warranty. Aquion, Inc. does not warrant that your RainSoft product and the non-RainSoft productwill perform properly when used together, and assume no liability therefore.RainSoft Division of Aquion, Inc.2080 East Lunt AvenueElk Grove Village, Illinois 60007 USA11
Installer Specification SheetDealer Name:Phone Number:Installation Number:Installation Date:Model Number:Serial Number: (See Label)Hardness:Line Pressure:Hardness:Chlorine:pH:Inlet TDS:12(psi)
NOTES13
NOTES14
NOTES15
RainSoft Division of Aquion, Inc.2080 East Lunt AvenueElk Grove Village, Illinois 60007Main Switchboard: 1.847.437.9400Customer Service: 1.800.860.7638www.rainsoft.com 2012 RAINSOFT DIVISION OF AQUION, INC.
Osmosis is a natural process that occurs in most living things. In plants, osmosis permits the absorption of water and nutrients through the root system and in people, osmosis permits the absorption of nutrients through the blood stream. To achieve Reverse Osmosis, your RainSoft system will utilize pressure to reverse the normal osmosis process.