Transcription
REVERSE OSMOSIS SYSTEMS WITH BOOSTER PUMPSINSTALLATION AND USER GUIDEMODELS: EWR 5100CEWR 5100EEWR 7100PBARRIE ONTARIO CANADA705.733.8900WWW.EXCALIBURWATER.COM
1REVERSE OSMOSIS INSTALLATION AND USER GUIDETABLE OF CONTENTSIntroduction . 2Filtration Stages . 2Mechanical Filtration . 2Carbon Block . 2Ceramic Filter . 2Reverse Osmosis Membrane . 2Enalka Filter (Premium Model Only) . 2In-Line Activated Carbon-Coconut Shell Post Filter . 2Reverse Osmosis Components. 3Automatic Reverse Osmosis Shut Off . 3Booster Pump. 3Faucet. 3Holding Tank . 3Drain Restrictor . 3Water Requirements. 3Water Supply. 3Chemistry Requirements . 4Installation . 4Tools Required . 4Site Selection for Major Components . 4Installation Instructions . 7Piping and Instrumentation Drawing . 12Reverse osmosis stages. 13Start up Instructions. 13Operation and Maintenance . 14Normal Operation . 14Changing Filters . 14Changing In-Line Activated Carbon Post Filter . 16Installation of Reverse Osmosis Membrane . 16Sanitizing the Reverse Osmosis System . 17Rinsing the Reverse Osmosis System . 18Technical Data . 18Troubleshooting guide . 19Troubleshooting Procedures . 19Replacement Part numbers . 21BARRIE ONTARIO CANADA705.733.8900WWW.EXCALIBURWATER.COM
2REVERSE OSMOSIS INSTALLATION AND USER GUIDEINTRODUCTIONYour new Reverse Osmosis Drinking Water System uses a combination of filtration technologies toreduce unwanted contaminants in your water supply. Your Reverse Osmosis System uses the 5 filtrationstages which combines to give you the best in clear sparkling Reverse Osmosis water.FILTRATION STAGESMechanical FiltrationThe Reverse Osmosis Turbidity Pre-filter will remove suspended matter that are larger than 5-micron aswell as silt, dirt, scale and rust. The 5-Micron nominal rating helps give maximum life to the ReverseOsmosis Membranes.Carbon BlockThe Reverse Osmosis Carbon Block Pre-filter contains carbon with a vast network of pores. Thetremendous surface area of these pores (typically 800-1200 square meters per gram of carbon) gives theReverse Osmosis carbon very good adsorption sites for substances that contribute to tastes and odors.The Reverse Osmosis carbon block in the Pre-filters will remove chlorine that may be present in the feedwater. This Reverse Osmosis pretreatment is necessary for membrane protection.Ceramic Filter (EWR 7100P model Only)This filter removes the bacteria, cysts and particles. This filter also prevents the microbiological growthwithin the ceramic element.Reverse Osmosis MembraneThe Reverse Osmosis Membrane is the heart of Reverse Osmosis filtration system. The Reverse Osmosissystem is designed to reduce the dissolved mineral content of the water. Minerals picked up in theenvironment by the water are measured as Total Dissolved Solids (TDS). In the Reverse Osmosis process,dissolved minerals are separated from the incoming water (feed water). The Reverse Osmosis excessminerals are rinsed to drain (the Reject Water) and clean water (permeate water) is stored in tank.Enalka Filter (EWR 5100E & EWR 7100P models only)The Reverse Osmosis Enalka filter includes an ultra-clean white granular media. Enalka filter of ReverseOsmosis system is used to neutralize the pH of water.In-Line Activated Carbon-Coconut Shell Post FilterThe Reverse Osmosis In-Line Activated Carbon Post Filter is located after the Holding Tank and reducestastes and odors that may pass through the Reverse Osmosis system. It adds a final polish to the water.BARRIE ONTARIO CANADA705.733.8900WWW.EXCALIBURWATER.COM
3REVERSE OSMOSIS INSTALLATION AND USER GUIDEREVERSE OSMOSIS COMPONENTSAutomatic Reverse Osmosis Shut OffThe Reverse Osmosis pressure switch senses when the product water tank is full and closes the feedwater supply to prevent excess Reverse Osmosis reject water going to drain when the Reverse OsmosisSystem is not producing water.Booster PumpThe Reverse Osmosis in line booster pump will increase the incoming water pressure after pre-turbidityand carbon filtration stages to 100psi for maximum efficiency and production quality through theReverse Osmosis TFC membrane TDS removal process. Power standard outlet plug 110V / 60Hz isrequired.FaucetThe reverse osmosis faucet is a designer lead free brushed nickel high flow 3/8” design goose neck withceramic disc valve.Holding TankThe reverse osmosis holding tank is 3.2-gallon plastic designed for the storage and repressurization ofreverse osmosis pure drinking water with valve.Drain RestrictorThe restrictor is vital for proper operation of the RO membrane cartridge as it keeps water flowingthrough the membrane at the proper rate ensuring the water produced is the best quality. It isrecommended the restrictor assembly be periodically inspected to be sure it is clean and unrestricted.WATER REQUIREMENTSWater SupplySourceSystem PressureTemperaturepHMaximum TDSTurbidityMunicipal / Well Water30 to 100 psi4o to 38o C (40o to 100o F)3.0 to 11.01800 mg/L 1.0 net turbidity (NTU)BARRIE ONTARIO CANADA705.733.8900WWW.EXCALIBURWATER.COM
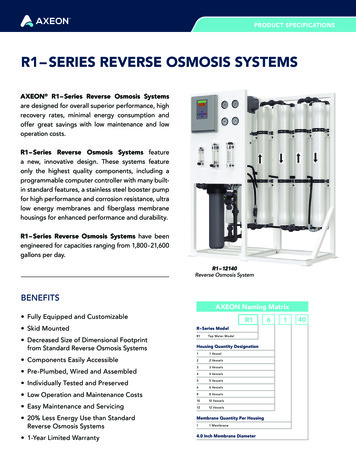
4REVERSE OSMOSIS INSTALLATION AND USER GUIDEChemistry RequirementsHardness (CaCo3)Iron (Fe)Manganese (Mn)Hydrogen Sulfide (H2S) 170 mg/L ( 10 gpg) 0.1 mg/L 0.05 mg/L0.00 mg/LINSTALLATIONTools Required1.Tape Measure10. Safety Glasses2.Phillips and Flat Head screwdrivers11. Paper Towels3.Adjustable Wrench12. Extra Plastic Tubing4.Variable Speed Drill Driver13. Basin Wrench or 10” Pipe Wrench5.Center Punch and hammer14. Low range air pressure gauge6.7/32”, 1/8” & 1/2” Drill Bits15. Liquid Chlorine Bleach7.Utility Knife16. Pencil8.Tubing Cutter17. Masking Tape9.Teflon TapeSite Selection for Major ComponentsThe Reverse Osmosis System was designed to fit under a sink, however, because of space limitations orother reasons, the Reverse Osmosis system's flexible design allows for other locations. Whendetermining the location of your Reverse Osmosis system remember that access to a cold water tap line,the household drain, and ease of Reverse Osmosis filter replacement are important considerations.All Reverse Osmosis components and tubing should be located in an area not exposed to freezingtemperatures. If winter temperatures are severe, the area should be above the minimum temperaturefor proper performance. Do not expose Reverse Osmosis system or tubing to direct sunlight.BARRIE ONTARIO CANADA705.733.8900WWW.EXCALIBURWATER.COM
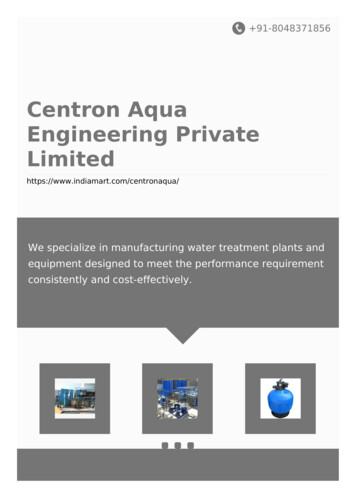
5REVERSE OSMOSIS INSTALLATION AND USER GUIDEUnder Sink InstallationBARRIE ONTARIO CANADA705.733.8900WWW.EXCALIBURWATER.COM
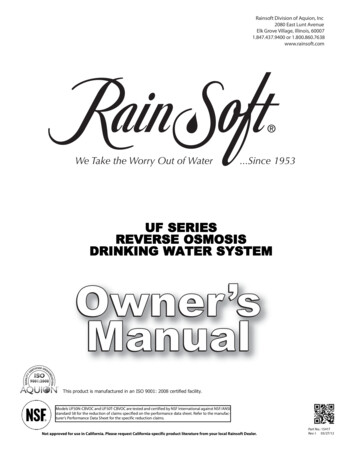
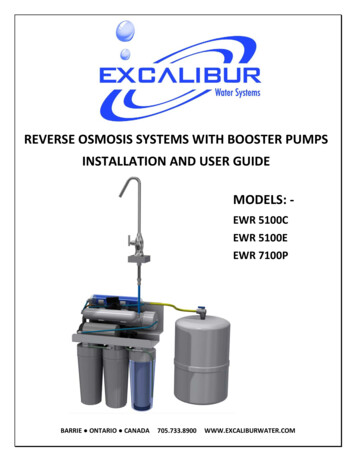
6REVERSE OSMOSIS INSTALLATION AND USER GUIDERemote Installation (Basement)BARRIE ONTARIO CANADA705.733.8900WWW.EXCALIBURWATER.COM
7REVERSE OSMOSIS INSTALLATION AND USER GUIDEDrinking FaucetReverse Osmosis faucet should be placed near the sink where drinking water is normally obtained.Convenience of use (filling of water pitchers and glasses), and an open area beneath the ReverseOsmosis faucet under the sink for attaching product and Reverse Osmosis drain tubing areconsiderations. A 2" diameter flat surface is required above and below the Reverse Osmosis installationsite.Holding TankThe Reverse Osmosis Holding Tank may be placed where it is convenient within 10 feet of the ReverseOsmosis faucet; under the sink, in an adjacent cabinet are the best choices or in a basement within 20feet of the Reverse Osmosis faucet. If a longer run of Reverse Osmosis tubing is required, a transferdelivery pump may be required extra to boost line pressure.Manifold AssemblyThe Reverse Osmosis manifold can be installed on either the right or left side of the under-sink area or acabinet. The right side is recommended because all the Reverse Osmosis tubing will be to the back ofthe cabinet and out of the way. Reverse Osmosis Installation in the basement is also an option; onelocation is near the laundry/utility sink where cold potable water and rain access are handy. Themounting location should allow adequate clearance and accessibility for Reverse Osmosis cartridgechanges.Feed Water ConnectionThe feed water has the option of angle valve adapter or self-piercing saddle valve. The Reverse OsmosisFeed Water Saddle Valve should be located as close to the manifold assembly as possible. The anglevalve adapter should be mounted over the faucet supply valve. USE A POTABLE COLD WATER SUPPLYONLY TO YOUR REVERSE OSMOSIS SYSTEM. Softened water is preferred as it will extend the life of theReverse Osmosis Membrane.Drain Line ConnectionThe Reverse Osmosis waste water must go to a drain connection with easy access. Do NOT connect theReverse Osmosis system drain line to the dishwasher drain or near the garbage disposal.Installation InstructionsAll plumbing should be done in accordance with local plumbing codes.In restricted under-sink areas, it may be easier to install the Reverse Osmosis faucet first. Allowadequate Reverse Osmosis tubing lengths for any final Reverse Osmosis component position.Push to Connect FittingsAssembly: - Cut the tube straight at the end and push the tubing intothe grey collar.Disassembly: - Push the grey release button and pull the tube out.BARRIE ONTARIO CANADA705.733.8900WWW.EXCALIBURWATER.COM
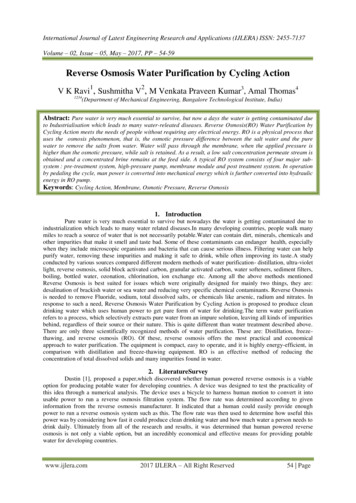
8REVERSE OSMOSIS INSTALLATION AND USER GUIDEFaucet Installation Installation on Stainless steel sinkCenter punch the hole to provide a starting point for the drill.Start with a smaller drill as a pilot and then drill a 1/2” diameter hole to accept the faucet to gothrough the countertop.Clean away any chips.Deburr any sharp edges.Drilling a porcelain sinkIt is best to use a special 1/2” diameter cutter designed for porcelain. A carbide tipped masonry bit is asecond choice. Place a piece of tape over the area to be drilled to help prevent chipping.Drill a pilot hole for the porcelain cutter. Use the pilot drill supplied with the kit or a carbide tippeddrill.When drilling the 1/2” hole, drill slowly and carefully; the porcelain chips easily.After drilling, clean the area well. Iron fillings, if left in place, can cause rust stains.Drilling a Counter topNOTE: The counter top must be less than 2¼" thick. Treat ceramic tiles as porcelain until the tile ispenetrated, then use the carbide tipped metal cutter.Formica counter tops may be drilled with a good 1/2" wood bit, drilling a 3/32" pilot hole will help keepthe bit going straight.Icemaker Hookup (If Exists): - Install a push to connect tee in the line anywhere from system to faucet.Use 3/8” tubing with inline ball valve from this tee to icemaker inlet.Note: - Always keep this ball valve and ice maker off while initial startup and servicing the system.Small Rubber WasherChrome PlateRubber GasketCounter TopLocating Plastic WasherLock WasherNutBARRIE ONTARIO CANADA705.733.8900WWW.EXCALIBURWATER.COM
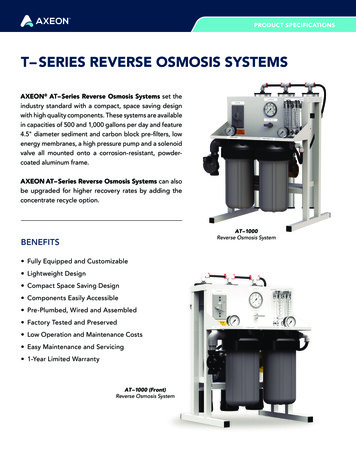
9REVERSE OSMOSIS INSTALLATION AND USER GUIDEFeed Water InstallationSelf-Piercing feed water saddle valveDecide on location. Do NOT connect Reverse Osmosis to a hot water feed line. Water over 100oF maycause permanent damage to the Reverse Osmosis Membrane. Shut the water supply off and drain the line by opening the faucet installed downstream of thislocation.Attach the self-piercing saddle valve to pipe and secure and tighten.Remove nut from the Reverse Osmosis feed water ball valve.Slide the nut onto the ¼” reverse osmosis tubing.Insert the ferrule and tube insert onto ¼” tubing.Place the ¼” tubing onto the exposed threads of the reverse osmosis feed self-piercing saddle valve.Screw the nut onto the Reverse Osmosis feed water ball valve.Note: - Keep the pipe pressurized while piercing with T-handle after installation.Figure: - Self Piercing Feed Water Valve Angle Valve AdapterIdentify the cold line.Shut the faucet supply valve off and drain the water by opening the faucet.T-Tape the male threads of faucet line valve and angle valve adapter.Fasten the angle valve adapter over the faucet line shut off valve and then install the faucet hose onangle valve adapter.Loosen the cap on ¼” quick connect port and then insert the ¼” tubing.Fasten the quick connect port cap. Note: - Only hand tighten, never use wrench or plier.BARRIE ONTARIO CANADA705.733.8900WWW.EXCALIBURWATER.COM
10REVERSE OSMOSIS INSTALLATION AND USER GUIDEFigure: - Angle Valve AdapterHolding Tank Check the Reverse Osmosis tank air pre-chargepressure. Make sure it is between 5 to 7 psig.Pull the cap/plug off the top of the Reverse Osmosistank where the Reverse Osmosis Tank Shut-Offshould go.Wrap Teflon tape three times around the ¼" maleoutlet thread. Wrap in the direction of the threads.The tape will act as a thread sealant. Screw on theReverse Osmosis Holding Tank Shut-Off Valve.Locate the 3/8" Reverse Osmosis Tubing. Firmlypress one end into the Reverse Osmosis HoldingTank Shut-Off Valve and the other end into the tee.The fittings will grab the Reverse Osmosis tubing andseal it in place. Make sure the Reverse Osmosistubing is pressed all the way in to create a pressuretight connection.BARRIE ONTARIO CANADA705.733.8900WWW.EXCALIBURWATER.COM
11REVERSE OSMOSIS INSTALLATION AND USER GUIDEDrain Clamp AssemblyChoose the Reverse Osmosis drain outlet location. The following are instructions for discharging in thesink drain pipe. Position the Drain Clamp on the sink drain pipe above the drain trap. Allow room for drilling. Tightensecurely.Use a battery powered or properly grounded drill. Using the Clamp port as a drill guide, drill a 7/32"hole through the wall of the drain pipe.Locate the 3/8" Drain Tubing connected to the Reverse Osmosis System. Route to the ReverseOsmosis tubing to the Drain Clamp and trim to length.Insert the tubing into the Drain Clamp.CAUTION: The lowest point of the line should be the point of connection to the Reverse Osmosis DrainClamp. There should be no sag in the Reverse Osmosis tubing as this may cause excessive noise as thereject water is flowing to drain.BARRIE ONTARIO CANADA705.733.8900WWW.EXCALIBURWATER.COM
12REVERSE OSMOSIS INSTALLATION AND USER GUIDEPIPING AND INSTRUMENTATION DRAWINGBARRIE ONTARIO CANADA705.733.8900WWW.EXCALIBURWATER.COM
13REVERSE OSMOSIS INSTALLATION AND USER GUIDEREVERSE OSMOSIS STAGESModel Number: - EWR 5100CStage#1st2nd3rd4th5th6thDescriptionSediment Filter 5-MicronCarbon Block 10-MicronCarbon Block 5-MicronBooster PumpRO Membrane 100GPDCoconut Shell Carbon PolisherModel Number: - EWR t Filter 5-MicronCarbon Block 10-MicronCarbon Block 5-MicronBooster PumpRO Membrane 100GPDEnalka Remineralizing FilterCoconut Shell Carbon PolisherModel Number: - EWR t Filter 5-MicronCarbon Block 5-MicronCeramic Filter 0.9-MicronBooster PumpRO Membrane 100GPDEnalka Remineralizing FilterCoconut Shell Carbon PolisherSTART UP INSTRUCTIONS Sanitize the system with good quality unscented liquid chlorine household bleach and follow thesanitizing instruction given in maintenance section of this manual. Slowly open the feed water valve counterclockwise and inspect plumbing for leaks. Fully open the holding tank valve. Let the system to fill holding tank and when system automatically shuts off, then open the faucet todrain all water stored in holding tank. Repeat this step 2 more times. Do not use the water of first two full holding tanks.BARRIE ONTARIO CANADA705.733.8900WWW.EXCALIBURWATER.COM
14REVERSE OSMOSIS INSTALLATION AND USER GUIDECAUTION: The Reverse Osmosis Membrane is shipped with a preservative in it (0.5% sodiummetabisulfite). This will be rinsed out with the first water produced. Allow the Holding Tank to fill(overnight) and discard the first two full tanks of production.When the Faucet is first opened, expect air and carbon fines (very fine black powder) from the In-LineActivated Carbon Post Filter to be rinsed out. This is normal for the first tank of water or after when Inline filter is changed.OPERATION AND MAINTENANCETools Required1. Basin Wrench or 10” Pipe Wrench5. Extra Plastic Tubing2. Low range air pressure gauge6. Pan or Bucket3. Air Pump7. Liquid Chlorine Bleach4. Liquid Chlorine BleachNormal OperationReverse Osmosis systems produce drinking water at relatively slow rates. Normal operation is to let theReverse Osmosis Holding Tank fill with water and then draw water as is needed. When the pressure inthe Reverse Osmosis Holding Tank falls to a given pressure (as the water is being used) the AutomaticShut-Off Valve (ASO Valve) will start water production and the Reverse Osmosis system will refill theReverse Osmosis Holding Tank. When the Reverse Osmosis Holding Tank is full and no water is beingused, the ASO Valve will automatically shut off the feed water to conserve water. The more water that isused (up to the capacity of the system) the better the Reverse Osmosis system will function.After periods of non-use, such as a week of vacation, it is better to empty the Reverse Osmosis HoldingTank and allow the Reverse Osmosis system to produce fresh water for use.Changing FiltersTHIS REVERSE OSMOSIS SYSTEM CONTAINS FILTERS WHICH MUST BE REPLACED AT REGULAR INTERVALSTO MAINTAIN PROPER PERFORMANCE. USE ONLY FACTORY APPROVED FILTERS.The recommended interval for changing the Reverse Osmosis filters (not the Reverse OsmosisMembrane) is every six (6) months. Local conditions may dictate more frequent changes.BARRIE ONTARIO CANADA705.733.8900WWW.EXCALIBURWATER.COM
15REVERSE OSMOSIS INSTALLATION AND USER GUIDE Close the Reverse Osmosis Feed Water Ball Valve by turning fully clockwise and open the ReverseOsmosis Dispensing Faucet by lifting the handle. Allow the Reverse Osmosis Holding Tank to empty. Loosen and remove the Reverse Osmosis Sediment Pre-filter and the Activated Carbon Pre-filterHousings. Wash the inside of the Reverse Osmosis Housings using a mild detergent and a soft cloth.Do not use abrasive cleaners or pads. Thoroughly rinse all soap from the Reverse Osmosis Housingsbefore reassembly. Sanitize the Reverse Osmosis system after the replacement of Reverse Osmosis filters:Note: Always sanitize the system before the installation of Reverse Osmosis Activated Carbon Pre-filter.BARRIE ONTARIO CANADA705.733.8900WWW.EXCALIBURWATER.COM
16REVERSE OSMOSIS INSTALLATION AND USER GUIDEChanging In-Line Activated Carbon Post Filter Close the Reverse Osmosis Feed Water Ball Saddle by turning fully clockwise. Close the Reverse Osmosis Holding Tank Valve and then open the Reverse Osmosis DispensingFaucet to release the pressure. Remove the In-Line Reverse Osmosis Activated Carbon Post Filter. Disconnect the used ReverseOsmosis Post Filter by pressing in the connector's collar and at the same time pulling the tube out ofthe fitting. Unscrew the fittings on the In-Line, re-Teflon tape them and install them on the newReverse Osmosis Post Filter. Do not over tighten the fittings. Firmly reconnect the polytubes to the new Post Filter. Slowly open the Reverse Osmosis Feed Water Saddle Valve. When water begins dripping out of the Reverse Osmosis Faucet, in the following order, close theReverse Osmosis Faucet and open the Reverse Osmosis Holding Tank Valve. When the ReverseOsmosis Faucet is first opened, expect air and carbon fines (very fine black powder), from the newReverse Osmosis Post Filter to be rinsed out. This is normal for the first tank of water.At time of start-up and each time the Reverse Osmosis filters are changed the Reverse Osmosis systemshould be sanitized.Installation of Reverse Osmosis Membrane Remove the Reverse Osmosis Membrane Housing (the closest of the three to in/out ports) Insert the Reverse Osmosis membrane into the Reverse Osmosis Membrane Housing (The O-ringshould be up toward the Reverse Osmosis Membrane Housing Cap). Check the Reverse OsmosisHousing O-ring for proper position in its groove, engage and firmly tighten the Reverse OsmosisHousing hand tight only. Typical T.F.C. Reverse Osmosis Membrane life expectancy is three to five years with Water Softenerprior to Reverse Osmosis systemBARRIE ONTARIO CANADA705.733.8900WWW.EXCALIBURWATER.COM
17REVERSE OSMOSIS INSTALLATION AND USER GUIDESanitizing the Reverse Osmosis SystemNOTE: The Reverse Osmosis system should be sanitized BEFORE installing the Reverse Osmosis ActivatedCarbon Pre-filter and the Reverse Osmosis Membrane.Use a drip pan to aid clean-up. Use a good quality unscented liquid chlorine household bleach. Fully close the feed water valve. Open the Reverse Osmosis dispensing faucet by lifting the handle and open the Reverse OsmosisHolding Tank Shut-Off Valve (the handle should be parallel with the valve body). Once all the pressure has been released, remove the Reverse Osmosis Housing on the side of themanifold labeled "SEDIMENT". Pour one capful of bleach (this is approximately 2 tsp. or 10 ml) intoone of the white Housings. Engage and firmly tighten the Reverse Osmosis Housing hand tight only. Remove all Reverse Osmosis Housings add one capful of bleach in each. Engage and firmly tightenthe Housings hand tight only. Slowly open the Reverse Osmosis Feed Water Valve (turning counter clockwise). As soon as the water begins to come out of the Reverse Osmosis Dispensing Faucet, close theFaucet. Let stand for 15 minutes.NOTE: During this time, check the Reverse Osmosis system carefully for leaks. At the end of 15 minutes, CLOSE the Reverse Osmosis Feed Water Ball Valve and open the ReverseOsmosis Dispensing Faucet. Allow the Reverse Osmosis Holding Tank to completely drain. Fully close the feed water valve and then remove the Reverse Osmosis Activated Carbon Pre-filterHousing and install the Reverse Osmosis activated Carbon Pre-filter. Firmly tighten the Reverse Osmosis Housing hand tight only.BARRIE ONTARIO CANADA705.733.8900WWW.EXCALIBURWATER.COM
18REVERSE OSMOSIS INSTALLATION AND USER GUIDERinsing the Reverse Osmosis System Slowly open the Reverse Osmosis Feed Water Saddle Valve fully counter clockwise. The Reverse Osmosis Holding Tank Valve should be open. The Reverse Osmosis System is nowmaking water. Do not use the first three full Reverse Osmosis tanks of water.TECHNICAL DATAReverse Osmosis water quality is normally measured with a TDS meter. The more dissolved solids in thewater, the higher the conductivity. The results are usually reported in Parts per Million (ppm) orMilligrams per Liter (mg/l) of Total Dissolved Solids (TDS). (Although technically they are not exactlyequal, in most discussions ppm mg/l)Reverse Osmosis Membranes are rated by the amount of dissolved solids that are rejected. This rating isa ration of the TDS in the feed water to the TDS in the product water and is reported as PercentRejection. If the feed water contained 100 ppm of TDS and the product water contained 10 ppm of TDS,90 ppm have been rejected and the reject ration is 90%.Percent Rejection Feed TDS Product TDSFeed TDSEXAMPLE: Feed water is 500 ppm TDS and the product water is 75 ppm TDS.Percent Rejection 500 – 75 x 100%500Percent Rejection 0.85 x 100% or 85%BARRIE ONTARIO CANADA705.733.8900WWW.EXCALIBURWATER.COM
19REVERSE OSMOSIS INSTALLATION AND USER GUIDETROUBLESHOOTING GUIDETroubleshooting ProceduresProblem1) Low quantity of ReverseOsmosis Product Waterfrom Holding Tank2) Low pressure at theReverse Osmosis DispensingFaucet3) Tastes and odors in theproduct waterPossible Causea) Reverse Osmosis Feed Water BallValve is plugged or closedb) Clogged Sediment Pre-filter orActivated carbon Pre-filterc) Low water pressured) Reverse Osmosis membrane isfoulede) Plugged in-line activated carbonpost filterf) Air pre-charge pressure in holdingtank is too highg) Air pre-charge is too lowh) Air bladder in the holding tank isrupturedi) Holding tank valve is closedj) No drain flow, the drain restrictor ispluggedk) The check valve is stuckl) ASO valve is malfunctioninga) In-Line activated carbon post filteris pluggedb) Air pre-charge in the ReverseOsmosis Holding Tank is too lowSolutiona) Open Valve or unclogb) Replace Reverse Osmosis filtersc) Reverse Osmosis feed water pressure must beabove 40 psigd) See feed water operating limits and correct thecause of fouling, then replace membranee) Replace post filterEmpty water from Reverse osmosis holding tank andwith the faucet open, adjust air pressure to 5-7 psig(35-48 kPa) range.h) Replace the holding tanki) Open the holding tank valvej) Clear or replace Drain Restrictork) Free the check valvel) Replace ASO valvea) Replace post filterb) Empty water from holding tank with faucet open,adjust air pressure to 5-7 psig (35-48 kPa)c) Holding tank valve is partially closedc) Fully open the holding tank valved) The dispensing faucet is out ofadjustment or faultye) Holding tank is depleted afterheavy water usagef) Low water productiona) The in-line or activated carbon prefilter is exhaustedd) Repair or replace dispensing faucetb) There is a foreign matter in the ROholding tankb) Clean, flush and sanitize the system. Replace thefiltersc) The product water and drain linesare reversedd) Dissolved gases in the RO feedwatere) Increase in product water TDSc) Correct plumbingBARRIE ONTARIO CANADA705.733.8900e) Allow holding tank to refill or add second holdingtank to increase the storage quantitySee troubleshooting section#1a) Replace RO filtersd) Pre-treat RO feed water to remove dissolvedgases.e) See high TDS in the RO product water sectionWWW.EXCALIBURWATER.COM
20REVERSE OSMOSIS INSTALLATION AND USER GUIDEProblem4) Drain water overflows atthe air gap faucet5) High Total DissolvedSolids (TDS) in the ProductWaterPossible Causea) Drain tubing is cloggeda) Clear drain tubingb) Drain clamp hole is misalignedb) Align with hole in the drain pipec) Excessive drain flow ratec) Replace Reverse osmosis drain restrictora) Clogged sediment Pre-filter orActivated Carbon Pre-filtera) Replace clogged filtersb) Low water pressureb) Reverse Osmosis feed water pressure must beabove 40 psigc) RO membrane O-ring is crimpedc) Check or replace O-ringd) RO membrane brine seal is notsealing up into the manifold headd) Check O-ringe) RO membrane is expendede) If RO membrane life
Reverse Osmosis carbon very good adsorption sites for substances that contribute to tastes and odors. The Reverse Osmosis carbon block in the Pre-filters will remove chlorine that may be present in the feed water. This Reverse Osmosis pretreatment is necessary for membrane protection. Ceramic Filter (EWR 7100P model Only)