Transcription
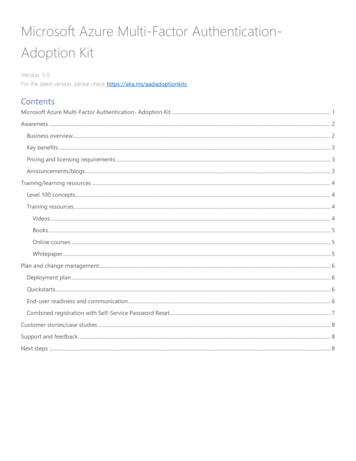
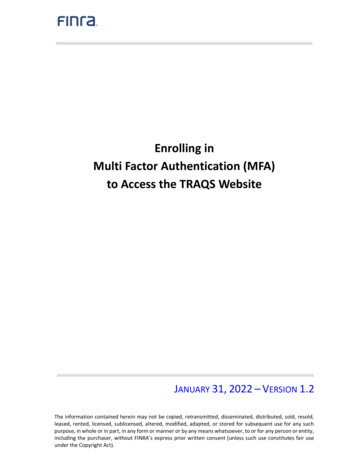
Multi-Factor Authentication using NAM & AAF with Cisco DuoMicro Focus - Cool Solutionby Gary L. GilbertIntroductionMulti-Factor Authentication (MFA) provides enhanced security in which at least two factors of verification are required forauthentication. This extra layer of security helps prevent fraudulent access. For example, a cybercriminal might know a stolenusername and password. However, the perpetrator is require to provide an additional form of identification known as a secondfactor. In general, there are three types of authentication factors commonly used:1.Something You Know – This is typically your username and password. This is anything remembered, but can be stolenthrough social compromise or sophisticated cybercriminal techniques.2.Something You Have – This includes anything you have in your physical possession for additional verification, such as smartphones, smart cards, USB drives, soft or hard tokens, push notifications, and more.3.Something You Are – This is also known as biometric identification. This includes any part of the physical human body usedfor verification, such as fingerprints, palm scanning, facial recognition, retina scans, iris scans, and voice verification.This article will cover the “Something You Have” factor of MFA by describing steps to integrate Cisco Duo with NetIQ AccessManager (NAM) and NetIQ Advanced Authentication Framework (AAF). This article assumes you are familiar with Access Manageralong with how to configure authentication methods and contracts. It also assumes you are familiar with Advance Authenticationframework and how to configure methods and chains. For detailed administration guidance on these products, please refer to thelatest product documentation located at https://support.microfocus.com.Technical OverviewPrerequisitesBefore starting, you will need to sign up for a free trial account with Cisco Duo at Duo.com. Once you open an account, you canenroll users by navigating to Duo Dashboard Users. For more information on how to install or enroll users, go tohttps://duo.com/docs/enrolling-users. You will also need to install the Duo Authenticator application on your mobile device.You will need a functioning NAM Identity Provider (Version 4.4 or later), which must be able to communicate with an AdvancedAuthentication server (Version 6.1 or later). For this solution, these servers must share the same user store LDAP directory.Solution Process FlowThe solution diagram below illustrates the components involved in setting up multi-factor authentication with Cisco Duo. The setupwill describe how to integrate the Advanced Authentication Framework (AAF) with the NAM Identity Provider using the OAUTH2integration method.The setup will also describe how to integrate AAF using the RADIUS Client method to interact with Duo Security Services. Thisinteraction requires a Duo Authentication Proxy server, which acts as a broker between AAF and Duo Security Services. The DuoAuth Proxy software is available for download from the Duo website including instructions on how to install the server. The DuoAuth Proxy should be installed in the same network segment as the NAM and AAF servers, and allow for communication over UDPPort 1812.In order for the Duo Auth Proxy to trust users, it must authenticate the user after receiving a second-factor authentication requestfrom the AAF server. The Duo Auth Proxy will determine how to authenticate the user based on the options chosen during theconfiguration setup. There are several options available for primary authentication including Active Directory, a separate RADIUS1
server, or just verifying the RADIUS client passcode (RADIUS Duo-Only). For simplicity, this solution will describe how to setup theRADIUS Duo-Only configuration since users will already be authenticated via NAM and AAF.Once the Duo Auth Proxy completes primary authentication, it will establish a secure connection with the Duo Security Service overstandard TCP port 443. At this point, the second-factor authentication is administered through the Duo Security service. Dependingon how you enrolled your mobile device, the service will conduct an automatic push notification or call to the user’s mobile device,or provide a passcode using the Duo authenticator application.The user must interact and accept the second-factor authentication request. The results are sent back to the Duo Auth Proxy, whichgrants the request through the Advanced Authentication server, which is integrated with NAM. The user is then allowed access tothe protected resources they requested.Installing the Duo Authentication Proxy ServerOverviewThe Duo Authentication Proxy is an on-premises software service that receives authentication requests from your local devices andapplications via RADIUS or LDAP, optionally performs primary authentication against your existing LDAP directory or RADIUSauthentication server, and then contacts Duo to perform secondary authentication. Once the user approves the two-factor request(received as a push notification from Duo Mobile, or as a phone call, etc.), the Duo proxy returns access approval to the requestingdevice or application. You may find detailed installation instructions for the Duo Authentication Proxy by visiting the Duo referenceguide at https://duo.com/docs/authproxy-reference.System RequirementsThe Duo Authentication Proxy can be installed on the latest versions of the following operating systems:2
-Windows 2012 or later (Server 2016 or 2019 are recommended)-SLES 12 or later-Red Hat Enterprise 7 or later-CentOS 7 or later-Ubuntu 16.04 or later-Debian 7 or later.Installation InstructionsThe Duo Authentication Proxy can be installed on virtual or physical hosts. The recommended system specifications are at least 1CPU, 200 MB disk space, and 4 GB RAM (although 1 GB RAM is sufficient).General installation instructions are as follows:Windows1.Install a Windows Server using the recommended versions listed above.2.Download the latest software using the following link - 3.Launch the Duo Authentication Proxy installer on the target Windows server as a user with administrator rights and followthe on-screen prompts.Linux1.Install a Linux Server using the recommended distributions and versions listed above.2.Install the following dependencies including Perl, Python 2.6 or 2.7 (including development headers and libraries), and acompiler toolchain installed. On most recent RPM-based distributions — like Fedora, RedHat Enterprise, and CentOS — youcan install these by running (as root): yum install gcc make python-devel libffi-devel perl zlib-develOn Debian-derived systems, install these dependencies by running (as root): apt-get install build-essential python-dev libffi-dev perl zlib1g-dev3.Download the latest software using the following link - .tgz4.Extract the Authentication Proxy files and build it as follows: tar xzf duoauthproxy-latest-src.tgz cd duoauthproxy-version-src make5.Install the authentication proxy (as root): cd duoauthproxy-build ./install6.Follow the prompts to complete the installation. The installer creates a user to run the proxy service and a group to ownthe log directory and files. You can accept the default user and group names or enter your own. Instructions for configuring3
and starting/stopping the service will be explained later in this solution.Configuring the Duo Authentication Proxy ServerOverviewIntegrating Duo Authentication Proxy with the Advanced Authentication server requires using a RADIUS Client / Server interaction.The Advanced Authentication server will act as the RADIUS Client and the Duo Authentication Proxy will host the RADIUS server.Enroll a RADIUS application on the Duo Authentication Proxy1.2.3.4.Login to your Duo administration accountOn the left-side navigation menu, click on Applications Protect an ApplicationFrom the list of applications, scroll down and find the RADIUS application. Click the Protect button for the RADIUSapplication.An application Integration Key, Secret Key and API hostname will be generated. Take note of these values as you will needthem when setting up the RADIUS server configuration on the Duo Authentication Proxy and on the AAF server.Configure the RADIUS settings on the Duo Authentication Proxy1.2.Login to the Duo Authentication Proxy server as the Administrator (or root on Linux).Edit the Duo Authentication Proxy configuration file:Windows - Install Location\Duo Security Authentication Proxy\conf\authproxy.cfgLinux - /opt/duoauthproxy/conf/authproxy.cfg3.Remove all of the default settings and add the following configuration using the generated RADIUS application settingsfrom the step above:[duo only client][radius server auto]ikey RADIUS application Integration Key skey RADIUS application Secret Key api host RADIUS application API Hostname radius ip 1 IP Address of your AAF server radius secret 1 netiqsecret4
Startup the Duo Authentication Proxy serviceOpen a Windows command prompt or Linux terminal window and start the Duo Authentication Proxy:Windows - net start DuoAuthProxyLinux - /opt/duoauthproxy/bin/authproxyctl startNote: You can also stop the service by replacing the “start” directive with “stop”.Integrating Duo Authentication Proxy with the Advanced Authentication Framework (AAF)OverviewAs mentioned above, the Advanced Authentication Framework will act as a RADIUS client, which interacts with the RADIUS serverhosted on the Duo Authentication Proxy.Configure the Advanced Authentication RADIUS Client1.2.3.4.5.Open the Advanced Authentication Administration portal.Click Methods RADIUS Client.Specify the IP address of DUO Proxy server in Server.Specify the secret key for DUO Authentication Proxy in the Secret field.Specify the port for the RADIUS authentication request. The default port is 1812.6. Click Save.Create a New Chain for the RADIUS Client1.2.Click Chain New Chain.Specify Radius Client in Name.5
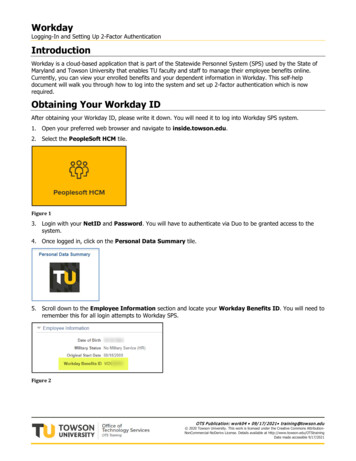
3.4.5.Set “Is enabled” to ON.Move the RADIUS Client from Available to Used listSpecify the repositories, roles and groups in Repos, Roles and Groups.6. Click Save.Test Duo Authentication using the RADIUS Client1.2.Login Advanced Authentication Self-Service portal as a normal user.Click on the RADIUS Client available under the Enrolled Authenticators.6
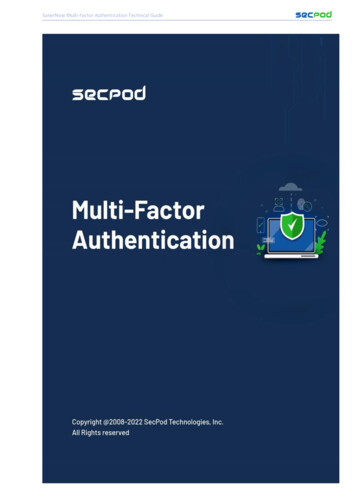
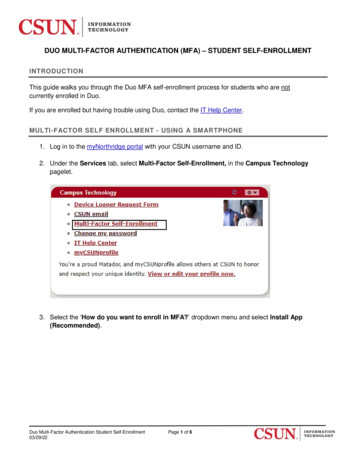
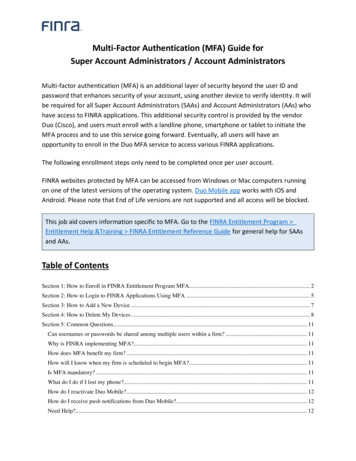
3.4.Enter the Repository Name \ Username . For example: EDIRECTORY\ggilbertClick the Test button.5.The following prompt will ask for a Password.IMPORTANT: The password is required to perform primary authentication against the Duo Authentication Proxy. Since wedid not setup an authentication source on the Duo Authentication Proxy, the server will instead verify the user by using theDuo passcode (i.e. RADIUS duo only client).During a real production setup, the Duo Authentication server should be setup using AD with users synchronized to theLDAP directory. The user would then authenticate by entering their LDAP password. Alternatively, when using NAM, singlesign-on would pass the LDAP password to AAF and allow for a seamless login.6.Enter the passcode displayed in the Duo Authenticator application using your mobile device. If accepted, the DuoAuthentication Proxy will forward the request to the Duo Security Service. If you enrolled in push notification, you willreceive a push notification. If everything worked successfully, you will be granted access and you will get a popup showing asuccessful test.7
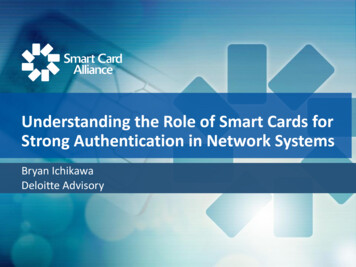
Integrating Advanced Authentication Framework (AAF) with Access Manager (NAM)OverviewThe final step in this solution is to integrate Advanced Authentication Framework with Access Manager. There are many variationsfor setting up multi-factor authentication with Access Manager (NAM). The most common way to enable multi-factor authenticationis by associating more than one method to an authentication contract. When integrating with AAF, you can allow NAM to be the firstfactor, and then use AAF to spawn the second factor authentication. We will use this approach in the steps below. Alternatively, youcould allow AAF handle both factors for authentication.Create a new OAuth2 event in AAF for integration to Access ManagerIn the Advanced Authentication administration console, perform the following steps to configure an event:1.2.Click Events New Event.Specify a name for the event.3. Select OAuth2 from Event type.4. Select the Duo Radius Client chain that you created earlier and optionally any other required chains you wish to use withNAM.NOTE: You need Client ID and Client secret while configuring the Advanced Authentication server in Access Manager. Youcannot view the Client secret later, therefore you must make a note of this value.5.Enter the Redirect URI: https:// identity server-url : port /nidp/oauth/nam/callbackConfigure the Advanced Authentication Server Details in Access Manager1.2.3.4.Login to the Access Manager Console.Click Devices Identity Servers Shared Settings Advanced Authentication.Specify the domain name or IP address of the Advanced Authentication server and port in Server Domain.Select Integrate using OAuth under OAuth Event Configuration.8
5.Specify the Event Name, Client ID, and Client Secret.6.7.8.Click Apply.Verify that the /etc/aaplugin/config.xml file is available on each Identity Server node.Verify that the endpoint has been created in the Advanced Authentication server. Go to the Advanced Authenticationadministration portal and verify that the hostname or domain name of the Identity Server cluster is displayed as theendpoint under Endpoints.9.In Access Manager, go to Dashboard and click Certificates Trusted Roots to verify if the Advanced Authentication servercertificate is available. If the certificate is not available, then perform the following steps to import the certificate:a. Click Certificates Trusted Roots Auto-Import from Server.b. Specify the server IP/DNS, port, and certificate name.c. Click OK.10. Make sure the same user store or repository is being used in the Advanced Authentication server.9
Configure Multi-Factor Authentication with Access ManagerAs state earlier, this solution focuses on Access Manager performing the first factor authentication when protecting a resource or anapplication. We will use Advanced Authentication to perform the second factor authentication using the Duo integration that wealready setup.The following steps show how to setup multi-factor authentication and is applicable when using the OAuth-based approach forintegration with AAF:Create a new Class1.2.3.4.5.Login to the Access Manager Console.Create a new class.Click Devices Identity Servers Edit Local Classes.Click New, then specify the name for the class and select Advanced Authentication Generic Class for the Java classClick Next Finish.Create a new Method1.2.Click Devices Identity Servers Edit Local Methods New.Select a chain you created in Advanced Authentication Chains on the AAF server. If you do not specify any chain, the user isprompted to select the preferred chain for authentication.Create a new Contract1.Click Devices Identity Servers Edit Local Contracts New.10
2.4.In URI, specify a value that uniquely identifies the contract from all other contracts. This value is used to identify thiscontract for external providers and is a unique path value that you create.In Methods, first add an Access Manager's authentication method (for example, Secure Name/Password - Form) and thenthe Advanced Authentication method that you created in the preceding step.NOTE: You can use more than one Advanced Authentication methods.Click Apply OK.5.On the Authentication Card tab (or next from the wizard), enter the display Text and Select an Image.6.Update Identity Servers.3.11
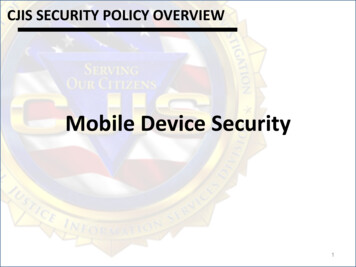
Test Multi-factor Authentication using NAMFor a simple test, we will use the multi-factor authentication to access the built-in Identity Application portal.1.2.Launch a new browser and enter the URL for you IDP – https:// idp.yourdomain.com : port /nidp.Click on the triple horizontal bars at the top-left of the login page, select the new contract that you setup in the previousstep.3.You will first be prompt for your LDAP credentials as the first factor, specified in the contract. Enter your Username andPassword.4.5.Click Sign In.Next, the request will be forwarded to the Advanced Authentication server, in which you will be prompt for the RADIUSPassword.NOTE: The password is required to perform primary authentication against the Duo Authentication Proxy. Since we did notsetup an authentication source on the Duo Authentication Proxy (i.e. RADIUS duo only client), the server will instead verifythe user by using the Duo passcode.12
During a real production setup, the Duo Authentication server should be setup with AD with users synchronized to the LDAPdirectory. The user would then authenticate by entering their LDAP password. If using an Access Gateway to protect theAAF URL, you can use web single sign-on to automatically inject the password and allow a seamless login experience.6.Enter the passcode displayed in the Duo Authenticator application using your mobile device. If accepted, the DuoAuthentication Proxy will forward the request to the Duo Security Service. If you enrolled in push notification, you willreceive a push notification. If everything worked successfully, you will be granted access to the Identity Applications portal.TroubleshootingThis solution can be deployed using NAM Identity Provider (version 4.4 or later) and Advanced Authentication server (version 6.1 orlater) and Duo Authentication Proxy server (version 3.2.4). If you have issues during the deployment of this solution, the followinglogs are available for troubleshooting:Duo Authentication Proxy Log FileLinux - /opt/duoauthproxy/log/authproxy.logWindows - Install Location\Duo Security Authentication Proxy\log\authproxy.logIdentity ProviderLinux - outWindows - c:\Program Files\Novell\Tomcat\logs\stdout.logAdvanced Authentication Server1.2.3.Open the Advanced Authentication administration console.Click on the Logs navigation menu.Click on the RADIUS tab13
This article will cover the "Something You Have" factor of MFA by describing steps to integrate Cisco Duo with NetIQ Access Manager (NAM) and NetIQ Advanced Authentication Framework (AAF). This article assumes you are familiar with Access Manager along with how to configure authentication methods and contracts.