Transcription
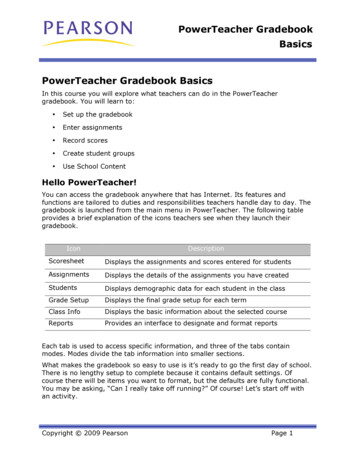
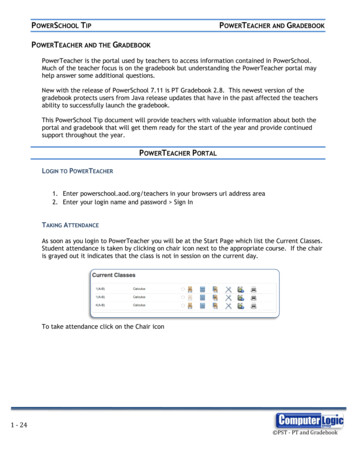
POWERSCHOOL TIPPOWERTEACHER AND GRADEBOOKPOWERTEACHER AND THE GRADEBOOKPowerTeacher is the portal used by teachers to access information contained in PowerSchool.Much of the teacher focus is on the gradebook but understanding the PowerTeacher portal mayhelp answer some additional questions.New with the release of PowerSchool 7.11 is PT Gradebook 2.8. This newest version of thegradebook protects users from Java release updates that have in the past affected the teachersability to successfully launch the gradebook.This PowerSchool Tip document will provide teachers with valuable information about both theportal and gradebook that will get them ready for the start of the year and provide continuedsupport throughout the year.POWERTEACHER PORTALLOGIN TO POWERTEACHER1. Enter powerschool.aod.org/teachers in your browsers url address area2. Enter your login name and password Sign InTAKING ATTENDANCEAs soon as you login to PowerTeacher you will be at the Start Page which list the Current Classes.Student attendance is taken by clicking on chair icon next to the appropriate course. If the chairis grayed out it indicates that the class is not in session on the current day.To take attendance click on the Chair icon1 - 24 PST - PT and Gradebook
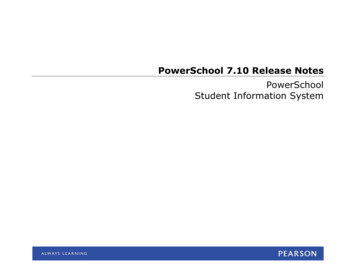
1.2.3.4.5.The Class roster will appear with an entry area for attendance codes.Use the drop-down menu in the upper left to select the appropriate codeClick in the box next to the student to enter that codeRepeat steps 2-3 for all codes neededClick Submit to save your attendanceNote: attendance taken by the front office will show for the student but you will not be able toadjust that attendance.As soon as you enter a code for a student a comment buble will appear to the right of the codeClick on this to enter information about the attendance code as needed. Once a comment hasbeen entered about a student’s attendance code it will change from gray to blue2 - 24 PST - PT and Gradebook
When attendance has been taken and submitted for a class, the Current Classes screen will showa green indicator to the left of the chair icon.THE BACKPACK ICONSo many teachers only use the PowerTeacher portal for attendance. I realize that most of ateacher’s life is spent entering grades but if nothing else it’s important you know what is in thebackpack.The Backpack is the teachers view into student record information. From the backpack you cansee the students demographics, quick lookup screen (same screen seen by parents andadministrators), historical grades, parent and student activity on the student record, scheduleand teacher comments from all his teachers.Click on the Backpack iconThe class list will appear on the left-side with basic information about how to proceed in themain area of the screen. Click on a student name to open the default student screen.3 - 24 PST - PT and Gradebook
NOTE: Once a new screen is selected you can view that screen for different students by clickingon their First Name in the class list. If you click on the students Last Name you will return to thedefault student screen.COMMON STUDENT SCREENSQuick Lookup –gives an At-a-Glance view of the student. Parents and administrators can viewthis same screen.Net AccessSummaryShows the number of times a parent or student has logged in to view theirinformationDemographicsShows the basic student demographics entered for the student in PowerSchool4 - 24 PST - PT and Gradebook
TeacherCommentsShows comments entered by the students other teachers by reporting termSETTING THE DEFAULT STUDENT SCREENWhen using the backpack, by default when you click on a student’s last name it opens the defaultstudent screen. This can be set to a screen that you use most often. Keep in mind that whenyou click on the student’s first name and stays on the last screen selected.To set your default student screen:1.2.3.4.5.Click on the PowerTeacher in the upper left to return to the Start PageClick Personalize from the left-side menuFrom the Personalize menu click Default Student ScreenUse the drop-down to select your favorite (mine is Quick Lookup)Click SubmitPOWERTEACHER GRADEBOOKPOWERTEACHER GRADEBOOK 2.8This latest release of PowerTeacher Gradebook protects users from Java release updates thathave, in the past, affected teacher’s ability to successfully launch the gradebook. It providesteachers the option of using the old launch method or installing a new launch method for thegradebook. Teachers who opt for the new Launch method will be safe from the threat of futureJava updates affecting their ability to launch the gradebook. Once this new installer isdownloaded and enabled on a teacher’s computer they will then be able to launch the Gradebookfrom within PowerTeacher as they have in the past OR they can now launch it directly from theDesktop Icon that is created during the initial installation process.Note that this install process will need to be completed for each device a teacher uses toaccess his/her gradebook5 - 24 PST - PT and Gradebook
To Download the New Installer for Windows1. Login to PowerTeacher2. On the left-side of the Start Page find the section labeled New Gradebook Launch. ClickRun Installer3. This will open the Install Wizard4. STEP 1 – Download the Installer Click on the link to Download Installer Depending on the browser you are using theDownloaded file will go to whatever location youdesignate these files go. (i.e. Downloads, temporaryfiles, etc). Find the location of the file and double-click theinstaller file labeled: PTG-Client-Install-win.exe Click on the Run from the dialogue box5. STEP 2 – Choose Install Location In the next window “browse” for the location towhich you want the file saved or click Install to savethe file to the default location Allow the Install Process to perform6. STEP 3 – Finish Installation6 - 24 PST - PT and Gradebook
Click Finish to complete the installation7. STEP 4 – Activate Installation In PowerTeacher, from the left-side of the Startpage click Launch The gradebook will begin to launch much as it has inthe past. You will see a window that shows that thegradebook is loading The first time you launch the gradebook with thenew installer you may come to a Login Screen. Thisscreen will ask you to enter you School, Usernameand Password. Enter the appropriate informationand click Sign in8. STEP 5 – Launching the Gradebook Once the gradebook has been successfully installedyou will now have two options for launching thegradebookoUsing the Launch Button withinPowerTeacher. 7 - 24If you use this method, you willimmediately be logged into yourgradebook as you have in the past PST - PT and Gradebook
oUse the NEW Desktop Shortcut Using the desktop shortcut allows youto login to your gradebook withouthaving to login to PowerTeacher.With this method you will Sign In tothe gradebook using the sign in screeshown here.To Download the New Installer for MACMAC users must be running Mac OS X 10.7.3 or later!1. Login to PowerTeacher2. On the left-side of the Start Page find the section labeled New Gradebook Launch. ClickRun Installer3. This will open the Install Wizard4. STEP 1 – Download the Installer Click on the link to Download Installer Depending on the browser you are using theDownloaded file will go to whatever location youdesignate these files go. (i.e. Downloads, temporaryfiles, etc).8 - 24 PST - PT and Gradebook
If provided with the option, (see right) identifywhere you want the file saved and click Save.5. STEP 2 – Run the Download If the download does not start automatically, locatethe Gradebook.dmg file and double-click to run,6. STEP 3 – Install the Launcher On the first installer window, double click on the iconto install If prompted to accept an application Downloadedfrom the Internet click: Open7. STEP 4 – Continue Installation On the next screen click Run8. STEP 5 – Finish Installation Read the directions provided on this screen andclick OK to complete the installation9. STEP 6 – Activate Installation In PowerTeacher, from the left-side of the StartPage click Launch 9 - 24If the browser asks you to save the file, enter thelocation for the save and click Save. Once saved,double click on the LaunchGradebook.ptg file fromthe saved location PST - PT and Gradebook
The gradebook will begin to launch much as it has inthe past. You will see a window that shows thegradebook is loading The first time you launch the gradebook with thenew installer you may come to a Login Screen.Enter you School, Username and Password then clickSign In.10. STEP 7 – Launching Gradebook Once the gradebook has been successfully installedyou will have two options for Launching thegradebook:oUsing the Launch Button withinPowerTeacher. oIf you use this method, you willimmediately be logged into yourgradebook as you have in the pastUse the NEW Desktop Shortcut Using the desktop shortcut allows youto login to your gradebook withouthaving to login to PowerTeacher.With this method you will Sign In tothe gradebook using the sign in screeshown here.10 - 24 PST - PT and Gradebook
For additional help you can watch a Video Demonstration by going to:Windows Users:https://www.youtube.com/watch?v Lam Al4x5F0&feature youtu.beMac Users:https://www.youtube.com/watch?v 7mgiIxucBNo&list UUyx2EEeONitePOJww0mpCbA&feature shareTHE GRADEBOOK SCREENSWITCHING BETWEEN CLASSESThe upper Left box of the gradebook is the Classes area. By default when you first launch thegradebook this will show your Current Classes.11 - 24 PST - PT and Gradebook
Click on the Drop-Down next to Current Classes and you can switch to previous years and view theclasses. This comes in Handy if you want to Copy Assignments or Grade Setups from previousyears.CATEGORIESThink of Categories like Buckets or Folders that you put assignments into. You MUST have atleast the default categories. You can create additional Categories or your own. When categoriesare created you set certain values such as: points possible for the assignment, any extra points, ifassignment is included in the final grade, when and how the assignments will be published. All ofthese settings are transferred to any assignments placed in this category.Adding a Category1. Click on the ‘ ’ in the upper right of theCategory Area2. The Edit Assignment Category window willopen. Enter the Following: Name for the CategoryAbbreviation for the CategoryPick a colorPoints Possible. This will be thedefault for any assignment in thiscategory. It can always be overwrittenon any assignments Extra Points. By default willassignments in the category be givenany automatic extra points? Typicallythis is set to 0.Score Type. Select Points, Percentageor Letter GradeCheck the box to Include assignments inthis category in the Final GradeWhen will assignments get publishedfor parents and students. Immediately,On a specific date, x number of daysbefore the due date, on the due dateor never. On date contains the date to publish ifon a specific date is chosen in thePublish Assignments drop-downDays Before Due – enter the daysbefore the due date to publish if daysbefore due is chosen in the PublishAssignments drop-down12 - 24 PST - PT and Gradebook
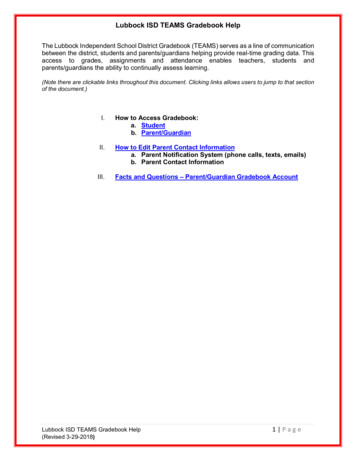
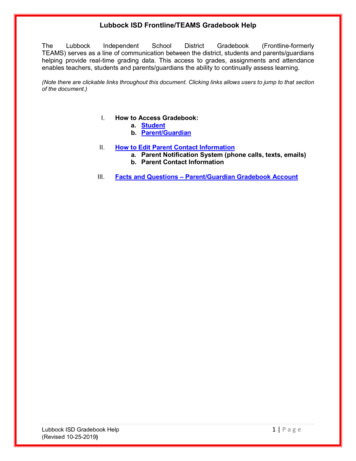
Check Publish Scores to show scoresentered to parents and students.Enter a description.3. Click Ok to save the CategoryGRADE SETUPWhen PowerSchool was setup for your school, the school determined which grades would be stored for thecourses (Q1, Q2, Q3, Q4, Y1). As a teacher, you will need to setup how those grades will be calculatedwithin your gradebook. Grades can be calculated as Total Points, by Category Weights or as Term Weights.Total PointsThis is the default. When using total points, grades are calculated by taking the total number of pointsa student earned for their assignments and dividing it by the total points possible.Category WeightsMost commonly used for quarter or trimester grades. By using category weights you can specify theweight of each category. This gives the ability to weight tests and projects higher than homework andquizzes, placing the emphasis on the assessment tools and not the learning.Term WeightsMost commonly used for Final Grades (semester or year). Using term weights you give each term apercentage of the final grade. Typically this would be something like: Y1 25% Q1 25% Q2 25% Q3 25% Q4.NOTE: Term Weights cannot be used for the lowest term ie. Quarters or TrimestersWeight ExampleThis example shows how using total points can skew a students grade, in this example it is skewed in apositive direction but it could go the other way as well. Using category weights ensures that eachassignment type carries a designated amount of the overall grade. Assuming Category weighting wassetup to have Homework 10%, Projects 30%, Tests 40%, Quizzes 20%13 - 24ASSIGNMENTCATEGORYPTS POSSIBLEPTS EARNEDTOTAL POINTSGRADECATEGORYWEIGHT 0 720/80090%1001007595909010070100x10% 1085x30% 25.590x20% 1885X40% 34Overall 87.5% PST - PT and Gradebook
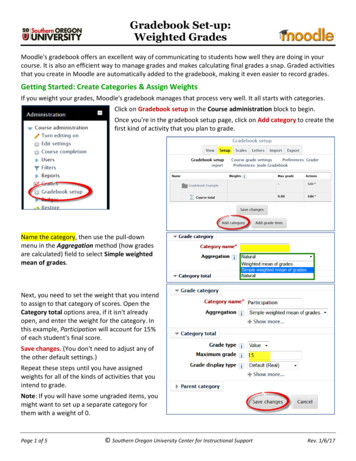
Grade Setup1. Click on the Grade Setup Tab in the top Iconbar2. The reporting terms identified in PowerSchoolwill be listed.3. Double Click on a Quarter grading term toopen the window where you can setup thecalculation method. By default Total Pointswill be selected.4. Click on Category Weights. This opens the areato add the categories to be evaluated. Onlyadd categories that you are sure you will haveassignments in.5. Click Add Category at the bottom of thecategory area to select categories. Place acheck in the box to the left of the categoriesyou plan on using for this term. Click Ok toaccept these categories.6. Enter the value of weight each category willhave. When entering weights you can base itoff a 100 point scale and say homework will be10% of the overall by entering a 10 in theweight of the homework, quizzes 20% so entera 20, Projects 30% so enter a 30 and Test 40%so enter 40. The values entered should all addto 100.Weights can also be entered as a base value.If homework is your lowest weighted category14 - 24 PST - PT and Gradebook
it would carry and value of 1 and all othercategories would be set according to that. Forexample quizzes carry 2 time the weight ofhomework so they have a value of 2 and so on.7. Click Save to save the setup for Q1. Repeatsteps 3-7 for all quarters or follow thedirections below to copy the setup from onequarter to the next.8. Once the quarters are setup you will need tosetup the Y1 or full year grade. Double-clickon Y1. By default Y1 is also set to total pointsas it’s calculation method9. Since Y1 encompasses lower-level terms youcan select Term Weights. Selecting termweights will allow the final grade to be apercentage of each terms final grade. Forexample Y1 25% of Q1 25% of Q2 25% ofQ3 25% of Q4. This is typically what parentsexpect to see.If each term is equally weighted you only needto select term weights and you are done. Justlike with category weights, you can adjust theweight column to meet your needs.10. Repeat steps 3 – 10 for all classes on yourschedule. If all classes will be graded thesame see the directions below on how to copygrade setup from one class to another.Copy Term Setup from One Term to AnotherIf all your terms for a course will be setup with the same category weights, setup one term and copy itto the others. To copy terms:15 - 241.Setup the first term using the directions above.2.Double-click on the term to open the details.3.Click on Copy at the top of the detail area.4.Select Q1 only to copy the quarter setup tothe rest of the quarters for this course.5.Click OK PST - PT and Gradebook
6.Check the boxes in front of the otherquarters.7.Click Next.8.Click Finish. The remaining quartersnow have the same setup.Copy term setup from one term to anotherIf all your classes are going to have the same setup for quarters and full year grade, completely setupone class and copy the setup to the other classes. To copy from one class to another:1.Setup the first class using the directions above.2.Double-click on the Y1 term to open the details.3.Click on Copy at the top of the detail area.4.Select Entire class as what it is you want tocopy.5.Click OK6.Check the boxes to the left of the classes thatwill have the same setup.7.Click Next8.Click Finish. All checked classes will now havethe same setup for the quarters and finalgrades.16 - 24 PST - PT and Gradebook
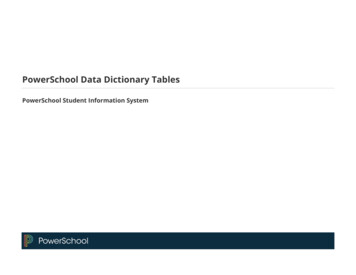
CREATING ASSIGNMENTSAssignments can be created in the Scoresheet or Assignments tab. Either place will use the “ ” to add anassignment and the “-“ to remove an assignment. This document will cover creating assignments in theScoresheet.How to Add an Assignment1.From the Scoresheet tab, select the reportingterm that will contain the assignment. NOTE:if the assignment due date is not within thisterm it will not be visible on the scoresheet.2.Be sure the Assignments Mode is highlightedand click on the “ ” to the left of theassignments area3.Enter the following on the Assignments tab: Name – Required Abbreviation – Required Select a Category – Required 17 - 24The following are defaults from thecategory and can be adjusted perassignment:Score Type (Points, Percent or Letter)Points PossibleExtra PointsWeight – recommend this never be changedDate Due – default is todayInclude in Final GradeDescription4.Click on the Publish tab and adjust as needed: Publish Assignment – determines whenparents will see the assignment. Can beset for: Immediately, On a Specific Date,Days Before Due, On Due Date or Never. If set to publish on a Specific Date enter OnDate If set to publish Days Before Due, enter thenumber of Days Before Due Publish Scores. If a score is used tocalculate a final grade ALWAYS publish thescore.5.Click Save. Assignment will show inscoresheet. PST - PT and Gradebook
How to Delete an Assignment1.From the Scoresheet tab, select the reportingterm that will contains the assignment. NOTE:if the assignment due date is not within thisterm it will not be visible on the scoresheet.2.Be sure the Assignments Mode is highlightedand Double-click on the assignment to bedeleted3.Click the “-“ at the left side of the assignmentsarea.4.In the Delete Assignments window, verify thatthis is the assignment to be deleted and clickYes.5.Assignment will be removed from thescoresheet window.GRADING ASSIGNMENTSGrading assignments works the same as entering values into an excel spreadsheet. There are someadditional features that can assist with the grading process that will be discussed in this section as well.Manually Grading an Assignment1.From the Scoresheet tab, place your cursor atthe intersection of the Student and assignmentto be graded.2.Enter the value the student earned and clickEnter or to move to the next student underthe same assignment3.Click Save often to save the scores entered.18 - 24 PST - PT and Gradebook
Marking an Assignment with a Special IndicatorThe grardebook features the ability to mark an assignment with special indicators that parents andadministrators will be able to view. These consist of CollectedLateMissingand Exempt1.From the Scoresheet tab, right-click at theintersection of the Student and assignment tobe graded.2.Select the appropriate Special Indicator.Collected will be overwritten once a grade isentered. Late, Exempt and Missing will bevisible regardless of a score being entered ornot.3.Click Save often to save the scores entered.Mass Filling an Assignment ScoreIf the majority of the students receive the same grade on an assignment, that grade can be mass filled intoall student grades and the outliers can be updated manually with their earned grade.19 - 241.From the Scoresheet tab, right-click at theintersection of the first Student and assignmentto be mass filled.2.Click Fill Scores3.From the Fill Assignment Scores window,choose to fill Items with No Score (default) orReplace All4.In the Scores area choose what is to be massfilled by checking the box on the left side.(Note that collected, late, exempt and missingcan be mass filled). You must then enter thevalue to be filled in the right side.5.Click OK for the fill to complete6.Manually change any students that should nothave received this fill.7.Click save to save the scores. PST - PT and Gradebook
ADDING COMMENTS TO ASSIGNMENTS AND FINAL GRADEComments can be added to individual assignments as well as the final grade. To have comments appear onthe report card they must be added to the final grade.Adding a Comment to an Assignment Score1.From the Scoresheet tab, right-click at theintersection of the Student and assignment toadd the comment.2.Click Show Score Inspector3.In the Assignment Score window enter thecomment in the comment area. Note that thisarea will be limited to the number ofcharacters that can be entered.4.Use the arrows at the top to move to the nextstudent or next assignment as required.5.Click close when you are done enteringcomments.6.Note that aappears next to the score as anindicator that the score has a comment.Adding a Comment to A Final Grade1.From the Scoresheet tab, right-click on thefinal grade for a student.2.Click Show Score Inspector3.In the Final Grade window enter the commentin the comment area. Note that this area willbe limited to the number of characters that canbe entered.4.Use the arrows at the top to move to the nextstudent as required.5.Click close when you are done enteringcomments.6.Note that aappears next to the final gradeas an indicator that the final grade has acomment.20 - 24 PST - PT and Gradebook
STANDARDS AND HOW TO GRADEAll standards assigned to a class will be available to be scored at the end of a marking period. AllStandards may not be taught during each marking period so only grade the ones that were taught.Grading Standards21 - 241.To see the standards associated with a classchange the Mode from Assignment to FinalGrades.2.To see what grades are associated with thestandards, right-click on the intersection of astudent and a standard. Click on Grades and alist of the available grades will be displayed.Select the grade to enter it for this student.3.Grades can be entered manually the same wayyou entered grades for assignments.4.The Fill Scores option is available for standardsas well and will fill the same as filling scoreswith assignments5.To get more detail about the scores beingentered you can right-click the intersection ofa student and the standard and select ShowScore Inspector. The Standard Final Gradewindow will list the Cut Off and Value of eachgrade.6.Enter your standard grades using any of themethods outlined above. Be sure to enter thegrades for any standard taught within thecurrent term. Effort and Conduct grades willbe entered for each term in at least theHomeroom class.7.Click Save to save your grades. PST - PT and Gradebook
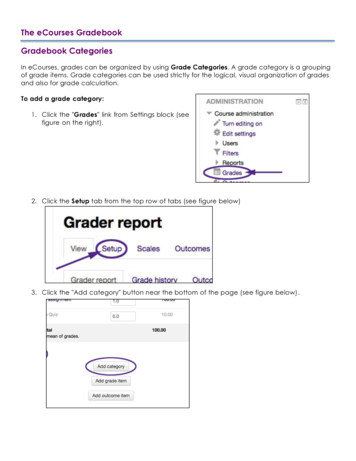
PRINTING REPORTSThe gradebook offers a collection of standard reports that give the teacher flexibility of how and what isprinted. All these reports function pretty much the same. In this section we will explore 2 reports; theStudent Roster and the Individual Student ReportStudent Roster ReportThe Student Roster allows the teacher to create an individualized roster of their students with theinformation they desire.1.Click on the Reports tab2.From the list of available reports, double-clickon Student Roster3.The Criteria of the reports will have the same look and feel. Users can adjust the settingsbased on the output they would like to see. 4.Name – predefined NameDescription – predefined descriptionOutput Type – reports can be outputted as PDF files or exported as CSV filesSections – the report can be run for the current class or all active classesStudents – the report can be run for all enrolled students or for just the currentselectionStudent Info – checking these boxes controls which student fields will be includedin the reportParent Info – same as student info, checking the boxes will include the informationin the reportThe Blank field can be added to give blank columns at the end of the report thatteachers can use to handwrite information into.Sort – allows you to choose the sort order of the reportThe preview area can be used to move columns around into the preferred order.Click Run Report once all options have been set.22 - 24 PST - PT and Gradebook
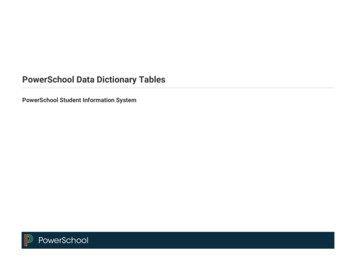
5.Choose to Open or Save the Report and Click Oka. Open Reports – opens the report in it’s own window.b. Save Report – opens the Save Report window where a report name and location can be set.Sample ReportIndividual Student ReportThe Individual Student Report is ideal for progress reports. This report provides the parents with thestudents overall grade, their assignment scores and the category scores.1.23 - 24Click on the Reports tab2.From the list of available reports, double-click on Individual Student Report3.The Criteria of the reports will have the same look and feel. Users can adjust the settingsbased on the output they would like to see. PST - PT and Gradebook
Name – predefined NameDescription – predefined descriptionOutput Type – reports can be outputted as PDF files, HTLM page or exported as CSVfiles (recommend PDF file to send home to parents)Sections – the report can be run for the current class or all active classesStudents – the report can be run for all enrolled students or for just the currentselectionStudent Fields – Select Student Name to show the name on the reportAbbreviate – if checked will use the abbreviation of assignments and categories tosave space on the document.Include – check the items to be included on the reportDate Range – can select a term or enter specific dates. Recommend selecting aterm for a progress report4.Click Run Report once all options have been set.5.Choose to Open or Save the Report and Click Oka. Open Reports – opens the report in it’s own window.b. Save Report – opens the Save Report window where a report name and location can be set.Sample Report24 - 24 PST - PT and Gradebook
Much of the teacher focus is on the gradebook but understanding the PowerTeacher portal may help answer some additional questions. New with the release of PowerSchool 7.11 is PT Gradebook 2.8. This newest version of the gradebook protects users from Java release updates that have in the past affected the teachers