Transcription
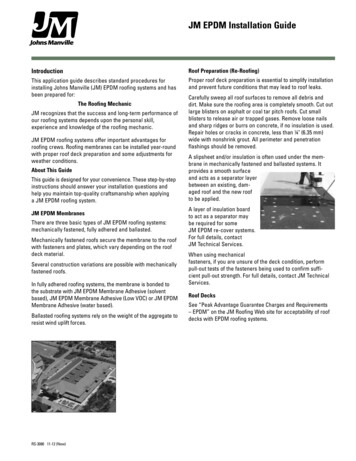
JM EPDM Installation GuideIntroductionRoof Preparation (Re-Roofing)This application guide describes standard procedures forinstalling Johns Manville (JM) EPDM roofing systems and hasbeen prepared for:Proper roof deck preparation is essential to simplify installationand prevent future conditions that may lead to roof leaks.The Roofing MechanicJM recognizes that the success and long-term performance ofour roofing systems depends upon the personal skill,experience and knowledge of the roofing mechanic.JM EPDM roofing systems offer important advantages forroofing crews. Roofing membranes can be installed year-roundwith proper roof deck preparation and some adjustments forweather conditions.About This GuideThis guide is designed for your convenience. These step-by-stepinstructions should answer your installation questions andhelp you maintain top-quality craftsmanship when applyinga JM EPDM roofing system.JM EPDM MembranesThere are three basic types of JM EPDM roofing systems:mechanically fastened, fully adhered and ballasted.Mechanically fastened roofs secure the membrane to the roofwith fasteners and plates, which vary depending on the roofdeck material.Several construction variations are possible with mechanicallyfastened roofs.In fully adhered roofing systems, the membrane is bonded tothe substrate with JM EPDM Membrane Adhesive (solventbased), JM EPDM Membrane Adhesive (Low VOC) or JM EPDMMembrane Adhesive (water based).Ballasted roofing systems rely on the weight of the aggregate toresist wind uplift forces.RS-3080 11-12 (New)Carefully sweep all roof surfaces to remove all debris anddirt. Make sure the roofing area is completely smooth. Cut outlarge blisters on asphalt or coal tar pitch roofs. Cut smallblisters to release air or trapped gases. Remove loose nailsand sharp ridges or burrs on concrete, if no insulation is used.Repair holes or cracks in concrete, less than ¼" (6.35 mm)wide with nonshrink grout. All perimeter and penetrationflashings should be removed.A slipsheet and/or insulation is often used under the membrane in mechanically fastened and ballasted systems. Itprovides a smooth surfaceand acts as a separator layerbetween an existing, damaged roof and the new roofto be applied.A layer of insulation boardto act as a separator maybe required for someJM EPDM re-cover systems.For full details, contactJM Technical Services.When using mechanicalfasteners, if you are unsure of the deck condition, performpull-out tests of the fasteners being used to confirm sufficient pull-out strength. For full details, contact JM TechnicalServices.Roof DecksSee “Peak Advantage Guarantee Charges and Requirements– EPDM” on the JM Roofing Web site for acceptability of roofdecks with EPDM roofing systems.
JM EPDM Installation GuideEquipmentGeneral InformationThe following equipment may be needed to install JM EPDMroofing systems:This section provides application information for JM EPDMand outlines specifications currently available throughJM Technical Services.Hammer drillElectric drillSnipsGravel pusherHammerPull-out testerBrooms (soft & stiff)Screw gunGlovesMeasuring tapeLadderRopeEye protectionWood sawMetal crimpersVise-grip pliersSolvent-resistant panCaulk gunSeam rollerPaint rollerScissorsWire brushChalk lineShovelPliersTongsGravel-moving equipmentNotched squeegee (adhered)Drill bits (carbide, steel)Reciprocal sawGrounded extension cordsSeam probeFirst-aid kitUtility knifeScrewdriver setRubber malletRagsWriting/marking instrumentsT-squareRollers and brushesAll general information contained in this section and in thecurrent JM Single Ply Roofing Systems Manual shall beconsidered part of these specifications.JM offers JM EPDM specifications for ballasted, mechanicallyattached and fully adhered systems. These specifications canbe installed over insulation, and over nailable, non-nailableand lightweight fill substrates.Each specification in this section is eligible to receive aJM Peak Advantage Guarantee. Refer to Section 1c on “PeakAdvantage Guarantees” in the current JM Single Ply RoofingSystems Manual or contact a JM representative for additionalinformation.Positive drainage of water off any roof membrane is necessary to prolong the service life of the system. JM, therefore,has the following policy:Drainage: Design and installation of the deck and/or membrane substrate must result in the roof draining freely, tooutlets numerous enough and so located as to remove waterpromptly and completely within 48 hours.Flashings: Refer to Section 3i of the current JM Single PlyRoofing Systems Manual for JM EPDM single ply flashingspecifications and details.Membrane SubstrateThe surface on which the single ply roofing membrane is tobe applied should be one of JM’s roof insulations (RetroPlus,SECUROCK, ENRGY 3, Invinsa Roof Board) or an approvedstructural substrate. The surface must be clean, smooth and dry.Certain insulations are not acceptable for fully adhered, ballasted or mechanically attached single ply applications. ContactJM Technical Services for details.RS-3080 11-12 (New)
JM EPDM Installation GuideGeneral Guidelines for Application of MaterialsThe proper application of roofing materials is as importantto the satisfactory performance of the roofing system as thematerials themselves. JM strongly recommends the followingguidelines for the application of EPDM materials be followed:A. Never use wet or damaged materials.B. Never apply any roofing materials during rain or snow, or towet or damp surfaces. Moisture trapped within the roofingsystem can cause severe damage to the roofing membrane,insulation and deck, as well as cause poor quality of adhesive bonds.C. Heed the specific cold weather application proceduresdescribed in the specifications.D. Always install the complete roofing system at one time.Phase construction is unacceptable for any JM roofingsystem.E. Always install water cutoffs at the end of each day’s workto prevent moisture from getting into and under the completed roof system. Water cutoffs should be completelyremoved prior to resuming work.F. Never use bituminous materials in contact with any JMEPDM Single Ply Membrane. These materials are notcompatible and may damage the EPDM sheet.G. Thoroughly review the guidelines and procedures for application of the roofing system, flashings and other materialsbefore starting work.H. Always review the warning label and MSDS for any product,and comply with the published safety procedures for allproducts being used. See the “Introduction” section of thecurrent JM Single Ply Roofing Systems Manual for healthand safety recommendations.JM EPDM Single Ply Membrane SystemsJM EPDM single ply roofing systems consist of a single membrane layer of EPDM sheeting. The material is supplied in rollsof various widths and lengths. Standard sizes are:WidthsLengths10', 16' 8"50', 100'20'50', 100'30'100'40', 50'100'*Not all sizes are available in every thicknessRS-3080 11-12 (New)Ballasted Systems [SE4B-(T), SE6B-(T), SE9B-(T)]Ballasted systems are those in which the sheet is loose laidover the substrate, without any means of attachment otherthan at the perimeter and at penetrations. The system is held inplace by stone ballast or pavers. Nonreinforced membranesare typically used in these systems.Mechanically Attached Systems (SE4RM, SE6RM, SE7RM):In mechanically attached systems, the sheet is attached tothe substrate at regularly spaced intervals, via anchor discor anchor bar systems. These systems employ a reinforcedsheet as the membrane. Black 45 mil (.045" [1.1 mm]) thick, 60mil (.060" [1.5 mm]) thick, and 75 mil (.075" [1.9 mm]) thick reinforced sheets are available for these systems.Fully Adhered Systems [SE4A-(T), SE6A-(T), SE9A-(T),SE4RA-(T), SE6RA-(T)]Fully adhered systems are totally attached to the substrate bymeans of adhesive. All JM EPDM Membranes may be used inthese assemblies.The letter “T” in parentheses following the specificationdesignation indicates that the JM EPDM Membrane laps shallbe sealed using JM EPDM Seam Tape. It is not acceptable touse JM Lap Cement for field seams.Membrane formulations offer superior ozone resistanceand remain elastic and flexible through wide temperatureranges. An EPDM single ply membrane is impervious to waterentry and resistant to weathering and UV rays.The product line includes flashing materials, adhesives, sealants, coatings and accessories, providing a single sourcesystems approach to the roofing assembly. JM roofing systemsare adaptable to many sizes and shapes of new or existing roofs.They are recommended for slopes not exceeding 2:12 forballasted systems and not exceeding 6:12 for fully adhered andmechanically attached systems. All three systems are suitablefor new construction, as well as re-roofing applications.The JM EPDM single ply specifications are written as installation guidelines only. These documents are intended to assistthe specifier in developing a comprehensive bid package, ina clear and concise format. The information is presented inan explanatory fashion rather than the authoritative, instructive manner commonly utilized in construction specifications.When experience, technical knowledge or established testingprocedures support a policy or position, it is clearly identified(i.e., “JM requires” or “is not acceptable”). When the use ofa particular product or practice is desirable, the reference isstated as an opinion rather than absolute fact, (i.e., “JMrecommends” or “JM suggests”).
JM EPDM Installation GuideAdhesive UseAll membranes and substrates to be adhered must beapproved by Johns Manville. Both surfaces must be clean,smooth, dry, compatible and free of contaminants and grease/oil. All fasteners, if required, must be properly seated andplates flush, leaving an acceptable surface to receive adhesive.JM EPDMUnroll the membrane and allow it to relax at least 30 minutesbefore applying adhesive, longer time is necessary in colderweather.Key:WB - Water-BasedSB - Solvent-BasedN/A - Not ApplicablePosition the membrane with an overlap appropriate for widthof seam type being used. Fold membrane back one-half of thelength of the first sheet’s length to expose its bottom side.Make sure adhesive container is sealed. Turn upside-downand wait a minimum of five minutes. Turn containers rightside up. Carefully open and vigorously stir until adhesive is auniform color and all solids are dispersed, with – NO SWIRLS.Saturate roller by dipping into can. Roll adhesive onto substrate and membrane for smooth-backed membranes.For solvent-based adhesives, the appearance of a spider webeffect will occur with stringers off the roller when the rollerneeds to be redipped into the adhesive. It will also be hard topush the roller.When adhesive is ready, carefully roll the membrane into thesubstrate, avoiding wrinkles. Apply even pressure with a lawnor linoleum roller (minimum 75 lb [34 kg]) to ensure good contact between the membrane and substrate.Do not apply adhesive in the seam area; seams are to remainclean and dry. Avoid puddling of adhesive. With adhesives,more is not necessarily better. “Over-coating” adhesives willlead to poor adhesion.Do not use in direct contact with polystyrene foam.Adhesive coverage, open time and dry time rates can varydramatically depending on the particular substrate and environmental conditions. Coverage rate charts, stated herein, areapproximate only. If FM Global or UL approval is required,please consult the specific RoofNavSM or UL CertificationDirectory for specific application rates.ENRGY 3 Dens Deck WB/SBWood FiberInvinsa N/AWB/SBWB/SBWB/SBWB/SBGypsum FiberRoof BoardConcreteN/ASECUROCK LightweightConcreteSubstrate for Adhered MembraneNotes: Water-Based Adhesive: Use the two-sidedcontact application method for all smooth-backedsingle ply membranes. DensDeck: Priming of the board is required. Not suitable for SECUROCK Glass-Mat roofboards.Solvent and Low-VOC/Solvent-Based, Two-Sided Applicationfor Plain-Backed (Smooth-Backed) MembraneApply solvent-based adhesive in a smooth, even, thin coat toboth membrane and approved substrate at the rates listed onspecific product data sheets. Most applications apply approximately half the listed rate to the membrane and the other halfto the substrate. For porous substrates such as wood and gypsum, apply more adhesive on the substrate.EPDM systems require adhesive to become tacky to the touchon both surfaces without stringers. Time will vary dependingon the ambient temperature and humidity.Water-Based, Two-Sided Application for Plain-Backed(Smooth-Backed) Membranes OnlyApply water-based adhesive in a smooth, even, thin coat toboth the membrane and approved substrate at the rates listedon specific product data sheets. Most applications applyapproximately half the listed rate to the membrane and theother half to the substrate. For porous substrates such aswood and gypsum, apply more adhesive on the substrate.Adhesive should be tacky at point of assembly; approximatetime will vary depending on the environmental conditions.Once the adhesive begins to change color (from white toclear) and feels tacky, but with no stringers (just like the solvent adhesive), carefully roll the membrane to the substrate.Avoid capturing air or creating wrinkles during this process. Ifadhesive is completely dry or too wet (still all white), adhesionwill be compromised.RS-3080 11-12 (New)
JM EPDM Installation GuideWater-Based Adhesive Cautions Water-based adhesives are white; if product appears tohave disappeared after application then adhesive is toodry and will need to be reapplied. Do not over apply. Use the coverage rate chart in thissection; too much adhesive will result in curing issues. Prior to application and curing, water-based adhesive canNEVER be exposed or stored to temperatures below 40 F.Do not apply when ambient temperatures are expected todrop below 40 F within 48 hours after application.Suggested Coverage Rate RangesFt2/gal (gal/sq)Solvent-Based )Insulation and 090(0.83)(0.91)(1.0)(1.11)Less Adhesive More AdhesiveLess Adhesive More AdhesiveInvinsaInvinsaSECUROCKSECUROCKGypsum FiberGypsumFiberRoof BoardRoof BoardDensDeckDensDeckPrimePrime ENRGY 3ENRGY 3 Wood FiberWood FiberDensDeckDensDeckNotes: Listed rates are for finished roofing areas. See JM requirements for correct application method. Two-Sided Application: Most applications apply approximately halfthe listed rate to the membrane and the other half to the substrate. Forporous substrates such as wood and gypsum, apply more adhesive onthe substrate.SurfacingsBallast SurfacingThe ballast should be of a suitable type, and of sufficientamount, to provide protection against wind uplift. Local windSuggestedCoverageRateconditions andcharacteristicsbe taken into accountSuggestedCoverageshouldRate RangesRanges2Ftwhen assessing the ballast requirements.The Single PlyFt2/gal/gal elinesto assist50SolventBasedor9080706050theSolvent Based or90807060LowVOC/SolventBased(1.43)(1.67) Single(2.0)designer,in its“Wind(1.11)Design(1.25)Guide 1.67)(2.0)Ply RoofingcanWaterBased13012011010090WaterBased Systems” (ANSI/SPRI130120 RP-4).110 Information10090(0.83)(0.91)(1.0)(1.11)also be obtained from(0.77)local buildingfrom (1.11)FM(0.77)(0.83) codes(0.91) and(1.0)Global Property Loss —PreventionData — Sheet1-29“Roof— DeckLessMoreAdhesive— —Less AdhesiveAdhesive — onents.”InvinsaInsulationandCoverInsulation and CoverBoardsBoardsSECUROCKSECUROCKGypsumGypsum FiberFiberRoofThe final decision on type andamount of ballast ultimatelyRoof BoardBoardDensDeckrests with the building owner DensDeckorPrimehis or her technical represenPrimelb/100 ft2tative, but should not be less than 10 ENRGYlb/ft2 (1,000ENRGY33Wood FiberFiberWood2[49 kg/m ). Note: This amount may not provide completeDensDeckcoverDensDeckage of the JM EPDM Single Ply Membrane.Notes:Notes: ListedListed ratesrates areare forfor fifinishednished roofiroofingng areas.areas. Two-SidedTwo-Sided Application:Application: ApplyApply half the rate to the membrane and theRS-3080 11-12 (New)otherotherhalfhalf toto thethe substrate.substrate. IfIf thethe rate is 1.0 gal/sq, 0.5 gal/sq goes onthethesubstratesubstrate andand thethe otherother 0.50.5 gal/sq goes on the membrane. Poroussubstratessubstrates willwill havehave moremore adhesiveadhesive on the substrate than the membrane.JM does not supply ballast materials; however, thefollowing materials are approved for use with ballastedSpecifications SE4B-(T), SE6B-(T), SE9B-(T), SE4RB-(T),SE6RB-(T) and SE9RB-(T):Nominal 1½" (3.81 cm) Aggregate: Clean, smooth river bottomstone consisting of ballast gradation Size #4 (or, alternatively,Size #3), as specified in ASTM D 448 “Standard Sizes of CoarseAggregate”. The ballast should consist of (#4) ¾" to 1½" (1.91 cmto 3.81 cm) or (#3) 1" to 2" (2.54 cm to 5.08 cm) washed river stonewith a minimum of 85% retained on a ¾" (1.91 cm) screen (#4) or 1"(2.54 cm) screen (#3).Nominal 2½" (6.35 cm) Aggregate: Clean, smooth river bottomstone consisting of ballast gradation Sizes #1 or #2 as specified in ASTM D 448 “Standard Sizes of Coarse Aggregate”. Itshould consist of 1½" to 3½" (3.81 cm to 8.89 cm) (#1) or 1½" to2½" (3.81 cm to 6.35 cm) (#2) washed river stone with a minimum of 85% retained on a 1½" (3.81 cm) screen.Pavers: Standard pavers (minimum 18 psf [88 kg/m2]), or interlocking lightweight pavers (minimum 10 psf [49 kg/m2), may besubstituted for nominal 1½" (3.81 cm) stone. Interlocking, lightweight pavers with documented or demonstrated equivalentwind performance data, or 22 psf (107 kg/m2) standard pavers,may be substituted for nominal 2½" (6.35 cm) stone.When pavers are used as ballast, and these pavers do notincorporate integral drainage channels, the pavers must beplaced on supports or pedestals. These supports or pedestalscan either be commercially available products or 6" (15.24 cm)square pieces of JM EPDM Walkpad (to give an approximate½" [1.27 cm] air space). These supports should be locatedat the intersection of the corners of the paver blocks. Allfour corners of adjacent pavers should rest on the same 6"(15.24 cm) square piece of JM EPDM Walkpad or pedestal.The approximate ½" (1.27 cm) air space between the paversand the membrane will allow moisture vapor to vent to theatmosphere. When concrete pavers are not installed on pedestals or supports, one layer of JM Polyester Mat ProtectionMaterial or cured JM EPDM Membrane must be installedbetween the paver and the membrane.If crushed rock or ballast with sharp edges is used, a protective layer of JM Polyester Mat Protection Material or otherapproved protection material must be used under the ballast.Gravel ballast must be clean and free of excessive fines, toavoid clogging the drains.JM recommends that sufficient ballast be applied to the membrane surface as soon as areas are completed, to provideimmediate protection against wind uplift.
JM EPDM Installation GuideCoatingJM roofing systems do not require coating and must notbe coated with any material not approved by JM. Bituminousbased coatings will damage EPDM roofing system productsand cannot be safely used for either coating or repairingEPDM roofing systems.JM recommends using TopGard 4000 or TopGard 5000, a 100%acrylic elastomeric coating, for JM EPDM roofing membranesystems.TopGard Coatings ApplicationWhen applying TopGard 4000 or TopGard 5000, use a brush,roller or spray equipment. Make sure that all surfaces areclean, dry and free of any dirt, grease, oil or other debris thatmay interfere with proper adhesion.It is recommended that coating be applied in two coats. Thefirst coat should be completely dry (normally 4 to 12 hours)before applying the second coat.Temperatures must be 50ºF (10ºC) and rising during time ofapplication. Do not apply TopGard 4000 or TopGard 5000 within24 hours of anticipated rain, dew or freezing temperatures. Aswith any coating, cooler temperatures and high humidity willslow the cure time.Membrane ApplicationIt is essential that JM products be correctly installed in orderfor the completed roofing system to perform properly. Thefollowing procedures are to be used in performing the variousoperations in installing roofing products:Positioning the Roofing MembranePosition the roll at the approximate application point, andunroll. If the membrane is wider than 10' (3.05 m), unfold themembrane to its fullest width. Move the membrane into placewithout stretching. The unfolding and movement of the membrane can be aided by waving the sheet in such a way asto pump a cushion of air under the sheet, creating a floatingeffect which simplifies movement of the sheet over thesubstrate.Allow a minimum of 30 minutes before fastening or splicing sothat the membrane can relax and release any tension inducedby packaging and handling. Visually inspect the membrane forany flaws or damage that would interfere with the acceptableapplication or performance of the membrane. Creases fromthe fold points can be very stubborn to flatten out, especiallyin cooler temperatures. These creases can create a problemin making the seam. The addition of heat to the area with anelectric heat gun, BEFORE APPLYING THE SEAM TAPE, willhelp relax the sheet to a flat condition.Apply the adjoining sheets in the same manner, lappingthe edges a minimum of 3" (7.62 cm). Consult JM TechnicalServices for lap width requirements for guarantees 20 yearsor longer. Sheets should be laid out in an offset pattern, witha minimum of 3' (91.44 cm) between adjacent end laps. Lapsshould be constructed with the upslope sheet overlappingthe adjoining sheet in a shingle manner to avoid any lapsopposing natural drainage.Perimeter attachment of the roofing membrane at theperimeter and at penetrations can be accomplished by eithermechanical fastening (using anchor discs or High Load plates)or adhesive fastening (using reinforced termination strips orRTS with Tape).Mechanically Fastened PerimeterFasten the EPDM membrane to the structural deck usinganchor discs or High Load plates 12" (30.48 cm) o.c. maximum,with appropriate fasteners.Adhesive Fastened PerimeterAdhere the EPDM membrane to the JM ReinforcedTermination Strip (RTS) with Tape using JM EPDM TapePrimer which is fastened 12" (30.48 cm) o.c. maximum, usinganchor discs or High Load plates with appropriate fasteners.NOTE: Do not use JM EPDM Bonding Cement to attach theEPDM sheet to the RTS.When possible, begin the installation at the highest point ofthe project area, working to the lowest point. Making sure allthe laps are shingled and do not buck water.RS-3080 11-12 (New)
JM EPDM Installation GuideTape Products ApplicationNote: Surfaces to be spliced must be cleaned and primedprior to the application of seam tape. Store seam tapes andpeel and stick products in the shade when rooftop temperature exceed 75 F (24 C).Position the top sheet to overlap the bottom sheet by aminimum of 3" (7.62 cm) at all locations for a 3" seam tape or aminimum of 6" (15.24 cm) for 6" seam tape, as indicated by thedotted sheet line. Sheets must be allowed to relax and musthave no fishmouths or wrinkles along the lap edge. Remove alldirt, oil, water and other contaminants from the surfaces to bejoined. Mark the position of the lap edge on the bottom sheetwith a pencil, crayon or marker.JM EPDM Tape PrimerThoroughly mix the JM EPDM Tape Primer prior to applicationto suspend solids contained in the mixture. Periodically stirduring use (every 5 to 10 minutes) to keep the solids in suspension.Fold back the top sheet, exposing the surfaces to be cleaned.Use JM EPDM Tape Primer to thoroughly clean talc, dirt, etc.,from the surface of both sheets in the area to be joined. Usinga scrubbing pad, apply JM EPDM Tape Primer to the cleanedarea at the rate of 350 to 400 ft2/gal (8.6 to 9.8 m2/l). Apply JMEPDM Tape Primer past the marked area and allow to dry thoroughly prior to application of tape products. Do not diluteJM EPDM Tape Primer.Turn the scrubbing pads frequently and change them often toensure that the release agent and dirt are completely removedfrom the sheet. Particular attention should be given to cleaning the factory splices in the membrane, since release agenttends to accumulate in this area during the manufacturingprocess. Scrub the JM EPDM Tape Primer into the factorysplice in the direction of the factory splice to remove therelease agent.JM EPDM Splice CleanerJM EPDM Splice Cleaner is an organic solvent mixturedesigned as a cleaning agent. Use to thoroughly clean dirtfrom JM EPDM membranes prior to applying primers or spliceadhesives if needed.RS-3080 11-12 (New)The splice area must be completely free of all dust and talcand surfaces must be maintained free from moisture, oil andother foreign contaminants until the splice has been completed. Areas with heavy accumulations of dirt or other contaminants should be washed with warm water and a low sudsingsoap and allowed to completely dry before using JM EPDMTape Primer.Seam TapeUnroll approximately an 18" (45.72 cm) length of tape and applyto the splice area, aligning the edge of the release paper withthe tape marks on the bottom sheet. Continue unrolling 18"(45.72 cm) lengths of the JM EPDM Seam Tape and securingeach segment in place along the entire length of the seam. Takecare to continue aligning the edge of the release paper withinthe marks on the bottom sheet. With the release paper still inplace, roll the entire length of the seam with a 2" (5.08 cm) widesilicone rubber roller to ensure good contact of the JM EPDMSeam Tape with the bottom sheet. Avoid excessive rolling pressure that could stretch or deform the JM EPDM Seam Tape.Fold the top sheet back over the JM EPDM Seam Tape withthe release paper still in place. Starting at one end of thesplice, remove the release paper from the JM EPDM SeamTape by peeling it back parallel to the roof surface and awayfrom the splice at a 45 angle. The top sheet should fall freelyonto the exposed JM EPDM Seam Tape surface, leaving 1 8" to1 4" (3.18 mm to 6.35 mm) of JM EPDM Seam Tape exposed.To ensure proper lap adhesion, roll with a 2" (5.08 cm) widesilicone rubber hand roller, first perpendicular to the outeredge of the splice on a diagonal, and then along the length ofthe splice.JM EPDM Seam Tape may be overlapped to form a continuous tape surface. Overlaps must be a minimum of 2" (5.08 cm).
JM EPDM Installation GuideMembrane end laps should be completed prior to making sidelaps. Special precautions must be taken at sheet end laps inorder to minimize the impact of t-joints created with the sidelap of the adjacent sheet.Tape ReleasePaperSide LapJM EPDMSeam Tape1½" (3.81 cm)Min.JM EPDM Tape Primer/WashEnd LapWhen the entire t-joint has been fabricated, roll the area carefully to ensure that the JM EPDM Seam Tape is forced into themembrane edges and corners.All t-joints in cured sheets must be covered with a patch thatextends a minimum of 3" (7.62 cm) beyond all seam edges. Itis acceptable to use uncured JM EPDM Peel & Stick Flashingproducts of the appropriate size.See Detail EL-14T-A in the Flashing Details Section for a drawing that illustrates this installation.JM EPDM Peel & Stick FlashingClean and prime the area to be flashed with JM EPDM TapePrimer, or other approved cleaning method, as described inthe “Tape Products Application” section, to remove the talcand any dirt from the sheet, and to prime the surface for thetape application.Unroll a manageable length of JM EPDM Peel & Stick Flashingand cut to length with scissors. Peel the release paper off theJM EPDM Peel & Stick Flashing. In certain details, i.e., corners, be sure to use the JM EPDM Peel & Stick Inside/OutsideCorners with a split-back release film to prevent the flashingfrom sticking to itself. Press the exposed tape area firmly intoplace in the area to be flashed. Be careful to apply the JMEPDM Peel & Stick Flashing without over-stretching the material. Apply pressure to the installed flashing with a 2" (5.08 cm)wide silicone roller, first diagonally to the edge of the sheet,and then along the entire length of the flashing, to ensureproper adhesion.Adjacent sheets of peel-and-stick flashing products must belapped a minimum of 3" (7.62 cm) and primed with Tape Primer.Stitch the material tight in areas where the sheet makeselevation changes. Care should be taken during rolling toavoid scoring, gouging or thinning the product.JM EPDM Peel & Stick T-Joint PatchesAll t-joints in cured sheets and butt joints in field seams mustbe covered by a patch that extends a minimum of 3" (7.62 cm)beyond all seam edges. It is acceptable to use any uncured JMEPDM Peel & Stick Flashing product of the appropriate size.The sheets are cleaned and primed as described previously.Remove the release paper and center the JM EPDM Peel &Stick Patch over the butt joint or t-joint and press it into place.Apply pressure to the installed patch with a 2" (5.08 cm) widesilicone roller to ensure proper adhesion. See flashing detailEL-14T for an illustration of a t-joint.JM EPDM Reinforced Termination Strip (RTS)JM EPDM RTS has splice tape pre-applied along one edgeof 6" (15.24 cm) reinforced JM EPDM Membrane. JM EPDMRTS with Tape can be installed horizontally or vertically in theangle change with the pre-applied tape facing up and towardthe field of the roof. See detail EB-2T or EB-3T.Position seam fastening plates 1 8" (3.18 cm) to 1" (2.54 cm)from the angle change. 12" (30.48 cm) o.c. maximum spacingis required. Secure with an approved fastener. Do not fastenplates over the top of release film, as this will cause film totear when removed. Roll the field membrane onto the exposedtape and apply hand pressure to the splice area.RS-3080 11-12 (New)
JM EPDM Installation GuideApplication of Wat
installing Johns Manville (JM) EPDM roofing systems and has been prepared for: The Roofing Mechanic JM recognizes that the success and long-term performance of our roofing systems depends upon the personal skill, experience and knowledge of the roofing mechanic. JM EPDM roofing systems offer important advantages for roofing crews.