Transcription
Ad Hoc Client for Outlook (also includes Sync)Installation Guide
ContentsSystem RequirementsInstalling Ad Hoc Transfer Plug-in for OutlookTypical Install of the Ad Hoc Transfer Plug-in for Outlook on a Single ComputerSilent InstallDeploy as Part of AD Group PolicyUsing the Ad Hoc Transfer Plug-in for OutlookCompleting the End User Configuration (DMZ)UpgradingCustomizing and RebrandingUser Interface CustomizationHelp Topic CustomizationAbout This GuideThis guide describes how to use the Ipswitch Client installer to install one or both of these filetransfer client applications: Ad Hoc Transfer Plug-in for Outlook (uses MOVEit to securely send email attachments) MOVEit Sync (synchronizes a local folder with a remote folder on the MOVEit server)Both applications connect to a MOVEit Server for secure transfer of files.2
System RequirementsThe following software must be installed on the machine on which you install the client(s). If therequired software is needed by only one of the clients, it is noted as such. Microsoft Outlook 2016, 2013, 2010, 2007 (Outlook plug-in only)Supported Operating Systems: Windows 10 (32-bit and 64-bit) Windows 8.1 (32-bit and 64-bit) Windows 8 (32-bit and 64-bit) Windows 7 (32-bit and 64-bit)Microsoft Visual Studio 2010 Tools for Office Runtime (VSTOR 2010) Redistributable (allOS) (Outlook plug-in only)Microsoft Visual Studio 2010 Tools for the Microsoft Office System (version 4.0 Runtime)Language Packs (non-English OS) (Outlook plug-in only)If you are running the installer live (not doing a silent install), the installer automaticallyinstalls the Microsoft Visual Studio redistributable programs. You do not need to downloadanything from Microsoft. If running a silent install, you must download and install theseredistributable programs before running the install. See the Requirements in the SilentInstall (on page 6) section. On the last screen of the installer, you can select to View Install Log.3
Installing Ad Hoc Transfer Plug-in forOutlookThis section describes how to use the Ipswitch Client installer to install one or both of these filetransfer client applications: Ad Hoc Transfer Plug-in for Outlook (uses MOVEit to securely send email attachments) MOVEit Sync (synchronizes a local folder with a remote folder on the MOVEit TransferServer)Both applications connect to a MOVEit Server for secure transfer of files.You can download the installation file from the MOVEit Support site.Typical Install of the Ad Hoc Transfer Plug-in forOutlook on a Single ComputerThis section describes how to use the Ipswitch Client installer to install the Ad Hoc TransferPlug-in for Outlook file transfer client that uses WS FTP Server to securely send emailattachments. This plug-in uses the Ad Hoc Transfer Module, which must be already installed onthe WS FTP Server computer. Each end user needs to install the plug-in in order to use Outlookto send files via Ad Hoc Transfer.Run the installer on the computer of each user for whom you want to provide the Ad HocTransfer Plug-in for Outlook client.On Windows 7 and Windows 8 the installer must be run as Administrator.You can also use the silent (unattended) install process to automate the installations. See SilentInstall of the Ad Hoc Transfer Plug-in for Outlook (on page 6) in this guide for more information.If you have a currently installed version of the client, the installer will remove the old version andinstall the new version of the client.To install the client on an end user computer:1 Close Microsoft Outlook.2 Run the Ipswitch Client Installer.4
3 On the installation W elcome screen, click Next to continue. The License Agreement dialogappears.Instead of the Welcome screen, Windows 8 users who do not have Microsoft .NETFramework 4.0 installed see a message that Windows is missing an installationrequirement. You must enable Microsoft .NET Framework 4.0 as a Windows feature asdescribed in the WS FTP Server 2017 Release Notes System lnotes), then continue the installation.4 Read and accept the license agreement, and click Next. The Setup Type screen opens.5 Specify a new path or click Next to use the default path: 32-bit: \Program Files\Ipswitch\Client 64-bit: \Program Files (x86)\Ipswitch\ClientThe Connection information screen opens.6 Enter the server and account information: Server. The IP address or fully qualified server name of the server where MOVEit DMZ isinstalled, for example: host1.domain.com This server requires an encrypted connection (SSL). By default, this option isselected, which means the server will require a secure SSL connection (HTTPS). Clearthe selection if you want to use an unsecure connection (HTTP). Port. The port used to connect to the WS FTP Server. For secure SSL connections, thedefault port is 443. For unsecure connections, the default port is 80. To set a custom SSLor HTTP port, select Use Custom Port, then click Custom Port and enter the new portnumber. User name. The user's MOVEit DMZ user name. Password. The user's MOVEit DMZ password.7 Click Next. The Ready to Install the Program screen opens.8 Click Install.Optionally, select View Install Log to display the log.9 On the last screen, click Finish.If you install the the client without entering valid connection information, you can enter the correctconnection information after the installation is finished. Click the Cannot connect to server errornotification to view the configuration dialog.When you have successfully installed the client, make sure you have completed theconfiguration by entering a valid WS FTP Server, username, and password. For moreinformation on entering this information, see Completing the End User Configuration.The install log is located at: \Users\[Username]\AppData\Roaming\OUTLOOK PLUGIN.logNext, see Ad Hoc Transfer Plug-in for Outlook Configuration.5
Once configured, you can start using the client, see Using the Ad Hoc Transfer Plug-in forOutlook (on page 14).Silent InstallTo automate installation of the client, you can use silent install. This silent install uses theMicrosoft Windows Installer and command line options to execute the installation.You must first manually install Microsoft redistributable packages if they are not already installedon the user's machine, otherwise the client will not install properly.You must run the installer as Administrator.You can also silently install the client remotely on multiple computers via Active Directory GroupPolicy. See Active Directory Group Policy for more information.RequirementsBefore installing the client:1 Make sure that the end user's computer meets the requirements in System Requirements(on page 3).2 (All OS; Outlook plug-in only) If not already installed, choose the appropriate architectureand language for the system and download the Microsoft Visual Studio 2010 Tools forOffice Runtime (VSTOR 2010) Redistributable px?id 44074) from the Microsoft Download Center. Use thesecommands for silent installations: 32-bit: vstor40 x86.exe /quiet 64-bit: vstor40 x64.exe /quiet3 (Non-English OS; Outlook plug-in only) If not already installed, download and install theappropriate Microsoft Visual Studio 2010 Tools for the Microsoft Office System (Version 4.0Runtime) Language Pack px?id 44075) for your OS. Use these commands for silent installs: 32-bit: vstor40 LP x86 lang .exe /quiet 64-bit: vstor40 LP x64 lang .exe /quiet4 Ensure Outlook is closed on the computer.Using the Silent Install ProgramThe silent install program installs the client for all user accounts on the end user's computer. Itdoes not allow you to run the installation for only the logged on user.6
You must run the installer as Administrator.Use this syntax to run the installer:msiexec /i [path executable].msi /q DEFAULT HOSTNAME "[Ad Hoc Transfer serveraddress]" DEFAULT SECURE "TRUE" DEFAULT PORT "443"DRIVER NAME "xftWSFTPDriver.dll" Run using all defaults (installs both the Ad Hoc Transfer plug-in and MOVEit Sync):msiexec /i [path executable].msi /quiet Install only MOVEit Sync:msiexec /i [path executable].msi /quiet ADDLOCAL Core,Sync Install only the Ad Hoc Transfer plug-in:msiexec /i [path executable].msi /quiet ADDLOCAL Core,Outlook Plug in When installing the Ad Hoc Transfer Plug-in, additional properties can be specified, asshown here:msiexec /i [path executable].msi /quietADDLOCAL Core,[Outlook Plug in,Sync]DEFAULT HOSTNAME "[MOVEit server address]" DEFAULT SECURE "TRUE"DEFAULT PORT "443"DEFAULT TEMPPATH "%APPDATA%\Ipswitch\AttachmentManager\Temp"DEFAULT USETEMP "TRUE"DEFAULT TEMPPATH: Location for temp filesDEFAULT USETEMP: Controls whether attachments are always copied to temp firstBecause MOVEit must sometimes use the temp directory (even when using temp is disabled), aninternal package flag indicates whether the attachment is a temp file (OK to delete) or not (don'tdelete) so MOVEit always knows when an attachment is safe to delete.If a requirement is not met during installation, the installer exits and writes a message to theinstall log indicating which requirement was not met.7
The /i option indicates install. To uninstall, use the option /x.You must run the install command from the Administrator account.Using the silent install with the command shown above (with configuration properties) will installthe client and configure the connection to the MOVEit DMZ server to use SSL on port 443 for allusers on a computer. There are additional properties you can choose depending on thesituation.The install properties are as follows (follow each option with an equals sign and enclose each ofthe values in quotes):PropertyDescriptionINSTALLDIR(Optional) Use this property to specify the install path. Thedefault path is:32-bit:\Program Files\Ipswitch\Ad Hoc Transfer Plugin for Outlook64-bit: \Program Files(x86)\Ipswitch\Ad Hoc Transfer Plugin for OutlookUse this command last.ADDLOCALRequired when you want to install only one of the clients.If not used, the installer installs the Ad Hoc Transfer plug-inand MOVEit Sync. Core installs the MOVEit Connectorframework; Outlook Plug in installs the Ad Hoc Transferplug-in; Sync installs MOVEit Sync. Values must beseparated by a comma, for example:ADDLOCAL Core,Outlook plug in,SyncDEFAULT HOSTNAMEThe address of the server where MOVEit Server isinstalled.DEFAULT SECURESpecify TRUE to use a secure SSL connection (HTTPS) orFALSE to use an unsecure connection (HTTP). The defaultis TRUE.DEFAULT PORTThe port used to connect to MOVEit Server. For secureSSL connections, this is typically 443. For unsecureconnections, this is typically 80. The default is 443.DEFAULT WINDOWS AUTHENTICATION When this option is set to "TRUE", the client will use theuser's corporate or domain credentials to sign on toMOVEit. This option is used when MOVEit DMZ isconfigured to use SAML single signon. When the option isenabled, the user will not see the user name and passwordfields in the MOVEit Connector configuration dialog.8
PropertyDescriptionDEFAULT ORGIDThis option idenitifies the user's MOVEit Organization andis used when theDEFAULT WINDOWS AUTHENTICATION option is"True." If the MOVEit Server has multiple organizations,you will need to add the Org ID here.DEFAULT LOGFILE(Optional) Changes the path where the transaction log iswritten. The default path ntManager\Transaction.logThis log can be opened from the MOVEit Connector rightmouse menu.If you change DEFAULT LOGFILE to use a different path,you must use an existing folder. The silent installation willnot create a new folder.DEFAULT SUPPCERTERRORSTo secure communications, MOVEit Server sends acertificate back to your local PC. Specify TRUE tosuppress any errors related to the certificate coming backfrom the MOVEit server. The errors will not be displayedon your PC. Specify FALSE to display any certificateerrors.DEFAULT DEBUGLEVELSets the level of information to be reported in the Ad HocTransfer log file.NONE - No information is logged.NORMAL - Logs each Ad Hoc transaction.DEBUG - Provides the connection and transferinformation, in addition to the transaction.After you run the silent install, the default values in the table above can be found in the followingfolder on the end user's computer:C:\ProgramData\Ipswitch\Ad Hoc Transfer Plug-in forOutlook\DefaultClientRepositorySettings.xmlBy default, the installation is for "All Users" on the computer. When an end user launches theclient or the MOVEit Connector, the default settings information is copied to that user's settingsfile, so that each user has a settings file. The name of the currently logged on user is added tothe settings file. Each user will need to enter their MOVEit password (and possibly theirusername) to complete the configuration.For more information on entering the username and password, see End User Configuration.Silent Install for a Single Computer and a Single User AccountYou can use the silent install, with a different set of properties, to install the client to a specificuser account on the machine. In this case, use this syntax to run the installer:msiexec /i [path executable].msi /quiet ADDLOCAL Core,Outlook Plug in,SyncCONNECTION HOSTNAME "[Ad Hoc Transfer server address]" CONNECTION SECURE "TRUE"9
CONNECTION USER "[Ad Hoc Transfer username]" CONNECTION PASS "[Ad Hoc Transferpassword]" CONNECTION PORT "443"Using the silent install command as shown above will install the plug-in and configure theconnection to the MOVEit DMZ server to use SSL on port 443. The username and password willalso be configured, which makes this appropriate only for a single user account on a nal) Use this property to specify the install path.The default path is:32-bit: \Program Files\Ipswitch\Client64-bit: \Program Files (x86)\Ipswitch\ClientUse this command last.CONNECTION HOSTNAMEThe address of the MOVEit Server.CONNECTION SECURESpecify TRUE to use a secure SSL connection (HTTPS)or FALSE to use an unsecure connection (HTTP). Thedefault is TRUE.CONNECTION USERThe user's MOVEit Server user name. If this property isleft blank, it defaults to the user name of the currentlylogged on user.CONNECTION PASSThe user's MOVEit Server password.CONNECTION PORTThe port used to connect to MOVEit Server. For secureSSL connections, this is typically 443. For unsecureconnections, this is typically 80. The default is 443.CONNECTION WINDOWS AUTHENTICATIONWhen this option is set to "TRUE", the client will use theuser's corporate or domain credentials to sign on toMOVEit. This option is used when MOVEit DMZ isconfigured to use SAML single signon. When the optionis enabled, the user will not see the user name andpassword fields in the MOVEit Connector configurationdialog.CONNECTION ORGIDThis option identifies the user's MOVEit Organizationand is used when theCONNECTION WINDOWS AUTHENTICATION optionis "True." If the MOVEit Server has multipleorganizations, you will need to add the Org ID here.LOG NAME(Optional) Changes the name of the install log. Thedefault is: OUTLOOK PLUGIN.log10
PropertyDescriptionLOG PATH(Optional) Changes the path where the transaction logis written. The default path nt Manager\Transaction.logThis log can be opened from the MOVEit Connectorright-mouse menu.If you change LOG PATH to use a different path, youmust use an existing folder. The silent installation willnot create a new folder.(Optional) To enable verbose logging by WindowsInstaller, add the following to the command line:-lv c:\install.log (or whatever log path and nameyou have set)-lvDeploy as Part of AD Group PolicyAdministrators can remotely deploy a client application to a large number of machines via ActiveDirectory Group Policy by assigning a user logon script to a Group Policy Object. After installingthe client, each user must enter credentials to authenticate to MOVEit DMZ.The Ipswitch Client Installer must be run as Administrator.Requirements Domain controller. A Microsoft Windows Server 2008 R2 or 2012 Active Directorydomain controller.Client computers. Each users' computer must meet the same requirements as a silentinstallation. See Silent Install of the Ad Hoc Transfer Plug-in for Outlook for moreinformation.Remote Deployment via Group PolicyAlways test the remote deployment on non-production computers before installing the client onyour users' computers.To install via Active Directory Group Policy:1 Configure a Group Policy Object that applies to all users for whom you plan to install theclient. See Microsoft Windows Server documentation for information about configuringGroup Policy Objects in Active Directory.11
2 Create a new user logon script in any language supported by the users' computers thatcalls this command to run the installer from a shared location:msiexec /i \\[sharename]\[sharepath]\[executable].msi /quietADDLOCAL Core,[Outlook Plug in,Sync] DEFAULT HOSTNAME "[MOVEit serveraddress]" DEFAULT SECURE "TRUE" DEFAULT PORT "443"You cannot use the Connection properties (for example, CONNECTION USER andCONNECTION PASS) as those are for configuring a specific user. Users must enter theircredentials to authenticate to MOVEit DMZ after logging onto Windows. See Silent Install of theAd Hoc Transfer Plug-in for Outlook for the complete list of install properties and their usage.3 Ensure that each requirement is met on all users' computers before running the MicrosoftWindows Installer (.msi). Each end user's computer must meet the requirements in System lnotes). (All OS; Outlook plug-in only) If not already installed, choose the appropriate architectureand language for the system and download the Microsoft Visual Studio 2010 Tools forOffice Runtime (VSTOR 2010) Redistributable px?id 44074) from the Microsoft Download Center. Use thesecommands for silent installations: 32-bit: vstor40 x86.exe /quiet 64-bit: vstor40 x64.exe /quiet(Non-English OS; Outlook plug-in only) If not already installed, download and install theappropriate Microsoft Visual Studio 2010 Tools for the Microsoft Office System (Version4.0 Runtime) Language Pack px?id 44075) for your OS. Use these commands for silentinstallations: 32-bit: vstor40 LP x86 lang .exe /quiet 64-bit: vstor40 LP x64 lang .exe /quietYou must install all requirements before running the installer, otherwise the client will notinstall properly.4 Use the Group Policy Management Console to assign the user logon script for the clientinstallation to the Group Policy Object. For information on assigning user logon scripts, see: Windows 2008 R2: Using Startup, Shutdown, Logon, and Logoff /cc730773.aspx) Windows 2012: Using Startup, Shutdown, Logon, and Logoff /cc775970(WS.10).aspx)5 After installing the client, notify users that they must enter their authentication credentials inthe MOVEit Connector Configuration dialog after logging onto Windows.After you run the silent install, the default values in the table above can be found in the followingfolder on the end user's computer:12
C:\ProgramData\Ipswitch\Ad Hoc Transfer Plug-in forOutlook\DefaultClientRepositorySettings.xmlBy default, the installation is for "All Users" on the computer. When an end user launches theclient or the MOVEit Connector, the default settings information is copied to that user's settingsfile, so that each user has a settings file. The name of the currently logged on user is added tothe settings file. Each user will need to enter their MOVEit password (and possibly theirusername) to complete the configuration.For more information on entering the username and password, see End User Configuration.13
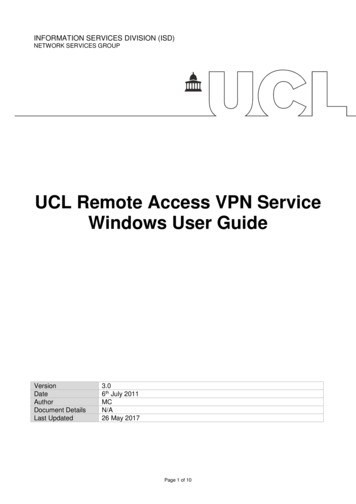
Using the Ad Hoc Transfer Plug-in forOutlookAfter completing the installation and configuration, you can start working with the client.1 Compose a new message in Microsoft Outlook, then click the WS FTP Send tab on theribbon and select Send through WS FTP, which invokes the Ad Hoc Transfer plug-in.2 Attach files to the mail message.3 Send them to recipients via Ad Hoc Transfer.The process is the same as sending an email message with attachments, except that attachedfiles will now be uploaded to the file transfer server. Recipients will receive a message with a linkto connect to the file transfer server and download the files you've sent. For more information,see the Ad Hoc Transfer Plug-in for Outlook help system.14
Completing the End User Configuration(DMZ)Each user must enter their MOVEit server username and password to complete theconfiguration.If the silent install or group policy was used to install the client, when the user logs on, theusername may already be configured on the end user's computer.You can educate users about entering their usernames and passwords in the following ways.To enter your username and password:1 When you log onto Windows, an error notification may appear next to the MOVEitConnector icon.2 Click the notification to open the MOVEit Connector Configuration dialog.If you closed the MOVEit Connector, MOVEit DMZ cannot send any messages until yourestart the MOVEit Connector. You can restart it by selecting Ipswitch MOVEitConnector from the Start menu.3 Enter your username and password to authenticate to the server.4 Click OK to save settings.-ORTo enter your username and password:1 Right-click the MOVEit Connector icon and select Configuration.15
2 In the MOVEit Send (or MOVEit Sync) tab, enter your username and password toauthenticate to the MOVEit server.Note: The configuration information, including server, username, and password is sharedby the Outlook plug-in and Sync clients.Note: If your Administrator has set up the SAML Single Signon feature in MOVEit, you maybe asked to use the Use Windows Authentication setting. When this option is selected,the client will use your corporate or domain user credentials to sign on to MOVEit. You willnot have to enter your user name and password here.When Use Windows Authentication is selected, the Username and Password fields will behidden, and the Organization ID will appear. Enter your MOVEit Organization nameprovided by your administrator. If you use the default organization, you can leave thisoption blank.1 Click OK to save settings.2 (Sync client only) In Configuration Sync options, set your Sync folders: local Sync folder: you can choose any folder on your machine remote Sync folder: a folder on the MOVEit Server for which you have appropriatepermissionsOnce configured, you can start using the client, see Working with the Client (on page 14).16
UpgradingAn upgrade installation will retain all configuration settings and data from the previousinstallation. Depending on the version, the Ipswitch Client Installer can update an existing AdHoc Transfer Plug-in for Outlook, and install Sync at the same time. Older versions of Ad HocTransfer Plug-in for Outlook may have to be removed before installing the latest version. Thissection describes which versions can be upgraded. When subsequent versions of MOVEit Syncare released, it will also be able to upgrade that client.Ipswitch no longer supports the Ad Hoc Transfer Plug-in for Outlook on Windows Server 2003 or2008. Do not upgrade to the Ad Hoc Transfer Plug-in for Outlook V2.3 on those operatingsystems.An Upgrade Affects Any Customizations to the User Interface andHelp TopicsWhen you upgrade from version 2.1 or later of Ad Hoc Transfer Plug-in for Outlook, a newcustomizations sample file is installed. This is necessary because the schema for this XML filehas changed. In order to maintain your customizations, you need to copy the entries from yourexisting customizations.xml file to a new customizations.xml that is based on the new samplefile. The new sample file can be found in: C:\ProgramData\Ipswitch\Ad Hoc Transfer Plugin for Outlook\customizations.xml.sampleFor more information, see Customizing the User Interface.If you are upgrading from version 2.2 or later of Ad Hoc Transfer Plug-in for Outlook, anychanges that you have made to the customizations.xml file are maintained.Standard UpgradeIf you have a previous version of the Ad Hoc Transfer Plug-in for Outlook installed on a systemwith a supported version of Outlook, you can upgrade to the new Ad Hoc Transfer Plug-in forOutlook by running the installer. It retains the previous configuration settings so that the Ipswitchclient can use them to connect to the MOVEit DMZ server.See Installing (on page 4) for installation requirements and information.Silent UpgradeIf your current version is Ad Hoc Transfer Plug-in for Outlook V2.0 or later, the silent installationwill handle the upgrade to the new version, and can install Sync at the same time.If your current version is Ad Hoc Transfer Plug-in for Outlook V1.5, before silently upgrading tothe new Ad Hoc Transfer Plug-in for Outlook, you must first uninstall the previous version usingcommand line options to execute the uninstall. The installer can use the previous configurationsettings during installation so that the plug-in can use them to connect to the MOVEit DMZserver.17
Ensure that you meet all requirements before attempting a silent install or you will break the plugin installation. See Silent install for information about installing the requirements and configuringthe silent installation.To silently upgrade the client application:1 Ensure Outlook is closed on the computer.2 If your current version is Ad Hoc Transfer Plug-in for Outlook V1.5. you need to silentlyuninstall the version 1.5 of the plug-in. When you run the installer, you must use this syntax:msiexec /x {D05A1A4A-82E2-4C04-8566-FB792A663C8E} /quietIf you did not install the client silently on Windows 7, an Administrator must either uninstallfrom the command line without using the quiet (/quiet) parameter or uninstall the clientfrom Programs and Features.3 Once the uninstall is complete, you can install the Ad Hoc Transfer Plug-in for Outlookand/or MOVEit Sync V2.3 using this syntax:msiexec /i [path executable].msi /quietADDLOCAL Core,Outlook Plug in,Sync[optional connection properties]The previous connection configuration information is saved on the computer afteruninstalling the client. You do not need to enter connection properties again.You must run all installer commands from the Administrator account.Remote Upgrade using Active Directory Group PolicySince remote installation uses silent installation via the Windows Installer, if your current versionis Ad Hoc Transfer Plug-in for Outlook V1.5, you must uninstall the plug-in before installing AdHoc Transfer Plug-in for Outlook. If your current version is Ad Hoc Transfer Plug-in for Outlook2.0 or later, the silent installation handles the upgrade to the new version. (See Silent Upgradeabove for more information.) Once the previous version is uninstalled, you can remotely upgradethe Ad Hoc Transfer Plug-in for Outlook the same way you remote install it. See RemotelyDeploying the Ad Hoc Transfer Plug-in for Outlook for more information.Upgrading the Ad Hoc Transfer Plug-in for Outlook on Outlook 2003If you installed a previous version of the Ad Hoc Transfer Plug-in for Outlook on a system withOutlook 2003, you must upgrade to Outlook 2007/2010 because Outlook 2003 is no longersupported. Before you upgrade Outlook, uninstall the previous version of Ad Hoc Transfer Plugin for Outlook. Once Outlook is upgraded, you can install the Ad Hoc Transfer Plug-in forOutlook V2.3.18
Upgrading Outlook 2007 to Outlook 2010 or 2013If you have the Ad Hoc Transfer Plug-in for Outlook V2.0 installed on a system with Outlook2007, you can upgrade to Outlook 2010, 2013, or 2016 without reinstalling the plug-in.If you have a previous version of the Ad Hoc Transfer Plug-in for Outlook installed on a systemwith Outlook 2007, you must upgrade the plug-in to Ad Hoc Transfer Plug-in for Outlook V2.0before upgrading to Outlook 2010, 2013, or 2016.19
Customizing and RebrandingThis section contains instructions related to customizing and re-branding the client UI and help. User interface customization (on page 20). Help topic customization (on page 22).User Interface CustomizationYou can customize the Ad Hoc Transfer Plug-in for Outlook to provide your own branding for theuser interface. The following product components can be customized: Text labels and icons in the user interfaceHelp topicsThe following topics describe what you can customize, and how to customize the interface, thenprovides a walk-though of a sample customization.What You Can Customize in the User InterfaceMost of the icons and text that can change are part of the MOVEit Send tab on the Outlook NewE-Mail (Compose) page, as highlighted on this screen:You can also have customized icons and text for the MOVEit Connector program that runs in theWindows system tray, the MOVEit Connector Configuration dialog, the Default Send Optionsdialog, and in some error messages.20
Location of Files for Customizing the InterfaceOn any system on which you have installed Ad Hoc Transfer Plug-in for Outlook, you will find(within the Program Data Directory) the following folder:C:\ProgramData\Ipswitch\Ad Hoc Transfer Plug-in for OutlookThe default icons used in the Outlook user interface are embedded in an executable program.Any new icons that you want to use need to be placed in the folder mentioned above. In thisfolder, you will also find the customizations.xml.sample file, which contains the options that letyou override the text labels and icon files. The available options are shown in the following table:Option (in customizations.xml)Default ValueUser Interface Lo
framework; Outlook_Plug_in installs the Ad Hoc Transfer plug-in; Sync installs MOVEit Sync. Values must be separated by a comma, for example: ADDLOCAL Core,Outlook_plug_in,Sync DEFAULT_HOSTNAME The address of the server where MOVEit Server is installed. DEFAULT_SECURE Specify TRUE to use a secure SSL connection (HTTPS) or