Transcription
Genesys Meeting CenterUser Guidewww.intercalleurope.comInformation Hotline0871 7000 170 44 (0)1452 0870 043 4167 44 (0)1452 comGenesys Meeting Center is your perfect everyday business conferencing tool. Ouraward-winning technology integrates fully-automated voice conferencing with easy-touse web conferencing and desktop video, turning your PC into a universalcommunications tool. Reliable and secure, you can present PowerPoint TM slides, shareapplications, quiz and survey participants, lead a web tour, even connect via VoIP – allwith the same impact and results as in-person meetings. So you meet more productivelyand more often without the time and expense of travel.Use Genesys Meeting Center for:Sales presentationsTraining and e-learning programsMarketing seminarsProduct launchesDepartmental meetingsCompany announcementsCollaboration and project managementTips for a Successful ConferenceBelow are some helpful hints for conducting an efficient and productive meeting withGenesys Meeting Center.Prepare in advance. To avoid meeting delays, take time before the conference tocreate and upload any resources you’ll need for your meeting, such aspresentations, surveys or quizzes.Enter the meeting early to ensure participants can access your meeting at thescheduled start time. Give yourself a few minutes to open the meeting room andmake sure all necessary system components are loaded.When speaking, talk directly into either a headset or telephone receiver foroptimal clarity.Mute all participants in non-collaborative meetings to minimize background noise.Be conscious of participant connection speeds, as they may vary. Allow time fortransition between slides.For optimal application sharing performance, keep the number of open windowsto a minimum.Use annotation tools and include polling and quizzes to promote interactivity.To help participants better understand and recall content, limit presentationmaterials to six or seven lines per slide. Use larger-sized fonts for legibility.Be sure participants download the Genesys Meeting Center application prior toyour meeting if they wish to use certain features such as presenter capabilities,desktop video and desktop VoIP.Note: Your participants are not required to download the application to join your meeting.Last modified on: 7/6/2010
Set UpStart a meeting using your Outlook or Lotus Notes Calendar or the Genesys Meeting Center desktop icon. It’s never beeneasier! Just follow the simple instructions below and you are on the way to your first multimedia conferencing experience.Note: Before proceeding with the following steps, please ensure that you have administrator rights to perform the download and installation.DOWNLOAD AND INSTALLATION12345Download Genesys Meeting Center by going to www.genesys.com/go and click Get It Now.Click Download.Once the download prompt appears, click Run, then click Next on the subsequent screen prompts.Select I accept the terms in the license agreement and click Next.Enter your Meeting Number and PIN (* are not required) in the fields shown. Check the box if you want to use theOutlook Calendar tool and Next.6Upon completing of download, check Sign in to Genesys Meeting Center and click Finish.7Soon, you will see the Genesys Meeting Center desktop iconGenesys Meeting Center!in your system tray. You have successfully installedBROWSER MODERATORIf you do not install the meeting application, you can launch browser-only meetings to manage your audio participants online.You can utilize features such as mute, dial me, chat and open/close meeting room door. You will not be able to usecollaborative features such as presentation slide show, application sharing, surveys, etc.Supported browsers and operating systems for Browser Moderator include: IE 6.0 (Windows), Firefox 2.0 (Windows/Mac/Linux), Safari 2.0 (Mac).
SET UP FOR INSTANT MESSENGER INTEGRATIONQuickly invite participants to your meeting using instant messenger. Genesys Meeting Center is fully integrated with a varietyof instant messaging programs.1Once you have installed Genesys Meeting Center, click the desktop iconMeeting.in your taskbar and select Start2Click the Meeting drop-down menu and select Meeting Options.3Click Instant Messenger, then the corresponding check boxes to integrate with Windows Live Messenger and/orMicrosoft Office Communicator.4To integrate with Lotus Sametime, check the corresponding box and enter your host name, communication port,user ID and password. Click OK to save the setting.Note: Your instant messenger program must be running while performing the instructions above and to send invites to your Genesys Meeting Centerparticipants.
Schedule and Start Meetings12345Open an appointment time in your Outlook Calendar, then click Genesys Meeting Center. The meeting accessinformation will appear in the body of the appointment.Your Outlook meeting invite will be automatically populated with meeting access links for you and participants.To join the meeting, the Moderator and Participants click their respective links in the meeting invite.Genesys Meeting Center will prompt Moderators and Participants to enter their telephone numbers to beautomatically dialed or choose to dial into the meeting.Genesys Meeting Center then dials out to both moderators and participants to begin the meeting if the Dial Me Nowoption is selected.: If you do not install the Outlook or Lotus Notes Calendar tools, click the Genesys Meeting Center icon in your taskbar and select Schedule a Meeting. Followthe steps through the scheduling wizard.
WITH IBM LOTUS NOTES1Open an appointment time in your Lotus Notes Calendar, then click Genesys Meeting Center. The meeting accessinformation will appear in the body of the appointment.2Your Lotus meeting invite will be automatically populated with meeting access links for the Moderator andParticipants.To join the meeting, the Moderator and Participants click the respective link in the meeting invite.Genesys Meeting Center will prompt moderators and participants to enter their telephone numbers to beautomatically dialed or choose to dial into the meeting.Genesys Meeting Center then dials out to both the moderator and participants to begin the meeting if the Dial MeNow option is selected.345Note: If you do not install the Outlook or Lotus Notes Calendar tools, click the Genesys Meeting Center icon in your taskbar and select Schedule a Meeting.Follow the steps through the scheduling wizard.Genesys Meeting Center IconThe Genesys Meeting Center desktop iconCenter application.is automatically populated in your taskbar when you install the Genesy MeetingThis user friendly tool can be used for:1 Accessing scheduled or instant meetings with one-click.2 Scheduling meetings.3 Joining meetings.4 Accessing Conference Manager.
Start a MeetingMODERATOR1To start an instant meeting, click the Genesys Meeting Center desktop iconStart Meeting.located in your taskbar and select2Select how you would like to join the voice portion of your meeting in the first Quick Start menu and click Next.3Select what you would like to do first when your meeting starts (i.e., Show Presentation, Share Application, etc.) inthe second Quick Start menu and click Finish.
Join a MeetingPARTICIPANTS1To join a meeting, click the Genesys Meeting Center desktop iconMeeting.located in your taskbar and select Join23Enter the moderator’s Meeting Number and click Join Meeting as Participant.Enter your display name, select how you would like to join the voice portion of the meeting in the Quick Start menuand click Join Meeting.Note: Moderators can also send a Quick Invite through instant messenger or email using the Quick Invite in-meeting shortcut button. Participants simply clickthe link to join the meeting.
Conference SecurityAdd further security to your meeting by closing the meeting room door.Once the meeting room door is closed, the moderator can screen participants in the waiting room, and then provide themaccess to the meeting one at a time.You will be notified of an incoming participant by the desktop icon prompt.You can accept or reject an incoming participant by either:Clicking the corresponding link in the desktop icon prompt.Right-clicking the incoming participant’s number/name.Note: By default the door to the meeting is closed if only the web portion of the meeting is launched.Voice ManagementVOICE STATUS ICONSThe moderator can always see the voice status of the participants in the Participant panel.Standard voice iconThe participant (or moderator) is currently in the main voice meeting room.Active speaker iconThe participant (or moderator) is currently speaking, or it may indicate background noise coming fromthis lineMuted line iconParticipants cannot be heard when their lines are muted. In Group Mute mode, participants have theability to unmute themselves.Lecture Mute iconParticipants cannot be heard when their lines are muted and do not have the ability to unmutethemselvesMUTE/UNMUTE PARTICIPANTSClick the voice iconnext to the participant’s name to mute or unmute that participant. To mute/unmute all participants atonce, click Mute Options/Unmute All.
MUTE ALL OPTIONSEnable Lecture Mute All or Q&A Mute All by clicking Mute Options at the top of the meeting interface.Lecture Mute All: All participants are muted and cannot unmute themselves.Q&A Mute All: Your participants will be informed that their lines have been muted. Instruct your participants to hit the * key toindicate that they would like ask a question. Click the raised hand in order to give the floor to the participant.DIAL OUT TO PARTICIPANTSClick Dial Out and the Dial Participant window will appear. Enter the name and telephone number of the participant to calland click Dial. (Be sure there are no spaces or invalid characters between the numbers).You can also choose from your Address Book Contacts by clicking Address Book.CONTROL ENTRY & EXIT NOTIFICATIONSClick Notifications at the top of the meeting interface to control participant entry and exit notifications for your currentmeeting. Choose from Tones, Names, or Nothing.Note: To change notification settings for all meetings, click the Voice icon from the Meeting/Meeting Options menu.
Showing a PowerPoint PresentationModerators can easily show a PowerPoint presentation to participants using the web.DURING THE MEETING1234In the Show panel, select Presentation. Choose previously shared presentations from the drop-down menu. It willload automatically.For new presentations, click Browse and double-click the presentation from your desktop. No upload required!Click the slide preview thumbnails or use the forward and back buttons to navigate through your presentation.Click the slide being displayed to proceed to the next slide.IF USING OPTIONAL PRESENTATION UPLOAD MODE, PRIOR TO THE MEETING:12345Click your desktop iconand select Enter Conference Manager.At the Conference Manager page, click Resources and select Presentations.At the Presentation Upload page, click Upload Presentation.Browse and select the file you want to upload and enter the presentation name.Check Convert slides to images (no animations) if you are using PowerPoint 2007.Note: You can also upload a presentation file here during your meeting. Simply click Browse and select the file you wish to upload.
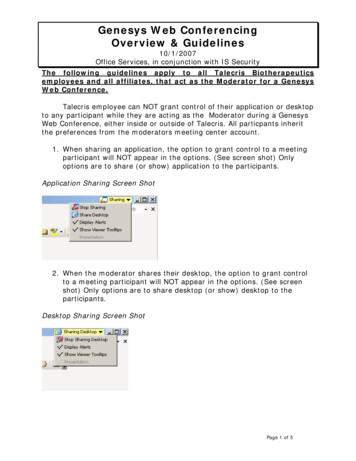
Share an Application or Entire DesktopShare and collaborate on files and applications with your participants directly from your desktop.1 In the Show panel, select File or Application and choose the application(s) you would like to show to participants.2 All applications currently open will be listed. If the application you want to share is not listed, click Browse and selectthe file.3 Check the application(s) to begin sharing.4 Alternatively, click Entire Desktop to share all applications open on your computer. Everything on your screen willbe visible to your participants.Note: You can click the shared application to hide the control panel. Simply scroll over the Genesys Meeting Center tab on the right-hand side of your screen forthe control panel to reappear on top of the application.REGION SHARINGShare a specific region of a file or application from your desktop.1 In the Show panel, select Region, A small window will appear2 Scroll over the specific section of the file or application you would like to share to the audience.3 Select Start Sharing from the drop down menu to begin sharing.4 To exit Region Share, click the X on the top right corner of the window. The Welcome Screen will now be displayed.PAUSE APPLICATION SHARINGModerators and Presenters can pause an application from being shared to the audience. Once paused, anything themoderator/presenter does on his desktop will not be seen by participants until sharing is continued.To pause a shared application:12Click Pause next to Sharing at the top right corner of the screen.The icon will flash and Sharing will change to Sharing – PausedTo continue sharing:Click Pause again. Sharing – Paused will change back to Sharing, indicating that the application is no longer paused.
GRANTING CONTROL TO PARTICIPANTSParticipants can be granted control to manipulate an application the moderator is sharing from their computer. This does notpromote them to a presenter role, but allows them to edit the moderator’s shared application.To grant control to a participant:1 Right-click the name of the participant you wish to grant control.2 Select Grant Control of Desktop / Application.3 The participant will receive a notification to take control by clicking her mouse.To revoke control from a participant at any time, simply click your mouse.PROMOTING PARTICIPANTS TO PRESENTERParticipants can be promoted to a Presenter during a meeting so they can share content from their own computers and pushslides in Presentation mode. *To promote a participant to Presenter:1 Right-click the name of the participant you wish to promote.2 Select Promote to Presenter.3 The participant will receive a notification that he has been promoted to the role of Presenter.4 To revoke control and demote a Presenter to participant, simply right click the participant’s name and select Demoteto Participant.Note: Participants must install the Genesys Meeting Center application in order to be promoted to Presenter.Enhanced FeaturesUtilize a variety of powerful features to make your meeting more interactive and enrich the experience.SURVEYS/QUIZZES/POLLSGather feedback, test your participants’ knowledge and get quick results with surveys/quizzes and polls.1 Click the Meeting drop-down at the top of the meeting interface and select Meeting Options.2 Check Display Survey-Quiz-Poll and click OK.3 Select the survey, quiz or poll from the control panel and click Send.You can also create a survey, quiz or poll on the fly by choosing Create in the drop down menu. Click Refresh before sendingyour survey.REPORTSGenesys Meeting Center stores detailed reports from your meetings, with information on the duration of the meeting, numberof participants, participant names and survey or quiz results.12Click the Reports tab in the Conference Manager to access meeting reports.Select Web, Survey, Quiz or Meeting Usage Reports to view report details.DESKTOP VIDEOEasily broadcast your webcam video from your desktop into your meeting.1 Click the Meeting drop-down menu at the top of the meeting interface and select Enable Desktop Video.2 Upon meeting start, click Broadcast My Video.3 Select the video device in the drop-down menu and click OK.
UPLOAD A PICTURE OR OTHER IMAGE TO BROADCAST IN A MEETING123In the Conference Manager, go to Resources, then Images.Click Upload Image and follow the upload wizard.During the meeting, to display the image, click the Meeting drop-down menu on the top of the interface. SelectMeeting Options, check Display Image, select the image from the pull-down and click OK. The image will bedisplayed in the top of the meeting interface.ARCHIVINGExtend the reach of your meeting by archiving it for future playback.1 Click the Meeting drop-down menu at the top of the meeting interface and select Record Archive.2 Name the archive and select Voice and/or Web.3 Click Record. The web recording will begin immediately. The audio recording session will begin after you hear thevoice prompt, “This session will now be recorded,” followed by a beep.4 Click Stop to end the recording.1 After the meeting, you can retrieve the archive in the Conference Manager, under Conferencing/Archives.Note: Additional charges will apply.DESKTOP VOIPConnect to the audio portion of an online meeting via Voice over IP. All you need is an Internet connection and headset withmicrophone connected to your computer.1 To connect via Desktop VoIP upon joining a meeting, simply click Connect via Desktop VoIP in the first Quick Startmenu.2Easily toggle between telephone and Desktop VoIP connection during a meeting via the Voice Connection panel.
Voice ConferencingSTARTING A CONFERENCE CALL12From your telephone, dial your Access Number, then your Meeting Number, ensuring that the Meeting Number ispreceded and followed by the * key.Enter your 4-digit PIN, ensuring the number is preceded and followed bythe * key.JOINING A CONFERENCE CALLParticipants dial your Access Number and Meeting Number to enter the conference, ensuring that the Meeting Number ispreceded and followed by the * key.AUDIO KEYPAD COMMANDSControl your conference call with your telephone keypad.FeatureFunctionDescription*1 phone# *Dial OutNorth AmericaDial Out InternationalDisconnect LastParticipantRedialSelf Mute / UnmuteClose/Open DoorOpen Meeting with Door ClosedReceive ParticipantsDial out to participants in North America*011 phone# **2**3**6 **7**PIN 7**1**9**10**50***5*End ConferenceConnect/Disconnect GlobalHelpdeskListen Only Q&ARequest the FloorGrant the Floor*51**52*Listen OnlyListen Only*70*Enable/DisableConference Security CodeSet the ConferenceSecurity CodeDelete ConferenceSecurity CodeActivate/DeactivateEntry/Exit Announcements*4#### **4**73*Dial out to international participantsDisconnect last entered participant or last number dialed out to.Redial the latest outgoing call.Moderator and Participants can self-mute / unmute their own line.Close/Open meeting room.Open meeting room but keep door closed.Allow participants into the meeting one by one from the waiting orgreeting rooms.End the conference call and disconnect all participants.Provides private conversation with Helpdesk TechnicianActivates/Deactivates Listen Only (Mute) with Q&AA participant requests the floor to ask a question.Moderator gives the floor to the next participant who has requested thefloor.Activates/Deactivates the Listen Only (mute all) mode.Mutes/Un-mutes all participants. Allows participants to unmutethemselves using *6*Enable/Disable Conference Security Code on a per call basis.Provides an additional security option forconferences in addition to the meeting room number.Delete the current Conference SecurityCodeActivates/Deactivates Participant Entry andExit Announcements.Note: When Roll Call is enabled,* 73* allows moderator to cycle through 4 announcementoptions (tone, announcement, name announcement, or no announcement)*74*Activate/DeactivateRoll Call*78**007*Participant Name RecordReplay ParticipantName/CountAllows Moderator to activate/deactivate roll call. Participants areprompted to record their name that will be played upon conferenceentry and exit.Requires participants who have not recorded their name to do so.Announces each participant’s name whenroll call is active. When roll call is not active, participant count will begiven.
Customer Service and SupportTECHNICAL SUPPORT AND ACCOUNT ASSISTANCETechnical support 44 (0)20 8288 4444 or 0800 10 16 10Technical support duringconferenceOn your phone keypad: *0*On the web:Through the Genesys Meeting Center interface: Help/Dial Private Customer SupportTRAINING AND RESOURCESSign up for free onlinetrainingwww.genesys.com/trainingOnline resources anduser guide:www.genesys.com/userguide
Genesys Meeting Center Icon The Genesys Meeting Center desktop icon is automatically populated in your taskbar when you install the Genesy Meeting Center application. friendly tool can be used for: Accessing scheduled or instant meetings with one-click. Scheduling meetings. Joining meetings. AccessingConference Manager.