Transcription
Business Bill PayUser GuideNovember 2020The information contained in this document is confidential and only for the intended recipient. It may not beused, published or redistributed without the prior written consent of City National Bank.City National Bank Member FDIC. City National Bank is a subsidiary of Royal Bank of Canada. 2020 City National Bank. All Rights Reserved
ContentsBusiness Bill Pay Overview . 3Learn Business Bill Pay with Video Training . 4Comparison of Treasury Net/Business Online Bill Pay with Business Suite/BusinessEssentials Bill Pay . 4Accessing Bill Pay . 6Adding Payees . 6Making a Payment . 10Multiple Payments Setup . 11Timing of Debits and Payments . 13Auto Pay and Payment Reminders. 15Auto Pay Setup . 15Approving Payments . 16Bill Pay Reporting . 18Downloading Reports and Information from Bill Pay . 20Payment Method Verification (Check vs. Electronic) . 21Cancel Single/Recurring (automatic payments) . 23Business Bill Pay Stop Payment Requests (Checks Only) . 24Business Suite Stop Payments . 24Business Essentials Stop Payments . 25November 2020 – Business Bill Pay User Guide2
Business Bill Pay OverviewMaking a payment has never been easier. Business Bill Pay is the online tool you canuse to issue a payment to any person or business with a U.S. mailing address. Fromthis single resource, you can save payee information for future payments, schedulerecurring payments, easily review transaction information, upload payment informationto various accounting software platforms, and more.Features include: Integrated with City National OnlineMake payments online to any person or business with a U.S. mailing addressPayments can be scheduled for the current business day or up to 12 months inadvance (payments sent on business days only).Schedule recurring payments for any amount up to 50,000.00Issue payments from up to 99 different accountsView 12 months history for all payments, including those that are approved orpending approvalSee pending transactions and make changes up to the scheduled payment dateMobile device access can enable payments to payees previously establishedthrough your desktop computer or laptop.Benefits of Business Bill Pay Provides a simple, online method for issuing paymentsThere is no complicated software or hardware installationYou can store frequently used payee information to expedite the process forsubsequent paymentsAutomates your payment issuing process through scheduled future or recurringpaymentsOffers a significant savings on the costs associated with printing and mailingchecksAs described below, you are provided with the information you need to: create a new payeecreate single and multiple payments and approve paymentsaccess reports,set up alertsTo access the Bill Pay service, select the Payments menu and click Bill PayNovember 2020 – Business Bill Pay User Guide3
Learn Business Bill Pay with Video TrainingPlease refer to the Business Bill Pay Training Video, found rison of Treasury Net/Business Online Bill Pay with BusinessSuite/Business Essentials Bill PayUsers who have used Business Bill Pay with Treasury Net or Business Online will bepleased with features that are now available through City National Business Suite orBusiness Essentials.November 2020 – Business Bill Pay User Guide4
Business Bill Pay Updated CapabilitiesFunctionalityCurrent (accessible throughTreasury Net)New (accessible throughBusiness Suite)User AdministrationSeparate user setup processUser setup is one streamlinedworkflowUser Registration/ActivationRequiredNot RequiredPayment ViewsMulti-pay onlySingle or multi-pay optionsFunding account selectionSingle funding account allowed formulti-pay submissionAllows varied fundingaccounts for multi-paysubmissionPayment dashboardSeparate view for pending activityvs. payment initiationCombined view of pendingpayments and paymentinitiation screenPayee SearchMust select from payee listSmart search from payeeentry fieldPayee setup optionsMust first set up payee before firstpaymentOption to create payee withfirst payment initiationSpending ReportNot availableNew graphical spendingreport by payment categoryForecast BalanceWorksheetNot availableForecast account balancewith upcoming paymentactivityAlerts ManagementAll AutomatedManage non-security alertsper user preferenceAlert RecipientsOnly provided to AdminAvailable for all usersPayee ListAvailable from Payee ModuleAvailable only from Multi-PayPageNovember 2020 – Business Bill Pay User Guide5
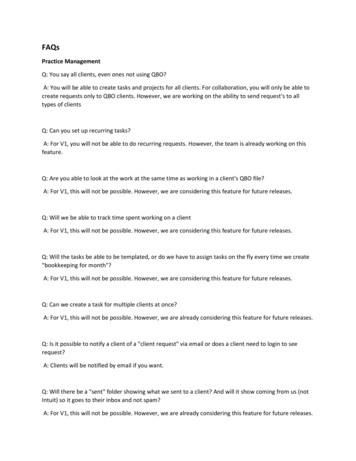
Accessing Bill Pay1. To access the Bill Pay service, log in to the Business Online Portal as describedin the General Overview User Guide. Select the Payments menu and click BillPay.2. The main Bill Pay screen shows your upcoming payments and bill pay activity.Adding PayeesTo add a payee, proceed as follows:1. Click on the Pay someone new hyperlink2. On the Pay someone new screen that appears, select from a list of commonlyused billers or enter a payee manually. (NOTE: Using commonly used billers,when available, ensures that the payment will be sent out electronically.)3. Enter the name for the payee in the field at the right side of the screen, as shownbelow. Click Add.November 2020 – Business Bill Pay User Guide6
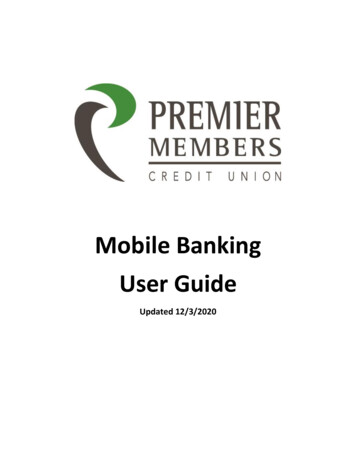
4. Enter the billing information as shown below. NOTE: It is recommended that youenter a phone number for the payee in the event that there are any deliveryNovember 2020 – Business Bill Pay User Guide7
questions. The city and state auto populate when you enter the ZIP code.5. Click the optional Category dropdown arrow and select the category. You canchange the icon for easy identification. Click Confirm when complete.November 2020 – Business Bill Pay User Guide8
November 2020 – Business Bill Pay User Guide9
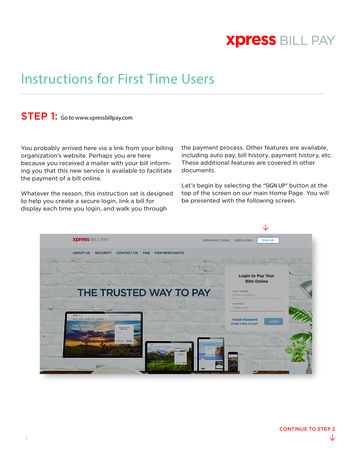
Making a Payment1. From the Bill Pay menu bar, select the Single Pay option. Your payees will bedisplayed across the top of the Bill Pay screen.2. Select the payee you wish to pay and enter or confirm the payment fields.Note: The payment method and delivery date are defined by the payee type. (If apayee is not in the Bill Pay System's commonly used billers list, payment willdefault to payment via check with the 5 business day date.) Payees that receive50 payments on a monthly basis (from all payors, not just your business) can beadded to the vendor database maintained by the Business Bill Pay provider toestablish electronic payment option instead of by check. Your payee mustrequest this on their own behalf.3. Choose a date to Deliver By. The field is defaulted to the earliest date that thispayment can be made.Electronic payments are delivered within two business days from the businessday of the request (or from the first business day after a request made onNovember 2020 – Business Bill Pay User Guide10
weekend or holiday), and check payments are delivered within 5 business daysfrom the business day of the request.4. To expedite a check or electronic payment, click the need to pay it fasterhyperlink. (Note: To request expedited payment, you must be entitled by yourAdministrator to do so. A convenience fee applies and is displayed on the screento assist you.)If you expedite payment before 1:00 p.m. Pacific Time, an electronic payment can bemade the same day and a check payment can be delivered the next business day byFedEx.Multiple Payments Setup1. To begin, click Multi Pay. Your upcoming bills are displayed. To filter thepayments, click the View dropdown menu in the dark blue bar and select desiredpreference. Options are All Payments or view of payments due in 30, 60 or 90days or you may create a custom view by clicking on Manage Custom Views.You may also sort by Pay To, Coming Due or Last Scheduled, in ascending ordescending order, by clicking on the column hyperlink.2. Enter an amount and delivery date for each payee.November 2020 – Business Bill Pay User Guide11
Additional tools to help you make payments are: Create a custom view of the payment windowUtilizing the note option to enter information, such as the invoice number orother notes about the payment3. When complete, click Confirm All payments.4. Review the payments and click Confirm.November 2020 – Business Bill Pay User Guide12
Note: Additional options are available for your payments. For example, you can addinvoice information, make an extra payment, and more.Timing of Debits and PaymentsPayments are debited from your account on the scheduled delivery date for paymentssent electronically. For payments issued by check, your account will be debited whenthe check is presented to City National Bank for payment. Checks are issued andmailed via USPS for delivery by or before the 5th business day after you submit thepayment request. Be aware your account may be debited anytime it is presented to CityNational Bank for payment, which in some cases may be prior to the 5th business dayafter you submit the payment request.Note: Clicking the Options link in the window showing your vendor/payee allows you todo the following, as allowed by your permissions in the system.November 2020 – Business Bill Pay User Guide13
Add an invoice Designate a faster payment option (if available). You must have permissionsestablished on the system to make this selection. Establish an auto pay process for this payee Add a reminder to alert you before a payment is due for that payee View the payment history for this payee4. When complete, click Make Payment. Click Confirm upon reviewing the Previewwindow and click Close on the Confirmation window.November 2020 – Business Bill Pay User Guide14
Auto Pay and Payment RemindersAuto Pay SetupAuto Pay sends payments automatically based on the rules you define.1. Select the account you will pay from and select Auto-Pay (it is in the drop downoptions, not on the default screen).2. Enter the amount of the payment.3. Select the frequency of this payment.4. Specify the date when the first payment will be made and when the payments willstop.5. Click Save auto-pay options, as shown in the screen below.November 2020 – Business Bill Pay User Guide15
Approving Payments1. First, click Approvals.2. All payments that require approval are displayed. Simply mark any of thepayments you wish to approve.3. When complete, click Submit.November 2020 – Business Bill Pay User Guide16
4. Review the payments and click Continue. Note: To the right of the Single Pay or Multi-Pay view, included are three tabsallowing for additional information on your Bill Pay system. These are describedin the Bill Pay Reporting section below.November 2020 – Business Bill Pay User Guide17
o Recent bill pay activity (See Bill Pay Reporting below)o History of payments for this payeeo MoreClicking the More tab on the side allows the following actions:o Reports – To choose from the reports availableo Balance worksheet – Allowing for cash flow forecasting based onpayments scheduled and the deposit account balanceso Alert preferences – To change how alerts are presented to youo Add/modify categories – Allows you to group your payees and paymentswithin default categories or create special categories you desireo Funding accounts – To select from funding accounts you have connectedto your Bill Pay serviceBill Pay Reporting1. The Activity tab shows the bill payments you scheduled today. The History tabshows a full history of all payments.November 2020 – Business Bill Pay User Guide18
2. You can view payments that occurred in the last 30 days up to the last 12months. The More tab provides access to additional Bill Pay reports.November 2020 – Business Bill Pay User Guide19
Downloading Reports and Information from Bill PayThe following procedures allow you to download reporting from Business Bill Pay foryour archive or reference purposes.1. Click the Reports drop down on your Bill Pay screen, as shown below. The Reportspopup screen will appear as shown below.November 2020 – Business Bill Pay User Guide20
2. Choose your preferred download option from the Download dropdown menu, asshown below.Payment Method Verification (Check vs. Electronic)Bill Pay payments are generally transmitted to recipients by ACH, unless the payeedoes not have account information in the system, in which case, a check will be issuedNovember 2020 – Business Bill Pay User Guide21
by the offsite check payment service. Whether a payment can be stopped or cancelledis determined by whether the payment is sent via ACH or check. To determine how apayment was processed, proceed as follows:1. Click on the Activity tab to the right of the Business Bill Pay screen.2. Click the appropriate payment from the list of pending payments to displaypayment details.3. Delivery Type will show as Check or Electronic.November 2020 – Business Bill Pay User Guide22
Cancel Single/Recurring (automatic payments)1. From the Activity tab, click on the appropriate payment to display the paymentdetails.2. For Single Payments click Cancel payment and confirm3. For Recurring Payments click Cancel paymenta. Select Cancel just this payment to cancel one paymentb. Select Cancel automatic rule to cancel all recurring paymentsNote: If a payment is sent electronically (via ACH), it cannot be stopped onceprocessed.November 2020 – Business Bill Pay User Guide23
Business Bill Pay Stop Payment Requests (Checks Only)Clients who are enrolled in Business Bill may place stop payments online, usingBusiness Suite or Business Essentials. Clients may request six (6)-months, two (2)years or a permanent stop payment, per single item or a range of up to 10 checks. Feesvary according to duration. To request a stop payment for a range larger than 10checks, clients must contact the Client Contact Center or visit a Branch.Note: THE BANK DOES NOT ACCEPT STOP PAYMENT REQUESTS FORELECTRONIC PAYMENTS (ACH).Business Suite Stop PaymentsTo place a stop payment for a check(s) online using Business Suite the client must:1.2.3.4.5.6.Sign onto Business Suite and click Accounts from the top navigation menu.Click Stop Pay Requests.Click Add Stop Payment Request.Select the appropriate account and complete the appropriate fields.Click Save.Confirmation message will display when completed successfully. (Request mayrequire an approval if the client company is setup with Single Approval notAllowed.)November 2020 – Business Bill Pay User Guide24
Business Essentials Stop PaymentsTo place a stop payment for a check(s) online using Business Essentials the clientmust:1. Sign onto Business Essentials and click Stop Pay Requests from the AccountServices menu.2. Click Add Stop Payment Request.3. Select the appropriate account and complete the appropriate fields.4. Click Save.5. Confirmation message will display when completed successfully.Standard stop payment charge(s) will be assessed according to the Business Suite orBusiness Essentials applicable Fee Schedule. Clients can view active stop paymentsfrom the Stop Payment Request list view or by clicking Checks and Stops Inquiry fromthe Accounts menu to search for a specific stop payment or range.November 2020 – Business Bill Pay User Guide25
Business Bill Pay. User Guide . November 2020 . . FedEx. Multiple Payments Setup 1. To begin, click Multi Pay. Your upcoming bills are displayed. To filter the . November 2020 - Business Bill Pay User Guide 14 Add an invoice Designate a faster payment option (if available). You must have permissions