Transcription
Custom Core Software Getting Started GuideVersion 1.2 SiFive, Inc.
Custom Core Software Getting StartedGuideProprietary NoticeCopyright 2019, SiFive Inc. All rights reserved.Information in this document is provided "as is," with all faults.SiFive expressly disclaims all warranties, representations, and conditions of any kind, whetherexpress or implied, including, but not limited to, the implied warranties or conditions of merchantability, fitness for a particular purpose and non-infringement.SiFive does not assume any liability rising out of the application or use of any product or circuit,and specifically disclaims any and all liability, including without limitation indirect, incidental, special, exemplary, or consequential damages.SiFive reserves the right to make changes without further notice to any products herein.Release arch 11, 2019 Initial releaseJune 21, 2019 Small fixes, graphical detail, code size options Fix typosVersion1.2Oct 22, 2019 Updated build flow diagram Add Freedom Studio method to create BSP
Contents1Custom Core Software Development Getting Started Guide .21.1Introduction . 21.2When is it Required to Generate a New BSP? .21.3High Level Flow Using E24 Custom Core Example .31.3.1Detail . 31.4Generate New BSP Using Freedom Studio .31.5Generate new BSP from the Linux Command Line .41.61.5.1Design Tarball . 41.5.2Device Tree Tools. 41.5.3Freedom E SDK . 5Create and Build Example . 61.6.1Build Options . 61.6.2Create New Project Space . 81.6.3Freedom Studio IDE . 91
Chapter 1Custom Core Software DevelopmentGetting Started Guide1.1 IntroductionSiFive custom core designs are packaged with a Device Tree Specification (design.dts) file thatis used to describe the hardware. This file is the foundation for generating the different linkerscripts and the header files required for software development.These components can be found in the bsp path within the github repository freedom-e-sdk. Forcustom cores, a unique BSP (board support package) is automatically generated and includedin the design package, also known as the design tarball. This document describes the manualprocess used to generate new header and linker script files for custom cores.1.2 When is it Required to Generate a New BSP?A new BSP should be generated when custom integration work is required in the design after itis initially received from SiFive. Some examples where a custom design can get out of phasewith the hardware description in design.dts are as follows: Adding IP into the design which requires software support. Changing the total number of interrupt lines, or changes to interrupt routing. Relocatable address mapping included in design. This is a custom SiFive feature. Updating the chosen node which defines the software entry point.When these types of changes are introduced, then the design.dts file should be updated toreflect the new design. Then, new linker and header files can be regenerated based ondesign.dts so software components reflect the design accurately.2
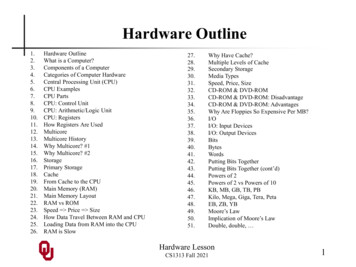
31.3 High Level Flow Using E24 Custom Core ExampleA high level flow is shown in the below diagram below, showing the input and output components required to generate a new BSP.1.3.1DetailThe .dts file contains information in text format that describes the hardware in detail, includingbase address and size for memory and peripherals. There is a specification that describes theformat of this file. For more information see devicetree.org. This file is an output from the designenvironment and one exists for every custom core.The .h file contains macros, include files, and structures which declare all instances of memorymapped features of the device.The .lds file contains formatted, named sections for code and data. This file is used by the toolchain to link compiled code and data sections to the actual hardware memory map.1.4 Generate New BSP Using Freedom StudioFreedom Studio users now have the ability to generate a new BSP from within the Eclipse IDE.This method is convenient for Windows or Mac users for example, since it does not require a
4dedicated Linux environment. Once a custom core design tarball has been created onsifive.com, then use Freedom Studio to generate a new BSP using the following steps. Download Freedom Studio from https://www.sifive.com/boards Extract the archive into a path which does not contain any spaces. Launch Freedom Studio from the root path of the extracted package. Click I want to import my Core IP Deliverable on the welcome screen. Select the Importfrom an IP package archive and select your tar.gz file, which is the custom core tarball. Select Help Open Freedom Studio Manual from the top menu of Freedom Studio. Follow the steps to build freedom-devicetree-tools and rebuild your bsp, as described inthe Manual.1.5 Generate new BSP from the Linux Command LineGenerating the new linker script and header file requires the design.dts file contained within thedesign tarball, and utilities within two github repositories.For this example we will reference a new workspace that contains the design tarball and twogithub reedom-e-sdk1.5.1Design TarballExtract the tarball for the custom core. The design.dts file is located here and used to generatethe .lds and .h files. mkdir my-new-core-tarballcp my new tarball v0p0.tar.gz /path/to/my-new-core-tarballcd /path/to/my-new-core-tarballtar -xvf tarball v0p0.tar.gzThe design.dts file resides in freedom-e-sdk/bsp/design-rtl and optionally,freedom-e-sdk/bsp/design-arty path. The design-arty BSP will only exist if the design tarball includes a bitfile for debugging on an Arty 100T FPGA board.1.5.2Device Tree ToolsSetup the device tree tools repository which contains C utilities to generate the various components needed for software development. Refer to the README for the required packagesnecessary to use the tools. Also note that a C 11 compiler is required to build the binaries. git clone .git cd freedom-devicetree-tools
5 git submodule update --init --recursive autoreconf -iThis step should show output similar to the following configure.ac:23: installing './compile'configure.ac:11: installing './install-sh'configure.ac:11: installing './missing'.Now, run configure ./configureYou should see the following steps at this point checking for a BSD-compatible install. /usr/bin/install -c checking whether build environment is sane. yes checking for a thread-safe mkdir -p. /bin/mkdir -p checking for gawk. gawk checking whether make sets (MAKE). yes. checking for dtc. yes checking that generated files are newer than configure. done configure: creating ./config.status config.status: creating Makefile config.status: executing depfiles commandsNow run make makeNow the binaries have been built and the freedom-devicetree-tools location needs to beadded to your system PATH.1.5.3Freedom E SDKIn this next step, we clone the freedom-e-sdk repository which contains software examples forthe SiFive standard cores. This repository contains the update-targets.sh script that uses theDevice Tree Tools binaries we built in the previous step to create the custom header file andlinker script file. git clone --recursive https://github.com/sifive/freedom-e-sdk.git cd freedom-e-sdk/bsp mkdir my-new-coreThe design.dts file from the tarball should now be moved into /bsp/my-new-core created in theprevious step. cp /path/to/my-new-core-tarball/info/design.dts \/path/to/freedom-e-sdk/bsp/my-new-core
6From the freedom-e-sdk/bsp path, show the arguments for the generation script using the following command ./update-targets.sh --helpGenerate the BSP components ./update-targets.sh --target-name my-new-core \--sdk-path ././ --target-dts ./my-new-core/design.dtsAll of the generated BSP components now reside in /path/to/freedom-e-sdk/bsp/my-new-core.1.6 Create and Build ExampleThe BSP also requires a settings.mk file. The settings.mk file is used to pass -march (architecture) and -mabi (application binary interface) information to the RISC-V GNU Toolchain. Earlierversions of freedom-devicetree-tools did not automatically generate a settings.mk file. If onedoes not exist, copy settings.mk from a different freedom-e-sdk/bsp with similar architecture.Check the file contents to ensure the correct architecture is declared in this file for the newdesign.We now have the required software components in freedom-e-sdk/bsp/my-new-core to startcompiling examples and creating your new projects.To build an example project cd freedom-e-sdk make PROGRAM hello TARGET my-new-core CONFIGURATION debug softwareThe output file(s) will reside in /software/debug or /software/release path depending on thebuild CONFIGURATION selected. The CONFIGURATION options include debug or release.To clean the build, replace 'software' above with 'clean'. To see all build options, use 'makehelp'.1.6.1Build OptionsThe debug configuration uses level zero optimizations by specifying compiler option -O0. Thisdefault selection does not optimize for code size. The debug configuration additionally uses -gto include debug symbols in the .elf file, but this does not change the code size sections. Therelease configuration uses the compiler option -Os to produce the smallest code footprint.These optimizations can be changed by modifying freedom-e-sdk/debug.mk or freedom-e-sdk/release.mk files.
7Options for Code SizeFor example, the -Os optimization will optimize for size for a possible reduction in performance.Consider -O2 or -O3 based on the application needs. Smaller code size can be achieved byusing newlib-nano library by specifying --specs nano.specs.The code size summary below shows how the different options directly affect code size for oneof the example programs available in the freedom-e-sdk repository. The code size summary canbe shown by using the riscv64-unknown-elf-size utility which is part of the prebuilt GCCtoolchain available on sifive.com.Level 0 OptimizationsRISCV CFLAGS -O0riscv64-unknown-elf-size 73hex17deddec54185hexd3a9Use newlib libraryRISCV CFLAGS -O0 --specs nano.specsriscv64-unknown-elf-size local-interrupt.elftextdatabss21409649626280Level 2 Optimizations and use smaller newlib libraryRISCV CFLAGS -O2 --specs nano.specsriscv64-unknown-elf-size 45hexb6fdOptions for Code LocationMultiple linker files exist in each BSP for flexibility in choosing the proper configuration based onapplication requirements. The following options describe the linker memory map options createdfor each BSP: metal.default.lds places code and data into SPI flash. metal.ramrodata.lds places read-only data into RAM for higher performance but executescode by fetching instructions from SPI flash. metal.scratchpad.lds places all code and data into RAM. This provides the best performance, provided enough memory exists for the targeted application. Note: The scratchpad option may not compile successfully for applications which requiremore memory than available on-target.
8The default linker file is metal.default.lds. To specify a new linker file on the command line make PROGRAM hello TARGET my-new-core \CONFIGURATION debug LINK TARGET ramrodata softwareThis option will select metal.ramrodata.lds as the linker file.The default build configuration is debug so the code size is not optimized. To configure a buildfor best code size, specify the release configuration make PROGRAM hello TARGET my-new-core \CONFIGURATION release software1.6.2Create New Project SpaceNow that we have a custom BSP setup, a separate project can be created using the freedom-esdk make process. Here we use the standalone option which creates a new project in a location you specify, complete with supporting Makefiles. cd freedom-e-sdk make helpA portion of the help menu will display the following standalone STANDALONE DEST /path/to/desired/location [PROGRAM hello] [TARGET sifive-hifive1] Exports a program for a single target into a standalone project directory at STANDALONE DEST.To create a standalone project that uses interrupts for the new BSP make PROGRAM local-interrupt TARGET my-new-core \CONFIGURATION debug STANDALONE DEST /path/to/my/new/proj standaloneExecuting this command will copy all source code to your new project path specified by STANDALONE DEST. This includes all of the freedom-metal API code, the specified example, and allmakefile components.To build your new project, navigate to /path/to/my/new/proj and type makeSimply using make will use the default build options, including the default linker file and the optimizations defined in the debug.mk file. Additional command line options includeLINK TARGET ramrodata or LINK TARGET scratchpad, and CONFIGURATION release. Theseare the same command line options described in the previous section.New source code files (.s, .h, .c) can be added to the /src path in this new project space andthey will be included automatically by the make files. This new project space can be used forfuture project development.
91.6.3Freedom Studio IDEIt is important to note that for users who prefer an integrated IDE for editing, compiling, anddebugging, the Eclipse based IDE Freedom Studio is available on SiFive.com. Freedom Studiois packaged with a prebuilt toolchain, OpenOCD/GDB debugger, and a tagged release of thefreedom-e-sdk repository, which provides the platform for example code and the flexible freedom-metal API.Freedom Studio has a new project creation process that leverages the standalone make optionwithin freedom-e-sdk, described previously. New project creation within Freedom Studio is aseasy as clicking a button. Refer to the Freedom Studio Manual available athttps://www.sifive.com/documentation. This is the quickest way to get up and running on SiFivehardware.
Custom Core Software Development Getting Started Guide 1.1 Introduction SiFive custom core designs are packaged with a Device Tree Specification (design.dts) file that is used to describe the hardware. This file is the foundation for generating the different linker scripts and the header files required for software development.