Transcription
Account Plan Pro 3Sales Planning SimplifiedTable of ContentsThis is the setup guide for Account Plan Pro 3.It is a sales planning app that works within Salesforce.com. It enables sales teams to create and implement insightful account plans that help themimprove their sales results. Further, it provides reporting and dashboards to track and guide progress.Table of Contents1. Set up Custom Profile2. Set Permissions3. Enable Visual Force Page Access4. Manage Licenses/Set up Users5. Add Territory Plan Tab6. Set Privacy Settings7. Set up Objects for Reports and Dashboards8. Optional: Set up Analytical Snapshot9. Optional: Attach Files to Plan10. Upgrade Only: Change Page Layout11. Upgrade Only: Update Account Planswww.plan2winsoftware.com650-508-0622Page 1
Account Plan Pro 3Sales Planning Simplified1. Set Up Custom ProfileThere are a number of custom objects that need to be enabled.Custom Profile for Custom ObjectsIf you are using a standard (out of the box) user profile, you will need to clone it to be able to enable custom objects in that profile.To clone a profile, go to Setup - Manage users - Profiles - Click on the name of the profile to cloneAt the top, click CloneType in profile name, i.e. “custom sales rep” and SaveAssign Custom Profile to Desired UsersIf you are using a standard (out of the box) user profile, you will need to clone it to be able to enable custom objects in that profile.Go into Set up - Manage users - UsersClick on name of userIn User screen, click EditOn the right, in Profile, select desired Profile and Savewww.plan2winsoftware.com650-508-0622Page 2
Account Plan Pro 3Sales Planning Simplified2. Set PermissionsThere are a number of unique objects that need to be enabled.Go into set up - Manage users - Profiles - Select the profile for the users of Account Plan Pro (i.e. sales)Toward the bottom, find the section: Custom Object Permissions:Enable read, create, edit and delete for the following objects:Account Channel PartnersAccountPlansAccount RelationshipsAccount TeamAssociated OpportunitiesStrategiesStrength, Weakness, Opportunity, Threatwww.plan2winsoftware.com650-508-0622Page 3
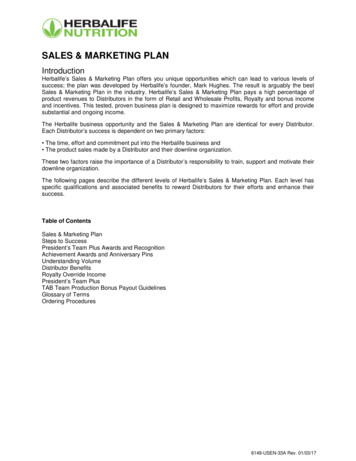
Account Plan Pro 3Sales Planning Simplified3. Enable Visualforce Page AccessOn the same page; lower down, find the section: Enabled Visualforce Page Access and Click Edit.Add these items from the left Available Visual Force Pages to the right Enabled Visualforce Pages and Save.plan2win ap.AccountOpportunityAssocViewPageplan2win ap.AccountPlanChannelPartnerViewPageplan2win ap.AccountPlanPDFplan2win ap.AccountPlanViewPageplan2win 2win.NewStrategySee next page.www.plan2winsoftware.com650-508-0622Page 4
Account Plan Pro 3Sales Planning Simplified3. Enable Visualforce Page Accesswww.plan2winsoftware.com650-508-0622Page 5
Account Plan Pro 3Sales Planning Simplified4. Manage Licenses/ Set up UsersWhat:Set up users.How:Go to your name - Set upUnder Deploy, click Installed PackagesIn the Installed Packages table, find the package nameTo the left of the package name, click Manage LicensesSelect users to apply licenses to.www.plan2winsoftware.com650-508-0622Page 6
Account Plan Pro 3Sales Planning Simplified5. Add the AccountPlans TabCustomize your tabs so that Account Plan Pro is a tab.This should be done for or by each user.What:Add the “AccountPlans” Tab to your Salesforce instance.Why:One click access to creation and review of Territory Plans for the Sales user and manager.How:Add the Custom Tab (see graphics on next two pages)From any screen, click on “Tabs” icon ( )www.plan2winsoftware.com650-508-0622Page 7
Account Plan Pro 3Sales Planning Simplified5. Add the AccountPlans TabSelect Customize My Tabswww.plan2winsoftware.com650-508-0622Page 8
Account Plan Pro 3Sales Planning Simplified5. Add the AccountPlans TabSelect AccountPlans, Add, SaveShowing tabsIf Account Plan Tab is not showing up, do this and then repeat the steps above.Setup - Administration Setup - Manage Users - Profiles - Click on the appropriate Profile - click Edit - scroll down to Tab Settings - Custom Tab Settings - Account Plans - select Default On.www.plan2winsoftware.com650-508-0622Page 9
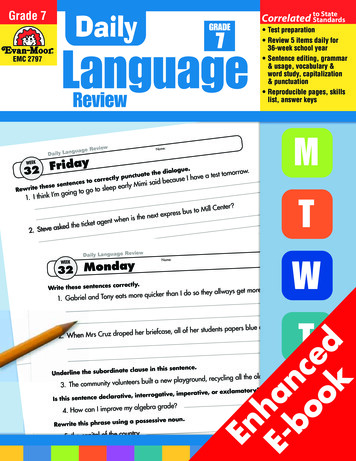
Account Plan Pro 3Sales Planning Simplified6. Set Privacy SettingsSet the Organization Wide Defaults for the Account Plan Pro object to make plans:Public everyone can see each other’s plans.Private people can only see their own plan or see plans in your hierarchy- if you “grant access using hierarchy.”Click Your Name Setup Security Controls Sharing Settings.Click Edit in the Organization-Wide Defaults area.For each object, select the default access you want to use.To enable automatic access to plans using your hierarchies, select Grant Access Using Hierarchies for Account Plan Pro.See graphics that follow.www.plan2winsoftware.com650-508-0622Page 10
Account Plan Pro 3Sales Planning Simplified6. Set Privacy Settingswww.plan2winsoftware.com650-508-0622Page 11
Account Plan Pro 3Sales Planning Simplified6. Set Privacy SettingsTo the right of AccountPlan, Select Public Read/Write, Public Read or PrivateD and “Grant Access Using Hierarchy” per your e 12
Account Plan Pro 3Sales Planning Simplified7. Set up Objects for Reports and DashboardsSet up - create - objects - Click edit to the left of AccountPlan e 13
Account Plan Pro 3Sales Planning Simplified7. Set up Objects for Reports and DashboardsBottom of page: optional features - click 22Page 14
Account Plan Pro 3Sales Planning Simplified8. OPTIONAL: Set Up Analytic SnapshotOptional: If you are upgrading from rev 2 to 3, you must click update plans first (step 11).Setup - Administration Setup - Data Management - Analytical SnapshotClick Account Plan Summarywww.plan2winsoftware.com650-508-0622Page 15
Account Plan Pro 3Sales Planning Simplified8. OPTIONAL: Set Up Analytic SnapshotScroll to Schedule Analytic Snapshot - click Editwww.plan2winsoftware.com650-508-0622Page 16
Account Plan Pro 3Sales Planning Simplified8. OPTIONAL: Set Up Analytic SnapshotSelect Frequency and start and end datesPreferred Start Time: click show available. Select the time SFDC gives youSavewww.plan2winsoftware.com650-508-0622Page 17
Account Plan Pro 3Sales Planning Simplified9. OPTIONAL: Attach Files to PlanOptional: To set up to attach files to plans:Setup - create - objectsClick on AccountPlan - editScroll down to page layouts - edit AccountPlan layout 3.0Click on related lists and drag notes an attachment to where you want them to be in the layoutSavewww.plan2winsoftware.com650-508-0622Page 18
Account Plan Pro 3Sales Planning Simplified10. UPGRADE ONLY: Change Page LayoutUpgrade only: From Rev 2 to Rev 3: Change the Page Layout version to 3.0Set up- create- objects- click e 19
Account Plan Pro 3Sales Planning Simplified10. UPGRADE ONLY: Change Page LayoutUpgrade only: Scroll to the page layouts section toward bottomClick Page Layout Assignmentwww.plan2winsoftware.com650-508-0622Page 20
Account Plan Pro 3Sales Planning Simplified10. UPGRADE ONLY: Change Page LayoutUpgrade Only: Click edit assignment and click all the profiles that use our appIn Page Layout to use, select the 3.0 version for those profiles - select 3.0 version then click savewww.plan2winsoftware.com650-508-0622Page 21
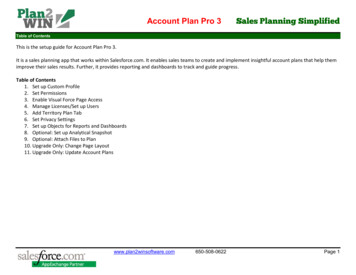
Account Plan Pro 3Sales Planning Simplified11. UPGRADE ONLY: Update Account PlansUpgrade only: If you ARE upgrading, do this step.You will need to update all plans to the new revision. This only needs to be done once for each user.This must be done before you set up the Analytic Snapshot- if you are upgrading from rev 2 to 3.Here is how:Set up - create - objects - click Account Plan- Search Layout section- Select Account Plan List Viewwww.plan2winsoftware.com650-508-0622Page 22
Account Plan Pro 3Sales Planning Simplified11. UPGRADE ONLY: Update Account PlansUpgrade only: In available button you will see "Update Account Plan" button you will need to add it.Savewww.plan2winsoftware.com650-508-0622Page 23
Account Plan Pro 3Sales Planning Simplified11. UPGRADE ONLY: Updating Account PlansUpgrade only: Go to the Account Plan tab.View: All - click GoThere are 3 buttons. Click Update Account Plan.www.plan2winsoftware.com650-508-0622Page 24
Account Plan Pro 3 Sales Planning Simplified www.plan2winsoftware.com 650-508-0622 Page 2 1. Set Up Custom Profile There are a number of custom objects that need to be enabled. Custom Profile for Custom Objects If you are using a standard (out of the box) user profile, you will need to clone it to be able to enable custom objects in that profile.