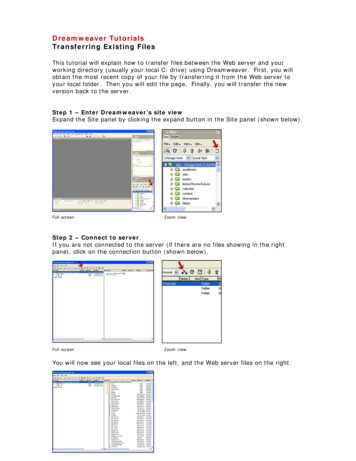
Transcription
Transferring Photos from Computer toCell Phone with Roxio Media Manager Resize photos for cell phone display Automatically synchronize photosbetween computer and cell 2007 Sonic Solutions. All rights reserved.
Most of us have lots of high-resolution photos on ourcomputers that we’d love to show off on our cellphones. Since the display window is much smaller onyour cell, you can save lots of space by scaling thephotos down before transfer, but who has the time?With Easy Media Creator 10, you don’t have to take thetime – Roxio Media Manager can scale the photos foryou - automatically. In fact, with Media Manager, youcan create custom synchronization settings for all ofyour media, than transfer it from computer to cell byclicking a single button.1. Start in Easy Media Creator Suite 10, then clickMedia and Devices, then Manage Media.This opens Roxio Media Manager.2. Let’s make sure we have the same windows open. Inthe top window, click the Folders tab to open that view.3. In the bottom window, click the My Devices tab toopen that view.
4. Then connect your cell phone to your computer. Ifthis is the first time that you connected your cell, youshould see the Mobile Synchronization setup screen(shown below). This is a wizard that lets yousynchronize media on your computer with your cellphone.If you don’t see the screen, click Tools SynchSettings to open it.5. In the Mobile Synchronization Setup Screen:a. Click the Allow Synchronizing checkbox.b. Name the device.c. Click Next three times. The first click will take you to the video synchronization screen, thesecond to audio and the third to photo, which is what we want.6. In the Photo Synchronization Setup screen, click theSynchronize Photo checkbox.
6. Let’s select the folder to store the photos in yourcell. On the upper right of the Photo SynchronizationSetup screen, click the Select Device Path button.7. In the Select Photo Device folder dialog, Select thetarget folder, and click OK to close the dialog.8. Now let’s select the source folder on your computerfor the photos that you’ll automatically synchronizewith your cell. On the middle right of the PhotoSynchronization Setup screen, click the Select PC Pathbutton.9. In the Select Photo PC folder dialog, Select thetarget folder, and click OK to close the dialog.
10. Now let’s tell Media Manager how to format yourphotos when it sends them to your cell phone. On thebottom left of the Photo Synchronization Setup screen,click the Transcoding Options button.11. Media Manager opens the Device Settings screen.Here’s where you pick the format and size that MediaManager will convert your files to before sending themto your cell phone. Don’t worry, Media Manager won’tchange your original files, it creates a new fileaccording to these parameters and sends it to your cell.First, select a Photo File Type in the list box. Unlessyou have a good reason for choosing otherwise, go withJPEG.12. Then, select your Photo Size in the list box. Choosea size that’s either the same or larger than your cellphone display. For most phones, 320x240 is fine, butyou can check your cell phone manual to see if yourscreen is larger.Click OK to close the Device Settings list box, thenNext four more times to reach the end of the MobileSynchronization Setup Wizard (should be screen 7,shown below).
13. To immediately synchronize photos between computer and cell phone, click the SynchronizeMobile Device checkbox in the final screen.Then click Done to close the wizard.14. Once you’ve completed the wizard, any time yourcell phone is connected to your computer, you can clickSync Now in the upper right toolbar, and MediaManager will synch all content in the selected folder onyour computer to the target folder on your cell phone,changing the formats as you’ve designated.15. If you don’t have the time to go through the wizard,you have another alternative. Click Tools Options,where you to choose a format for your photos.Thereafter, any time you manually transfer your photosfrom computer to cell phone, Media Manager willconform them to the selected parameters. Again, MediaManager will never change your original files, it createsa new file according to these parameters and sends it toyour cell.
16. In the Options window: Click My Devices. Select your Device. Select a Photo File Type in the list box. Unless you have a good reason for choosingotherwise, go with JPEG. Then, select your Photo Size in the list box. Choose a size that’s either the same or larger thanyour cell phone display. For most phones, 320x240 is fine, but you can check your cell phonemanual to see if your screen is larger.
17. After setting these parameters, to transfer photos from your computer to cell phone: Select the Photos in Media Manager. Click the Target Folder in your cell phone. Click Copy Down. Media Manager copies the photos from your computer to your cell,converting them to the selected parameters.18a. Let’s analyze the results. As you can see on theright, the original photo was 1698x1131 and 1.84 MB insize.18b. While copying the photo to your cell phone, MediaManager converted it to 320x213, and saved it in 18KB. The converted photo will look just as good on yourcell as the original, and you’ll have room for hundredsmore photos.
19. As you can see, Media Manager scales the photos to a smaller size to fit your cell withoutdistorting the photo. If you’d like to customize the photo for your cell, rather than simply scaling itdown to fit, you can choose an image, right click and choose Edit, which opens Roxio PhotoSuite10, shown below.Then use Mobile PhotoFit to customize the image for cell phone display. In the photo below, I’mfocusing in on my friends dancing. I’ll be able to see their faces much more clearly on my cell thanI could with the original photo.Note that you can learn how to use this feature in the tutorial entitled “Optimize Photos for CellPhone Display.”
17. After setting these parameters, to transfer photos from your computer to cell phone: Select the Photos in Media Manager. Click the Target Folder in your cell phone. Click Copy Down. Media Manager copies the photos from your computer to your cell, converting them to the selected parameters. 18a. Let's analyze the results.