Transcription
Skip to contentManuals User Manuals Simplified.AO Smith Water Heater InstructionsHome » AO Smith » AO Smith Water Heater InstructionsContents [ hide1 AO Smith Water Heater2 What’s in the box?3 General4 Specifications5 Key Features6 Installation7 Connecting Multi-function Safety Valve8 Connecting to Water Supply9 Troubleshooting10 Warranty10.1 General Terms of Warranty10.2 Post Warranty11 Service and Maintenance12 File Downloads13 References14 Related ManualsAO Smith Water Heater
Congratulations!And welcome to the A. O. Smith family. We would like to thank you for the trust you have shown in choosing an A. O. Smith waterheater. You can be sure it will live up to your expectations. Thousands of delighted users all over the world trust A. O. Smith waterheaters for their families. This user guide will introduce you to your water heater. Follow the instructions carefully and look forwardto enjoying long years of trouble-free service.A. O. Smith is a company known for its innovative technologies and energy-efficient solutions. Ours are the only water heaters withthe Blue Diamond Glass Lining for the inner tank. This cutting edge technology prevents sediment and scaling, fights corrosionand extends the life of your water heater.Our customer-centric approach manifests itself in many other ways too. If you need any information or assistance with your waterheater, just call us from any phone, anywhere in the ncountry to our Customer Care No. 1800-103-2468/1860-500-2468. OrFactory Address:A. O. Smith India Water Products Private Limited(formerly known as A. O. Smith India Water Heating Private Limited)Plot 300, Phase – II, KIADB Industrial Area, Harohalli, Kanakapura Taluk,Ramanagara District, Karnataka – 562 112, India.CIN: U31909KA2006PTC040282A. O. Smith India Water Products Private Limited was established in 2006. Since then, the A. O. Smith team has conductednumerous focus group studies and spent endless research hours determining what India wanted in a water heater. Backed by 75years of proven technological advances, A. O. Smith India has created a stylish design with features demanded by the Indianconsumer.The A. O. Smith plant with manufacturing facilities spread over 76,000 sq. ft. is located on 20 acres, just outside Bengaluru, in theKIADB Industrial Area, Harohalli. The India operations is the 16th A. O. Smith manufacturing facility worldwide. In 2013, additional150,000 sq. ft. was added in Bengaluru factory. A. O. Smith’s India plant has extensive engineering and technical resources andhas the latest technologies incorporated. A. O. Smith is the first manufacturer to invest in and produce glass lined water heaters inIndia. Today, A. O. Smith Corporation is one of the largest water heater manufacturers in the world and is a global leader ininnovative technology and energy efficient solutions.What’s in the box?
Read Before OperationOn ReceiptIt is our policy to promote safe delivery of all orders. This product shipment has been thoroughly checked, packed and qualitycertified before leaving our factory.Visible Loss or DamageIf any of the goods called for on the bill of lading or express receipt are damaged or the quantity is short, do not accept them untilthe freight or express delivery agent makes an appropriate notation on your freight bill or receipt.Concealed Loss or DamageWhen a shipment has been delivered to you in apparent good condition, but upon opening the packaging if any loss or damage hastaken place while in transit, inform the carrier’s agent / A. O. Smith representative immediately.About this manualThis manual is a guide to good practice for operating and periodic maintenance of the A. O. Smith HSE-VAS water heaterDo not operate the water heater before reading the user manual. Please follow instructions in this manual to ensure personal safetyand proper operation of this product. Always install, operate, inspect and maintain this product in accordance with all applicablestandards. Please store this user manual carefully for any future reference.GeneralSafetyYour safety and the safety of your loved ones is paramount. There are several safety related messages in this manual, which havebeen provided during various steps such as the installation, operation and maintenance of your HSE-VAS water heater. Thesemessages point out potential hazards and also educate on how to reduce any potential risks. Please always read and follow allsafety messages as provided in this user manual.This is the safety alert symbol. This symbol alerts you to potential hazards that can hurt you and others. All safety messages willfollow the safety alert symbol and either the word “DANGER” or “WARNING”.DANGER: Indicates an imminently hazardous situation which, if not avoided, will result in death or serious injury.WARNING: Indicates a potentially hazardous situation, which if not avoided, could result in death or serious injury.CAUTION: Indicates a potentially hazardous situation which, if not avoided, may result in minor or moderate injury or propertydamage.WARNINGDO NOT use this water heater if any part has been under water. Immediately contact a Qualified Service Technician to inspect thewater heater and contact A. O. Smith Service personnel to replace any part of the control system which has been under water.Failure to follow this instruction can result in property damage, serious injury or death.ImportantThese instructions have been written as a guide for the proper installation and operation of your water heater. A. O. Smith will notaccept any liability where these instructions have Nnot been followed. However, for your safety and to avoid damage caused byimproper installation, it is recommended that water heater must be installed by a Qualified Service Technician.Before proceeding with the installation instructions:
1. Inspect the water heater and its component parts for possible damage. Do Not Ninstall or attempt to repair any damagedcomponent parts. If you detect any Ndamage in the water heater, please contact the dealer where the water heater waspurchased or call A. O. Smith Customer care.2. Verify that the voltage being supplied corresponds to that which is marked on the water heater manual.SpecificationsModel (Vertical 50Volume [L]15253550Power [W]2000Voltage/Frequency [V/Hz]230 /50Actual Stdg. Loss[kWh/24h/45 C diff.]0.4500.5400.6150.724Reheating Time for 35ºC rise[in min.]12202935Temperature range [ºC]25-75 *182024N/cm280Rated waterpressureWater head(metres)80Inlet/Outlet connections [inch]½ BSPNet Weight (kgs)14*The maximum set temperature(75 C) may vary 5 C.Dimensions
ModelHSE-VAS-015 HSE-VAS-025 HSE-VAS-035 HSE-VAS-050A [mm]510516665870B [mm]339395395395C [mm]100100100100D [mm]134155155155E [mm]181187187187
PartDescription1Service Cover2Temperature Control Knob3Power indicator lamp4Heating indicator lamp5Anode6Cold water inlet pipe with diffuser7Hot water outlet pipe8Blue Cap9Red Cap10Thermal Cut-out11Thermostat12Heating Element13Wall Mount Bracket14Suppor tKey FeaturesBlue Diamond Glass LiningBlue Diamond technology increases the life of the inner tank. The lining is stronger and more corrosion resistant than any other inthe industryGlass Coated Heating ElementScale and sediment build-up on the surface of the element can lead to premature failure. A. O. Smith Glass Coating helps toprevent scale formation and extends the life of the heating element.Anode RodThe tank has an anode rod which has stainless steel core that is designed to protect the tank from corrosive elements. The anoderod uses a special cathodic action to fight these elements and thus prolong the life of the water heater.Temperature Control KnobThe temperature control knob allows you to set the temperature anywhere between 25ºC to 75ºC.Thermal CutoutIf the water temperature exceeds the highest preset level, the thermal cut-out cuts off the power supply to assure safety.Multi-function Safety ValveThe Multi-function safety valve is designed to automatically relieve pressure and discharge water in case the pressure overshootsthe preset limits.Note: A. O. Smith reserves the right to amend or modify the specifications and features at any time, as and when required withoutany prior notification.
Safety PrecautionsDuring InstallationDo not install the water heater where there is direct sunlight or rain. It is has to be installed indoor only.Do not install the water heater where water splashes on the water heater.InstallationBefore installing, ensure that the following tools are available:Tools RequiredWater HeaterIt is recommended as per IS302-1 to have 6inches clearance from wall.Select a place to mount water heater vertically with water connection at the bottom3-1/2ft. (approx.) from a 230V electrical outlet with proper grounding.Mounting the
at least twice the weight of the water heater when completely filled with water.drill 2 holes at least 90mm deep in the wall (Fig. 8 : Step 3). The two holes should be aligned horizontally. The horizontaldistance between the 2 holes should be 150mm (Fig. 8 : Step 2).hole (Fig. 9 : Step 1).Expansion anchor and tighten the Hanging screw by rotating it till it gets fixed steadily (Fig. 9 : Step 2).Place the water heater on the Hanging screw through wall mount bracket. (Fig. 10) Tug downwards on the water heater to
ensure that the water heater is fixed steadily.WARNINGHot water is dangerous, especially for children aged or the disabled. The water heater allows you to control the temperature ofyour hot water. Water Ntemperatures over 52 C can cause severe burns instantly or death from scalds. NDo not leave a childor an infirm person in the bath unsupervised.Connecting Multi-function Safety ValveWrap the threaded part of the cold water inlet pipe with Teflon tape in clockwise direction.Connect the Multi-function Safety valve to cold water inlet pipe and rotate it inclockwise direction till it get fixed.Connect one end of the discharge tube to Figure 13
the Multi-function Safety valve and connect the other end to the drain.Note: TheMulti-function Safety valve may drip during the usage of the heater. As the water is heated, it expands and tries to flowback throughthe inlet pipe but is prevented by the presence of the non-return valve. Hence water may drip from the Multi-function Safety valve.Therefore a Discharge tube is given from the valve tip to a nearby drain. To avoid dripping, it is recommended to install non-returnvalve at a distance of atleast 40 feet away from the inlet of the water heater.CAUTIONprevent it from dripping or releasing the excess pressure inside the heater. Failure to do so may result in damage to the waterheater and injuries to the user. This will also make the warranty null and void.Ensure that the free end of the Discharge tube is placed over a suitable drain and away from the users.Multi-function Safety valve) in case excessive pressure is developed. The contents of the discharge from the Multi-functionSafety valve may be hot and may cause burns to the users and damage nearby objects if not properly routed to a drain.a regular basis to ensure that there are no blockages and also to remove any lime deposits that would have been formedinside the water heater. being operated. Ensure that the water is filled completely in the water heater beforeswitching it ON.Connecting to Water Supply*Flexible Hoses to be procured by the customer, not part of standard product. ** Multi-function Safety valve comes included with theWater Heater.CAUTION:Make sure a suitable Teflon tape is used for all plumbing connections to prevent leakage. Use only Nylon/ Stainless Steel(SS) braided hoses (Flexible Hoses) having a minimum pressure rating of 8 Bar and hoses should be compatible for hot waterapplications.Failure to follow this instruction can result in property damage.
OperationFilling the Water Heater Tank1.2.3.4.Open a nearby hot water faucet to permit air to escape.Open the cold water inlet valve fully, filling the water heater and the piping.Close hot water faucet when water flows.Check all the connections to see if there is any leakage. In case of a leakage, drain the water completely, repair the leakingjoint and then refill the water heater.CAUTIONThis water heater should not be operated with insufficient amount of water. Failure to do so may result in damage to the waterheater and injuries to the user. This will also make the warranty null and void.Once the Mounting, Multi-function Safety valve, Plumbing and Water filling is completed, then only the power supply should beswitched ON.Connecting to Electrical SupplyThe power cord and plug are connected with Figure 16 this water heater. Find a separate socket for power plug and make sure thesocket is in firm contact with the plug. Ensure that reliable earthing has been done.CAUTIONConnect the water heater using independent sockets, do not use any adapters. Use multimeter to check whether the live lineand neutral line are not reverse, to ensure complete safety.Before installing the water heater, confirm that the power of water heater matches electric meter capacity and supply wire.The water heater should be earthed reliably. It is prohibited to connect the earth wire to neutral wire or faucet water pipe.Temperaute Conrol KnobSwitch on the water heater’s power supply. The Power indicator lamp glows.Temperature settingTurn the Temperature control knob clockwise for the device to commence heating and change the set temperature. The Heatingindicator lamp will glow. [The set temperature increases if the Temperature control knob is turned clockwise]. Temperature can beadjusted from 25 C to maximum 75 C. Recommended to keep Temperature control knob notch position always in medium orabove level.ModesThere are two types of modes depending on the actual water temperature inside the inner tank of the water heater:
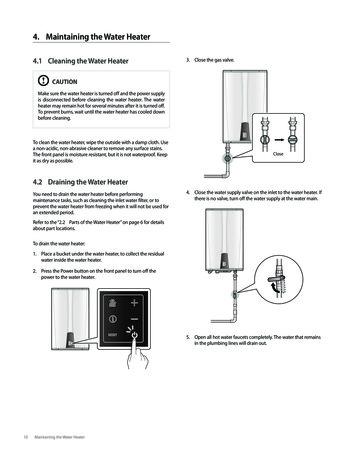
Heating modeWhen the actual temperature of the water is less than the set temperature, it enters into Heating mode. The Heating indicator lampglows as shown in (Fig. 18)Standby modeAfter the water heater reaches set temperature, it will enter into the Standby mode due to thermostat cut-off and the Power indicatorlamp glows and Heating indicator lamp switch off as shown in (Fig. 19)When the temperature of the water drops by 5 C from the set temperature due to usage of water, the water heater again enters intoheating mode.Draining the Water Heater TankWhenever the water heater is not used for an Figure 20 extended period, unplug the unit and drain. If it is below freezingtemperature, you will need to unplug the unit and drain it.Switch OFF the electric supply to the water heater.Open the hot water faucet until the water runs cool.Close cold water supply.Drain the water by lifting the DischargeLever of the Multi-function Safety valve upwards. (Fig. 20)
CAUTION: Please turn off the power supply to the water heater prior to draining the water heater.TroubleshootingThe water heater may not operate as desired if used incorrectly or there is a minor cause, even though the product has no fault. Inthese cases, check the following issues to solve simple problems without the help from the Customer care centre. If the problemdoes not solve after checking the following issues, call Customer care centre.ProblemsPossible Cause(s)Power indicator lamp and Heating indicatorNo power supply to the water heater.lamp does not glow.SolutionTurn ON electrical switch.Thermostat is not functioning.Call Customer care centre.Improper thermostat calibration.Call Customer care centre.Thermal Cut-out switch open.Call Customer care centre.No power supply to the heater.Check the power socket.Control circuit or internal wiring error.Call Customer care centre.Improper thermostat calibration.Call Customer care centre.Thermostat does not shut OFF.No hot water.Water temperature is too high.
Thermal Cut-out trips.Call Customer care centre.Water heats slowly.Heating Element is not functioning.Call Customer care centre.Piping connection leaks.Connection not sealed.Re-connect piping, using Teflon tape.Water leakage from product.Leakage in tank or other parts.Switch off power immediately and CallCustomer care centre.Non-return valve is installed close to theinlet of the water heater.Install Non-return valve at a distance ofatleast 40 feet from the inlet of the waterheater or connect a Discharge tube fromMulti-function Safety valve to nearbydrain. (Refer page 8)Presence of organic matter in input water.Provide treated water at the input.No usage of hot water for a long timeperiod.If the water heater is not used for anextended period of time, drain the waterfrom the water heater. Ensure water isfilled back before use of water heater.Water dripping from Multi-function Safetyvalve during heating.Foul smell from hot waterCall Customer care centre.High electrical conductivity of water due todissolved substances in input water.Anode options availablefor highly conductive water.Note: Customer Care No. 1800-103-2468/1860-500-2468.Circuit Diagram
WarrantyProduct WarrantyYour A. O. Smith water heater is warranted against defects arising from faulty design, workmanship and materials for a period of 24months from the date of the invoice, subject to the following conditions:1. The customer will notify the Company promptly about defects noticed and give the Company or its Authorised service provideradequate opportunity to inspect, test and remedy them, for which the customer will deposit the goods, if necessary, with theCompany’s Office / Authorised service provider along with the original invoice.2. Special warranty from the date of purchase is subject to the following conditions:TankHeating Element – 2 Upto 2 Years Extended Warranty*Rest of the parts – 2 Years3. Inspection and Test Report of the Company’s Office / Authorised service provider will be treated as final & binding under thewarranty for determining the defects, repairs / alterations required or carried out, or certifying working of the goods thereafter.4. The Company or its Authorised service provider will be entitled to retain any defective part replaced under the warranty.5. The Company’s liability under the warranty will be limited only to defects which occur under conditions of proper installation,normal operation and under proper use. It excludes defects occurring because of abuse, faulty care or maintenance andrepairs / alterations to product or the parts by unauthorised person.6. The water heater should not be operated without water inside 35 & 50 Ltrs. 1 year extended the tank. This will make thewarranty null and void.7. warranty applicable for In case of dry heating (water heater operated without water 15 & 25 Ltrs. inside the tank), if the waterheater or any component of the water heater is damaged, then it will be repaired / changed on a chargeable basis. After anyrepair or part replacement in the water heater, the basic warranty continues as per the actual date of purchase.8. The customer will have no claim under this warranty in respect of any personal injury, damage of property or consequentialdamages, or for utilisation of the goods not in accordance with the user guide9. The inner tank and Heating element need to be cleaned for any deposits / scales periodically from an Authorised servicetechnician. This will ensure your water heater works efficiently for longer time10. Anode is not included under warranty, the service life of the Anode is determined by the quality and quantity of the waterflowing through. If the Anode is consumed, it needs to be replaced by an Authorised service technician for efficient protectionof the water heater. The warranty on the tank will be null and void,11. Warranty does not cover:Plastic Parts: Cleaning of the scales deposits inside water heater tank as a general device.Any damages to water heater occuring due to site conditions like electrical works and plumbing works.Damage to water heater or its suroundings due to non usage of Multi Function Safety valve, Pressure Reducing Valve ornon recommended reducing valve in plumbing lines.Product installed in direct sunlight exposure or rain or non serviceable areas.damage to water heater at customer house during installation or serviceable procedures by unauthorised servicetechnician.Any service related issues/ replacement due to non A.O. Smith connecting hoses.General Terms of Warranty1. The “goods” shall mean the goods described in the purchase agreement.2. “The customer” shall mean the original purchaser under the purchase agreement.
3. “The Company” shall mean A. O. Smith India Water Products Private Limited.4. The “Purchase Agreement” shall mean the General Terms and Conditions of Sale agreed upon by the customer and theCompany as printed on the Invoice.5. “Invoice” shall mean the Invoice issued for the Unit by the Company or Authorised Dealer to the customer describing thegoods and indicating, inter alia, the total purchase price thereof, the name of the customer and the place where the goods areto be installed.6. “User Guide” shall mean the instructions for installation leaflet published by the Company and delivered to the customer.Note: Follow any one for registration of the Extended Warranty.Customer Care No. 1800-103-2468/1860-500-2468. visit www.aosmithindia.com.Post Warranty1. The customer may be offered a yearly Service Contract at the prevailing Company rates and terms.2. In case the customer does not wish to enter the Service Contract, he has an option to call our Customer Care Centre and getA. O. Smith water heater unit serviced on actual basis i.e. by paying the Labour Cost and Spares needed to attend to thatService or Complaint Call at the prevailing Company rates. Such service will be rendered by the Company in towns or placeswhere the Company has its Authorised service providers.3. In case of product repair after warranty by Authorised service provider, all expenses of transporting the goods to and from theAuthorised service provider shall be borne by the customer directly.4. If, during such service, it is necessary for the Company or Authorised service provider to replace or repair defectivecomponents or parts, the customer shall be required to pay for the same as per the Company’s prevailing price list.JurisdictionThe courts of competent jurisdiction at Bengaluru, Karnataka shall have exclusive jurisdiction over all matters arising out of anydisputes in relation to the product.Expert Company Service – Power of 11. Different models has different service delivery levels.2. Service level mentioned for particular models are applicable for Metros and A Class Cities e. g. Delhi and NCR, Bengaluru,Hyderabad, Kolkata, Pune, Goa, Cochin, Chennai, Chandigarh and Ahmedabad.3. Service level deliverables are valid up to city municipal limit only.4. Service level may differ in case of public holidays and unavoidable conditions due to natural climate, any political and regionalregulations.5. Power of 1 valid service is applicable for calls registered at A. O. Smith call centre before 4 p.m. only.Warranty CardCustomer Copy to be retained by the CustomerInvoice Number: Dated: Unit Serial Number:Model: Capacity: Customer’s Name and Address:Ph: Mobile:E-mail:Dealer’s Stamp and SignatureCompany Copy to be sent back to the CompanyInvoice Number: Dated: Unit Serial Number:Model: Capacity: Customer’s Name and Address:Ph: Mobile:E-mail: Dealer’s Stamp and SignatureService and MaintenanceFor Service needs:Please contact our A. O. SmithCustomer Care No. : 1800-103-2468/1860-500-2468.SMS us : 91 99410 32468E-mail us : aosmithcs@aosmithindia.comRegistered OfficeA. O. Smith India Water Products Private Limited(formerly known as A. O. Smith India Water Heating Private Limited) Plot 300, Phase – II, KIADB Industrial Area, Harohalli,Kanakapura Taluk, Ramanagara District, Karnataka – 562 112, India.
Customer Care No. 1800-103-2468/1860-500-2468.Website: www.aosmithindia.comCIN: U31909KA2006PTC040282File DownloadsInstructionsDownload [optimized]Water Heater, HSE-VAS DownloadReferencesaosmithindia.comDiamond TrademarkRelated Manuals1. AO Smith Storage Electrical Water Heater CEWHR-PE6 User Manual User Manual AO Smith Storage Electrical Water HeaterCEWHR-PE6 .2. Rheem Performance Platinum Gas Water Heater Instructions Rheem Performance Platinum Gas Water Heater InstructionsPerformance PlatinumTM PERFORMANCE.3. Ecosmart Tankless Water Heater User Manual 3 Smart Steps For Endless Hot Water: 1. Find your.4. Mr.Heater MH9BX Portable Buddy Radiant Heater Operating Instructions and Owner’s Manual Mr.Heater MH9BX PortableBuddy Radiant Heater Operating Instructions and Owner’s.5. Intertek Electric Water Heater User Manual Intertek Electric Water Heater User Manual THE WARRANTY ON THIS.6. Haier Solar Water Heater User Manual User Manual Haier Solar Water Heater Please read through.
component parts. If you detect any Ndamage in the water heater, please contact the dealer where the water heater was purchased or call A. O. Smith Customer care. 2. Verify that the voltage being supplied corresponds to that which is marked on the water heater manual. Specifications Model (Vertical Wall Mounted) HSE-VAS-015 HSE-VAS-025 HSE-VAS .