Transcription
UFT OneSoftware Version:15.0Installation GuideGo to HELP CENTER ONLINEhttp://admhelp.microfocus.com/uft/Document Release Date: November 2019 Software Release Date: November 2019
Installation GuideUFT OneLegal NoticesDisclaimerCertain versions of software and/ordocuments (“Material”) accessible here may contain branding from Hewlett-Packard Company (now HP Inc.)and HewlettPackard Enterprise Company. As of September1,2017,the Material is now offered by Micro Focus,a separately owned and operatedcompany. Any reference to the HP and HewlettPackard Enterprise/HPE marks is historical in nature,and the HP and HewlettPackardEnterprise/HPE marks are the property of theirrespective owners.WarrantyThe only warranties forproducts and services of Micro Focus and its affiliates and licensors (“Micro Focus”) are setforth in the express warrantystatements accompanying such products and services.Nothing herein should be construed as constituting an additional warranty.Micro Focusshall notbe liable fortechnical oreditorial errors oromissions contained herein.The information contained herein is subjectto change withoutnotice.Restricted Rights LegendContains Confidential Information.Exceptas specifically indicated otherwise,a valid license is required forpossession,use orcopying.Consistentwith FAR 12.211 and 12.212,Commercial ComputerSoftware,ComputerSoftware Documentation,and Technical Data forCommercial Items arelicensed to the U.S.Governmentundervendor's standard commercial license.Copyright Notice Copyright1992 - 2019 Micro Focus orone of its affiliates.UFT One (15.0)Page 2 of 72
Installation GuideUFT OneContentsUFT One1Installation overview6Installedcomponents6AdditionalUFT components6Before you install8Required access permissions9Requiredpermissions for UFT9Requiredpermissions for ALM10Requiredpermissions for BPT10Enterprise deployment12UFT andUser Account Control(UAC)12Stingray or TerminalEmulator Add-ins12Upgrade UFT14Before you upgrade14Perform your upgrade14Notes for upgrading14Install UFT17Installation prerequisites17Downloadthe installation files18InstallUFT with the installwizard19Run the installation wizard19UFT improvement program19Custom Setupscreen20UFT Configuration screen22InstallWeb2.0 add-ins or extensibility toolkits23UFT silent installation25Before running a silent installation25InstallUFT silently25Silent commands for installing UFT prerequisites26Silent commands for installing individualUFT features28Set UFT remote configuration options32Additionalsilent installation commands33Installa lighter version ofUFT34Verify the installationUFT One (15.0)36Page 3 of 72
Installation GuideUFT OneRun the UFT Installation Validation Toolanalysis36Understanding a UFT Installation Validation Toolreport36Known issues when installing37Previous UFT versions37Files in use37Component registration failed38UFT installations andother ADM software38UFT installations andMicrosoft software39UFT installations andthe Micro Focus UFT Agent (browser support)41UFT installations and64-bit applications41UFT installations andJava42UFT licensing44UFT license types44View license information44AutoPass License server44Seat vs. concurrent licenses46Seat licenses46Concurrent licenses46License editions48Supportedlicense editions48Upgrading licenses from before UFT 14.0049Licensing fallbackmechanism49Manage licenses with the wizard52Manage licenses with the commandline57Run the License Installer from the commandline57Define seat licenses with the commandline57Consume concurrent licenses with the commandline58Configure license behavior60Generallicense settings60Configure the licensing fallbackmechanism60Configure licensing timeouts61Licensing FAQs63UFT HelpCenter licensing scope63Can I use my oldlicense (from before UFT 12.50) with the new License Server?63Which license shouldI install?64How do I installthe AutoPass License Server?64IfI am using concurrent licenses, how do I connect to the License Server?64How do I installlicenses ifI am deploying UFT across an enterprise network?65How do I manage the concurrent licenses on the License Server?65Can I configure license behavior myself?65UFT One (15.0)Page 4 of 72
Installation GuideUFT OneCan I set upmy License Server to workwith a redundant (backup) License Server?65Can I use the AutoPass License Server with a proxy?66What is a cleanuplicense?66My demo license is expiring early. What can I do?66Known issues with UFT licensingBefore connecting to ALM6769When to run this procedure69Microsoft Windows 7 andWindows Server 2008 R269For Microsoft Windows 8.x andWindows Server 201270For Microsoft Windows 1070Enable UAC again ifrequired70Send Us FeedbackUFT One (15.0)71Page 5 of 72
Installation GuideInstallation overviewInstallation overviewThis guide provides details about how to install UFT from the full installation package, or a compressed,lighter installation package.This chapter includes: Installed components Additional UFT components Before you install668Installed componentsIn either package, installing UFT provides core UFT features, the Run Results Viewer, and the followingmandatory GUI testing add-ins:llllWebStandard WindowsMobileWindows Runtime (when installing on computers with Windows 8.x and higher, and WindowsServer 2012)Select additional add-ins during installation, as needed.Web 2.0 add-ins and extensibility toolkits must be installed separately from the full installation package,after the UFT installation is complete.The lighter installation package provides the UFT setup program only.The full installation package provides the UFT setup program, as well as additional setup programs forUFT components. To install an additional component, select it from the UFT installation wizard Startupscreen.Additional UFT componentsAdditional UFT components include:ComponentDescriptionUFT Add-infor ALMEnables UFT to communicate with ALM and run tests or components from ALM.Install the standalone version only if UFT is not installed on the computer.To install this together with UFT, select to install it while installing UFT. If you did notinstall this originally with UFT, and want to later on, run the installation wizard again.Select Change, and then select ALM Plugin in the Custom Setup screen.UFT One (15.0)Page 6 of 72
Installation GuideInstallation e you to develop support for Java, .NET, WPF, Silverlight, or Web object notsupported by UFT by default.Web 2.0ToolkitSupportEnable you to recognize and use objects in your test from Web 2.0 technologies,including:lllllASP .NET AjaxDojoGWT (Google Web Toolkit)jQueryUISalesforce LightningSiebelOpenUIl EXT-JSl YahooUIWeb 2.0 Toolkits appear in UFT as GUI Add-ins.lLicense serversetupEnables you to install the AutoPass License Server, which is used to install andmanage UFT concurrent and commuter licenses.For details, see "UFT licensing" on page 44 and the AutoPass License Server UserGuide.Run ResultsViewer setupEnables you to install a standalone version of the Run Results Viewer.Install the standalone version only if UFT is not installed on the computer.UFT Developer Enables you to install UFT Developer, a functional testing tool that enables you tosetupcode tests directly from your developer IDE.Install the standalone version only if UFT is not installed on the computer.l To install this together with UFT, select to install it while installing UFT. If you didnot install this originally with UFT, and want to later on, run the installation wizardagain. Select Change, and then select the UFT Developer in the Custom Setupscreen.l You must install Node.js 4.1.2 before installing UFT Developer:https://nodejs.org/en/download/For more details, see the UFT Developer Readme.lNote: Unless otherwise specified, references to Application Lifecycle Management or ALMapply to all currently supported versions of ALM and Quality Center.UFT One (15.0)Page 7 of 72
Installation GuideInstallation overviewSome features and options may not be supported in the specific edition of ALM or Quality Centerthat you are using.Before you installCaution: UFT can potentially be used to record user actions and/or network communications.Therefore, we strongly recommend running UFT on dedicated test machines that do not contain orprovide access to sensitive information. Additionally, you should thoroughly review your labnetwork topology and access permissions before using UFT.Before installing, perform the following steps:Ensure that you have required permissions, as listed in "Required access permissions" on page 9l If you are installing in an enterprise environment, review "Enterprise deployment" on page 12.l If you are upgrading , review "Upgrade UFT" on page 14 for specific steps that may apply to you.l Review any known issues, as listed in "Known issues when installing" on page 37 and "Known issueswith UFT licensing" on page 67.For more details, see "Installation prerequisites" on page 17.lSee also:lll"Install UFT" on page 17"UFT licensing" on page 44"Before connecting to ALM" on page 69UFT One (15.0)Page 8 of 72
Installation GuideRequired access permissionsRequired access permissionsVerify the following access permissions before you start running UFT, or working with UFT and ALM orBPT.This chapter includes: Required permissions for UFT Required permissions for ALM Required permissions for BPT91010Required permissions for UFTRequired file system permissionsRead/write You must have read/write permissions to the following files and folders, as well as anypermissions sub-folders:llllllllThe Windows\System32 folderThe Temp folderThe folder containing UFT solutions, tests, or run resultsThe Program Files \Common Files\Mercury Interactive folderThe Program Data \Hewlett-Packard folderUser Profile foldersThe Windows \mercury.ini fileThe following AppData wlett-Packard\UFT%appdata%\HP\API TestingReadYou must have read permissions to the following folders:permissionsl The Windows folderl The System folderUFT One (15.0)Page 9 of 72
Installation GuideRequired access permissionsRequired registry key permissionsRead/writepermissionsRead andQuery ValuepermissionsAll keys under:lHKEY CURRENT USER\Software\Mercury Interactivelor[HKEY LOCAL MACHINE\SOFTWARE\Wow6432Node\Hewlett-Packard]HKEY CURRENT USER\SOFTWARE\Hewlett PackardlHKEY LOCAL MACHINE keyslHKEY CLASSES ROOT keysNote: Some folder paths intentionally include previous company branding, due to backwardcompatibility considerations.Required permissions for ALMRead/write permissionsAdministrative permissionslALM cache folderl Program Data \HP folderlUFT Add-in for ALM installation folderFor the first connection to ALMRequired permissions for BPTEnsure that you have the required ALM permissions before working with business components andapplication areas.Component stepsTo work with component steps in ALM, you must have the appropriate Add Step, Modify Step, or DeleteStep permissions set.You do not need Modify Component permission to work with component steps.The Modify Component permission enables you to work with component properties (the fields in thecomponent Details tab).UFT One (15.0)Page 10 of 72
Installation GuideRequired access permissionsParameters in ALM or other testing toolsTo work with parameters in ALM or in a testing tool, you must have all the parameter task permissions setin ALM.Application areasTo modify application areas, you must have the separate permissions for resources required for modifyingcomponents, and adding, modifying, and deleting steps.All four permissions are required.If one of these permissions is not assigned, you can open application areas only in read-only format.UFT One (15.0)Page 11 of 72
Installation GuideEnterprise deploymentEnterprise deploymentWhen installing UFT in an enterprise business model across many computers in a network or company,ensure that you have administrator permissions on each computer.UFT also supports silent installations. For details, see "UFT silent installation" on page 25.This chapter includes: UFT and User Account Control (UAC) Stingray or Terminal Emulator Add-ins1212UFT and User Account Control (UAC)You do not need to turn off the computer's User Account Control (UAC).For users to connect to ALM from UFT for the first time without turning off UAC, you must also install theALM client MSI file on each machine.Generate a custom MSI for all your users with the ALM Client MSI Generator. This tool enables you toconfigure the settings for your ALM servers before installing the client-side MSI.Configure the settings for a custom MSI, as described in the user guide provided with each MSI Generatorversion.Note: When configuring the settings, select the Check Include Component Registration and UseShared Deployment Mode options.Stingray or Terminal Emulator Add-insIf your users are using either the Stingray or Terminal Emulator add-ins, there are additionalconfigurations you or the user must perform after installing UFT.Both the Stingray and Terminal Emulator Add-insRun the Additional Installation Requirements after the main installation on each computer.This tool is found in the Start menu (Start All Programs Micro Focus Micro Focus UnifiedFunctional Testing Tools Additional Installation Requirements).In the Additional Installation Requirements, select the Run Stingray Wizard and/or Run TerminalEmulator Wizard options, and follow the configuration wizard steps to set up the add-ins.Stingray Add-inAfter installing UFT, users must run the Stingray Support Configuration Wizard from inside UFT: Tools Options GUI Testing tab Stingray pane Select Version.UFT One (15.0)Page 12 of 72
Installation GuideEnterprise deploymentThis configuration requires no administrative permissions.Terminal Emulator Add-inAfter installing UFT, users must run the Terminal Emulator configuration wizard from inside UFT: Tools Options GUI Testing tab Terminal Emulator pane Open WizardUsers must have administrator permissions to run this wizard.You can also run the wizard once, and then save the settings to a registry file that can be deployed on allcomputers, as follows:1. In the final screen of the Terminal Emulator Wizard, select the Save terminal emulator settings to fileoption.Note: Ensure that you record the vendor name and emulator name assigned to theconfiguration, as wel as the exact location of the .reg file.2. Copy the file to the UFT installation folder \dat folder on your computer.3. Double-click the registry file to open the Registry Editor message box.4. Click Yes to add the information into the registry. A message opens confirming that the informationhas been copied into the registry.5. Click OK. The emulator name assigned to this configuration is added to the list of available terminalemulators for your UFT installation.UFT One (15.0)Page 13 of 72
Installation GuideUpgrade UFTUpgrade UFTYou can upgrade directly to the most recent version of UFT from any previous version of UFT, or fromService Test 11.50.For other upgrades, including versions of QuickTest or Service Test versions earlier than 11.50, manuallyuninstall QuickTest or Service Test, and then install UFT.This chapter includes: Before you upgrade Perform your upgrade Notes for upgrading141414Before you upgradeUFT 15.0 uses a newer version of the .NET Framework (4.8) than earlier UFT versions.If you are upgrading from a version earlier than 15.0, consult the Product Availability Matrix to make surethat your operating system is compatible with the new version.Perform your upgradeDo the following to upgrade UFT:1. Download the installation files for your new version: ied-functional-automated-testing/download2. Restart your system ensure complete configuration for the system.3. Run the UFT VersionNumber Setup.exe file to upgrade using the installation wizard.Alternately, update your silent installation scripts to use the newly downloaded files.Note: Upgrades retain Run Session and Startup options only. Redefine all other settings asneeded.Notes for upgradingThe following items address issues when upgrading in specific situations. Read the instructions for any ofthe situations that are relevant for your upgrade.lllll"Upgrade silent installation scripts" on the next page"Upgrade licenses" on the next page"Upgrade with a concurrent license" on the next page"Upgrade with Web tests on Microsoft Edge" on the next page"Upgrade with Web tests on Safari" on page 16UFT One (15.0)Page 14 of 72
Installation GuideUpgrade UFTlllll"Upgrade UFT" on the previous page"Upgrade with text recognition options in automation scripts" on the next page"Upgrade after using UFT and ALM" on the next page"Upgrade with the QTPNET 00015 patch" on the next page"Upgrade from QuickTest Professional 11.00" on the next pageUpgrade silent installation scriptsIf you are upgrading your silent installation scripts, and the current scripts including the Help Documentsparameter, remove this parameter from your scripts. Help documents are no longer installed with UFT.Instead, access our Help Center online, or download it to your local drive. Download the Help from theOptions dialog box (Tools Options General tab Help).Upgrade licensesIf you are upgrading from QuickTest, Service Test, or a version of UFT earlier than 12.50, you must get anew license.In addition, you can also upgrade your license to the new Functional Testing licenses: UFT Ultimate, UFTEnterprise, and UFT Pro. This step is not required.For assistance, contact a regional licensing support center or your sales representative.Upgrade with a concurrent licenseUFT supports the AutoPass License Server as its concurrent license server.If you are upgrading to UFT with a concurrent license, you must also upgrade your concurrent licenseserver and install your licenses on the AutoPass License Server.For details, see the AutoPass License Server User Guide , downloaded with your AutoPass License Serverinstallation.Note: If you are installing UFT from the compressed package for the Web, this link is not available. Ifyou need to install UFT and the License Server, you must install UFT from the full installationpackage.Upgrade with Web tests on Microsoft EdgeUFT has changed the way that the Microsoft WebDriver program (required for the Micro Focus UFT Agentfor Edge) is used. For details on the required steps to perform, see the topic on using the Edge extension.UFT One (15.0)Page 15 of 72
Installation GuideUpgrade UFTUpgrade with Web tests on SafariIf you used a previous version of UFT to test Web applications on Safari, you must reinstall theUFT Connection Agent on the Mac from the current version of UFT.The UFT Connection Agent preferences and the Unified Functional Testing Agent Safari extensionpreferences are reset to their defaults.Upgrade with text recognition options in automation scriptsIf you are running UFT with an automation script and have added text recognition options to the script, thefollowing properties are obsolete and must be nismUpgrade after using UFT and ALMIf you upgrade to UFT from an version of UFT earlier than 12.50 shortly after using UFT to run GUI testsfrom ALM, make sure to stop the Remote Agent (if running) before running tests from ALM again.To stop the previous Remote Agent process, in the Windows system tray, right-click the Remote Agent iconand select Exit.Upgrade with the QTPNET 00015 patchIf you install UFT while the QTPNET 00015 patch (a QuickTest 10.00 patch) is installed on your computer,UFT may behave unexpectedly.Before installing UFT, remove the patch from the Windows Control Panel Add/Remove Programs dialogbox.Upgrade from QuickTest Professional 11.00When upgrading from QuickTest Professional 11.00 and installing UFT into the same directory asQuickTest, certain files will be missing from the installation.After the upgrade, run the UFT installation again and select the Repair Installation option.UFT One (15.0)Page 16 of 72
Installation GuideInstallation prerequisitesInstall UFTThis section describes how to install UFT, starting with prerequisites and downloading the installationfiles.This chapter includes: Installation prerequisites Download the installation files1718Installation prerequisitesBefore installing, verify the following rify that you are logged on to your machine with the relevant accesspermissions.For details, see "Required access permissions" on page 9.Install locationSelect the location where you want to install UFT.Do not install UFT on a network drive.The installation path, and the path to the installation files, must includeEnglish characters only.Computer stateEnsure that your computer does not need to be restarted.SystemrequirementsEnsure that your computer meets all minimum system requirementslisted in the Product Availability Matrix.Internet accessIf you are installing the UFT Installation Package for the Web, ensure thatyou have Internet access.UpgradesIf you are upgrading, check any relevant prerequisites described in"Upgrade UFT" on page 14.LicensesKnow which type of license you are using.If you are using a concurrent license, have the license server URLavailable.For more details, see "UFT licensing" on page 44.GUI testing add-insUFT One (15.0)Know which add-ins you want to use for GUI testing. We recommendinstalling only those you expect to use.Page 17 of 72
Installation GuideDownload the installation filesPrerequisiteDescriptionAPI testingIf you plan to run tests of a Web Service using security settings, you musthave the .NET Framework 3.5, WSE 2.0sp3 package, and WSE 3.0package installed on your computer.These packages are not installed with the UFT installation. If they are notinstalled on your computer, you can install them from the followinglocations on the DVD:lllNET 3.5 Framework: DVD/prerequisites/dotnet35sp1/donetfx35 sp1.exeWSE 2.0 untime.msiWSE .msiNote: In Windows 10, Microsoft no longer officially supports WSE.For details on installing these prerequisites using the silent installationcommands, see "Silent commands for installing UFT prerequisites" onpage 26.Download the installation filesAccess the UFT installation files here: fiedfunctional-automated-testing/downloadSave your download to a location that will have 260 characters or less in the path, including filenameswithin the installation folder.Note: Windows is limited to 260 characters in these files, and the installation will fail if your filepath is longer. In such cases, move your download to a location with a shorter path.Next steps:lll"Install UFT with the install wizard" on page 19"UFT silent installation" on page 25"Verify the installation" on page 36UFT One (15.0)Page 18 of 72
Installation GuideInstall UFT with the install wizardInstall UFT with the install wizardThis topic describes how to run the UFT installation wizard, which guides you through the installationprocess.If you are installing UFT on a computer using a language other than English, your installation setupand wizard automatically runs in the language of your computer.This chapter includes: Run the installation wizard UFT improvement program Custom Setup screen UFT Configuration screen Install Web 2.0 add-ins or extensibility toolkits1919202223Run the installation wizardBefore the installation, restart your computer to ensure complete configuration of the system.Then, run the Setup.exe file, and select Unified Functional Testing Setup. Follow the steps asinstructed to complete your installation.For more details, see:"UFT improvement program" belowl "Custom Setup screen" on the next pagel "UFT Configuration screen" on page 22When the UFT installation is complete, you are prompted to view the Readme and installation log.lYou may also be prompted to restart your computer. If you are, we recommend restarting as soon aspossible. Delaying the system restart may result in unexpected UFT behavior.Note: If you are using Web 2.0 add-ins or extensibility toolkits, perform additionalinstallations. For details, see "Install Web 2.0 add-ins or extensibility toolkits" on page 23.UFT improvement programIn the End-User License Agreement pane, UFT enables you to select to participate in the UFTImprovement Program.Selecting this option configures UFT to collect and send usage data back to Micro Focus. This datahelps us understand which improvements matter most to our users.UFT One (15.0)Page 19 of 72
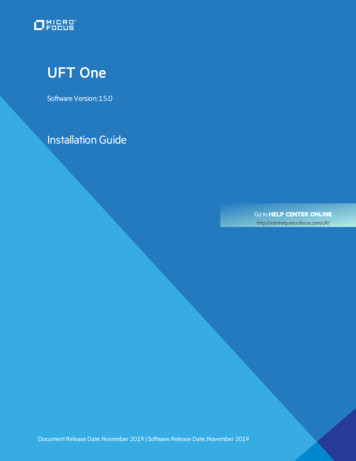
Installation GuideInstall UFT with the install wizardIn the wizard, click More Details for details about the program.Note: You can later disable and re-enable this data collection inside UFT. For more details,see Usage Data Collector pane in the UFT Help Center.Change the language of the UFT interfaceBy default, UFT is installed in English.If you want to install UFT in the language of your operating system, select the language option at thebottom of the License Agreement screen.Custom Setup screenSelect the UFT features you want to install in the Custom Setup screen.UFT One (15.0)Page 20 of 72
Installation GuideInstall UFT with the install wizardFor example:For each feature, select one of the following installation options:Will be installed on local hard drive.Installs the selected feature on your local hard drive. Sub-features of the selected featureare not installed.Entire feature will be installed on local hard drive.Installs the entire selected feature and its sub-features on your local hard drive.For example, you can instruct UFT to install the .NET Add-in with its sub add-ins, Silverlightand Windows Presentation Foundation.Note: SelectingEntire feature will be unavailable. excludes the feature from theinstallation. It will not be available in UFT.The following table describes each feature listed:FeatureDescriptionRuntime EngineMandatory. Enables you to run UFT or UFT Developer tests.UI Designer and Enables you to edit UFT tests.IDEUFT One (15.0)Page 21 of 72
Installation GuideInstall UFT with the install wizardFeatureDescriptionRun ResultsViewerEnables you to view UFT or UFT Developer run results.SamplesDemo applications used in the UFT tutorials.ALM PluginEnables you to run and edit UFT tests directly from ALM.UFT DeveloperEnables you to create functional tests directly from your developer IDE.GUI TestingAdd-insProvide the support which enable you to test applications using supportedtechnology versions.Alternatively, you can view run results in a browser window without the RunResults Viewer.You must install the Web Add-in to test applications based on Web 2.0technologies.UFT Configuration screenSelect any required items you want to configure automatically with the UFT installation.For example:Configuration options include:UFT One (15.0)Page 22 of 72
Installation GuideInstall UFT with the install wizardConfigure InternetExplorer settingsEnables UFT to use the Microsoft Script Debugger applicationduring test runs.Alternatively, configure these settings manually before runningUFT. In Internet Options Advanced, select the followingoptions:Allow running UFTremotely from ALMlDisable script debugginglEnable third-party browser extensionsChanges DCOM permissions and security settings and opens afirewall port on your UFT computer.Required if you are running UFT on Windows 7, and want to runUFT tests remotely from ALM.To set these options manually later on, 239325Enable running UFTChanges DCOM permissions and security settings to enableremotely from Automation other computers to remotely control UFT using automationScriptsscripts.To set these options manually later on, 239325Caution: Running UFT remotely from Automation Scripts enables remote users to controlUFT on this machine, exposing the UFT computer to security risks.Install Web 2.0 add-ins or extensibility toolkitsYou must perform an additional installation to use Web 2.0 add-ins or extensiblity toolkits.Extensibility toolkits enable you to develop support for add-in objects not currently supported byUFT add-ins.UFT One (15.0)Page 23 of 72
Installation GuideInstall UFT with the install wizardDo one of the following, depending on the type of UFT installation you performed:UFT installationpackageWeb 2.0 / extensibility installationFull installationpackage1. Run the UFT installation wizard.In the UFT installation start screen, select the Add-in Extensibility andWeb 2.0 Toolkits option.2. In the Unified Functional Testing Add-in Extensibility and Web 2.0Toolkit support page, select the Extensibility SDK or Web 2.0 Toolkitsinstallation option that you want.3. Follow the steps in the wizard to complete your installation.Lighterinstallationpackage for theWeb1. After performing the UFT installation, navigate to the UFTinstallation \Installations\Web2AddinSetup folder.2. In the Web2AddinSetup folder, run the Web2AddinSetup.exe file.3. Follow the steps in the wizard to complete your installation.After your installation, the toolkit files and Extensibility SDKs are found in the UFT installation \dat\Extensibility folder.Web 2.0 add-ins are displayed as child add-ins to the Web Add-in in the Add-in Manager whenstarting UFT.UFT One (15.0)Page 24 of 72
Installation GuideUFT silent installationUFT silent installationYou can install UFT and the ALM Add-in silently on your computer or a remote computer.This chapter includes: Before running a silent installation Install UFT silently Silent commands for installing UFT prerequisites Silent commands for installing individual UFT features Set UFT remote configuration options Ad
Contents UFT One 1 Installationoverview 6 Installedcomponents 6 AdditionalUFTcomponents 6 Beforeyouinstall 8 Requiredaccesspermissions 9 RequiredpermissionsforUFT 9