Transcription
SonicWall GlobalManagement System 9.2Getting Started Guide
1ContentsPart 1. Introducing GMSIntroduction to GMS . . . . . . . . . . . . . . . . . . . . . . . . . . . . . . . . . . . . . . . . . . . . . . . . . . . . . . . . . . . . . . . . . 5Part 2. Installing GMSBefore You Begin . . . . . . . . . . . . . . . . . . . . . . . . . . . . . . . . . . . . . . . . . . . . . . . . . . . . . . . . . . . . . . . . . . . . 7System Requirements . . . . . . . . . . . . . . . . . . . . . . . . . . . . . . . . . . . . . . . . . . . . . . . . . . . . . . . . . . . . . . . . . . 7Installation Quick Start . . . . . . . . . . . . . . . . . . . . . . . . . . . . . . . . . . . . . . . . . . . . . . . . . . . . . . . . . . . . . . . . . 8Record Configuration Information . . . . . . . . . . . . . . . . . . . . . . . . . . . . . . . . . . . . . . . . . . . . . . . . . . . . . . . . 8Installing the GMS OVA File . . . . . . . . . . . . . . . . . . . . . . . . . . . . . . . . . . . . . . . . . . . . . . . . . . . . . . . . . . . 9Setting Up the Network Configuration . . . . . . . . . . . . . . . . . . . . . . . . . . . . . . . . . . . . . . . . . . . . . . . . . 16Configuring the System . . . . . . . . . . . . . . . . . . . . . . . . . . . . . . . . . . . . . . . . . . . . . . . . . . . . . . . . . . . . . . 18Performing Basic Tasks and Manual Host Configuration . . . . . . . . . . . . . . . . . . . . . . . . . . . . . . . . . . . . . 21Power the Virtual Appliance On . . . . . . . . . . . . . . . . . . . . . . . . . . . . . . . . . . . . . . . . . . . . . . . . . . . . . . . . . 21Configure Host Settings on the Console . . . . . . . . . . . . . . . . . . . . . . . . . . . . . . . . . . . . . . . . . . . . . . . . . . 22Configure Host Settings on the Appliance Management Interface . . . . . . . . . . . . . . . . . . . . . . . . . . . . . 23Viewing the Settings Summary . . . . . . . . . . . . . . . . . . . . . . . . . . . . . . . . . . . . . . . . . . . . . . . . . . . . . . . . . . 24Editing The Virtual Machine Settings . . . . . . . . . . . . . . . . . . . . . . . . . . . . . . . . . . . . . . . . . . . . . . . . . . . . . 25Setting the Install Mode . . . . . . . . . . . . . . . . . . . . . . . . . . . . . . . . . . . . . . . . . . . . . . . . . . . . . . . . . . . . . 26Single Server Deployment . . . . . . . . . . . . . . . . . . . . . . . . . . . . . . . . . . . . . . . . . . . . . . . . . . . . . . . . . . . . . . 26Distributed Deployment . . . . . . . . . . . . . . . . . . . . . . . . . . . . . . . . . . . . . . . . . . . . . . . . . . . . . . . . . . . . . . . 30Registering GMS . . . . . . . . . . . . . . . . . . . . . . . . . . . . . . . . . . . . . . . . . . . . . . . . . . . . . . . . . . . . . . . . . . . 42GMS Registration . . . . . . . . . . . . . . . . . . . . . . . . . . . . . . . . . . . . . . . . . . . . . . . . . . . . . . . . . . . . . . . . . . . . . 42Adding Devices . . . . . . . . . . . . . . . . . . . . . . . . . . . . . . . . . . . . . . . . . . . . . . . . . . . . . . . . . . . . . . . . . . . . 45Basic Mode . . . . . . . . . . . . . . . . . . . . . . . . . . . . . . . . . . . . . . . . . . . . . . . . . . . . . . . . . . . . . . . . . . . . . . . . . . 45Advanced Mode . . . . . . . . . . . . . . . . . . . . . . . . . . . . . . . . . . . . . . . . . . . . . . . . . . . . . . . . . . . . . . . . . . . . . . 46Part 3. Using GMSUsing the GMS Management Interface . . . . . . . . . . . . . . . . . . . . . . . . . . . . . . . . . . . . . . . . . . . . . . . . . 50Centralized Management and Monitoring . . . . . . . . . . . . . . . . . . . . . . . . . . . . . . . . . . . . . . . . . . . . . . . . 51Distributed Intelligent Platform Monitoring . . . . . . . . . . . . . . . . . . . . . . . . . . . . . . . . . . . . . . . . . . . . . . . 53Navigating the GMS Management Interface . . . . . . . . . . . . . . . . . . . . . . . . . . . . . . . . . . . . . . . . . . . . . . . 55CONSOLE View . . . . . . . . . . . . . . . . . . . . . . . . . . . . . . . . . . . . . . . . . . . . . . . . . . . . . . . . . . . . . . . . . . . . . . . 59Understanding GMS Icons . . . . . . . . . . . . . . . . . . . . . . . . . . . . . . . . . . . . . . . . . . . . . . . . . . . . . . . . . . . . . 59HOME View . . . . . . . . . . . . . . . . . . . . . . . . . . . . . . . . . . . . . . . . . . . . . . . . . . . . . . . . . . . . . . . . . . . . . . . 61HOME View (Flow Based) . . . . . . . . . . . . . . . . . . . . . . . . . . . . . . . . . . . . . . . . . . . . . . . . . . . . . . . . . . . . . . 61Live Monitor . . . . . . . . . . . . . . . . . . . . . . . . . . . . . . . . . . . . . . . . . . . . . . . . . . . . . . . . . . . . . . . . . . . . . . . . . 65SonicWall Global Management System 9.2 Getting Started GuideContents2
HOME View (Syslog Based) . . . . . . . . . . . . . . . . . . . . . . . . . . . . . . . . . . . . . . . . . . . . . . . . . . . . . . . . . . . . . 66MANAGE View . . . . . . . . . . . . . . . . . . . . . . . . . . . . . . . . . . . . . . . . . . . . . . . . . . . . . . . . . . . . . . . . . . . . . 67SETUP . . . . . . . . . . . . . . . . . . . . . . . . . . . . . . . . . . . . . . . . . . . . . . . . . . . . . . . . . . . . . . . . . . . . . . . . . . . . . . 67SYSTEM . . . . . . . . . . . . . . . . . . . . . . . . . . . . . . . . . . . . . . . . . . . . . . . . . . . . . . . . . . . . . . . . . . . . . . . . . . . . . 68SECURITY . . . . . . . . . . . . . . . . . . . . . . . . . . . . . . . . . . . . . . . . . . . . . . . . . . . . . . . . . . . . . . . . . . . . . . . . . . . 68REPORTS View . . . . . . . . . . . . . . . . . . . . . . . . . . . . . . . . . . . . . . . . . . . . . . . . . . . . . . . . . . . . . . . . . . . . . 69REPORTS View (Flow Based) . . . . . . . . . . . . . . . . . . . . . . . . . . . . . . . . . . . . . . . . . . . . . . . . . . . . . . . . . . . . 69REPORTS View (Syslog Based) . . . . . . . . . . . . . . . . . . . . . . . . . . . . . . . . . . . . . . . . . . . . . . . . . . . . . . . . . . 71ANALYTICS View . . . . . . . . . . . . . . . . . . . . . . . . . . . . . . . . . . . . . . . . . . . . . . . . . . . . . . . . . . . . . . . . . . . 73Status . . . . . . . . . . . . . . . . . . . . . . . . . . . . . . . . . . . . . . . . . . . . . . . . . . . . . . . . . . . . . . . . . . . . . . . . . . . . . . 73CONSOLE View . . . . . . . . . . . . . . . . . . . . . . . . . . . . . . . . . . . . . . . . . . . . . . . . . . . . . . . . . . . . . . . . . . . . . 78Control Center . . . . . . . . . . . . . . . . . . . . . . . . . . . . . . . . . . . . . . . . . . . . . . . . . . . . . . . . . . . . . . . . . . . . . . . 80ZeroTouch . . . . . . . . . . . . . . . . . . . . . . . . . . . . . . . . . . . . . . . . . . . . . . . . . . . . . . . . . . . . . . . . . . . . . . . . . . . 86Connectwise . . . . . . . . . . . . . . . . . . . . . . . . . . . . . . . . . . . . . . . . . . . . . . . . . . . . . . . . . . . . . . . . . . . . . . . . . 86Reports . . . . . . . . . . . . . . . . . . . . . . . . . . . . . . . . . . . . . . . . . . . . . . . . . . . . . . . . . . . . . . . . . . . . . . . . . . . . . 87SonicWall Support . . . . . . . . . . . . . . . . . . . . . . . . . . . . . . . . . . . . . . . . . . . . . . . . . . . . . . . . . . . . . . . . . . 92About This Document . . . . . . . . . . . . . . . . . . . . . . . . . . . . . . . . . . . . . . . . . . . . . . . . . . . . . . . . . . . . . . . . . 93SonicWall Global Management System 9.2 Getting Started GuideContents3
Part 1Introducing GMS Introduction to GMSSonicWall Global Management System 9.1 Getting Started GuideIntroducing GMS4
1Introduction to GMSSonicWall Global Management System (GMS) is a Web-based application that can configure and managethousands of SonicWall firewall appliances from a central location.SonicWall GMS is: easy to install easy to configure easy to license easy to add devices to easy to monitor and manage your GMS instances using the Control Center and the Intelligent PlatformMonitor (IPM)GMS can be used as a Management Console in an Enterprise network containing a single SonicWall appliance,and it can also be used as a Remote Management System for managing multiple unit deployments for Enterpriseand Service Provider networks consisting of hundreds and thousands of firewalls, Email Security appliances, andSecure Mobile Access (SMA) appliances. This dramatically lowers the cost of managing a secure distributednetwork. GMS does this by enabling administrators to monitor the status of and apply configurations to allmanaged SonicWall appliances, groups of SonicWall appliances, or individual SonicWall appliances. GMS alsoprovides centralized management of scheduling and pushing firmware updates to multiple appliances and toapply configuration backups of appliances at regular intervals.GMS also includes Analytics for flow-based reporting. Analytics is a powerful management tool that providesintelligence-driven analytics with real-time visualization, monitoring, and alerting of correlated security data. Itis a valuable module that can be taken out and sold on its own as a different product. Historically, the GMSanalytics reporting has been based on incoming and outgoing syslog traffic from the appliances to the server.However, the new module allows the GMS analytics reporting to also be based on flow traffic, as a differentpacket. The way to capture the traffic selection, of either flow or syslog, is done at the time of installation.GMS provides monitoring features that enable you to view the current status of SonicWall appliances andnon-SonicWall appliances, pending tasks, and log messages. It also provides graphical reporting of firewall,Secure Mobile Access (SMA), and Email Security (ES) appliance and network activities for the SonicWallappliances. A wide range of informative real-time and historical reports can be generated to provide insight intousage trends and security events.Network administrators can also configure multiple site VPNs for SonicWall appliances. From the GMS userinterface, you can add VPN licenses to SonicWall appliances, configure VPN settings, and enable or disableremote-client access for each network.SonicWall Global Management System 9.2 Getting Started GuideIntroduction to GMS5
Part 2Installing GMS Before You Begin Installing the GMS OVA File Setting Up the Network Configuration Configuring the System Setting the Install Mode Registering GMS Adding DevicesSonicWall Global Management System 9.2 Getting Started GuideInstalling GMS6
1Before You BeginReview these sections for information before installing your SonicWall GMS Virtual Appliance: System Requirements Installation Quick StartSystem RequirementsThe SonicWall GMS Virtual Appliance comes with a base license to manage either 5, 10, or 25 nodes. You canpurchase additional licenses on MySonicWall. For more information on licensing additional nodes, act-support/licensing-assistance.To determine the hardware requirements for your deployment, use the Capacity Planning Tool em.System RequirementMinimum RequirementsSonicWall GMS Virtual Appliance ESXi 6.5A CPU greater than quad core level16 GB RAM (more is recommended for increased performance)40, 250 or 950 GB available disk space (depending on number ofdevices) thick provisioningNOTE: GMS is not supported as a VMware virtual machine running in acloud service, such as Amazon Web Services EC2.Hard Drive Browser Google Chrome 42.0 and higher (recommended browser fordashboard real-time graphics display) Mozilla Firefox 37.0 and higher Microsoft Edge 41 or higher Microsoft Internet Explorer 10.0 and higherNOTE: Internet Explorer version 10.0 in Metro interfaces of Windows 8 iscurrently not supported.Spindle Speed: 10,000 RPM or higherCache: 64 MB or higherTransfer rate: 600 MBs or higherAverage Latency: 4 microseconds or lowerNOTE: When using Internet Explorer, turn off Compatibility Mode whenaccessing the GMS management interface.NOTE: Internet Explorer is not supported for Angular-based flow reports.Network access to the Internet either: an IP address automatically assigned through DHCP a static IP addressSonicWall Appliance and Firmware SonicOS 6.2 and higherSonicWall Global Management System 9.2 Getting Started GuideBefore You Begin7
NOTE: SonicWall GMS provides monitoring support for non-SonicWall TCP/IP- and SNMP-enabled devicesand applications. See the documentation that came with your device for more information.Installation Quick StartInstalling GMS requires only these major steps:123456Installing theGMS OVA FileSetting Up theNetworkConfigurationConfiguring theSystemSetting theInstall ModeRegistering GMSAdding DevicesUse theeasy-to-usewizard toconfigure GMSusing the defaultsettings.Set the mode tobe used by GMSto monitor yourdevices:Flow-based,Syslog-based, noreporting.Install the GMS If needed,virtual appliance customize theon your system. configuration forGMS to operatein your networkenvironment.(Console Only)Register GMSusing its serialnumber andyourMySonicWallaccount.Add the devicesyou want tomonitor andmaintain usingGMS using eitherBasic orAdvanced Mode.Record Configuration InformationIf you install GMS using a static IP address, record the following configuration information from your system foryour reference before proceeding with your installation. You might not be prompted for this if you are installingusing a DHCP-generated IP address.Information NeededDescriptionYour Configuration InformationSMTP Server AddressThe Host IP or Name of your Simple MailTransfer Protocol (SMTP) server. Forexample, mail.emailprovider.com.SMTP Server PasswordThe Password for your SMTP.HTTPS Web Server PortThe number of your secure (SSL) Webserver port if customized. The default portis 443.GMS Administrator Email 1The email address of a GMS administratorwho receives email notifications fromGMS.GMS Administrator Email 2The email address of an additional GMSadministrator who receives emailnotifications from GMS. This field isoptional.Sender Email AddressThe email address from which the emailnotifications are sent by GMS.SonicWall Global Management System 9.2 Getting Started GuideBefore You Begin8
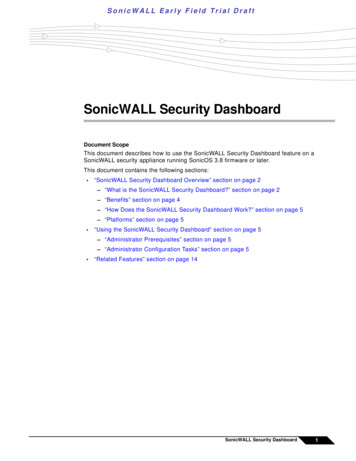
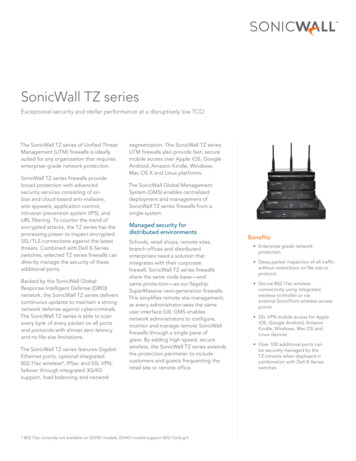
2Installing the GMS OVA FileBefore installing the SonicWall Global Management System, please read Before You Begin for the systemrequirements and other useful information.To install GMSYou can install GMS by deploying the OVA file to your VMware ESXi server. Each OVA file contains the softwarecomponents needed. Deploy the OVA file by using the vSphere or vCenter client, which are available with ESXi.NOTE: VMware ESXi elements must already be in place and the administrator must be familiar with thebasics of deploying a virtual appliance on the ESXi server.TIP: Step 15 has some important information about selecting your networks. Even if you do not need allthese step-by-step instructions, be sure to follow the instructions in Step 15 to avoid connectivity issuesafter the deployment.To perform a fresh install of GMS on VMware ESXi:1 Download the GMS OVA file from MySonicWall to a computer with vSphere / vCenter access.2 Access vSphere or vCenter and log into your ESXi server.3 Navigate to the location where you want to install the virtual machine, and select the folder.4 To begin the import process, click Actions and select Deploy OVF Template.5 In the Select an OVF template screen, select Local file: Local file – Click Choose Files and navigate to the GMS OVA file that you previously downloadedfrom the provided beta link.SonicWall Global Management System 9.2 Getting Started GuideInstalling the GMS OVA File9
6 Click Next.7 In the Select a name and folder screen, type a descriptive name for the GMS appliance into the Virtualmachine name field and select a location for the virtual machine.8 Click Next.SonicWall Global Management System 9.2 Getting Started GuideInstalling the GMS OVA File10
9 In the Select a computer resource screen, click Next to accept the default resource for the selectedfolder, or select a different resource and then click Next. Wait while the resource is validated. This is theresource pool where you want to deploy the template.SonicWall Global Management System 9.2 Getting Started GuideInstalling the GMS OVA File11
10 In the Review details screen, verify the template details and then click Next.11 In the License agreements screen, read the terms for the SonicWall End User Product Agreement, clickthe checkbox next to I accept all license agreements and then click Next.SonicWall Global Management System 9.2 Getting Started GuideInstalling the GMS OVA File12
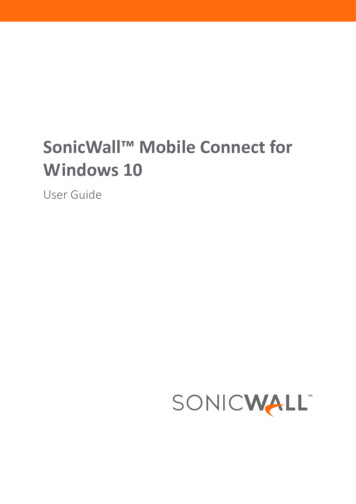
12 In the Select storage screen, first select a datastore from the table. This is the location where you want tostore the virtual machine files.13 In the same screen, select the type of provisioning for the GMS virtual appliance disk from the Selectvirtual disk format drop-down list. SonicWall recommends Thick Provision, but any selection works.14 Click Next.GMS 9.2 VM contains only one interface.NOTE: The GMS configuration should have the option for MAC address changes enabled for thevswitch ports connected.Typically, GMS is deployed between your internal network and a network with internet access. Thereforeyou map the source X0 to your LAN network (vswitch port), and map the source X1 to the WAN network(vswitch port) with connectivity to the internet.IMPORTANT: SONICOS X1 (the default WAN Interface) is set to DHCP by default, with HTTPSmanagement enabled for GMS, as this configuration eases deployments in virtual/cloudenvironments.NOTE: System defaults for the X1 interface: X1 – Default WAN – DHCP addressing, with HTTPS and Ping management enabledNOTE: Configuration settings import from physical firewalls to GMS is not supported.SonicWall Global Management System 9.2 Getting Started GuideInstalling the GMS OVA File13
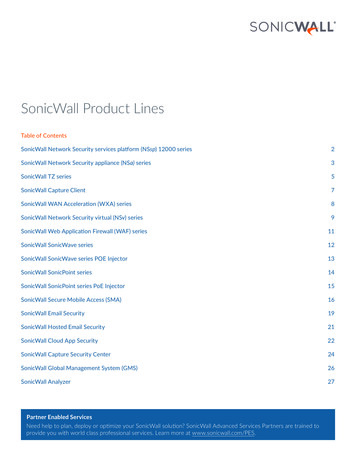
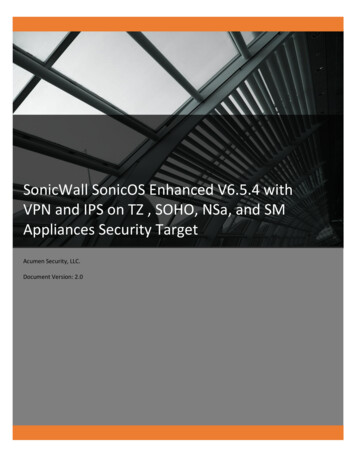
15 In the Select networks screen, choose a destination network for each source network by choosing itfrom the drop-down menu next to VM Network.16 Click Next.SonicWall Global Management System 9.2 Getting Started GuideInstalling the GMS OVA File14
17 In the Ready to complete screen, review the settings and click Finish to create the GMS virtual appliance.To change a settings, click Back to navigate back through the screens to make a change.The name of the new GMS virtual appliance appears in the left pane of the vSphere or vCenter windowwhen complete.The next step is to power on your GMS virtual appliance in the vSphere or vCenter interface.Once your GMS virtual firewall is powered on, the next step is to register it on MySonicWall.SonicWall Global Management System 9.2 Getting Started GuideInstalling the GMS OVA File15
3Setting Up the Network ConfigurationAfter installing GMS, you need to configure its network settings.To set up the network configuration for GMS:1 Launch the remote console.2 If your network configuration has a DHCP server, an IP address is automatically assigned to the virtualmachineNOTE: If a DHCP server is not present, you need to use the command-line interface to manuallyassign an IP address to the virtual machine.SonicWall Global Management System 9.2 Getting Started GuideSetting Up the Network Configuration16
3 Open a web browser and enter the IP address of the GMS installation in this format: https:// IPaddress .4 Log in the GMS console using the default administration account: Username: admin Password: passwordSonicWall Global Management System 9.2 Getting Started GuideSetting Up the Network Configuration17
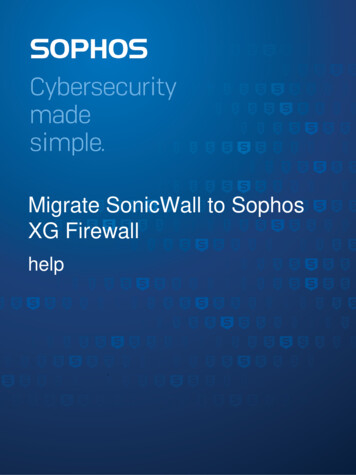
4Configuring the SystemThis section guides you through the configuration of the IP address, gateway address, preferred time setting,and the domain for your GMS installation.To configure the GMS system:1 If you are not already logged in to GMS, log in using the default administration account.The first page of the System Configuration tool displays.2 Click Next to proceed with the configuration.3 When configuring with DHCP, you can update the values for the host Name, Domain, and the DNS serversto those required for your network environment. The Host IP address/Subnet mask and the DefaultSonicWall Global Management System 9.2 Getting Started GuideConfiguring the System18
gateway are automatically populated by the DHCP server. You can opt to select the “Static” radio buttonto configure a static Host IP address / Subnet mask and the Default gateway address. Click Next.NOTE: By default, the Select IP type is DHCP. The Host IP address/ Subnet mask is automaticallyassigned. The customer does not need to configure the Host IP address/ Subnet Mask and Defaultgateway. The fields appear grayed out. If the customer switches to Static, the fields are enabled.4 If necessary, update the Time, Date, and TimeZone for your GMS installation and click Next. By defaultthe time zone is UTC.SonicWall Global Management System 9.2 Getting Started GuideConfiguring the System19
5 Verify the settings your system provides. If you need to change any of the configuration settings that youentered on previous pages, click Back. If no changes are required, click Cancel to continue with setting up GMS without restarting thevirtual machine. If you need to change any settings from their default values, click Apply to accept yourconfiguration settings. If you need to change any of the configuration settings that you entered onprevious pages, click Back.SonicWall Global Management System 9.2 Getting Started GuideConfiguring the System20
The virtual machine reboots after you apply your configuration settings. If it does, you need toenter your username and password again to continue.NOTE: If the DHCP server has been configured correctly, the values for the DNS-related fields arefilled in automatically.Performing Basic Tasks and Manual HostConfigurationThis section describes how to manually power on and configure basic settings on the GMS Virtual Appliance,including virtual hardware settings and networking settings when no DHCP server is available.The following tasks are required to configure your GMS Virtual Appliance before registering it:1 Power the Virtual Appliance On on page 212 Configure Host Settings on the Console on page 223 Configure Host Settings on the Appliance Management Interface on page 23This chapter also contains information on: Viewing the Settings Summary on page 24 Editing The Virtual Machine Settings on page 25Power the Virtual Appliance OnThere are multiple ways to power the GMS Virtual Appliance on (or off).To power the virtual appliance on (or off), complete one of the following steps: Right-click the SGMS Virtual Appliance in the left pane and navigate to Power Power On (or Power Power Off) in the right-click menu. Select the GMS Virtual Appliance in the left pane and then click Power on the virtual machine (or Shutdown the virtual machine) on the Getting Started tab in the right pane. Select the GMS Virtual Appliance in the left pane and then click Power On (or Shut down guest) on theSummary tab in the right pane.SonicWall Global Management System 9.2 Getting Started GuideConfiguring the System21
Configure Host Settings on the ConsoleNOTE: This feature is only applicable when a DHCP Server is not available to grant an IP address to thedeployed virtual machine, or when you wish to configure a Static IP.After powering on the GMS Virtual Appliance, complete the following steps to open the console and configurethe IP address and default route settings:1 In vSphere, right-click the GMS Virtual Appliance in the left pane.2 Select Open Remote Console in the right-click menu.3 When the console window opens, click inside the window, type snwlcli at the login: prompt.4 Press Enter. Your mouse pointer disappears when you click in the console window. To release it, pressCtrl Alt.5 The console might display warning messages that can be ignored, and then displays a second Login:prompt. Type admin at the Login: prompt.6 Press Enter.7 Enter password at the Password: prompt.8 Press Enter. The SNWLCLI prompt is displayed.9 Configure the local IP address for the virtual appliance by entering the following command, substitutingyour IP address and subnet mask for the values shown here:interface eth0 10.208.112.175 255.255.255.0You can also configure IPv6 address at this step by using the interface command. Or, use the /appliance(System) interface Network Settings screen to do the IPv6 configuration.10 Configure the default route for the virtual appliance by typing the following command, substituting yourgateway IP address for the value shown here:route --add default --destination 10.208.112.1You can test connectivity by pinging another server or your main gateway, for example:ping 10.208.111.1ping 10.0.0.1Press Ctrl c to stop pinging.11 Enter exit to exit the CLI.12 Close the console window by clicking the X.SonicWall Global Management System 9.2 Getting Started GuideConfiguring the System22
Configure Host Settings on the ApplianceManagement InterfaceAfter configuring the IP address and default route settings on the GMS Virtual Appliance console, the next stepsare to configure the host name, network, and time settings in the appliance management interface.The Host Configuration Tool is a wizard that takes you through several basic steps to get your GMS VirtualAppliance configured for your network.NOTE: This wizard can be skipped if no changes are required or when an IP has already been dynamicallyassigned.The wizard starts automatically after you log in for the first time. You can cancel the wizard at this time, whichleaves the default configuration on the virtual appliance and prevents the wizard from automatically startingagain.NOTE: If you log out of the appliance management interface without actually cancelling the wizard, itstarts automatically on your next login.You can manually start the wizard at any time by clicking Wizards at the top-right corner of the page.To complete host configuration for the virtual appliance, complete the following steps:1 Launch a browser and enter the URL of the virtual appliance, such as:https://10.208.112.1752 On the appliance interface login page, enter the default credentials:User—adminPassword—password3 Click Submit to log in.4 The login page re-displays with the default login credentials pre-populated.5 Click Submit.6 The Host Configuration Tool wizard starts automatically. In the Introduction screen, click Next.7 In the Network Settings screen, configure the following network settings for the GMS Virtual Appliance. Name – A descriptive name for this virtual appliance Domain – In the form of “sonicwall.com”; this domain is not used for authentication Host IP Address – The static IP address for the eth0 interface of the virtual appliance Subnet Mask – In the form of 255.255.255.0 Default Gateway – The IP address of the network gateway – this is the default gateway and isrequired for networking purposes. DNS Server 1 – The IP address of the primary DNS server DNS Server 2 (Optional) – The IP address of the secondary DNS server8 Click Next:9 In the Time Settings screen, select values for the following system settings on the virtual appliance: Time (hh:mm:ss) – Hours, minutes, and seconds of current time; this field is disabled if the NTPoption is selected Date – Month, day, and year of current date; this field is disabled if the NTP option is selectedSonicWall Global Management System 9.2 Getting Started GuideConfiguring the System23
TimeZone – Select from the drop-down list Set time automatically using NTP – Select this checkbox to use an NTP server to set the virtualappliance time; a default NTP server is pre-configured10 Click Next:11 In the Summary screen, verify the settings.12 Click Back to make changes on a previous screen, or click Apply to accept the settings.A dialog warns you that the virtual appliance is rebooting.13 Click OK.14 Wait for the settings to be applied, possibly for a few minutes. The screen displays a progress bar until itfinishes, and then displays the status.NOTE: If you modified the DNS settings, the services on the appliance restart when changes areapplied, causing a momentary connectivity loss to the Web server. Your browser is redirected tothe appliance management interface login page.If you modified the Time settings, the virtual appliance reboots. Use your browser to reconnect tothe appliance management interface.Viewing the Settings SummaryWhen the GMS Virtual Appliance is selected in the left pane, the Summary tab of the vSphere interface displayspertinent information such as memory, powered on/off state, hard disk storage usage, network subnet settings,and other settings.NOTE: This page might incorrectly indicate that VMware Tools are not installed.A short list of commands are also provided on this page, including Power On and Edit Settings.SonicWall Global Management System 9.2 Getting Started GuideConfiguring the System24
When using vSphere with vCenter Server, the Migrate and Clone commands are also available in the Actionsdrop-down.Editing The Virtual Machine SettingsYou can use the vSphere client to edit settings for the GMS Virtual Appliance, including memory, CPUs,descriptive name, datastore, and resource allocation.To edit virtual machine settings:1 In the vSphere client, right-click the GMS Virtual Appliance in the left navigation pane and select EditSettings.2 In the Virtual Hardware window, see the settings for CPU, memory, hard disk, and other hardware. Clickthe row in the table to access the editable settings in the right pane.3 Click the VM Options tab to view and edit the GMS Virtual Appliance name, location (datastore), guestpower management (for standby), and other settings.4 When finished, click OK.SonicWall Global Management System 9.2 Getting Started GuideConfiguri
SonicWall Global Management System 9.2 Getting Started Guide Introduction to GMS 1 5 Introduction to GMS SonicWall Global Management System (GMS) is a Web-based application that can configure and manage