Transcription
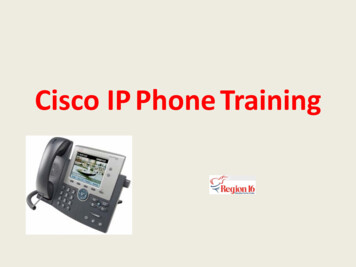
Cisco IP Phone Training
Objectives OverviewCisco IP Phone LayoutBasic Phone FunctionsVoicemailQuestions2
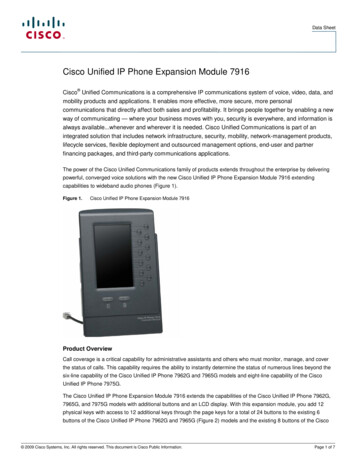
Foot Stand Release Press the foot standadjustment knob onthe right-hand sideof the phone. With the buttondepressed, adjustthe foot stand to thedesired height tohelp cradle thehandset. Release the footstand adjustmentknob.3
Buttons Buttons can beconfigured for LineAppearances, SpeedDials or Busy LampFields4
Ring Volume Adjust the Ringer Volume– While the phone is noton a call, press the Upor Down Volume keys tohear a sample ring.– As the ring plays, pressthe Up or Down Volumekeys to adjust volume tothe desired level.– The adjustment isautomatically saved.5
Handset, Speakerphone and Headset Volume Adjust the Handset,Speakerphone, andHeadset Volume– During a call, pressthe Volume key toincrease or decreasethe volume of yourHandset,Speakerphone, orHeadset.– To save the volumesetting, press theSave softkey.6
Messages Voicemail Access– Press the Messages buttonto access voicemail.– The first time you will beprompted to set up thevoicemail box.– Use 1234 as the defaultpassword.7
Call History– Press the Directories button anduse the Scroll keys to highlight thedesired call history option: MissedCalls, Received Calls, or Placed Calls.– Press the Select softkey to displaythe desired call history.– To dial a number, use the Scroll keysor touch screen to highlight thedesired number and press the Dialsoftkey.– To return to the previous menu orto exit the Directories, press Exit.8
Directories– Press the Directories button anduse the Scroll keys to highlightthe desired Directory.– Press the Select softkey to displaythe Search feature.– To search, use the TelephoneKeypad to type the name. Pressthe Search softkey.– To return to the previous menu orto exit the Directories, pressCancel or Exit.9
Voice Recognition Directory Voice recognition directory that canbe used internally and with all VoIPcontracting districts. Dial 0 Speak the name of the person10
Flexible Feature Buttons Softkeys– The buttons change based on the phone status.– You must use the buttons.11
Help Press the “?” button on your phonefor help. Select “About Your Cisco Unified IPPhone” for IP phone details. Select “How Do I ?” for commontasks details. Select “Calling Features” for callingfeatures details.12
Basic Phone Functions Place Answer CallEnd CallMute HoldCall Forward DNDTransferConference– Ad Hoc– Join13
Placing Calls– Dial without phone off-hook.– Lift the Handset and dial the number.– Press a Line buttonand dial the number.– Press the Speaker buttonand dial the number.– Press the Headset buttonand dial the number.– Press thesoftkey and dial the number.14
Answering Calls– Lift the Handset.– Press thesoftkey.– Press the Speakerbutton.– Press the Headsetbutton.15
Ending Calls To end the call by using the handset:– Return the handset to its cradle.– Or press thesoftkey. To end the call by using the headset:– Press or to keep the headset mode activepress thesoftkey.16
Ending Calls (cont) To end the call by using the speakerphone:– Pressor press thesoftkey. To end the call one-by-one and preserve other calls:– Press. If necessary, remove the call fromhold first.17
Mute and Hold Mute– During a call, press thekey to activate Mute.– To deactivate, pressagain. Hold– During a call, press thesoftkey.– To return to the call, press thesoftkey.Note:Answering an incoming call automaticallyplaces the current call on hold.18
Forwarding All Calls Press thesoftkey and enter the ID number(extension number) or external phone number.REMEMBER: Add “9” prior to the area code for anexternal phone number. To forward all calls directly to voicemail, simply press thesoftkey and then press thebutton.19
Forwarding All Calls (Cont.) Your display will read “Forwarded to xxxx ” andhave a phone indicator of. The “xxxx” display is the ID (extension) ortelephone number where the calls are forwarded.20
Cancel Forwarding All Calls To cancel call forwarding, press thesoftkey.21
Do Not Disturb To activate DND, press. If “Do Not Disturb” is active, itdisplays on the status bar of thephone. When DND is active and a call arrives,the phone extension flashes, but thering tone is turned off. To deactivate DND, press.22
Transferring Calls Blind Transfer– From an active call, press thesoftkey.– Enter the target number (4-digit ID or extension).– Press thesoftkey. Supervised/Consult Transfer (Talk to the Transfer Recipient First)– From an active call, press thesoftkey.– Enter the target number (4-digit ID or extension).– Wait for the transfer recipient to answer.– Announce the call to the recipient.– Press thesoftkey to complete the transfer.23
Conference – Ad Hoc Ad Hoc (3 or More Parties)– During a call, press thesoftkey. This opens a newline while you place the other party or parties on hold.– Enter the participant’s phone number. This can be the 4digit staff member’s ID, the 9 Area Code Phone Numberfor local numbers, or the 9 1 Area Code Phone Numberfor long distance numbers.– Wait for the call to connect.– When the other party answers, pressagain to addthis party to the call.– Repeat the first four steps to add additional callers.24
Conference - Join Establish a conference by joining multiple calls together:– With an active call on your phone and the party you want tojoin the caller to on hold (this can be an existing conferencecall); Highlight the call that you have on hold by pressing upon the center navigation button.– Press thesoftkey (You may need to press the Moresoftkey to see Join.)25
Conference - List To view a list of conference participants, follow the stepsbelow:– Highlight an active conference.– Press thesoftkey.– Participants are listed in the order in which they jointhe conference with the most recent additions at thetop.– While you are viewing the conference list, press thesoftkey to refresh the list.26
Conference - Remove To remove a conference participant, follow the stepsbelow:– While you are viewing the conference list, highlight theparticipant’s name by using the navigation pad.– Press thesoftkey.27
Voicemail28
Voicemail Objectives Access VoicemailActivate Voicemail BoxCheck for MessagesReply to a MessageForward a MessageDelete a Message29
Access Voicemail Personal Desk Phone– Press thebutton.– Enter password, default is 1234. Other Internal Phone– Press thebutton, press * to enter your 4digit ID or extension, then password. From Phone Outside Organization– (xxx)xxx-xxxx then enter your ID or extension30
Activate Voicemail From your personal desk phone,press thebutton.– Enter password (Default is 1234). Set up your personal settings:– Recorded Name– Standard Greeting– Password31
Changing Voicemail Passwords Access the voicemail system. From the main menu, select Setup Option(Press 4), Personal Settings, ChangePassword. Follow the prompts to enter and confirmthe new password. Use a minimum of 4 digits for thepassword (up to 255 digits max).32
Changing Recorded Name Access the voicemail system. From the main menu, select Setup Option (Press 4),Personal Settings, Change Recorded Name. Follow the prompts to record your name or a shortmessage.Note:You must record your name to ensure that yourvoicemail will function properly. This also allowsyour ID to be found when users search by name.33
Greetings Tip: Callers who reach yourgreeting may bypass it by pressing *. Login to voicemail and select Setup Options (Press 4), Greetings. After Cisco Unity plays your current greeting, follow the promptsto rerecord it. Five Greeting Types:– Standard Greeting – plays during normal business hours or ifany of the other greetings are not enabled– Busy Greeting – plays when you are busy on the phone– Closed Greeting – not currently utilized or supported– Internal Greeting – plays for internal caller– Alternate Greeting – plays instead of all other greetings whenit is on (Use for special occasions such as vacation.)34
Voice Mail Tips From your phone, press * ID(extension number), and the systemgoes direct to voicemail without ringingthe extension number. A caller may press * to bypass agreeting.35
Check Voicemail Messages Access the voicemail system. From the main menu, select theapplicable menu options of either PlayNew Messages (Press 1) or Review OldMessages (Press 2). Follow the prompts to listen to andmanage your messages.36
Reply to a Message After you listen to a message, select the menuoption Reply (Press 8). Follow the prompts to add recipients (ifapplicable), to record your reply, and to send it. Press # to switch between addressing by mailboxnumber and addressing by name. Follow the prompts to handle the originalmessage to which you just replied.37
Forward a Message After you listen to a message that you want to forward,select the menu option Forward (Press 6). Follow the prompts to address the forwarded message toone or more recipients, to record an introduction (ifapplicable), and to send the forwarded message. Press # to switch between addressing by mailbox numberand addressing by name. Follow the prompts to handle the original message thatyou just forwarded.38
Delete a Message While you are listening to amessage, press 3 to delete themessage immediately. Once amessage is deleted, it does notcontinue to play to finish themessage.39
Questions?Contact Jackie DavisRegion 16 ESC(806)677-555040
Login to voicemail and select Setup Options (Press 4), Greetings. After Cisco Unity plays your current greeting, follow the prompts to rerecord it. Five Greeting Types: - Standard Greeting - plays during normal business hours or if any of the other greetings are not enabled - Busy Greeting - plays when you are busy on the phone
