Transcription
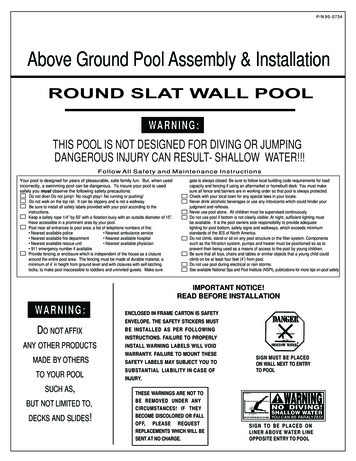
P/ N 9 5 - 0 73 4Above Ground Pool Assembly & InstallationWA R N I N G :THIS POOL IS NOT DESIGNED FOR DIVING OR JUMPING.DANGEROUS INJURY CAN RESULT- SHALLOW WATER!!!Follow All Safety and Maintenance InstructionsYour pool is designed for years of pleasurable, safe family fun. But, when usedincorrectly, a swimming pool can be dangerous. To insure your pool is usedsafely you must observe the following safety precautions:Do not dive!-Do not jump!- No rough play!- No running or pushing!Do not walk on the top rail. It can be slippery and is not a walkway.Be sure to install all safety labels provided with your pool according to theinstructions.Keep a safety rope 1/4” by 50’ with a flotation buoy with an outside diameter of 15”.Have accessible in a prominent area by your pool.Post near all entrances to pool area; a list of telephone numbers of the: Nearest available police Nearest ambulance service Nearest available fire department Nearest available hospital Nearest available rescue unit Nearest available physician 911 emergency number if availableProvide fencing or enclosure which is independent of the house as a closurearound the entire pool area. The fencing must be made of durable material, aminimum of 4’ in height from ground level and with closures with self-latchinglocks, to make pool inaccessible to toddlers and uninvited guests. Make suregate is always closed. Be sure to follow local building code requirements for loadcapacity and fencing if using an aftermarket or homebuilt deck. You must makesure all fence and barriers are in working order so that pool is always protected.Check with your local town for any special laws in your locale.Never drink alcoholic beverages or use any intoxicants which could hinder yourjudgment and reflexes.Never use pool alone. All children must be supervised continuously.Do not use pool if bottom is not clearly visible: At night, sufficient lighting mustbe available. It is the pool owners sole responsibility to provide adequatelighting for pool bottom, safety signs and walkways, which exceeds minimumstandards of the IES of North America.Do not climb, stand or sit on any pool structure or the filter system. Componentssuch as the filtration system, pumps and heater must be positioned so as toprevent their being used as a means of access to the pool by young children.Be sure that all toys, chairs and tables or similar objects that a young child couldclimb on be at least four feet (4’) from pool.Do not use pool during electrical or rain storms.See available National Spa and Pool Institute (NSPI), publications for more tips on pool safety.IMPORTANT NOTICE!READ BEFORE INSTALLATIONWA R N I N G :ENCLOSED IN FRAME CARTON IS SAFETYENVELOPE. THE SAFETY STICKERS MUSTDO NOT AFFIXBE INSTALLED AS PER FOLLOWINGANY OTHER PRODUCTSINSTALL WARNING LABELS WILL VOIDMADE BY OTHERSTO YOUR POOLSUCH AS,BUT NOT LIMITED TO,DECKS AND SLIDES!INSTRUCTIONS. FAILURE TO PROPERLYWARRANTY. FAILURE TO MOUNT THESESAFETY LABELS MAY SUBJECT YOU TOSUBSTANTIAL LIABILITY IN CASE OFSIGN MUST BE PLACEDON WALL NEXT TO ENTRYTO POOLINJURY.THESE WARNINGS ARE NOT TOBE REMOVED UNDER ANYCIRCUMSTANCES! IF THEYBECOME DISCOLORED OR FALLOFF, PLEASE REQUESTREPLACEMENTS WHICH WILL BESENT AT NO CHARGE.SIGN TO B E PL A C ED ONLINER ABOVE WATER LINEOPPOSITE ENTRY TO POOL
POOL AREA DIMENSIONS (POOL RADIUS PLUS ONE FOOT)Pool radius means the measurement from the center point of the pool to the pool wall.12’ ROUNDPOOL15’ ROUNDPOOL24’ ROUNDPOOL30’ ROUNDPOOL18’ ROUNDPOOL27’ ROUNDPOOL33’ ROUNDPOOL21’ ROUNDPOOL20’ ROUNDPOOL28’ ROUNDPOOL36’ ROUNDPOOL
INTREPID SEMI INGROUND INSTALLATIONThe extruded aluminum slat wall pool can be installed semi inground. It can go in the ground36”. As shown in the diagram we recommend an earth cove next to the pool wall to drain wateraway from the pool. Accumulation of water against the outside of the pool wall will cause thepool to cave in and does void the warranty. In the 12 months following the pool installation thehome owner must check every-other month for settling of the earth against the pool wall. Ifthere is a settling next to the pool water can collect and cause a cave in. The area around thepool must then be graded and filled in around the pool as needed. The pool must never be emptied of water when the earth around the pool is wet, such as following rain or snow melt, as thiswill also cause the pool wall to collapse and void the warranty.
DECK OR FENCEIMPORTANT!If you are installing a fence on your pool, you will need to install post holders on youruprights BEFORE you install the uprights on the pool.Please refer to your Fence Installation Instructions for for details.Plastic UprightMetal UprightFence Post 50-5/16" LongUpright1/4-20 Nuts1/4-201/2" longMachinescrews9-3/4"Nut covercapsPost Holder1/4-20 Machine screws2" long3.0"Holes must be centeredon UprightIf you are installing a deck on your pool, then part of the deck support system must beinstalled on your pool uprights BEFORE you install the uprights on the pool.Please refer to your Fence Installation Instructions for for details.
STEP 1: POOL LOCATIONDo not locate pool over underground lines, septic tanks, under electrical lines, near hazardous structures, or out of local coderestrictions. It is essential that the area selected for your pool has a level and firm base. Do not assemble your pool on asphalt,tar or oil base surfaces. Avoid areas with sharp objects, or ground treated with weed killer or other chemicals. Also avoid areaswhere nut grass, Bermuda grass or bamboo grass grows, as they can grow through your liner. Grass must be removed. Do notplace components such as filters, pumps, and heaters in a way that they can be used as a means of access to pool byyoung children. Be sure to follow all local building codes and obtain all building permits required for your area.Plan location of pool views, pool entrance, decks, fences, privacyshields, sun path, breeze direction, shrubs, filters, pumps,skimmer and return plumbing, and in-ground drainage.Skimmer and return plumbing location should be planned nowsince this impacts placement of the first bottom plate andsupporting patio block. See Step 4 for clarification*BE SURE TO AVOID:-All electrical wires-All gas lines-Septic tanks-Cesspools-Dry wells-Tree roots/ stumps-Buried debris(trees,building material, etc.)-Sudden slopes within 6’of pool areaSTEP 2: PREPARE THE POOL SITEDetermine the pool circumference by putting a stake in the ground at the center of the location desired, and with a lineequal in length to the radius of the pool area (1/ 2 the pool size plus 12”), mark off the circumference with a sharp object,lawn edger, white powder or spray paint.After all of the sod has been removed, you must make the pool area absolutely level as measured by a level ortransit, not simply by the naked eye. Find the lowest spot within the pool area and level the ground to that lowest spot.Do not add dirt to the low areas as that will cause settling after the pool is filled with water. It is the high areas that must bedug away. The footing (perimeter) of the pool must be a solid foundation to prevent the pool from settling into dirt that isloosened by rain and water splashing over the side. Be sure to clean the area of all sharp objects, including roots that latereffect your swimming pool. For leveling, we recommend that you use a long straight edge board and a carpenters level ortransit.LEVEL POOLAREA(Pool Radius 12”)Remove soil andgrass from highareas to beequal with thelow areas.Remove grass onlyfrom the low areas.
STEP 3A: IDENTIFY SLAT WALL PARTSUse your pool parts breakdown sheet to separate all pool components, becoming familiar with each part.Please note that we include five extra slats just in case you have any parts that aredamaged in transit or at the job-site. We know how frustrating it can be to stop a jobdue to a damaged part and we take every precaution to make sure that does nothappen.The wall of your pool has four different types of slats. Please separate the four different types of slats before you begin. Thesmooth surface of the slat ALWAYS faces in toward the water side of the pool. All ribs and bumps are on the outside, or dry sideof the pool. Shown below are the four different types of slats.*VERY IMPORTANT*BE SURE TO IDENTIFY AND SEPARATE THEDIFFERENT SLATS BEFORE BEGINNINGINSTALLATION.- A is a regular slat- B is a skimmer slat- C is a return slat- D is a beam slat
STEP 3: IDENTIFY SLAT WALL PARTS continuedThis chart will help you finding the right amount of slats to complete your wall.Slat Wall Pool: Slat CountBeamSlatsReg SlatsNeeded8'2249WSLAT54-SMN0812'228515'2218'Pool SizeParent WallCarton #1Carton #2Carton #3Carton 1614110WSLAT54-SMN1016 217 220 MN1224 MN1524 LAT54-SMN1526 MN1530 MN1833 54-SMN1840 LAT54-SMN2143 CW54RB-4722BCW54RB-8804CW54R-86CW54R-70
STEP 3B: IDENTIFY SLAT WALL PARTS, CONTINUEDThere are two different types of tracks, the top tracks and the bottom tracks. They look similar, but they are different lengths.The shorter tracks must go on the top of your pool, and the longer tracks must go on the bottom. Please refer to the chart belowto determine the exact length. Track length is measured at its’ center by placing a tape measure in the center groove. The bottomtrack slides into the bottom plate. The top track does not slide into the top plate, it slides over the wall between the top plates.Top track is installed in between top plates.It does not overlap or enter top platesBottom track is insertedup to dimple only.8'BOTTOM WALL RIMTOP WALL RIMQuantityLengthDescriptionPart NumberQuantityLengthDescriptionPart Number1125 1/4"4' 0" RADIUS380642650312'1138"5' 6" RADIUS3805222625111122 1/4"1/2"35 7/8"1/4"20324' 0" RADIUS 5' 6" RADIUS3806538053265042271715'18'20'1149"7' 6" RADIUS38054226261146 1/4"437/8"7' 6" RADIUS38055227181350"9' 0" RADIUS38056226271347 7/8"1/4"449' 0" RADIUS22719380571548"10' RADIUS38066226281545 7/8"1/4"4210' RADIUS380672272024'28'30'18212048"48"54 1/8"12' 0" RADIUS 14' 0" RADIUS 15' 0" RADIUS38068380703807222629264662646718212042 1/4"7/8"49 3/8"1/8"4545 7/8"1/4"514212' 0" RADIUS 14' 0" RADIUS 15' 0" RADIUS380693807138073227212646826469STEP 4: BOTTOM RING ASSEMBLYPosition the first bottom plate so that it is approximately centered between your planned skimmer and return plumbing lines.Assemble the rails in a circle by using the bottom plates to join them together. Rails can be squeezed between your thumb andforefinger to facilitate insertion into the plates.Check the roundness of your circle by measuring the diameter across in several locations. Since the rails do not automaticallyform a true circle, DO NOT SKIP THIS STEP. Otherwise, you might end up with a slightly oval shape, which can cause problemslater on. Once you have formed a true circle, stake the bottom rails at every other rail being careful not to scratch the rails.FOR POOLS WITH ODDNUMBER of BOTTOMPLATES:Measure from bottomplate to center of oppositebottom rail at every otherbottom plate. When true,stake into position.FOR POOLS WITH EVENNUMBER of BOTTOMPLATES:Measure from bottomplate to opposite bottomplate at every otherplate. When true, stakeinto position.Measurementsmust go throughcenter of the pool.
STEP 5: PATIO BLOCK INSTALLATIONOnce the frame is in position, begin centering 2”x8”x16” patio blocks below bottom plates. Sink patio blocks into the groundunder the bottom plates, making sure that the blocks are level in all directions (side to side as well as front to back). Repeatthis step around the frame making the tops of all blocks level with the ground. Do not install blocks or rails on loose sifted soilor sand. There must be no space between the ground and the bottom of the rails. All patio blocks must be flush with theground, solid and level with each other in all directions. You may remove a bottom rail at this time to cart in sand or sifted soilfor the cove (Step 9) as long as your pool ring remains staked in position. Make sure you replace the bottom rail in its properposition. A chalk outline of the bottom plates or cuffs on the patio block is an easy and temporary way to ensure that your trackdoes not move throughout the remainder of the installation.Position 8”x16” patio blocks like this,leaving only an inch inside the pool.1"6"Make sure poolis level fromblock to block.Check for levelness in all directions.STEP 6A: SLAT INSTALLATIONThe location of skimmer and return slats must be planned before proceeding. These slats can be anywhere you want on the pool.However, we recommend you keep the following in mind:1.2.You will need to run plumbing to both the skimmer and the return slat, so place them in a location that is close to yourfiltration system.Keep the return and the skimmer separated by at least 3 regular slats, but not more than 8 slats.**THE FIRST SLATS INSTALLED MUSTFIRSTSLATINSTALLEDMUST PLATE.BE TWO**THEREGULARSLATSCENTEREDON A BOTTOMA REGULARSLATABOTTOMBOTTOMTHEN
safely you must observe the following safety precautions: Do not dive!-Do not jump!- No rough play!- No running or pushing! Do not walk on the top rail. It can be slippery and is not a walkway. Be sure to install all safety labels provided with your pool according to the instructions. Keep a safety rope 1/4” by 50’ with a flotation buoy with an outside diameter of 15”. Have accessible in .