Transcription
User’s Guide4.1.3 February 2014 3725-63715-004/APolycom RealPresence GroupSeries
Trademark InformationPOLYCOM and the names and marks associated with Polycom's products are trademarks and/or service marks ofPolycom, Inc., and are registered and/or common law marks in the United States and various other countries.All other trademarks are the property of their respective owners.Patent InformationThe accompanying product may be protected by one or more U.S. and foreign patents and/or pending patentapplications held by Polycom, Inc. 2014 Polycom, Inc. All rights reserved.Polycom, Inc.6001 America Center DriveSan Jose CA 95002USANo part of this document may be reproduced or transmitted in any form or by any means, electronic or mechanical, forany purpose, without the express written permission of Polycom, Inc. Under the law, reproducing includes translatinginto another language or format.As between the parties, Polycom, Inc., retains title to and ownership of all proprietary rights with respect to the softwarecontained within its products. The software is protected by United States copyright laws and international treatyprovision. Therefore, you must treat the software like any other copyrighted material (e.g., a book or sound recording).Every effort has been made to ensure that the information in this manual is accurate. Polycom, Inc., is not responsiblefor printing or clerical errors. Information in this document is subject to change without notice.ii
ContentsUsing the Remote Control . . . . . . . . . . . . . . . . . . . . . . . . . . . . . . . . . . . . . . . . . . . . . . . . . . . . . 2Recharging the Remote Control Battery . . . . . . . . . . . . . . . . . . . . . . . . . . . . . . . . . . . . . . . 3Powering On and Off . . . . . . . . . . . . . . . . . . . . . . . . . . . . . . . . . . . . . . . . . . . . . . . . . . . . . . . . . 4Power On Self Test (POST) . . . . . . . . . . . . . . . . . . . . . . . . . . . . . . . . . . . . . . . . . . . . . . . . 4Navigating the User Interface . . . . . . . . . . . . . . . . . . . . . . . . . . . . . . . . . . . . . . . . . . . . . . . . . . 5Calling and Answering . . . . . . . . . . . . . . . . . . . . . . . . . . . . . . . . . . . . . . . . . . . . . . . . . . . . . . . . 6Placing a Call . . . . . . . . . . . . . . . . . . . . . . . . . . . . . . . . . . . . . . . . . . . . . . . . . . . . . . . . . . . 6Keypad . . . . . . . . . . . . . . . . . . . . . . . . . . . . . . . . . . . . . . . . . . . . . . . . . . . . . . . . . . . . . 6Recent Calls . . . . . . . . . . . . . . . . . . . . . . . . . . . . . . . . . . . . . . . . . . . . . . . . . . . . . . . . . 6Contacts . . . . . . . . . . . . . . . . . . . . . . . . . . . . . . . . . . . . . . . . . . . . . . . . . . . . . . . . . . . . 6Speed Dial . . . . . . . . . . . . . . . . . . . . . . . . . . . . . . . . . . . . . . . . . . . . . . . . . . . . . . . . . . 7Calendar . . . . . . . . . . . . . . . . . . . . . . . . . . . . . . . . . . . . . . . . . . . . . . . . . . . . . . . . . . . . 7Calling by Entering a Name or Number . . . . . . . . . . . . . . . . . . . . . . . . . . . . . . . . . . . . . . . 7Calling from the Contacts Screen . . . . . . . . . . . . . . . . . . . . . . . . . . . . . . . . . . . . . . . . . . . . 7Calling from the Recent Calls List . . . . . . . . . . . . . . . . . . . . . . . . . . . . . . . . . . . . . . . . . . . . 8Calling a Speed Dial Entry . . . . . . . . . . . . . . . . . . . . . . . . . . . . . . . . . . . . . . . . . . . . . . . . . 8Answering a Call . . . . . . . . . . . . . . . . . . . . . . . . . . . . . . . . . . . . . . . . . . . . . . . . . . . . . . . . . 8Ending a Call . . . . . . . . . . . . . . . . . . . . . . . . . . . . . . . . . . . . . . . . . . . . . . . . . . . . . . . . . . . . 9Using Kiosk Mode . . . . . . . . . . . . . . . . . . . . . . . . . . . . . . . . . . . . . . . . . . . . . . . . . . . . . . . . . . . 9Using Call Hold and Resume . . . . . . . . . . . . . . . . . . . . . . . . . . . . . . . . . . . . . . . . . . . . . . . . . . 9Point-to-Point Hold and Resume . . . . . . . . . . . . . . . . . . . . . . . . . . . . . . . . . . . . . . . . . . . . 10Multipoint Hold and Resume . . . . . . . . . . . . . . . . . . . . . . . . . . . . . . . . . . . . . . . . . . . . . . . 10Participating in Encrypted Calls . . . . . . . . . . . . . . . . . . . . . . . . . . . . . . . . . . . . . . . . . . . . . . . . 11Using Encryption Check Code on H.323 Point-to-Point Calls . . . . . . . . . . . . . . . . . . 11Controlling What You See . . . . . . . . . . . . . . . . . . . . . . . . . . . . . . . . . . . . . . . . . . . . . . . . . . . . 12Viewing Details About Your System . . . . . . . . . . . . . . . . . . . . . . . . . . . . . . . . . . . . . . . . . 12Switching Between Full-Screen Video and the Home Screen . . . . . . . . . . . . . . . . . . . . . 12Selecting and Adjusting a Camera or Other Video Source . . . . . . . . . . . . . . . . . . . . . . . . 13Using the Polycom EagleEye IV Camera . . . . . . . . . . . . . . . . . . . . . . . . . . . . . . . . . . . . . 14Using EagleEye Director Tracking in a Call . . . . . . . . . . . . . . . . . . . . . . . . . . . . . . . . . . . 14Enabling and Disabling Tracking in a Call . . . . . . . . . . . . . . . . . . . . . . . . . . . . . . . . . 15Setting and Using Camera Presets . . . . . . . . . . . . . . . . . . . . . . . . . . . . . . . . . . . . . . . . . . 15Polycom, Inc.iii
User’s Guide for the Polycom RealPresence Group SeriesControlling What You Hear . . . . . . . . . . . . . . . . . . . . . . . . . . . . . . . . . . . . . . . . . . . . . . . . . . . 16Adjusting Volume . . . . . . . . . . . . . . . . . . . . . . . . . . . . . . . . . . . . . . . . . . . . . . . . . . . . . . . 16Muting the Microphone . . . . . . . . . . . . . . . . . . . . . . . . . . . . . . . . . . . . . . . . . . . . . . . . . . . 17Enjoying Stereo Audio in Video Calls . . . . . . . . . . . . . . . . . . . . . . . . . . . . . . . . . . . . . . . . 17Showing Content . . . . . . . . . . . . . . . . . . . . . . . . . . . . . . . . . . . . . . . . . . . . . . . . . . . . . . . . . . . 17Showing Content with People Content IP . . . . . . . . . . . . . . . . . . . . . . . . . . . . . . . . . . . . 18Showing Content from a Computer Connected to RealPresence Group Systems . . . . . . 19Working with Directory and Contact Entries . . . . . . . . . . . . . . . . . . . . . . . . . . . . . . . . . . . . . . 21Searching for Directory Contacts . . . . . . . . . . . . . . . . . . . . . . . . . . . . . . . . . . . . . . . . . . . 21Including Multiple Sites in Video Calls . . . . . . . . . . . . . . . . . . . . . . . . . . . . . . . . . . . . . . . . . . . 22Placing a Multipoint Call . . . . . . . . . . . . . . . . . . . . . . . . . . . . . . . . . . . . . . . . . . . . . . . . . . 22Hanging Up a Multipoint Call . . . . . . . . . . . . . . . . . . . . . . . . . . . . . . . . . . . . . . . . . . . . . . . 23Passwords for Multipoint Calls . . . . . . . . . . . . . . . . . . . . . . . . . . . . . . . . . . . . . . . . . . . . . 23Multipoint Viewing Modes . . . . . . . . . . . . . . . . . . . . . . . . . . . . . . . . . . . . . . . . . . . . . . . . . . . . 24Multipoint Viewing Layouts . . . . . . . . . . . . . . . . . . . . . . . . . . . . . . . . . . . . . . . . . . . . . . . . 25Multiple Layouts in Lync Calls . . . . . . . . . . . . . . . . . . . . . . . . . . . . . . . . . . . . . . . . . . 25Changing the Way Calls Are Answered . . . . . . . . . . . . . . . . . . . . . . . . . . . . . . . . . . . . . . . . . 25Temporarily Refusing Calls . . . . . . . . . . . . . . . . . . . . . . . . . . . . . . . . . . . . . . . . . . . . . . . . 25Answering Video Calls Automatically . . . . . . . . . . . . . . . . . . . . . . . . . . . . . . . . . . . . . . . . 26Muting Automatically Answered Video Calls . . . . . . . . . . . . . . . . . . . . . . . . . . . . . . . . . . . 26Using a Polycom SoundStation IP 7000 ConferencePhone with a Polycom RealPresence Group System . . . . . . . . . . . . . . . . . . . . . . . . . . . . . . . 27Using Microsoft Outlook Calendaring . . . . . . . . . . . . . . . . . . . . . . . . . . . . . . . . . . . . . . . . . . . 28Viewing Scheduled Meetings . . . . . . . . . . . . . . . . . . . . . . . . . . . . . . . . . . . . . . . . . . . . . . 28Calling From Meetings on Your Calendar . . . . . . . . . . . . . . . . . . . . . . . . . . . . . . . . . . . . . 28Performing Tasks Involving Microsoft Office Communications Server or Lync Contacts . . . . 29Viewing Contact Presence States . . . . . . . . . . . . . . . . . . . . . . . . . . . . . . . . . . . . . . . . . . . 29Multipoint Calls Using Centralized Conferencing Control Protocol (CCCP) . . . . . . . . . . . 30Muting in a CCCP Call . . . . . . . . . . . . . . . . . . . . . . . . . . . . . . . . . . . . . . . . . . . . . . . . 30Recording Calls . . . . . . . . . . . . . . . . . . . . . . . . . . . . . . . . . . . . . . . . . . . . . . . . . . . . . . . . . 30Using Avaya Network Features with Video Calls . . . . . . . . . . . . . . . . . . . . . . . . . . . . . . . . . . 30Customizing Your Workspace . . . . . . . . . . . . . . . . . . . . . . . . . . . . . . . . . . . . . . . . . . . . . . . . . 31Configuring and Viewing Administration Settings . . . . . . . . . . . . . . . . . . . . . . . . . . . . . . . 31Allowing the Far-End System to Control Your Camera . . . . . . . . . . . . . . . . . . . . . . . . . . . 32Adjusting for Room Lighting . . . . . . . . . . . . . . . . . . . . . . . . . . . . . . . . . . . . . . . . . . . . . . . 32Configuring the Automatic Self View Control . . . . . . . . . . . . . . . . . . . . . . . . . . . . . . . . . . 32Allowing Video Display on the Web . . . . . . . . . . . . . . . . . . . . . . . . . . . . . . . . . . . . . . . . . 33Using a USB Keyboard . . . . . . . . . . . . . . . . . . . . . . . . . . . . . . . . . . . . . . . . . . . . . . . . . . . 33Recording Calls on a RealPresence Group 700 System . . . . . . . . . . . . . . . . . . . . . . . . . . . . . 33Incoming Call Alert for Hearing-Impaired Users . . . . . . . . . . . . . . . . . . . . . . . . . . . . . . . . . . . 34Polycom, Inc.iv
User’s Guide for the Polycom RealPresence Group SeriesTroubleshooting . . . . . . . . . . . . . . . . . . . . . . . . . . . . . . . . . . . . . . . . . . . . . . . . . . . . . . . . . . . . 34Placing a Test Call . . . . . . . . . . . . . . . . . . . . . . . . . . . . . . . . . . . . . . . . . . . . . . . . . . . . . . 34Accessing System Information, Status, and Diagnostics Screens . . . . . . . . . . . . . . . . . . 34System Information . . . . . . . . . . . . . . . . . . . . . . . . . . . . . . . . . . . . . . . . . . . . . . . . . . . 35System Diagnostics . . . . . . . . . . . . . . . . . . . . . . . . . . . . . . . . . . . . . . . . . . . . . . . . . . 37Viewing Call Statistics . . . . . . . . . . . . . . . . . . . . . . . . . . . . . . . . . . . . . . . . . . . . . . . . . . . . 39Searching for Answers in the Product Documentation . . . . . . . . . . . . . . . . . . . . . . . . . . . 40Using the Knowledge Base . . . . . . . . . . . . . . . . . . . . . . . . . . . . . . . . . . . . . . . . . . . . . . . . 40Contacting Technical and Solution Support . . . . . . . . . . . . . . . . . . . . . . . . . . . . . . . . . . . . . . 40Polycom Technical Support . . . . . . . . . . . . . . . . . . . . . . . . . . . . . . . . . . . . . . . . . . . . . . . 40Polycom Solution Support . . . . . . . . . . . . . . . . . . . . . . . . . . . . . . . . . . . . . . . . . . . . . . . . . 41Regulatory Notices . . . . . . . . . . . . . . . . . . . . . . . . . . . . . . . . . . . . . . . . . . . . . . . . . . . . . . . . . 42Polycom, Inc.v
User’s Guide for the Polycom RealPresence Group SeriesThis guide includes overview information that you might find helpful when you're just starting to learn aboutvideo conferencing or if you need a quick refresher. It also includes step-by-step instructions for everydayvideo conferencing tasks. The latest user information about version 4.1.3 of the Polycom RealPresence Group systems software is provided in this guide, which covers the following systems:RealPresence Group 300 and RealPresence Group 500 systemsRealPresence Group 700 systemPolycom RealPresence Group systems can be configured to show only those options used in yourorganization. Therefore, this guide might cover options that you cannot access on your system. Tofind out more about these options, please talk to your administrator.Polycom, Inc.1
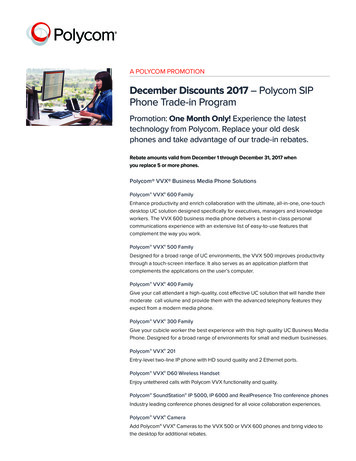
User’s Guide for the Polycom RealPresence Group SeriesUsing the Remote ControlYou use the remote control to place calls, adjust the volume, zoom the camera, navigate screens, and selectoptions. The RealPresence Group systems and the EagleEye cameras have infrared receivers. You cancontrol your RealPresence Group system by pointing the remote control toward the RealPresence Groupsystem or the EagleEye camera (if connected). You might need a special cable to connect an SDI camerato the system to receive infrared signals from the remote control. For more information about the cable,contact Polycom support.Parts of the Remote ControlNumberDescription1LED IR emitter2Decrease speaker volume3Increase speaker volume4Zoom camera out5Zoom camera in6Select button - Press center button toselect highlighted menu item7Navigate through menu items using theUp, Down, Left, and Right buttons;pan/tilt the camera8Delete letters or numbers or go back toa previous screen9Display the Menu screen.10Return to the Home screen11Place or answer a call12End or reject a call13Enter letters or numbers14In camera control mode, move thecamera to a stored preset or press andhold a number to store a preset15Generate touch (DTMF) tones16Mute a microphonePolycom, Inc.2
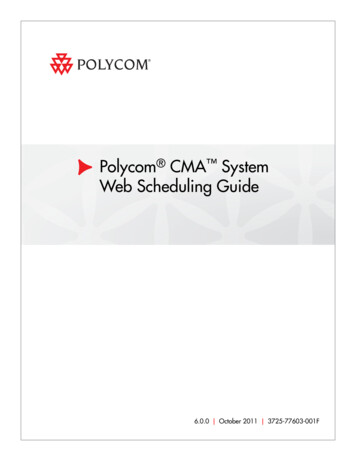
User’s Guide for the Polycom RealPresence Group SeriesRecharging the Remote Control BatteryYour system setup sheet shows how to charge the battery in the remote control the first time. When theremote control battery power is at 10% or less, a notification is displayed on the home screen. Althoughother notifications override the low battery notification, the low battery notification returns after the othernotifications are dismissed. The low battery notification is not displayed while the system is in a call.To recharge the remote control battery:1 Pull the battery out of the end of the remote control.2 Insert the USB plug of the battery into a USB 2.0 port such as the one on your system.The RealPresence Group 300 and RealPresence Group 500 systems have two USB 2.0 ports on theback of the system, while the RealPresence Group 700 has one USB 2.0 port on the front of thesystem and two USB 3.0 ports on the back of the system.3 Wait until the status light on the battery turns green before removing it from the port.Recharging the battery might take from 20 minutes to multiple hours.4 Insert the charged battery into the remote control.If you have a RealPresence Group 700 system, you can also recharge the battery using the USB port onthe front of the system.Recharging the Battery For RealPresence Group 300, 500 and 700 systemsPolycom, Inc.3
User’s Guide for the Polycom RealPresence Group SeriesCharging the Remote Control BatteryNumberDescription1Pull the battery out of the end of theremote control.2Insert the USB plug of the battery into aUSB 2.0 port such as the one on yoursystem.3Wait until the status light on the batteryturns green before removing it from theport.4Insert the charged battery into theremote control.Powering On and OffPowering your system on and off is a simple procedure, but it is important to perform the tasks in a certainorder. Make sure that the system is powered off before you connect devices to it. After you have connectedall of the related equipment that you will use, connect the power and power on the RealPresence Groupsystem.It is also important to note that Polycom RealPresence Group systemsdo not have what you might think ofas a power button—they have a power proximity sensor. Instead of pressing an actual button that moves,you touch the sensor (or near the sensor) that indicates poweron the front of the system.To power on the RealPresence Group System:Do one of the following: Press any button on the remote control or pick up the remote control to wake up the system if it isasleep. Touch and hold thepower sensor on the front of the system. Because the power sensor is touchsensitive, you can touch your finger on or close to the sensor.The Polycom splash screen is displayed within several seconds.Power On Self Test (POST)After being powered on, the RealPresence Group systems automatically perform system health checksbefore the systems are initialized. This process is known as a power on self test, or POST. The status of thePOST sequence is displayed with the LED indicator light on the front of the device, or for the RealPresenceGroup 700 system, in the text field display on the front of the system.All test results are logged in the system’s memory. For more information about what the colors of theindicator lights mean, refer to the Administrator’s Guide for Polycom RealPresence Group Series.Polycom, Inc.4
User’s Guide for the Polycom RealPresence Group SeriesWhen the POST sequence completes with no severe errors, the RealPresence Group system startsnormally.To view POST warnings:If any warnings occur during POST, you can view them after the system starts.» Go to System Information Status Active Alerts.For more details, use your remote control to select More Information. If a severe error occurs duringstartup, the system will not power on. Contact Polycom technical support.Navigating the User InterfaceCycle through the icons at the bottom of the Home screen to access system features. To accomplish tasks,you can press buttons directly on your remote control or use your remote control to navigate menus on theleft side of the local user interface.Available icons on the home screen vary based on how your administrator configured the system.Your system’s IP address, extension, and SIP address might be displayed on the home screen if youradministrator has configured them to be visible.IconItemDescriptionMenuDisplays the Menu screen, which allows you to place a call, changecameras, show content in a call, and show the Self View (PIP).Place a CallDisplays the keypad, recent calls, or contacts so that you can enternumbers, letters, or names to make a call.ContentAllows you to send content from a supported device. This iconappears only when a content source is detected.SettingsDisplays the Settings screen, which allows you to open one of thefollowing screens:System Information - Displays the System Information screen,which allows you to obtain system details, view system usage, rundiagnostic tests, and view call statistics.User settings -Displays the User Settings screen, which allowsyou to change basic camera settings and to configure call andmeeting preferences. This screen is only available if youradministrator has allowed you access to the user settings.Administration - Displays the Administration screen, whichallows you to configure location settings, specify LAN properties,and manage some user security settings. This screen is onlyavailable if your administrator has allowed you access to theadministration settings. Once an admin password is configured,this icon changes to a padlock.Polycom, Inc.5
User’s Guide for the Polycom RealPresence Group SeriesTo return to the Home screen:» On the remote control, pressscreen.; in the local interface, navigate to Back to return to the HomeTo open the Menu:» Using your remote control, do one of the following: Press. On the Home screen, select.To return to the previous screen:» Using your remote control, do one of the following: Press. Navigate to Back and select it.Calling and AnsweringTo place, answer, and end calls, refer to the following sections:Placing a Call on page 6Calling by Entering a Name or Number on page 7Answering a Call on page 8Ending a Call on page 9Placing a CallFrom the Home screen, you can use your system to place a video call in any of the following ways:Keypad On the Home screen, selectand then enter a number or name in the dialing field.Recent Calls Choose a name from the recent call list by doing the following: On the Home screen, select Use your remote control to select. .Contacts Choose a name from the contact list by doing the following: On the Home screen, select Use your remote on control to selectPolycom, Inc. .6
User’s Guide for the Polycom RealPresence Group SeriesSpeed Dial Select the Speed Dial tab and choose a Speed Dial entry. This option must be configured by youradministrator.Calendar Choose Join from a meeting on your calendar. This option must be allowed by your administrator. Tolearn how to configure this calling method, refer to Using Microsoft Outlook Calendaring on page 28.Calling by Entering a Name or NumberTo place a call by entering a name or number:1 To place a call, do one of the following using your remote control: Press. Navigate to.2 In the dialing field, enter the dialing information as follows:Numbers: To enter numbers, select each number on the keypad with the remote control or enternumbers on your remote control.Letters: To enter letters, select Keyboard. Then use your remote control to select each letter on theonscreen keyboard. Or you can use the text-entry method commonly used with cell phones to selectletters directly on your remote control.The Keyboard button does not display on your system screen if a USB keyboard is plugged into thesystem’s USB port. After you unplug the USB keyboard from the system’s port, the Keyboard buttondisplays.Backspace: To delete a number or letter, presson the remote control.Depending on the capabilities of your system and the system you are calling, the dialing informationcould look like one of these examples: 10.11.12.13 (IPv4 address—include the dots) 2555 (E.164 extension for H.323 or SIP) stereo.polycom.com (host name) user@domain.com (SIP)3 Enter any additional information needed for the call. The available settings depend on the type ofcall and your system’s configuration.4 Presson the remote control to place the call or select Place a Call.Calling from the Contacts ScreenIf your system administrator has added directory and contacts, you can view your favorites and search forcontacts registered to the same Global Directory Server.Polycom, Inc.7
User’s Guide for the Polycom RealPresence Group SeriesTo place a call from the Contacts screen:1 Navigate to or use your remote control to select 2 With your remote control, highlight the entry on the RealPresence Group system screen and selectCall or press.To see more details about an entry, select Info.3 To search for an entry in the directory, enter the contact name then select the Search keyboard key.Calling from the Recent Calls ListYou can quickly choose a number to call from a list of the sites you have called recently. The Recent Callsscreen provides details of all incoming and outgoing calls, including the time of the calls.To place a call from the Recent Calls list:1 Using your remote control, do one of the following: On the local interface, navigate to Pressand selectand on the local interface, select.2 Highlight the entry you want to call.3 Press Select and Call, or to use your remote control, select.Calling a Speed Dial EntryIf your system administrator enabled Speed Dial, you can quickly call a contact in your directory.To place a call to a speed dial entry:Using your remote control, do the following:1 At the top of the Home screen, select the Speed Dial tab and select a Speed Dial entry to call.2 To place the call, select Call or to use your remote control, select.Answering a CallThe way a RealPresence Group system handles incoming calls depends on how it is configured. It eitheranswers the call automatically, rejects the call automatically, or prompts you to answer the call manually.To answer a call manually:» Using your remote control, select Answer or press.For more information about answering calls, see Changing the Way Calls Are Answered on page 25.Polycom, Inc.8
User’s Guide for the Polycom RealPresence Group SeriesEnding a CallTo hang up a call:» On the remote control, press.If prompted, confirm that you want to hang up.Using Kiosk ModeKiosk Mode simplifies the Home screen by displaying only speed dial entries and calendar meetings (ifenabled). In Kiosk Mode, therefore, you can call speed dial numbers, join calendar meetings, and answercalls.Your administrator must create speed dial numbers and enable Kiosk Mode before you can use this mode.For information on adding speed dial entries, enabling speed dial and Kiosk Mode, refer to theAdministrator’s Guide for the Polycom RealPresence Group Series. For information about obtaining thePolycom Conferencing Add-In for Microsoft Outlook, refer to Polycom Solution Support on page 41.Points to Note about Kiosk Mode:Kiosk Mode is disabled by default. If your administrator enables Kiosk Mode: The Home screen menu, Out of Call menu, and other icons are disabled. Alerts bring the local interface out of Kiosk Mode until the alerts are cleared. While in a call, you can still use the remote to adjust the volume, control the camera, andmute/unmute the microphone.You can display the In a Call menu by pressing Menu on the remote.To use Kiosk Mode for speed dialing:1 Select the Speed Dial tab.Use the arrow keys on the remote control to move the focus on thescreen to the Speed Dial block.2 Press the number on the remote control that corresponds to the speed dial number you want to call.You can also use the arrow keys to move the focus to the speed dial number you want to call andpress OK.To use Kiosk Mode for calling from the calendar:1 Select the Calendar tab.2 Use the arrow keys on the remote control to move the focus on the screen to the Calendar block.3 Use the arrow keys to move the focus to the meeting you want to call into, and then click Join.Using Call Hold and ResumeThe RealPresence Group system supports call hold and resume in Microsoft Lync 2013 and H.323 calls.Putting a call on hold pauses audio and video bidirectionally between RealPresence Group systems, remoteLync clients, or Lync A/V MCUs.Polycom, Inc.9
User’s Guide for the Polycom RealPresence Group SeriesPoint-to-Point Hold and ResumeIn a point-to-point call, you can place a call on hold, and then answer an incoming call, make an outgoingcall, or switch between two calls. After you complete a call, you can resume the call you had on hold.To place a call on hold:» Press Menu on the remote control, then select Active Call Hold.When a call is on hold, On Hold appears on the RealPresence Group system screen for 5 seconds.After 5 seconds, the Hold iconappears and remains on the screen until all calls disconnect or areresumed.To place a call on hold to answer an incoming call:» Use your remote control to select Hold Answer. If all lines are in use and you want to hang up onthe call that has been on hold the longest, select Hang Up 1 Answer.To make an outgoing call while a call is on hold:» Presson the remote control. Place the call using your preferred method.To switch between calls:» Use your remote control to select Switch To.To resume a held call:» Use your remote control to select Resume Call.If the far-end site puts you on hold, a message displays for 5 seconds that you have beenplaced on hold.Multipoint Hold and ResumeIn a multipoint call, you can do all of the point-to-point hold and resume tasks, with one exception. Youcannot hold and resume individual calls in a multipoint conference. For information on point-to-point call andhold tasks, see Point-to-Point Hold and Resume .To manage an incoming call while on a call:» Use your remote control to select one of the following: Select Add to Call to add the call to the conference. Select Hold Answer to hold the current call and answer the incoming call. Select Hang Up 1 Answer to hang up the call that has been on hold the longest. The incomingcall is added to the conference.Polycom, Inc.10
User’s Guide for the Polycom RealPresence Group Series Select Hang Up All Answer to hang up all active and held calls and establish a point-to-pointcall with the incoming call.To make an outgoing call while a call is on hold:» Presson the remote control. Place the call using your preferred method. To switch between calls:» Use your remote control to select Manage. This allows you to determine which call to make active.To resume a call on hold:» If you have a single call on hold with no active call, to resume the call on hold, select Resume Call.Participating in Encrypted CallsIf encryption is enabled on the system, a locked padlock iconappears on the monitor screen when acall is encrypted. If a call is not encrypted, an open padlock appears on the monitor screen. If you are in a point-to-point call or a multipoint call hosted by another system, the padlock icondisplays the state of your individual connection. If you are hosting a multipoint call, the padlock icon displays the combined state of all connections:encrypted if all connections in the call are encrypted, unencrypted if one or more connections in thecall are not encrypted.In one call, some connections might be encrypted while others are not. However, the lock icon might notaccurately indicate whether the call is encrypted if the call is cascaded or includes an audio-only endpoint.If encryption is required on your system, the far end must support encryption or the call will not becompleted.To avoid security risks, Polycom recommends that all participants communicate the state of theirpadlock icons verbally at the beginning of a call.Using Encryption Check Code on H.323 Point-to-Point CallsTo provide extra security for encrypted H.3
video conferencing or if you need a quick refresher. It also includes step-by-step instructions for everyday video conferencing tasks. The latest user in formation about version 4.1.3 of the Polycom RealPresence Group systems software is provided in this guide, which covers the following systems: